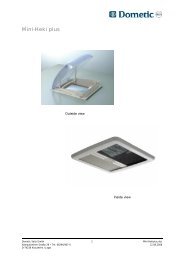
Heki 1 repair instructions - Swift Owners Club
Heki 1 repair instructions - Swift Owners Club
Heki 1 repair instructions - Swift Owners Club

You also want an ePaper? Increase the reach of your titles
YUMPU automatically turns print PDFs into web optimized ePapers that Google loves.
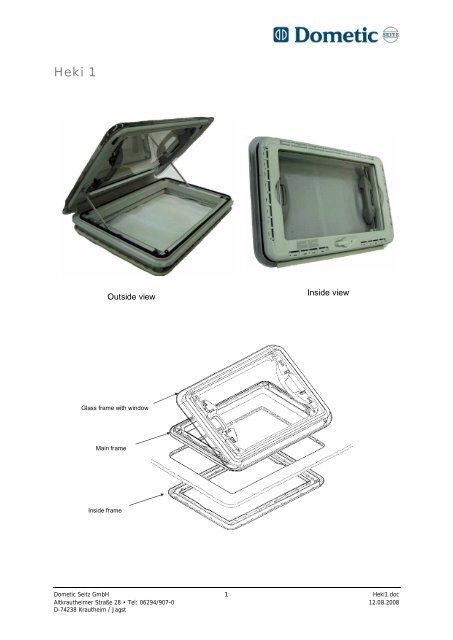
<strong>Heki</strong> 1<br />
Outside view<br />
Inside view<br />
Glass frame with window<br />
Main frame<br />
Inside frame<br />
Dometic Seitz GmbH 1 <strong>Heki</strong>1.doc<br />
Altkrautheimer Straße 28 • Tel: 06294/907-0 12.08.2008<br />
D-74238 Krautheim / Jagst
Glass frame with glass dome<br />
Glass dome<br />
Rubber gasket for<br />
model without<br />
forced ventilation<br />
Rubber<br />
buffers<br />
Grip<br />
Rubber gasket<br />
for model with<br />
forced ventilation<br />
Opening rod<br />
Hinge rail<br />
Insert<br />
wedge<br />
Glass frame<br />
PROBLEM:<br />
Replacing the glass dome<br />
Replacing the glass frame<br />
Replacing the gasket ring<br />
Dometic Seitz GmbH 2 <strong>Heki</strong>1.doc<br />
Altkrautheimer Straße 28 • Tel: 06294/907-0 12.08.2008<br />
D-74238 Krautheim / Jagst
Replacing the glass dome<br />
Use a screw drive to release the axis clamping cap on<br />
the handles. Thereafter, open the glass dome with the<br />
handles. Use a lever type tool (screw driver etc.) to<br />
carefully take the opening rod out of the end of the<br />
handle.<br />
Attention!: In order to avoid damaging the mounting of the glass frame, caution must be<br />
exercised when levering out the opening rod from the handle.<br />
The same applies when working on the other side.<br />
Attention!: We strongly advise against loosening the screw connections of the handle when<br />
replacing the glass dome since this may cause leakage.<br />
Assemble the glass dome in the reverse order of sequence.<br />
Attention!: Please keep in mind when replacing the glass dome that the screw connections of<br />
the handle are off-center. Making a mark (glass dome - main frame) is to your advantage since<br />
it is possible to assemble the glass dome by 180° in reverse fashion.<br />
Replacing the glass frame<br />
Open the glass frame all the way using the hand<br />
crank to detach the opening rods form the lifting<br />
mechanism (à 4 screws). Only loosen the lateral<br />
fastening screw in the frame hinge on one side if<br />
there is enough room. Now push out the entire glass<br />
frame through the frame hinge from the side.<br />
Attention!: Make sure that you do not damage (gouging, scratching, ruining) the roof when<br />
pushing out the glass frame.<br />
If it is not possible to push the glass frame out from<br />
the side - then the hinge on the glass frame must be<br />
removed (Phillips screws). Make sure that you follow<br />
the exact reverse order of sequence when carrying out<br />
the steps to reinstall the glass dome.<br />
Replacing the gasket ring (glass frame)<br />
Remove the window as described under Replacing the glass dome.<br />
Take out the window. Take the profile gasket out of the groove. The<br />
profile gasket is glued on the corners (radii) and on the butts with super<br />
glue. A razor blade or a small screw driver must be used to remove<br />
adhesive or rubber residue from the groove. Insert a new gasket and glue<br />
it in place thereafter, reinstall the glass dome in the reverse order of<br />
sequence.<br />
Dometic Seitz GmbH 3 <strong>Heki</strong>1.doc<br />
Altkrautheimer Straße 28 • Tel: 06294/907-0 12.08.2008<br />
D-74238 Krautheim / Jagst
Main frame<br />
Rubber gasket for<br />
model without<br />
forced ventilation<br />
(between the main<br />
frame and the glass<br />
frame)<br />
Lifting device<br />
Drive shaft<br />
Rubber gasket for<br />
model with forced<br />
ventilation (between<br />
the main frame and<br />
the glass frame)<br />
Hinge rail<br />
Profile gasket<br />
(between the<br />
frame and the<br />
roof)<br />
Crank drive<br />
Main frame<br />
Drive sprocket<br />
Crank<br />
PROBLEM:<br />
Replacing the gasket ring<br />
Replacing the main frame<br />
Replacing the lifting device<br />
Replacing the crank drive<br />
Replacing the drive sprocket<br />
Dometic Seitz GmbH 4 <strong>Heki</strong>1.doc<br />
Altkrautheimer Straße 28 • Tel: 06294/907-0 12.08.2008<br />
D-74238 Krautheim / Jagst
Replacing the gasket ring (main frame)<br />
Open the glass dome all the way with the crank. Take<br />
the profile gasket out of the groove. The profile<br />
gasket is glued on the corners (radii) and on the butts<br />
with super glue. A razor blade or a small screw driver<br />
must be use to remove adhesive or rubber residue<br />
from the groove. Insert a new gasket and glue it in place thereafter, reinstall the glass dome in<br />
the reverse order of sequence.<br />
Replacing the main frame<br />
Remove the inside frame as described under Replacing the inside frame. Begin by trying to<br />
lift the complete upper part on one of the corners upward.<br />
Attention!: The risk of rupturing the roof sheeting exists when the main frame is removed.<br />
Remove any sealing residue from the surface of the roof and clean with a grease free agent.<br />
Apply a suitable sealing agent (e.g. butyl) onto the sealing surface of the main frame before<br />
installing it. Install the main frame in the reverse order of sequence.<br />
Replacing the lifting device<br />
Remove the inside frame as described under<br />
Replacing the inside frame. Loosen the 4<br />
Phillips screws. Pull the drive shaft off the<br />
hexagonal bolt before removing the lifting<br />
device. Install the new part in the reverse<br />
order of sequence.<br />
Replacing the crank drive<br />
Remove the inside frame as described under<br />
Replacing the inside frame. Loosen the Phillips<br />
screws and pull the drive shaft off the hexagonal bolt.<br />
Remove the drive and install the new part in the<br />
reverse order of sequence.<br />
Replacing the drive sprocket<br />
Make sure that the crank remains in the closed position before removing<br />
the inside frame otherwise the ratio between the crank and the hexagonal<br />
drive bolt will no longer correspond. Remove the inside frame as<br />
described under Replacing the inside frame. Remove the crank with a<br />
Philips screw driver and install the new part in the reverse order of<br />
sequence.<br />
Dometic Seitz GmbH 5 <strong>Heki</strong>1.doc<br />
Altkrautheimer Straße 28 • Tel: 06294/907-0 12.08.2008<br />
D-74238 Krautheim / Jagst
Inside frame<br />
Insect guard roller<br />
Roller blind<br />
Spring<br />
Roller guide rail<br />
Inside frame<br />
Ventilation<br />
PROBLEM:<br />
Replacing the inside frame<br />
Replacing the roller blind<br />
Replacing the insect guard roller<br />
Replacing the spring drive<br />
Dometic Seitz GmbH 6 <strong>Heki</strong>1.doc<br />
Altkrautheimer Straße 28 • Tel: 06294/907-0 12.08.2008<br />
D-74238 Krautheim / Jagst
Replacing the inside frame<br />
Remove the ventilation grille (be careful not to overbend)<br />
and loosen the screws located underneath it.<br />
Remove the two cover lids next to the crank and also<br />
loosen the screws. Installation takes place in the<br />
reverse order of sequence.<br />
Replacing the insect guard roller<br />
Remove the inside frame as described under Replacing the inside frame.<br />
Remove the spring drive from its mounting with a long-nose pliers.<br />
Attention!:<br />
The spring is under tension. Risk of injury!<br />
Thereafter, the roller can be removed from the inside frame by tilting the<br />
locking rod. Make sure that the surface coating of the roller material<br />
(only applies to the roller blind) is not damaged when tilting the rod. The<br />
installation is carried out in the reverse order of sequence and in<br />
observation of the tensioning rule.<br />
Tensioning rule:<br />
Example:<br />
Tube length in mm/100 +3= revolutions of the spring drive shaft<br />
Tube length=1000mm 1000mm/100+3= 13 this means: 13 clockwise<br />
revolutions<br />
Replacing the roller blind<br />
Replacement of the insect guard roller takes place in the same manner as described under<br />
Replacing the insect guard roller.<br />
Replacing the spring drive<br />
Remove the roller in the same manner as described under Replacing the<br />
roller blind and Replacing the insect guard roller. Pull the spring drive<br />
out of the roller shaft from the side. After inspection or replacement<br />
reinstall the spring drive in the reverse order of sequence.<br />
Dometic Seitz GmbH 7 <strong>Heki</strong>1.doc<br />
Altkrautheimer Straße 28 • Tel: 06294/907-0 12.08.2008<br />
D-74238 Krautheim / Jagst