KP220 Keypad Disassembly & Assembly Process - LG Mobiles
KP220 Keypad Disassembly & Assembly Process - LG Mobiles
KP220 Keypad Disassembly & Assembly Process - LG Mobiles

You also want an ePaper? Increase the reach of your titles
YUMPU automatically turns print PDFs into web optimized ePapers that Google loves.
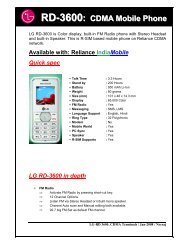
<strong>KP220</strong> <strong>Keypad</strong> <strong>Disassembly</strong> & <strong>Assembly</strong> <strong>Process</strong><br />
Step 1<br />
Step 2 Step 3<br />
Remove the screws<br />
Remove the tape<br />
and unlock FPCB<br />
Separate the FPCB<br />
Step 4 Step 5 Step 6<br />
Remove the tape Unlock the <strong>Keypad</strong> Separate the <strong>Keypad</strong><br />
Step 7<br />
Take a new <strong>Keypad</strong><br />
Part no MKAG0007103<br />
Insert the keypad first<br />
under the window LCD<br />
then from other sides<br />
Push from sides<br />
to fix the locks<br />
Step 8<br />
Profitable Growth Thru’ B3X Number One for the Customer !
<strong>KP220</strong> <strong>Keypad</strong> FPCB <strong>Disassembly</strong> & <strong>Assembly</strong> <strong>Process</strong><br />
Requirements<br />
• Screwdriver<br />
• Pair of tweezers<br />
• ESD-gloves (cotton gloves)<br />
• ESD-wristband<br />
• ESD-cloth (Cotton Cloth)<br />
1 2<br />
(1)Iso-Propyle Alcohol<br />
(IPA)<br />
(2)ESD cloth (Cotton<br />
Cloth)<br />
Step 1. Remove the keypad by following the <strong>Keypad</strong> disassembly process<br />
defined in first slide from step 1 to step 6.<br />
Use tweezers to lift the<br />
side of the Key FPCB.<br />
Step 2<br />
Separate the key FPCB<br />
from front cover slowly.<br />
Step 3<br />
Remove the key FPCB<br />
Step 4<br />
Profitable Growth Thru’ B3X Number One for the Customer !
<strong>KP220</strong> <strong>Keypad</strong> FPCB <strong>Disassembly</strong> & <strong>Assembly</strong> <strong>Process</strong><br />
Use ESD cloth (Cotton<br />
cloth) & Iso-Propyle<br />
Alcohol to clear the<br />
adhesive residue from<br />
front cover<br />
Step 5<br />
There 3 small holes in<br />
the front cover.<br />
Step 6<br />
There are 3 holes in<br />
the key FPCB and<br />
adhesive on rear side.<br />
Paste a new keypad FPCB part no SAJY0033801<br />
and fix the 3 poles between front cover and keypad<br />
FPCB, then press the keypad FPCB.<br />
Step 7<br />
Profitable Growth Thru’ B3X Number One for the Customer !
Part Details<br />
Window LCD <strong>Keypad</strong> Dome Assy Front Cover<br />
<strong>Keypad</strong> FPCB<br />
Sr.No Part No Description<br />
1 AWAB0032401 WINDOW ASSY,LCD<br />
2 MKAG0007103 <strong>Keypad</strong><br />
3 ADCA0081901 Dome Assy<br />
4 MCJK0083701 Front Cover<br />
5 SAJY0033801 KEYPAD FPCB<br />
6 ACGK0101901 Front Cover Assy<br />
Front Cover Assy<br />
Profitable Growth Thru’ B3X Number One for the Customer !