BoonDocker Nitrous System Installation Instructions for Kawasaki ...
BoonDocker Nitrous System Installation Instructions for Kawasaki ...
BoonDocker Nitrous System Installation Instructions for Kawasaki ...

You also want an ePaper? Increase the reach of your titles
YUMPU automatically turns print PDFs into web optimized ePapers that Google loves.
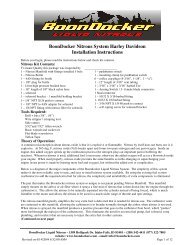
Part VI – Electrical <strong>Installation</strong><br />
A. Using the supplied push-button<br />
Wire the connections according to the diagram below. Use a 12V supply that is only<br />
on when the ignition key is turned on and the kill switch is in the “run” position. We<br />
still recommend using the rectifier even if the system has a battery – the diodes in the<br />
rectifier absorb the large current spike produced by the solenoid when the button<br />
breaks the connection (this prevents a spark). Even if a DC voltage is used, you must<br />
still connect the voltage supply to the two AC terminals.<br />
Most rectifiers are labeled on the side “+”, “AC”, “-”, “AC” (see picture). If the<br />
rectifier is not labeled, see the picture below.<br />
12V<br />
power<br />
handlebar<br />
switch<br />
+<br />
AC<br />
Rectifier<br />
_<br />
rectifier markings on the side<br />
Ground wire<br />
AC<br />
Solenoid<br />
Note: + and –<br />
connections can<br />
be wired either<br />
way<br />
For the KXF 700 the Yellow/Red wire from the ignition is +12 and the Black/Yellow<br />
wire is Ground, or a good contact to the chassis (near the fuel switch) can be used <strong>for</strong><br />
Ground.<br />
rectifier terminals<br />
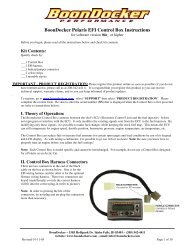
B. Using the existing “Override” button and a toggle switch – BE CAREFUL!<br />
The Override button can be used with a toggle switch so it can be used as the<br />
nitrous button with the switch in one position, or it can function as the<br />
Override button with the switch in the other position.<br />
There is a two-wire pair (yellow/white and brown wires) that the Override<br />
button controls. The yellow/white wire connects to a yellow/black wire –<br />
break this connection and wire the toggle switch according to the diagram<br />
below:<br />
12V<br />
power<br />
Brown<br />
wire<br />
existing<br />
wiring<br />
Override<br />
switch<br />
Toggle<br />
switch<br />
(SPDT)<br />
Yellow/white<br />
wire<br />
Yellow/black<br />
wire – back to<br />
original wiring<br />
+<br />
AC<br />
Rectifier<br />
AC<br />
_<br />
Ground<br />
wire<br />
Solenoid<br />
Note: + and –<br />
connections can<br />
be wired either<br />
way<br />
<strong>BoonDocker</strong> Liquid <strong>Nitrous</strong> – 1609 Hollipark Dr. Idaho Falls, ID 83401 – (208) 542-4411<br />
website: www.boondockers.com - email: info@boondockers.com<br />
Revised 08-22-03 Page 6 of 8