Panasonic KX-NT3XX Series Telephone User Guide - Atcom
Panasonic KX-NT3XX Series Telephone User Guide - Atcom
Panasonic KX-NT3XX Series Telephone User Guide - Atcom

Create successful ePaper yourself
Turn your PDF publications into a flip-book with our unique Google optimized e-Paper software.
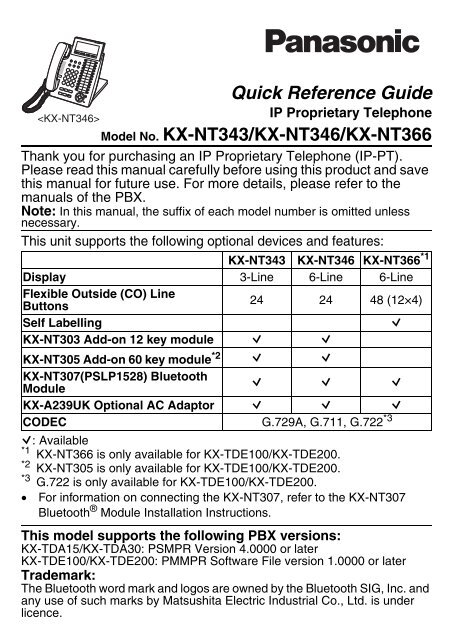
Quick Reference <strong>Guide</strong><br />
IP Proprietary <strong>Telephone</strong><br />
Model No. <strong>KX</strong>-NT343/<strong>KX</strong>-NT346/<strong>KX</strong>-NT366<br />
Thank you for purchasing an IP Proprietary <strong>Telephone</strong> (IP-PT).<br />
Please read this manual carefully before using this product and save<br />
this manual for future use. For more details, please refer to the<br />
manuals of the PBX.<br />
Note: In this manual, the suffix of each model number is omitted unless<br />
necessary.<br />
This unit supports the following optional devices and features:<br />
<strong>KX</strong>-NT343 <strong>KX</strong>-NT346 <strong>KX</strong>-NT366 *1<br />
Display 3-Line 6-Line 6-Line<br />
Flexible Outside (CO) Line<br />
Buttons<br />
24 24 48 (12×4)<br />
Self Labelling<br />
Q<br />
<strong>KX</strong>-NT303 Add-on 12 key module Q Q<br />
<strong>KX</strong>-NT305 Add-on 60 key module *2 Q Q<br />
<strong>KX</strong>-NT307(PSLP1528) Bluetooth<br />
Module<br />
Q Q Q<br />
<strong>KX</strong>-A239UK Optional AC Adaptor Q Q Q<br />
CODEC G.729A, G.711, G.722 *3<br />
Q: Available<br />
*1 <strong>KX</strong>-NT366 is only available for <strong>KX</strong>-TDE100/<strong>KX</strong>-TDE200.<br />
*2 <strong>KX</strong>-NT305 is only available for <strong>KX</strong>-TDE100/<strong>KX</strong>-TDE200.<br />
*3 G.722 is only available for <strong>KX</strong>-TDE100/<strong>KX</strong>-TDE200.<br />
• For information on connecting the <strong>KX</strong>-NT307, refer to the <strong>KX</strong>-NT307<br />
Bluetooth ® Module Installation Instructions.<br />
This model supports the following PBX versions:<br />
<strong>KX</strong>-TDA15/<strong>KX</strong>-TDA30: PSMPR Version 4.0000 or later<br />
<strong>KX</strong>-TDE100/<strong>KX</strong>-TDE200: PMMPR Software File version 1.0000 or later<br />
Trademark:<br />
The Bluetooth word mark and logos are owned by the Bluetooth SIG, Inc. and<br />
any use of such marks by Matsushita Electric Industrial Co., Ltd. is under<br />
licence.
Location of Controls<br />
Location Controls of<br />
A<br />
W<br />
V<br />
U<br />
B<br />
C<br />
D<br />
E<br />
F<br />
G<br />
T<br />
H<br />
I<br />
J<br />
K<br />
S<br />
R<br />
<br />
L M N<br />
A LCD (Liquid Crystal<br />
Display)<br />
B PAUSE: Used to insert a<br />
pause when storing a<br />
telephone number. This<br />
button is also used for<br />
programming this unit.<br />
C FWD/DND (Call Forwarding/<br />
Do Not Disturb): Used to set<br />
Call Forwarding or Do Not<br />
Disturb on your extension.<br />
O<br />
P Q<br />
D CONF (Conference): Used to<br />
establish a multiple party<br />
conversation.<br />
E INTERCOM: Used to make or<br />
receive intercom calls.<br />
F AUTO ANS (Auto Answer)/<br />
MUTE: Used to receive an<br />
incoming call in hands-free<br />
mode or mute the<br />
microphone/handset during a<br />
conversation.<br />
2
Location of Controls<br />
G AUTO DIAL/STORE: Used<br />
for System/Personal Speed<br />
Dialling or storing programme<br />
changes.<br />
H TRANSFER: Used to transfer<br />
a call to another party.<br />
I REDIAL: Used to redial the<br />
last dialled number.<br />
J MESSAGE: Used to leave a<br />
message waiting indication or<br />
call back the party who left<br />
the message waiting<br />
indication.<br />
K Headset Jack<br />
L FLASH/RECALL: Used to<br />
disconnect the current call<br />
and make another call without<br />
hanging up.<br />
M HOLD: Used to place a call<br />
on hold.<br />
N SP-PHONE<br />
(Speakerphone): Used for<br />
performing hands-free<br />
operations.<br />
O NEXT PAGE Key: Used to<br />
switch the page for the Self<br />
Labelling feature. (<strong>KX</strong>-NT366<br />
only)<br />
P ENTER: Used to assign the<br />
selected item.<br />
Q Microphone: Used for hands<br />
free conversations.<br />
R Navigator Key: Used to<br />
adjust the volume and the<br />
display contrast or select<br />
desired items.<br />
S CANCEL: Used to cancel the<br />
selected item.<br />
T Flexible CO Buttons: Used<br />
to seize an outside line or<br />
perform a feature that has<br />
been assigned to the key.<br />
U LCD Panel: Can be adjusted<br />
to the desired angle.<br />
V Soft Buttons (S1-S4): S1-S4<br />
(located from left to right) are<br />
used to select the item<br />
displayed on the bottom line<br />
of the display.<br />
W Message/Ringer Lamp:<br />
When you receive an<br />
intercom call, the lamp<br />
flashes green, and on an<br />
outside call, the lamp flashes<br />
red. When someone has left<br />
you a message, the lamp<br />
stays on red.<br />
3
Settings<br />
Settings<br />
Speaker volume<br />
Handset/Headset<br />
volume *<br />
While in a hands-free conversation<br />
While using the handset or<br />
headset<br />
Ringer volume<br />
LCD Contrast<br />
(for the main<br />
display)<br />
While on-hook or receiving a call<br />
While on-hook<br />
PAUSE<br />
Press Up to increase<br />
or Down to decrease<br />
the volume.<br />
PAUSE<br />
Ring Tone<br />
PAUSE<br />
(CO)<br />
OR<br />
INTERCOM<br />
OR<br />
AUTO DIAL<br />
PAUSE<br />
While on-hook<br />
Press 2 times.<br />
STORE<br />
LCD Backlight<br />
PAUSE<br />
OR<br />
AUTO DIAL<br />
STORE<br />
Automatic<br />
Always ON<br />
Always OFF<br />
OR<br />
AUTO DIAL<br />
PAUSE<br />
STORE<br />
* If you hear your own voice through the handset or headset, decrease the<br />
volume.<br />
4
Features List<br />
Features List<br />
Icon Meanings<br />
(CO) = Flexible CO button = Off-hook = On-hook<br />
= Feature number = Talk C. Tone = Confirmation Tone<br />
Making Calls<br />
To an extension<br />
extension no.<br />
Calling<br />
To an outside party<br />
(CO)<br />
outside phone no.<br />
Redial<br />
REDIAL<br />
Quick Dialling<br />
quick dial no.<br />
One-touch Dialling<br />
To store (<strong>KX</strong>-NT343/<strong>KX</strong>-NT346) For storing on a <strong>KX</strong>-NT366, refer to page 12.<br />
PAUSE<br />
To dial<br />
To dial<br />
(CO)<br />
AUTO DIAL<br />
desired no.* (max. 32 digits)<br />
* Enter outside line access<br />
STORE<br />
number before outside phone number.<br />
(CO)<br />
assigned as a One-touch Dialling button<br />
Personal Speed Dialling<br />
To store<br />
AUTO DIAL<br />
STORE<br />
personal speed<br />
dial no. (2 digits)<br />
desired no.*<br />
(max. 32 digits)<br />
PAUSE<br />
C. Tone<br />
* Enter outside line access number before<br />
outside phone number.<br />
personal speed dial no. (2 digits)<br />
5
Features List<br />
To dial<br />
AUTO DIAL<br />
STORE<br />
System Speed Dialling<br />
system speed dial no. (3 digits)<br />
Doorphone Call<br />
doorphone no. (2 digits)<br />
C. Tone<br />
During a Conversation<br />
Call Hold<br />
To hold<br />
To retrieve a call at the holding extension<br />
HOLD<br />
(CO) / INTERCOM<br />
C. Tone<br />
To retrieve an outside call from another extension<br />
(CO)<br />
Call Transfer<br />
TRANSFER<br />
C. Tone<br />
Useful Features<br />
(CO)<br />
extension no.<br />
outside<br />
phone no.<br />
To an extension<br />
To an outside<br />
party<br />
Multiple Party Conversation<br />
To add other parties during a conversation (i.e., conference)<br />
CONF<br />
desired<br />
CONF<br />
C. Tone<br />
phone no.<br />
Talk to the C. Tone<br />
Talk with<br />
new party.<br />
multiple parties.<br />
To leave a conference<br />
CONF<br />
C. Tone<br />
6
Setting the <strong>Telephone</strong> According to Your Needs<br />
Do Not Disturb<br />
Features List<br />
Both Calls<br />
Outside Calls<br />
Intercom Calls<br />
Set<br />
Cancel<br />
C. Tone<br />
To set<br />
Timed Reminder<br />
12 H<br />
hour/minute<br />
(4 digits)<br />
24 H<br />
hour/minute<br />
(4 digits)<br />
AM<br />
PM<br />
1 time<br />
daily C. Tone<br />
To cancel<br />
To stop or answer the ring back<br />
INTERCOM<br />
C. Tone /<br />
Before Leaving Your Desk<br />
Call Forwarding<br />
Both Calls<br />
Outside Calls<br />
Intercom Calls<br />
All calls<br />
Busy<br />
No answer<br />
Busy/<br />
No answer<br />
Cancel<br />
extension no.<br />
OR<br />
CO line<br />
access no.<br />
outside<br />
phone no.<br />
C. Tone<br />
7
Features List<br />
Making Use of the Voice Mail Service<br />
Listening to a message<br />
From your own extension<br />
<strong>KX</strong>-TVM series<br />
VPS extension no.<br />
Listen to Message<br />
Mailbox Password*<br />
Deliver Message<br />
Mailbox Management<br />
* If you have no password, you can skip<br />
the last step.<br />
Automated Attendant<br />
Message Notification<br />
Other Features<br />
From someone else’s extension<br />
End Call<br />
VPS extension no.<br />
<strong>KX</strong>-TVP series<br />
Listen to Message<br />
mailbox no.<br />
Mailbox Password*<br />
* If you have no password, you can skip<br />
the last step.<br />
VPS extension no.<br />
Leaving a message<br />
Deliver Message<br />
Check Mailbox Distribution<br />
Automated Attendant<br />
Mailbox Management<br />
Other Features<br />
End Call<br />
From your own extension<br />
Mailbox Password*<br />
From someone else’s extension<br />
mailbox no. Mailbox Password*<br />
* If you have no password, you can skip the last step.<br />
Enter the desired mailbox number<br />
To send the message immediately<br />
(<strong>KX</strong>-TVM series)<br />
(<strong>KX</strong>-TVP series)<br />
To set the delivery time<br />
Follow the guidance<br />
Leave<br />
a message<br />
8
Features List<br />
During playback<br />
Repeat Voice Guidance<br />
Exit<br />
• Consult your dealer for more details regarding feature numbers.<br />
• It is possible to assign flexible CO buttons as feature buttons.<br />
• Control panel/button names and descriptions can be found in “Location of<br />
Controls” on page 2.<br />
Accessing Features Using the Display<br />
Using the LCD Display<br />
It is possible to access the following directories, logs, and menus by<br />
pressing left or right on the Navigator Key while this unit is idle:<br />
Extension Number Directory<br />
System Speed Dialling Directory<br />
Personal Speed Dialling Directory<br />
Outgoing Call Log<br />
Incoming Call Log<br />
Entering Characters<br />
You can enter alphabetic characters and digits using the dialling<br />
buttons. Pressing a dialling button repeatedly displays different<br />
characters, as shown in the following tables. While entering<br />
characters, you can move the cursor with the left and right Navigator<br />
keys and delete characters with the TRANSFER button. To toggle<br />
between Table 1 and Table 2, press the Soft button (S1) at any time<br />
while entering characters. For a list of available characters, refer to<br />
the next page.<br />
9
Accessing Features Using the Display<br />
Accessing Features Using the Display<br />
Table 1 (Standard mode)<br />
Times<br />
Buttons<br />
! ? " 1<br />
A B C a b c 2<br />
D E F d e f 3<br />
G H I g h i 4<br />
J K L j k l 5<br />
M N O m n o 6<br />
P Q R S p q r s 7<br />
T U V t u v 8<br />
W X Y Z w x y z 9<br />
(space) . , ’ : ; 0<br />
/ + — = < ><br />
$ % & @ ( ) £ #<br />
Table 2 (Option mode)<br />
Times<br />
Buttons<br />
/ + — = < ><br />
$<br />
% & @ ( ) £ #<br />
10 11 12 13 14 15<br />
!<br />
A<br />
D<br />
G<br />
J<br />
M<br />
P<br />
T<br />
W<br />
?<br />
B<br />
E<br />
H<br />
K<br />
N<br />
Q<br />
U<br />
X<br />
"<br />
C<br />
F<br />
I<br />
L<br />
O<br />
R<br />
V<br />
Y<br />
ä<br />
a<br />
d<br />
g<br />
j<br />
m<br />
S<br />
t<br />
Z<br />
ö<br />
b<br />
e<br />
h<br />
k<br />
n<br />
p<br />
u<br />
w<br />
ü<br />
c<br />
f<br />
i<br />
l<br />
o<br />
q<br />
v<br />
x<br />
1<br />
À<br />
Ð<br />
Ì<br />
5<br />
Ñ<br />
r<br />
Ù<br />
y<br />
Á<br />
È<br />
Í<br />
Ò<br />
s<br />
Ú<br />
z<br />
Â<br />
É<br />
Î<br />
Ó<br />
Š<br />
Û<br />
ý<br />
Ã<br />
Ê<br />
Ï<br />
Ô<br />
ß<br />
Ü<br />
Z<br />
Ä<br />
Ë<br />
4<br />
Õ<br />
7<br />
8<br />
9<br />
Å<br />
3<br />
Ö<br />
Æ<br />
Ø<br />
Ç<br />
Œ<br />
2<br />
6<br />
(space) . , ’ : ; 0<br />
10
Self Labelling (<strong>KX</strong>-NT366 only)<br />
Self Labelling (<strong>KX</strong>-NT366 only)<br />
The <strong>KX</strong>-NT366 IP-PT features 12 flexible buttons, with an LCD<br />
screen next to the buttons. Each item can be named on the LCD<br />
screen through personal or system programming to reflect the<br />
function of its corresponding flexible button. Additionally, the flexible<br />
buttons can be organised into 4 “pages”, allowing you to assign a<br />
total of 48 items to the 12 flexible buttons. You can toggle between<br />
pages by pressing the NEXT PAGE key, as follows:<br />
CO 12<br />
CO 11<br />
CO 10<br />
CO 09<br />
CO 08<br />
CO 07<br />
CO 06<br />
CO 05<br />
CO 04<br />
CO 03<br />
CO 02<br />
CO 01<br />
Bank<br />
Home<br />
London offc.<br />
NY offc.<br />
Sales<br />
Chris Walace<br />
Andre Romel<br />
Sean Carter<br />
Keith Murray<br />
Log-in/out<br />
LCS<br />
CO 13<br />
NEXT PAGE is pressed<br />
• This feature is only available for the <strong>KX</strong>-TDE100/<strong>KX</strong>-TDE200.<br />
11
Self Labelling (<strong>KX</strong>-NT366 only)<br />
Storing a One-touch Dialling button, and setting the displayed<br />
text for the Self Labelling LCD Display<br />
PAUSE<br />
(CO)<br />
OR<br />
(CO)<br />
AUTO DIAL<br />
desired no.*<br />
(max. 32 digits)<br />
STORE<br />
* Enter outside line access number<br />
before outside phone number.<br />
desired text<br />
(max.12 characters)<br />
OR<br />
AUTO DIAL<br />
STORE<br />
PAUSE<br />
• Similar to the above procedure, when storing other types of buttons (CO<br />
buttons, feature buttons, etc.), the displayed text for the Self Labelling<br />
LCD Display can be assigned.<br />
Setting the Self Labelling LCD Display contrast levels<br />
PAUSE<br />
OR<br />
AUTO DIAL<br />
OR<br />
AUTO DIAL<br />
PAUSE<br />
STORE<br />
STORE<br />
12
Operation Board Angle Adjustment<br />
Operation Board Angle Adjustment<br />
The angle of the operation board can be set to one<br />
of eight angles (level 1 = 0°, level 8 = 45°).<br />
8<br />
7<br />
6<br />
5<br />
4<br />
3<br />
2<br />
1<br />
CAUTION:<br />
Hold the operation board until the operation board is secured at the<br />
desired angle. Make sure you do not pinch your fingers when raising<br />
or lowering the operation board.<br />
To raise:<br />
Gently lift the operation board one level at a<br />
time.<br />
To lower:<br />
Raise the operation board to level 8. Next,<br />
with one hand on the base of the unit, lift the<br />
operation board again to release the latch,<br />
then slowly push the operation board down<br />
to level 1. If the operation board cannot be<br />
lowered to level 1, repeat this step.<br />
• When a <strong>KX</strong>-NT305 is attached to this unit, first<br />
lift the unit’s handset cradle to release the<br />
latch (A), then with one hand on the base of<br />
the <strong>KX</strong>-NT305, similarly lift its operation board<br />
to release its latch (B).<br />
Locking the Handset Hook<br />
Pull down the handset hook until it locks to prevent the<br />
handset from falling off the handset cradle when the unit<br />
is mounted to a wall or set at a high angle. To temporarily<br />
place the handset down during a conversation, hook it<br />
over the top edge of the unit as shown.<br />
13
Connection<br />
Connection<br />
<br />
To a PC.<br />
To a Switching Hub.<br />
Optional AC adaptor<br />
(not included).<br />
Clamp<br />
AC adaptor<br />
Headset jack<br />
Recommended: <strong>KX</strong>-TCA89<br />
PC connection<br />
• Use a straight CAT 5 (or higher) Ethernet cable (not included) that is 6.5<br />
mm in diameter or less.<br />
• For further information on the connection to a PC, refer to the<br />
documentation provided for the PBX.<br />
Switching Hub connection<br />
• Use a straight CAT 5 (or higher) Ethernet cable (not included) that is 6.5<br />
mm in diameter or less.<br />
AC adaptor<br />
• Use a <strong>Panasonic</strong> AC adaptor <strong>KX</strong>-A239UK (PQLV206E).<br />
• The AC adaptor is used as the main disconnect device. Ensure that the<br />
AC outlet is located near the unit and is easily accessible.<br />
14
Connection<br />
CAUTION:<br />
When selecting Ethernet cables<br />
Use flexible, high-quality, snagless<br />
(without strain relief) cables. Do not<br />
use cables with coating that may tear<br />
or crack when bent.<br />
To prevent damage to the cables, use<br />
cables * that do not protrude from the<br />
bottom of the base when the<br />
operation board is set to level 1. (For<br />
information on adjusting the angle of<br />
the operation board, refer to<br />
page 13.)<br />
* Use cables as shown.<br />
Ethernet cable<br />
35 mm or less<br />
When connecting cables<br />
Ensure that the Ethernet cables and the AC adaptor cord are<br />
inserted in the grooves, and are clamped to prevent damage to the<br />
connectors. Leave some slack in the AC adaptor cord and the<br />
Ethernet cable connected to the hub.<br />
When connecting headset jack<br />
Ensure that the headset cord is wound around the hook to prevent<br />
damage to the connector.<br />
15
Installing the <strong>KX</strong>-NT303/<strong>KX</strong>-NT305<br />
Installing the <strong>KX</strong>-NT303/<strong>KX</strong>-NT305<br />
The <strong>KX</strong>-NT303/<strong>KX</strong>-NT305 allow 12/60<br />
additional flexible CO buttons to be added to<br />
this unit. These buttons are used to seize an<br />
outside line, make a call using One-touch<br />
Dialling, or perform a feature that has been<br />
assigned to the key.<br />
<br />
CAUTION:<br />
Before you install or uninstall the Add-on Key Module, turn off the<br />
unit by disconnecting the AC adaptor (if connected) and the<br />
Ethernet cable connected to the switching hub.<br />
<strong>KX</strong>-NT303 (For <strong>KX</strong>-NT343/<strong>KX</strong>-NT346)<br />
1. Open the cover. 2. Attach the <strong>KX</strong>-NT303 to your<br />
unit with the screws<br />
(included).<br />
3. Plug the flat cable into the<br />
connector (A), then bend the<br />
cable slightly as shown (B).<br />
4. Close the cover.<br />
16
Installing the <strong>KX</strong>-NT303/<strong>KX</strong>-NT305<br />
<strong>KX</strong>-NT305 (For <strong>KX</strong>-NT343/<strong>KX</strong>-NT346)<br />
1. Open the cover. 2. Attach the <strong>KX</strong>-NT305 to your<br />
unit with the screws*<br />
(included).<br />
3. Plug the flat cable into the<br />
connector (A), then bend the<br />
cable slightly as shown (B).<br />
4. Close the cover.<br />
* Two types of screws (2 screws of each type) are included with the <strong>KX</strong>-<br />
NT305, as shown below.<br />
For attaching to the unit<br />
For wall mounting<br />
17
Wall Mounting<br />
Wall Mounting<br />
1. Remove the wall mounting adaptor<br />
from the unit as shown, set the<br />
operation board to level 1, then<br />
connect and secure the cables.<br />
• The cables can also be run from<br />
the top of the unit (page 14, 15).<br />
2. Attach the wall mounting adaptor<br />
as shown.<br />
• Make sure the cables are not<br />
pinched by the wall mounting<br />
adaptor. When running the cables<br />
from the top of the unit, look<br />
through the opening in the wall<br />
mounting adaptor (A) to confirm<br />
that the cables are not being<br />
pinched.<br />
Slide the wall<br />
mounting adaptor<br />
up to this point.<br />
3. Drive the 2 screws (included) into<br />
the wall either 83 mm or 100 mm<br />
apart, and mount the unit on the<br />
wall.<br />
• You can find a wall mounting<br />
template on page 23.<br />
• Make sure that the wall that the<br />
unit will be attached to is strong<br />
enough to support the unit<br />
(approx. 1.5 kg; approx. 2.5 kg<br />
when the <strong>KX</strong>-NT305 is attached).<br />
• Make sure the cables are securely<br />
fastened to the wall.<br />
• When this product is no longer in<br />
use, make sure to detach it from<br />
the wall.<br />
100 mm<br />
83 mm<br />
Washer<br />
Drive the screw<br />
to this point.<br />
• If using a <strong>KX</strong>-NT305, attach the <strong>KX</strong>-NT305 (page 17) to the unit first, and<br />
perform step 3 only.<br />
• For information on locking the handset hook, refer to page 13.<br />
18
Important Information<br />
Important Information<br />
When using <strong>KX</strong>-NT300 series IP-PTs, keep the following<br />
conditions in mind.<br />
• If the unit does not operate properly, disconnect the unit from the<br />
Ethernet cable and then connect again.<br />
• If you are having problems making calls, disconnect the Ethernet cable<br />
and connect a known working IP-PT. If the known working IP-PT operates<br />
properly, have the defective IP-PT repaired by an authorised <strong>Panasonic</strong><br />
factory service centre. If the known working IP-PT does not operate<br />
properly, check the PBX and the Ethernet cable.<br />
• Wipe the unit with a soft cloth. Do not clean the unit with abrasive<br />
powders or with chemical agents such as benzene or thinner.<br />
• Use only the correct <strong>Panasonic</strong> handset.<br />
• Do not disassemble this unit. Dangerous electrical shock could result.<br />
The unit must only be disassembled and repaired by qualified service<br />
technicians.<br />
• If damage to the unit exposes any internal parts, immediately disconnect<br />
the cable or cord. If the power is supplied from the network to the IP-PT<br />
[Power-over-Ethernet], disconnect the Ethernet cable. Otherwise,<br />
disconnect the AC adaptor cord. Then return this unit to a service centre.<br />
• Never attempt to insert wires, pins, etc. into the vents or other holes of<br />
this unit.<br />
• This unit is designed to aid the visually handicapped to locate dial keys<br />
and buttons.<br />
• This unit is designed to be installed under controlled conditions of<br />
ambient temperature and a relative humidity.<br />
• Avoid installing the unit in damp or humid environments, such as<br />
bathrooms or swimming pools.<br />
• 999 and 112 can be dialled on the product after accessing the CO line for<br />
the purpose of making outgoing calls to the BT emergency (999) and<br />
(112) services (United Kingdom only).<br />
Take special care to follow the safety suggestions listed below.<br />
Safety<br />
1) The unit should only be connected to a power supply of the type<br />
described in the Quick Reference <strong>Guide</strong> or as shown on the label on the<br />
unit.<br />
2) When left unused for a long period of time, the optional AC adaptor<br />
should be unplugged from the AC outlet, if you are using Power-over-<br />
Ethernet, disconnect the Ethernet cable.<br />
19
Important Information<br />
Installation<br />
Environment<br />
1) Do not use this unit near water, for example, near a bathtub, washbowl<br />
or sink. Damp basements should also be avoided.<br />
2) Keep the unit away from heating appliances and devices that generate<br />
electrical noise, such as fluorescent lamps, motors and televisions.<br />
These noise sources can interfere with the performance of the unit. It<br />
also should not be placed in rooms where the temperature is less than<br />
5 °C or greater than 40 °C.<br />
Placement<br />
1) Do not place heavy objects on top of this unit.<br />
2) Care should be taken so that objects do not fall onto, and liquids are not<br />
spilled into, the unit. Do not subject this unit to excessive smoke, dust,<br />
moisture, mechanical vibration, shock or direct sunlight.<br />
3) Place the unit on a flat surface.<br />
WARNING:<br />
TO PREVENT POSSIBLE FIRE OR ELECTRIC SHOCK, DO NOT EXPOSE<br />
THIS UNIT TO RAIN OR MOISTURE.<br />
THIS HANDSET EARPIECE IS MAGNETISED AND MAY RETAIN SMALL<br />
FERROUS OBJECTS.<br />
DISCONNECT THIS UNIT FROM POWER OUTLET/THE ETHERNET<br />
CABLE IF IT EMITS SMOKE, AN ABNORMAL SMELL OR MAKES<br />
UNUSUAL NOISE. THESE CONDITIONS CAN CAUSE FIRE OR<br />
ELECTRIC SHOCK. CONFIRM THAT SMOKE HAS STOPPED AND<br />
CONTACT AN AUTHORISED SERVICE CENTRE.<br />
IMPORTANT NOTICE:<br />
• Under power failure conditions, the IP-PT may not operate. Please<br />
ensure that a separate telephone, not dependent on local power, is<br />
available for use in remote sites in case of emergency.<br />
• For information regarding network setup of the IP-PT such as IP<br />
addresses, please refer to the Installation Manual for the <strong>Panasonic</strong> PBX.<br />
• If an error message is shown on your display, consult the network<br />
administrator.<br />
• The firmware of the <strong>KX</strong>-NT343, <strong>KX</strong>-NT346, and <strong>KX</strong>-NT366 are protected<br />
by copyright laws and international treaty provisions, and all other<br />
applicable laws. It cannot be reverse engineered, decompiled or<br />
disassembled.<br />
20
Important Information<br />
This unit is capable of being used in conjunction with hearing<br />
aids fitted with inductive coil pick-ups. The handset should be<br />
held as for normal conversation. For operation, the hearing<br />
aid should be set to its “T” position or as directed in the<br />
operating instructions for the hearing aid.<br />
Information on Disposal for <strong>User</strong>s of Waste Electrical &<br />
Electronic Equipment (private households)<br />
This symbol on the products and/or accompanying documents<br />
means that used electrical and electronic products should not be<br />
mixed with general household waste.<br />
For proper treatment, recovery and recycling, please take these<br />
products to designated collection points, where they will be<br />
accepted on a free of charge basis. Alternatively, in some<br />
countries you may be able to return your products to your local<br />
retailer upon the purchase of an equivalent new product.<br />
Disposing of this product correctly will help to save valuable resources and<br />
prevent any potential negative effects on human health and the environment<br />
which could otherwise arise from inappropriate waste handling. Please<br />
contact your local authority for further details of your nearest designated<br />
collection point.<br />
Penalties may be applicable for incorrect disposal of this waste, in<br />
accordance with national legislation.<br />
For business users in the European Union<br />
If you wish to discard electrical and electronic equipment, please contact your<br />
dealer or supplier for further information.<br />
Information on Disposal in other Countries outside the<br />
European Union<br />
This symbol is only valid in the European Union.<br />
If you wish to discard this product, please contact your local authorities or<br />
dealer and ask for the correct method of disposal.<br />
21
Important Information<br />
0682<br />
This product is intended to be connected to a <strong>Panasonic</strong> PBX only.<br />
<strong>Panasonic</strong> Communications Company (U.K.) Ltd. declares that this<br />
equipment is in compliance with the essential requirements and other<br />
relevant provisions of Radio & Telecommunications Terminal Equipment<br />
(R&TTE) Directive 1999/5/EC.<br />
Declarations of Conformity for the relevant <strong>Panasonic</strong> products described in<br />
this manual are available for download by visiting:<br />
http://www.doc.panasonic.de<br />
Contact:<br />
<strong>Panasonic</strong> Services Europe<br />
a Division of <strong>Panasonic</strong> Marketing Europe GmbH<br />
<strong>Panasonic</strong> Testing Centre<br />
Winsbergring 15, 22525 Hamburg, Germany<br />
22
One screw here<br />
157 mm<br />
One screw here<br />
for base unit<br />
100 mm<br />
83 mm<br />
WALL MOUNTING TEMPLATE<br />
1. Drive the screws into the wall as<br />
indicated.<br />
Note:<br />
If the <strong>KX</strong>-NT305 is attached to the unit,<br />
leave 157 mm of space between the 2<br />
screws for the unit and the 2 screws for<br />
the <strong>KX</strong>-NT305, as indicated above. This<br />
space is abbreviated in this template and<br />
must be measured.<br />
2. Hook the unit onto the screw heads.<br />
83 mm<br />
100 mm<br />
for <strong>KX</strong>-NT305 Add-on 60 Key Module<br />
One screw at either point<br />
One screw at either point<br />
23
<strong>Panasonic</strong> Business Systems U.K.<br />
<strong>Panasonic</strong> House, Willoughby Road, Bracknell,<br />
Berkshire RG12 8FP<br />
Copyright:<br />
This material is copyrighted by <strong>Panasonic</strong> Communications Co., Ltd., and<br />
may be reproduced for internal use only. All other reproduction, in whole or in<br />
part, is prohibited without the written consent of <strong>Panasonic</strong> Communications<br />
Co., Ltd.<br />
© 2007 <strong>Panasonic</strong> Communications Co., Ltd. All Rights Reserved.<br />
PSQX4394ZA<br />
KU0707ME0 (UK)