Eco 6 How to use - Pop Up Products
Eco 6 How to use - Pop Up Products
Eco 6 How to use - Pop Up Products

You also want an ePaper? Increase the reach of your titles
YUMPU automatically turns print PDFs into web optimized ePapers that Google loves.
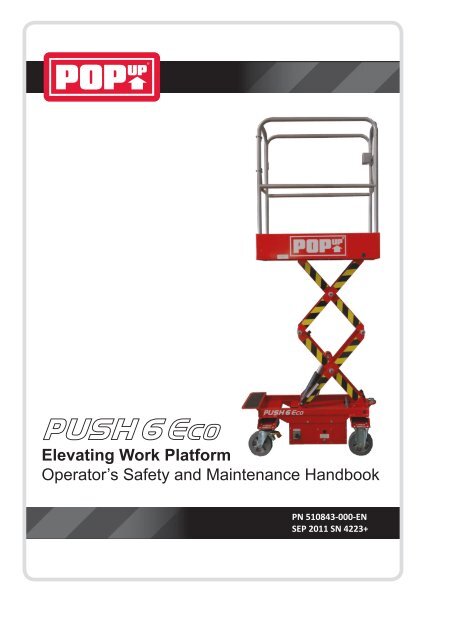
Elevating Work Platform<br />
Opera<strong>to</strong>r’s Safety and Maintenance Handbook<br />
PN 510843-000-EN<br />
SEP 2011 SN 4223+
POP-UP PUSH 6 ECO<br />
Opera<strong>to</strong>r’s Safety and Maintenance<br />
Handbook<br />
Contents<br />
Section 1<br />
DESCRIPTION<br />
Introduction 3<br />
Description 3<br />
Intended <strong>use</strong> 3<br />
Training 3<br />
Modifications 3<br />
Terminology 5<br />
Section 2<br />
SPECIFICATION<br />
Technical data 6<br />
Operating site 7<br />
Noise and vibration 7<br />
Limitations 7<br />
Section 3<br />
SAFETY RULES<br />
Safety Rules 8<br />
Section 4<br />
OPERATING INSTRUCTIONS<br />
Daily checks 9<br />
Manoeuvring the platform 9<br />
Engaging the brakes 10<br />
Powering up 10<br />
Entering and leaving the platform 11<br />
Control pendant 11<br />
Emergency s<strong>to</strong>p 12<br />
Emergency lowering 12<br />
Battery charging 12<br />
Page<br />
Section 5<br />
MAINTENANCE<br />
Safety during maintenance 13<br />
Page<br />
Periodical maintenance and checks 13/14<br />
S<strong>to</strong>rage 14<br />
Lubrication 14<br />
Hydraulic oil 15<br />
Electrical schematic 16<br />
Hydraulic schematic 17<br />
Troubleshooting 18<br />
Section 6<br />
TRANSPORT INSTRUCTIONS<br />
Loading and unloading 19<br />
Lifting 20<br />
Preparation for transport 20<br />
Section 7<br />
MAINTENANCE AND<br />
REPAIR RECORD<br />
Maintenance and repair record 21<br />
Notes 22<br />
Daily checks – opera<strong>to</strong>r checklist 23<br />
<strong>Pop</strong>-<strong>Up</strong> PUSH 6 ECO Opera<strong>to</strong>r’s Safety and Maintenance Handbook (v.0.4.0409)<br />
Page 2 of 23
Section 1<br />
DESCRIPTION<br />
Introduction<br />
This handbook provides information on the safe operation of this work platform.<br />
Opera<strong>to</strong>rs should read and understand all of the information contained within this<br />
manual prior <strong>to</strong> operating the work platform.<br />
An abridged set of instructions in the form of a training card and a training sticker<br />
can also be found attached <strong>to</strong> the POP-UP PUSH 6 ECO at the control pendant<br />
and <strong>to</strong>e board respectively.<br />
The handbook contains several warnings, these indicate situations which if not<br />
avoided could result in serious injury or death <strong>to</strong> persons, or damage <strong>to</strong> the machine<br />
or property.<br />
Additional copies of this handbook are available from the manufacturer at the address<br />
below. Information contained in this handbook is based on the latest product<br />
information at time of publication.<br />
POP-UP <strong>Products</strong> Ltd operate a policy of continuous improvement and therefore<br />
reserve the right <strong>to</strong> make product changes at any time without obligation.<br />
Description<br />
The POP-UP PUSH 6 ECO is a scissor lift type work platform, which is manoeuvred<br />
manually in<strong>to</strong> work positions and elevated and lowered using an electro-hydraulic<br />
control system.<br />
The standard machine includes the following standard features:<br />
• 240kg safe working load<br />
• 3.63 metre working height<br />
• 1.65 metre s<strong>to</strong>wed height<br />
• Easily manoeuvrable<br />
• Weighs just 225kg<br />
• Pass through standard doors<br />
• Simple operation<br />
• Steel guard rails<br />
• Non-slip platform<br />
• Steerable wheels<br />
• Brakes on two wheels<br />
• Battery powered with<br />
built-in battery charger<br />
• Emergency lowering facility<br />
• Easily transportable<br />
• Low maintenance<br />
• Complies with EN280:2001<br />
Intended <strong>use</strong><br />
The machine has been designed <strong>to</strong> comply with the safety requirements of the<br />
Machinery Directive 98/37/EC taking guidance from the European Standard<br />
EN280:2001 Mobile Elevating Work Platforms.<br />
The machine is intended <strong>to</strong> be <strong>use</strong>d <strong>to</strong> lift persons, plus essential <strong>to</strong>ols and<br />
materials, <strong>to</strong> enable work <strong>to</strong> be undertaken at height. Typical applications will<br />
include maintenance, cleaning, painting, etc. at varying heights above ground level.<br />
WARNING<br />
THE MACHINE MUST NOT BE USED IN APPLICATIONS OR FOR USES<br />
OUTSIDE OF THE SCOPE OF THIS HANDBOOK. SHOULD A CERTAIN<br />
APPLICATION NOT BE COVERED, THEN THE MANUFACTURER SHOULD BE<br />
CONTACTED<br />
<strong>Pop</strong>-<strong>Up</strong> PUSH 6 ECO Opera<strong>to</strong>r’s Safety and Maintenance Handbook (v.0.4.0409)<br />
Page 3 of 23
Training<br />
Since POP-UP PUSH 6 ECO is classed as ‘work equipment’ it also falls within the<br />
scope of the Provision and Use of Work Equipment Regulations 1998 (PUWER).<br />
Regulation 9 of PUWER requires that persons using this equipment have received<br />
adequate training.<br />
Section 1<br />
DESCRIPTION<br />
A full Opera<strong>to</strong>r’s Safety & Maintenance handbook is provided with the equipment<br />
which forms the basis of training on and familiarisation of the equipment. Safety<br />
decals are also fitted <strong>to</strong> the machine <strong>to</strong> warn the opera<strong>to</strong>r and other personnel of<br />
potential hazards whilst the machine is in <strong>use</strong>.<br />
WARNING<br />
OPERATION OF THIS MACHINE BY UNTRAINED OPERATORS MAY RESULT<br />
IN SERIOUS INJURY OR DEATH<br />
Modifications<br />
No modifications must be made <strong>to</strong> this machine unless the manufacturer has given<br />
full written approval. If in doubt contact the manufacturer for advice.<br />
Manufacturer’s address:<br />
POP-UP<br />
Vigo Centre<br />
Birtley Road<br />
Washing<strong>to</strong>n<br />
Tyne & Wear<br />
NE38 9DA<br />
UK<br />
Tel +44 (0)845 1550 057<br />
Fax +44 (0)845 1557 756<br />
<strong>Pop</strong>-<strong>Up</strong> PUSH 6 ECO Opera<strong>to</strong>r’s Safety and Maintenance Handbook (v.0.4.0409)<br />
Page 4 of 23
Terminology<br />
Section 1<br />
DESCRIPTION<br />
1 Control pendant<br />
2 Emergency s<strong>to</strong>p but<strong>to</strong>n & key<br />
3 Training card<br />
4 Guard rail<br />
5 Gate<br />
6 Handbook<br />
7 Platform<br />
8 110V and 240V charger leads<br />
9 Scissor pack<br />
10 Main lift cylinder<br />
11 Maintenance props<br />
12 Winch point<br />
13 Forklift pocket (1 of 4)<br />
14 Chassis<br />
15 Bubble spirit level<br />
16 Brake (1 of 2)<br />
17 Battery<br />
18 Hydraulic tank<br />
19 Hydraulic Pack<br />
20 Battery charger<br />
21 Chassis plate<br />
22 Battery charger socket<br />
23 Battery charging indica<strong>to</strong>r<br />
24 Battery condition meter & but<strong>to</strong>n<br />
25 Maintenance Isola<strong>to</strong>r switch<br />
26 Warning buzzer<br />
27 Emergency lowering valve<br />
<strong>Pop</strong>-<strong>Up</strong> PUSH 6 ECO Opera<strong>to</strong>r’s Safety and Maintenance Handbook (v.0.4.0409)<br />
Page 5 of 23
Technical data<br />
Safe working load (SWL)<br />
equivalent <strong>to</strong><br />
Maximum platform height<br />
Maximum working height<br />
Platform length<br />
Platform width<br />
Platform guard rail height<br />
Toe board height<br />
Maximum allowable manual force<br />
Maximum allowable wind speed<br />
Maximum allowable chassis inclination<br />
Electrical system<br />
Mo<strong>to</strong>r<br />
Batteries<br />
Battery charger<br />
Hydraulic system<br />
Maximum pressure<br />
Reservoir capacity<br />
240kg<br />
1 person + 160kg <strong>to</strong>ols and materials<br />
1.63 metres<br />
3.63 metres<br />
1.01 metres<br />
0.52 metres<br />
1.10 metres<br />
0.15 metres<br />
200 New<strong>to</strong>ns<br />
0 metres/sec<br />
0 degrees<br />
12 volt DC<br />
0.7 kW<br />
1 x 80 Ah<br />
Self-seeking au<strong>to</strong>matic<br />
range 90 – 240 volt AC<br />
250 bar<br />
1 litre<br />
Section 2<br />
SPECIFICATION<br />
Function speeds (approx.)<br />
Raise<br />
8 seconds<br />
Lower<br />
7 seconds<br />
Approx. no. of lifts (fully charged with SWL) 300<br />
Overall length (s<strong>to</strong>wed)<br />
Overall height (s<strong>to</strong>wed)<br />
Overall width (s<strong>to</strong>wed)<br />
Overall mass (GVW)<br />
Maximum wheel load<br />
1.2 metres<br />
1.65 metres<br />
0.70 metres<br />
225kg<br />
350kg<br />
<strong>Pop</strong>-<strong>Up</strong> PUSH 6 ECO Opera<strong>to</strong>r’s Safety and Maintenance Handbook (v.0.4.0409)<br />
Page 6 of 23
Operating site<br />
Select a site for the machine from which the platform will be able <strong>to</strong> reach the<br />
required work area. A visual inspection of the operating site should be made before<br />
setting up the machine. Particular attention should be given <strong>to</strong> the following items:<br />
Section 2<br />
SPECIFICATION<br />
1. Ground conditions<br />
Ensure that the ground on which the POP-UP PUSH 6 ECO is <strong>to</strong> operate is<br />
capable of supporting the weight of the machine (including the weight of the<br />
opera<strong>to</strong>r plus <strong>to</strong>ols and materials). Be aware of floors or coverings (e.g. manhole<br />
covers) that may not withstand point loadings exerted by the cas<strong>to</strong>r wheels.<br />
2. Ground flatness<br />
The POP-UP PUSH 6 ECO must only be operated on flat (0º chassis inclination)<br />
and level surfaces. The allowable chassis inclination is indicated when the bubble<br />
spirit level is within the marked limits. All cas<strong>to</strong>r wheels must be in full contact with<br />
the ground.<br />
3. Overhead obstructions<br />
Ensure that adequate clearance is available above and around the platform before<br />
elevation.<br />
Noise and vibration<br />
Noise levels emitted from this machine do not exceed 70 dB(A). Hand and arm<br />
vibration experienced on this machine does not exceed 2.5 m/s 2 .<br />
Limitations<br />
The POP-UP PUSH 6 ECO is intended for <strong>use</strong> INDOORS ONLY, and must not be<br />
<strong>use</strong>d outdoors as wind forces may make it unstable.<br />
This machine has been tested for Electromagnetic Compatibility (EMC) however,<br />
operation near <strong>to</strong> high powered radio transmission apparatus (e.g. radar, antennae)<br />
or within strong electrical and/or magnetic fields may affect some features of this<br />
product.<br />
WARNING<br />
THIS MACHINE HAS NOT BEEN DESIGNED FOR OPERATION WITHIN<br />
POTENTIALLY EXPLOSIVE ATMOSPHERES<br />
WARNING<br />
THIS MACHINE IS NOT ELECTRICALLY INSULATED AND MUST NEVER BE<br />
USED FOR LIVE LINE WORKING. DEATH OR SERIOUS INJURY CAN RESULT<br />
FROM CONTACT WITH, OR INADEQUATE CLEARANCE FROM, ELECTRICAL<br />
CONDUCTORS<br />
<strong>Pop</strong>-<strong>Up</strong> PUSH 6 ECO Opera<strong>to</strong>r’s Safety and Maintenance Handbook (v.0.4.0409)<br />
Page 7 of 23
Safety Rules<br />
NEVER<br />
NEVER<br />
NEVER<br />
NEVER<br />
NEVER<br />
NEVER<br />
NEVER<br />
NEVER<br />
NEVER<br />
NEVER<br />
NEVER<br />
Exceed the rated capacity (Safe Working Load or SWL) of the platform<br />
(240kgs).<br />
Use the POP-UP PUSH 6 ECO as a ‘crane’ (e.g. by suspending loads<br />
from beneath the platform).<br />
Make any attempt <strong>to</strong> increase the working height or outreach of the<br />
platform (e.g. by <strong>use</strong> of stepladders in the platform).<br />
Operate the POP-UP PUSH 6 ECO if the bubble spirit level is outside<br />
the marked limits.<br />
Manoeuvre the POP-UP PUSH 6 ECO on an inclined surface<br />
otherwise it may become uncontrollable.<br />
Manoeuvre the POP-UP PUSH 6 ECO whilst in its elevated position,<br />
as this may ca<strong>use</strong> instability.<br />
Manoeuvre the POP-UP PUSH 6 ECO with a person or materials in<br />
the platform.<br />
Enter or exit the platform unless the platform is in the lowered and<br />
transport position.<br />
Apply external side loads <strong>to</strong> the platform or scissor structure.<br />
Allow persons at ground level <strong>to</strong> operate the controls whilst the<br />
platform is occupied (unless in an emergency situation).<br />
Operate the POP-UP PUSH 6 ECO outdoors, it has not been<br />
designed <strong>to</strong> withstand wind loading.<br />
Section 3<br />
SAFETY RULES<br />
ALWAYS<br />
ALWAYS<br />
ALWAYS<br />
ALWAYS<br />
ALWAYS<br />
ALWAYS<br />
ALWAYS<br />
ALWAYS<br />
ALWAYS<br />
ALWAYS<br />
ALWAYS<br />
Undertake the daily checks recommended in this handbook p.9 prior<br />
<strong>to</strong> operation of the machine.<br />
Ensure that all instructions, Safe Working Load and warning decals<br />
are clean and legible.<br />
Ensure the POP-UP PUSH 6 ECO is positioned on adequate ground<br />
<strong>to</strong> support the weight of the machine.<br />
Ensure that sufficient clearance is given if working near <strong>to</strong> live<br />
conduc<strong>to</strong>rs.<br />
Ensure that the cas<strong>to</strong>r brakes have been locked before elevating the<br />
work platform.<br />
Ensure that the platform does not come in<strong>to</strong> contact with fixed objects<br />
(e.g. buildings, etc.) or moving objects (e.g. vehicles, other plant<br />
equipment, etc.).<br />
Replace any removable guard rails (e.g. close and lock access gate)<br />
<strong>to</strong> enable full edge protection <strong>to</strong> be maintained.<br />
Ensure that the load is evenly distributed within the platform.<br />
Ensure the safety of persons that may enter the area around the<br />
platform (e.g. cordon off areas <strong>to</strong> prevent persons entering the danger<br />
area).<br />
Ensure hands are kept within the confines of the handrail when<br />
operating the machine.<br />
Ensure that the area below the platform is clear of obstruction before<br />
lowering.<br />
<strong>Pop</strong>-<strong>Up</strong> PUSH 6 ECO Opera<strong>to</strong>r’s Safety and Maintenance Handbook (v.0.4.0409)<br />
Page 8 of 23
Section 4<br />
OPERATING INSTRUCTIONS<br />
Daily checks<br />
Prior <strong>to</strong> operating the POP-UP PUSH 6 ECO, the following items must be checked:<br />
• Structure (e.g. damage, cracks,<br />
corrosion, abrasion, welds, connections)<br />
• Platform (floor, rails, handrail<br />
sockets)<br />
• Cas<strong>to</strong>rs (smooth movement, damage)<br />
• Brakes<br />
• Oil leaks<br />
• Battery condition<br />
• Raise and lower functions<br />
• Emergency s<strong>to</strong>p and lowering<br />
functions<br />
• Safety decals and<br />
training card<br />
If the above checks reveal malfunctions or damage on the POP-UP PUSH 6<br />
ECO, then the machine must not be <strong>use</strong>d until the problem is rectified.<br />
If in doubt, seek further assistance from the manufacturer.<br />
If safety decals are no longer legible or missing, please contact the<br />
manufacturer for replacements.<br />
The Daily Checks page in Section 7 of this handbook may be pho<strong>to</strong>copied <strong>to</strong><br />
provide an aide memoir for opera<strong>to</strong>rs when undertaking these important checks.<br />
WARNING<br />
BEFORE OPERATING YOUR POP-UP PUSH 6 ECO, YOU MUST ENSURE<br />
THAT YOU HAVE BEEN ADEQUATELY TRAINED IN ITS USE AND HAVE<br />
FULLY READ AND UNDERSTOOD THIS OPERATOR’S HANDBOOK,<br />
PAYING PARTICULAR ATTENTION TO SECTION 3 - SAFETY RULES<br />
Manoeuvring the platform<br />
Manoeuvre the platform in<strong>to</strong> position using both hands on the guard rails at<br />
gate end. Take care <strong>to</strong> avoid trapping hands or feet whilst manoeuvring the<br />
platform.<br />
Never manoeuvre the POP-UP PUSH 6 ECO whilst it is elevated or with a<br />
person, <strong>to</strong>ols or materials in the platform.<br />
<strong>Pop</strong>-<strong>Up</strong> PUSH 6 ECO Opera<strong>to</strong>r’s Safety and Maintenance Handbook (v.0.4.0409)<br />
Page 9 of 23
Engaging the brakes<br />
Always ensure that both cas<strong>to</strong>r brakes are locked before elevating the work platform<br />
<strong>to</strong> prevent any inadvertent movement.<br />
The brakes are engaged by pushing down on the lever and pulling up the lever as<br />
shown.<br />
Section 4<br />
OPERATING INSTRUCTIONS<br />
Brake off<br />
Brake on<br />
Powering up<br />
The POP-UP PUSH 6 ECO is provided with a key operated switch which is <strong>use</strong>d<br />
<strong>to</strong> isolate the battery and therefore the electrical system, preventing unauthorised<br />
<strong>use</strong>. To enable the electrical system, first turn the Maintenance Isolater switch <strong>to</strong><br />
position ‘1’ (ON) and insert the key in<strong>to</strong> the emergency s<strong>to</strong>p but<strong>to</strong>n. Turn clockwise<br />
<strong>to</strong> release the but<strong>to</strong>n. Ensure that when the machine is not in <strong>use</strong>, the emergency<br />
s<strong>to</strong>p but<strong>to</strong>n is depressed and the key is removed. Turn the Maintenance Isola<strong>to</strong>r<br />
switch <strong>to</strong> position ‘0’ (OFF).<br />
<strong>Pop</strong>-<strong>Up</strong> PUSH 6 ECO Opera<strong>to</strong>r’s Safety and Maintenance Handbook (v.0.4.0409)<br />
Page 10 of 23
Entering and leaving<br />
the work platform<br />
Always <strong>use</strong> three points of contact when entering or exiting the platform, using the<br />
guard rails provided. For example, <strong>use</strong> two hands and one foot, as shown below.<br />
Use the step provided on the base of the machine.<br />
On entering the platform, ensure that the gate is closed behind you.<br />
Section 4<br />
OPERATING INSTRUCTIONS<br />
Control pendant<br />
The control pendant ho<strong>use</strong>s the platform raise and lower controls.<br />
Pressing the enable but<strong>to</strong>n and selecting ‘UP’ raises the platform.<br />
Pressing the enable but<strong>to</strong>n and selecting ‘DOWN’ lowers the platform.<br />
Take care <strong>to</strong> avoid repeated jerky movements which could ca<strong>use</strong><br />
unnecessary impact loads on the structure.<br />
<strong>Pop</strong>-<strong>Up</strong> PUSH 6 ECO Opera<strong>to</strong>r’s Safety and Maintenance Handbook (v.0.4.0409)<br />
Page 11 of 23
Emergency s<strong>to</strong>p<br />
Section 4<br />
OPERATING INSTRUCTIONS<br />
An emergency s<strong>to</strong>p but<strong>to</strong>n is provided on the control pendant. Once depressed,<br />
this isolates power <strong>to</strong> the raise and lower functions.<br />
To res<strong>to</strong>re functionality, twist the emergency s<strong>to</strong>p but<strong>to</strong>n clockwise <strong>to</strong> release the<br />
but<strong>to</strong>n, as shown below.<br />
Turning the Maintenance Isola<strong>to</strong>r switch <strong>to</strong> the ‘0’ position also has the effect of<br />
isolating power <strong>to</strong> the raise and lower functions.<br />
Emergency lowering<br />
To lower the platform in the event of an emergency, a control is provided at<br />
the chassis.<br />
Turning the knob in an ANTICLOCKWISE direction, as shown, opens the<br />
lift valve. Once the valve is fully open the platform will lower, at this point<br />
please stand back <strong>to</strong> ensure your safety. Always close the valve after <strong>use</strong>.<br />
Battery charging<br />
A battery condition meter is fitted <strong>to</strong> the POP-UP PUSH 6 ECO as shown.<br />
To check the battery condition, elevate the platform from ground level<br />
whilst at the same time pressing the red but<strong>to</strong>n above the battery condition<br />
meter. This is the only way <strong>to</strong> obtain an accurate reading. The battery will<br />
require charging if there is less than 4 bars on the display. Do not attempt<br />
<strong>to</strong> <strong>use</strong> the machine in this state as battery damage may occur. Never<br />
allow the battery <strong>to</strong> run completely flat as this damages the cells and can<br />
lead <strong>to</strong> premature battery failure. It is good practice <strong>to</strong> charge the battery<br />
daily <strong>to</strong> ensure optimum battery condition. The POP-UP PUSH 6 ECO is<br />
supplied with a built-in multi voltage au<strong>to</strong>matic battery charger, for supply<br />
voltages between 90V and 240V AC. The battery charger is located on the<br />
underside of the platform.<br />
To charge the battery, follow these steps:<br />
1. Turn the Maintenance Isola<strong>to</strong>r switch <strong>to</strong> ‘0’ (OFF) position.<br />
2. Connect the battery charger lead <strong>to</strong> the POP-UP PUSH 6 ECO at the<br />
point shown.<br />
3. Connect the battery charger <strong>to</strong> the power supply (either 110V or 240V<br />
AC at 50 Hz depending on the mains supply).<br />
4. Turn the Maintenance Isola<strong>to</strong>r switch <strong>to</strong> ‘2’ (CHARGE) position.<br />
5. The battery should be fully recharged once the 95% LED is illuminated<br />
on the charging indica<strong>to</strong>r.<br />
<strong>Pop</strong>-<strong>Up</strong> PUSH 6 ECO Opera<strong>to</strong>r’s Safety and Maintenance Handbook (v.0.4.0409)<br />
Page 12 of 23
Section 5<br />
MAINTENANCE<br />
Safety during maintenance<br />
When performing maintenance on the POP-UP PUSH 6 ECO with the platform<br />
elevated, always ensure that the maintenance props are engaged as shown.<br />
WARNING<br />
FAILURE TO ENGAGE THE MAINTENANCE PROPS MAY RESULT<br />
IN THE PLATFORM LOWERING WITHOUT WARNING<br />
Periodical maintenance and checks<br />
The following checks should be undertaken at the recommended intervals shown:<br />
Daily/Pre-<strong>use</strong> Monthly 6 Monthly 12 Monthly<br />
Inspect structure • • • •<br />
Inspect platform • • • •<br />
Check cas<strong>to</strong>rs • • • •<br />
Check brake function • • • •<br />
Inspect for oil leaks • • • •<br />
Check battery condition • • • •<br />
Check raise/lower functions • • • •<br />
Inspect training card and safety decals • • • •<br />
Check hydraulic oil level • • •<br />
Inspect limit switches • • •<br />
Inspect wiring • • •<br />
Check electrical connec<strong>to</strong>rs • • •<br />
Lubricate roller guides • • •<br />
Lubricate grease nipples • • •<br />
Lubricate pivot pins • •<br />
Lubricate cas<strong>to</strong>r mounts • •<br />
Replace hydraulic oil<br />
•<br />
<strong>Pop</strong>-<strong>Up</strong> PUSH 6 ECO Opera<strong>to</strong>r’s Safety and Maintenance Handbook (v.0.4.0409)<br />
Page 13 of 23
Periodical maintenance and checks<br />
(continued)<br />
Section 5<br />
MAINTENANCE<br />
Prior <strong>to</strong> first <strong>use</strong> of the POP-UP PUSH 6 ECO, all daily/pre-<strong>use</strong> checks must be<br />
undertaken. If the machine has been in s<strong>to</strong>rage for a long period of time, it may be<br />
necessary <strong>to</strong> undertake checks and tests as per the table on the preceding page (e.g.<br />
lubrication, hydraulic oil, battery condition).<br />
The Lifting Operations and Lifting Equipment Regulations 1998 (LOLER) require that<br />
lifting equipment for lifting persons must be THOROUGHLY EXAMINED every six<br />
months.<br />
Following any maintenance on the POP-UP PUSH 6 ECO, a full function test should<br />
be undertaken <strong>to</strong> ensure correct operation of the machine.<br />
It is essential that only manufacturer’s approved replacement parts are <strong>use</strong>d when<br />
maintaining and servicing the POP-UP PUSH 6 ECO.<br />
Failure <strong>to</strong> do so may result in an unsafe or unstable machine.<br />
S<strong>to</strong>rage<br />
The electrical components of this POP-UP PUSH 6 ECO are not protected from<br />
external weather conditions and the machine should therefore not be s<strong>to</strong>red outdoors.<br />
S<strong>to</strong>rage in a clean, dry indoor environment is recommended.<br />
Frequent checks on the condition of the machine should be made <strong>to</strong> ensure no<br />
excessive deterioration occurs due <strong>to</strong> the environment in which the machine is ho<strong>use</strong>d.<br />
Lubrication<br />
The required lubrication points are listed as per the table on the preceding page.<br />
These include: roller guides, grease nipples, pivot pins and cas<strong>to</strong>r mounts.<br />
The lubricant recommended for <strong>use</strong> with this POP-UP PUSH 6 ECO is: standard<br />
machine grease.<br />
<strong>Pop</strong>-<strong>Up</strong> PUSH 6 ECO Opera<strong>to</strong>r’s Safety and Maintenance Handbook (v.0.4.0409)<br />
Page 14 of 23
Hydraulic oil<br />
Section 5<br />
MAINTENANCE<br />
The hydraulic oil level can be checked by removing the filler cap fitted <strong>to</strong> the<br />
hydraulic oil tank shown below. The correct amount of oil is in the tank when<br />
hydraulic fluid appears on the tip of the dipstick. This check must be carried out<br />
with the platform in the fully lowered position.<br />
The hydraulic oil can be <strong>to</strong>pped up by adding oil <strong>to</strong> the filler as highlighted<br />
below. Take care not <strong>to</strong> spill hydraulic fluid over any of the surrounding machine<br />
components.<br />
The hydraulic oil can be drained by removing the tank. Remove the 4 bolts as<br />
highlighted below and separate the tank from the pump body. The hydraulic fluid<br />
can then be correctly disposed of. Reassembly is the reverse of above.<br />
Filler cap/dipstick Oil filler Bolts<br />
The hydraulic oil recommended for <strong>use</strong> with this POP-UP PUSH 6 ECO<br />
is:<br />
mineral basis hydraulic oil with lubricating, antifoaming, anti-corrosive,<br />
antioxidant HL-HLP (ISO and UNI HM)-HV-HLPD performances<br />
according <strong>to</strong> DIN51524 part 1-2 standards<br />
Minimum viscosity 15cts (23 o E / 77,39 SSU at 100 o F)<br />
Max. viscosity at starting up 800cts (105,6 o E / 3708 SSU at 100 o F)<br />
Max. working viscosity 100cts (13,2 E / 463,5 SSU at 100 o F)<br />
Suggested viscosity range 25 ÷ 40 cts = (3,47 ÷ 5,35 o E / 119,3 ÷ 186,3 SSU a 100 o F)<br />
Allowed temperature Max 80 o C (176 o F)<br />
Recommended temperature 30 ÷ 60 o C (86 ÷ 140 o F)<br />
<strong>Pop</strong>-<strong>Up</strong> PUSH 6 ECO Opera<strong>to</strong>r’s Safety and Maintenance Handbook (v.0.4.0409)<br />
Page 15 of 23
Electrical schematic<br />
Section 5<br />
MAINTENANCE<br />
Lo ck Ou t Sw it ch<br />
Em er ge nc y S<strong>to</strong>p<br />
Switch<br />
Pe nd an t Co nt ro l<br />
St ro ke Travel<br />
Li mi t S witc h<br />
4A Fu se<br />
63A Fu se<br />
Wa rn in g Bu zz er<br />
Me te r<br />
Pa ne l<br />
Ch an ge ov er Sw it ch<br />
Hydraulic Pack<br />
DC Mo<strong>to</strong>r<br />
Ch ar ge r Cy cl e Me te r<br />
5A<br />
F<strong>use</strong><br />
Relay<br />
Pump<br />
Coil<br />
<strong>Pop</strong>-<strong>Up</strong> PUSH 6 ECO Opera<strong>to</strong>r’s Safety and Maintenance Handbook (v.0.4.0409)<br />
Page 16 of 23
Hydraulic schematic<br />
Section 5<br />
MAINTENANCE<br />
CYLINDER<br />
512610-000<br />
DAMPER<br />
VALVE 512728-000<br />
VALVE<br />
FILTER<br />
CHECK VALVE<br />
RELIEF VALVE<br />
MOTOR<br />
PUMP<br />
FILTER<br />
RESERVOIR<br />
HYDRAULIC CIRCUIT<br />
<strong>Pop</strong>-<strong>Up</strong> PUSH 6 ECO Opera<strong>to</strong>r’s Safety and Maintenance Handbook (v.0.4.0409)<br />
Page 17 of 23
Troubleshooting<br />
Section 5<br />
MAINTENANCE<br />
Problem Ca<strong>use</strong> Repair<br />
Platform does not raise<br />
(hydraulic pack mo<strong>to</strong>r<br />
not running)<br />
Platform does not raise<br />
(hydraulic pack mo<strong>to</strong>r<br />
running)<br />
Platform creeps<br />
(uncontrolled lowering)<br />
1. Faulty wiring 1. Check the wiring by referring<br />
<strong>to</strong> the electrical schematic<br />
diagram p.16<br />
2. Battery is disconnected 2. Reconnect the battery<br />
3. Battery charge is insufficient 3. Charge the battery<br />
1. Faulty adjustment of relief<br />
valve<br />
1. Adjust relief valve<br />
2. Faulty hydraulic pump 2. Replace power pack<br />
3. Insufficient hydraulic oil 3. Add hydraulic oil<br />
1. Oil leakage in power pack 1. Replace lowering valve<br />
2. Oil leakage from hydraulic<br />
circuit<br />
2. Check hydraulic circuit and<br />
repair<br />
Oil leakage from cylinder Faulty sealing Replace sealing<br />
Oil leakage from hydraulic pipes<br />
Oil leakage from air breather<br />
( ller cap)<br />
Insufficient tightening or seal<br />
invalid<br />
Excessive quantity of oil<br />
Tighten joint again or replace<br />
seal<br />
Reduce oil quantity<br />
<strong>Pop</strong>-<strong>Up</strong> PUSH 6 ECO Opera<strong>to</strong>r’s Safety and Maintenance Handbook (v.0.4.0409)<br />
Page 18 of 23
Loading and unloading<br />
When loading or unloading the POP-UP PUSH 6 ECO, <strong>use</strong> one of the methods<br />
Section 6<br />
TRANSPORT INSTRUCTIONS<br />
Forklift<br />
Tail lift<br />
shown.<br />
When using a forklift <strong>to</strong> lift the POP-UP PUSH 6 ECO, ensure the forks are<br />
sufficiently inserted in<strong>to</strong> the forklift pockets in the base of the machine. Please see<br />
the location of the forklift pockets below.<br />
When using a tail lift <strong>to</strong> load or unload the POP-UP PUSH 6 ECO ensure that<br />
brakes are applied <strong>to</strong> both cas<strong>to</strong>rs. Ensure that the capacity of the tail lift is<br />
sufficient <strong>to</strong> handle the POP-UP PUSH 6 ECO. Take care when manoeuvring the<br />
machine on the tail lift.<br />
Fork lift pocket<br />
Winch point<br />
When winching the machine on<strong>to</strong> or off a vehicle, ensure that the winch is<br />
connected <strong>to</strong> the winch point as shown below. Ensure personnel are available <strong>to</strong><br />
guide the machine whilst the winch is in operation.<br />
WARNING<br />
NEVER ATTEMPT TO LOAD OR UNLOAD THE POP-UP PUSH 6 ECO BY<br />
MANUAL EFFORT ONLY, SERIOUS INJURY, MACHINE OR PROPERTY<br />
DAMAGE COULD RESULT<br />
<strong>Pop</strong>-<strong>Up</strong> PUSH 6 ECO Opera<strong>to</strong>r’s Safety and Maintenance Handbook (v.0.4.0409)<br />
Page 19 of 23
Lifting<br />
No lifting attachment points are provided on the POP-UP PUSH 6 ECO and therefore<br />
lifting of the machine (e.g. with a crane or straps) is prohibited. If lifting of the<br />
machine is required, please contact the manufacturer for further details.<br />
Preparation for transport<br />
Prior <strong>to</strong> transporting the POP-UP PUSH 6 ECO on a vehicle, ensure that the following<br />
precautions are taken in order <strong>to</strong> avoid damage <strong>to</strong> the machine or damage<br />
<strong>to</strong> the transporting vehicle.<br />
1. Ensure that the platform is fully lowered <strong>to</strong> its rest position.<br />
2. Ensure that the control pendant is in its cradle.<br />
3. Ensure brakes are engaged on both cas<strong>to</strong>rs.<br />
4. Secure the POP-UP PUSH 6 ECO <strong>to</strong> the transport vehicle using straps through<br />
the forklift pockets as shown below.<br />
Section 6<br />
TRANSPORT INSTRUCTIONS<br />
<strong>Pop</strong>-<strong>Up</strong> PUSH 6 ECO Opera<strong>to</strong>r’s Safety and Maintenance Handbook (v.0.4.0409)<br />
Page 20 of 23
Maintenance<br />
Section 7<br />
MAINTENANCE AND<br />
REPAIR RECORD<br />
Date Scheduled maintenance undertaken By<br />
Repairs<br />
Date Repairs undertaken By<br />
Examinations/tests<br />
Date Examinations/tests undertaken By<br />
PLEASE PHOTOCOPY THIS PAGE FOR YOUR OWN USE, AS REQUIRED.<br />
<strong>Pop</strong>-<strong>Up</strong> PUSH 6 ECO Opera<strong>to</strong>r’s Safety and Maintenance Handbook (v.0.4.0409)<br />
Page 21 of 23
Section 7<br />
MAINTENANCE AND<br />
REPAIR RECORD<br />
Notes<br />
<strong>Pop</strong>-<strong>Up</strong> PUSH 6 ECO Opera<strong>to</strong>r’s Safety and Maintenance Handbook (v.0.4.0409)<br />
Page 22 of 23
Section 7<br />
MAINTENANCE AND<br />
REPAIR RECORD<br />
At POP-UP <strong>Products</strong> we welcome any feedback and suggested<br />
improvements for our product. Please email us at feedback@<br />
popupproducts.co.uk<br />
Daily checks – opera<strong>to</strong>r checklist<br />
The following checklist has been provided <strong>to</strong> enable daily checks <strong>to</strong> be<br />
undertaken prior <strong>to</strong> <strong>use</strong> of this POP-UP PUSH 6 ECO. These checks should<br />
be carried out each working day or at the beginning of each shift. The<br />
purpose of the checks is <strong>to</strong> identify any wear and tear or malfunction of the<br />
machine’s components and systems.<br />
WARNING<br />
FAILURE TO UNDERTAKE THESE CHECKS MAY RESULT IN DEFECTS ON, OR<br />
DETERIORATION OF THIS POP-UP PUSH 6 ECO GOING UNDETECTED AND<br />
POSSIBLY RESULTING IN AN UNSAFE MACHINE<br />
Machine number<br />
Note that Regulation 8 of the Lifting Operations and Lifting Equipment Regulations 1998 (LOLER)<br />
require that persons using lifting equipment have appropriate training and instructions <strong>to</strong> enable them<br />
<strong>to</strong> identify whether lifting equipment is safe <strong>to</strong> <strong>use</strong>.<br />
1. Prior <strong>to</strong> operating the platform, the following items must be checked:<br />
(please refer <strong>to</strong> the relevant sections in this handbook for more detail.)<br />
OK? (please tick)<br />
OK? (please tick)<br />
Structure<br />
Platform<br />
Cas<strong>to</strong>rs<br />
Brakes<br />
Oil leaks<br />
Battery condition<br />
Raise and lower<br />
Emergency s<strong>to</strong>p<br />
Emergency lower<br />
Safety decals and training card<br />
Date<br />
Checked by<br />
2. Use raise, lower and emergency s<strong>to</strong>p functions <strong>to</strong> ensure correct operation.<br />
Should any defects be identified in any of the above areas, these should be reported <strong>to</strong> your supervisor or<br />
employer. It may be necessary <strong>to</strong> seek further assistance from the supplier of the machine, this may be the hire<br />
company or the manufacturer.<br />
You should only rectify any defects if you are authorised and competent <strong>to</strong> do so.<br />
Do not <strong>use</strong> the machine unless each of the items above is checked and stated OK.<br />
<strong>Pop</strong>-<strong>Up</strong> PUSH 6 ECO Opera<strong>to</strong>r’s Safety and Maintenance Handbook (v.0.4.0409)<br />
Page 23 of 23
POP-UP<br />
Vigo Centre<br />
Birtley Road<br />
Washing<strong>to</strong>n<br />
Tyne & Wear<br />
NE38 9DA<br />
UK<br />
Tel +44 (0)845 1550 057<br />
Fax +44 (0)845 1557 756<br />
ISO9001 : 2008<br />
Certificate No.<br />
FM 513133