PowerPoint - Master Template Quick Note - Oakland University
PowerPoint - Master Template Quick Note - Oakland University
PowerPoint - Master Template Quick Note - Oakland University

Create successful ePaper yourself
Turn your PDF publications into a flip-book with our unique Google optimized e-Paper software.
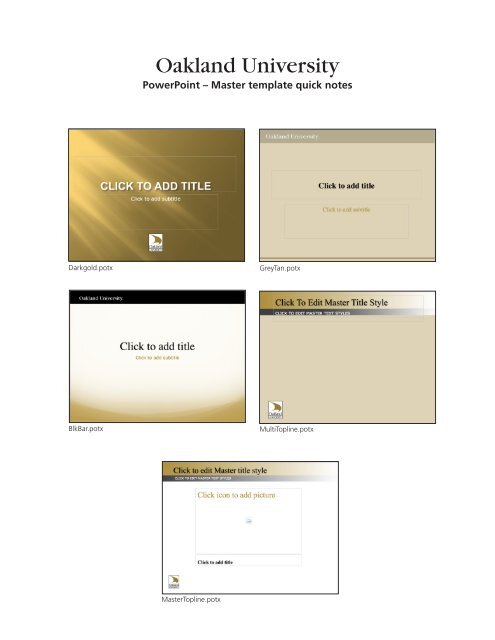
<strong>Oakland</strong> <strong>University</strong><br />
<strong>PowerPoint</strong> – <strong>Master</strong> template quick notes<br />
Darkgold.potx<br />
GreyTan.potx<br />
BlkBar.potx<br />
MultiTopline.potx<br />
<strong>Master</strong>Topline.potx
Sample of all the templates found in the Darkgold.potx file.<br />
Two masters are included in this sample containing a gold or grey/silver background
<strong>Master</strong> templates for<br />
GreyTan.potx
<strong>Master</strong> templates for<br />
BlkBar.potx
<strong>Master</strong> templates for <strong>Master</strong>Topline.potx<br />
Presentation/department name is placed in the Slide <strong>Master</strong> to serve as a global header for document.
<strong>Master</strong> templates for MultiTopline.potx<br />
Top bar area is designed to serve as header of each page.<br />
Two masters are included in this sample containing a white or cream background.
<strong>PowerPoint</strong> - <strong>Master</strong> template MAC user notes<br />
When you open – only one slide will appear.<br />
Click on the Slide Layouts button<br />
This will show you all the options under the template design.<br />
Insert slide format by selecting first the insert new slide button<br />
You can view and edit the master layouts under the VIEW menu.<br />
Change the view from NORMAL to MASTER.
Under MASTER VIEW – the master templates can be edited or additional masters can be created under the same theme.
Placing color theme in master folder allows you to access the OU pallet through any Microsoft program.<br />
MAC placement directions:<br />
Go to your System folder, LIBRARY, then APPLICATION SUPPORT, MICROSOFT<br />
Seen above – you can see that all My <strong>Template</strong>s are stored in that location with My COLOR THEMES<br />
The file “Main OU.xml” is the color profile used in all the templates.
<strong>PowerPoint</strong> <strong>Template</strong>s – Windows User <strong>Note</strong>s<br />
First, to make the OU Color Palette available, place the file ‘Main OU.xml’ into the color palette directory.<br />
Navigate to the appropriate path for your version of Windows:<br />
For Windows XP:<br />
C:\Documents and Settings\USERNAME\Application Data\Microsoft\Document Themes\Theme Colors<br />
For Windows Vista:<br />
C:\Users\USERNAME\AppData\Roaming\Microsoft\<strong>Template</strong>s\Document Themes\Theme Colors
Next, copy the <strong>Oakland</strong> <strong>University</strong> pre-designed templates to a convenient location. This could be something as common<br />
as a folder called ‘<strong>Template</strong>s’ inside ‘My Documents’, or you could choose to copy them to the Microsoft Office program<br />
folder directly. For this tutorial, I will place all of my template files in a folder called ‘<strong>Oakland</strong> <strong>University</strong>’ inside the<br />
Microsoft Office <strong>Template</strong> folder like so:<br />
Do not close this window yet – it will be needed again in just a moment!
Next, open <strong>PowerPoint</strong> and click the “Office button” in the upper left corner of the application window.<br />
Click ‘New’ to open the New Presentation window:<br />
In the left navigation area, click on ‘My <strong>Template</strong>s…’
Next, go back to the folder which contains the template files, select all of the templates you wish<br />
to make available from <strong>PowerPoint</strong>, then drag them into the ‘My <strong>Template</strong>s’ section of the<br />
‘New Presentation’ window:<br />
Next, select any one of the template files and click the ‘OK’ button.<br />
This will open <strong>PowerPoint</strong> with the template of your choice already available.
You may now proceed with adding your personalized presentation content. To add a new slide to your presentation, click<br />
on the ‘Home’ tab of the Office Ribbon, click the arrow under ‘New Slide’.<br />
Select one of the available slide layout options to add that slide to your presentation.
To see which slides currently exist in the presentation, click the ‘Normal’ button on the ‘View’ tab of the Office Ribbon.<br />
When finished adding content to the presentation, save the file as a <strong>PowerPoint</strong> presentation, as normal.<br />
From now on, a pre-defined template can be used by following these steps:<br />
1.) Open <strong>PowerPoint</strong>.<br />
2.) Click the Office button in the upper left corner of the application window.<br />
3.) Click ‘New’.<br />
4.) Click ‘My <strong>Template</strong>s…’<br />
5.) Select a template and click ‘OK’.
General OU photos for use in presentations.<br />
ucm-2925_8/09