DS-2500 - Olympus
DS-2500 - Olympus
DS-2500 - Olympus

You also want an ePaper? Increase the reach of your titles
YUMPU automatically turns print PDFs into web optimized ePapers that Google loves.
DIGITAL VOICE<br />
RECORDER<br />
<strong>DS</strong>-<strong>2500</strong><br />
INSTRUCTIONS<br />
ENGLISH ........................................1<br />
FRANÇAIS ..................................... 65<br />
ESPAÑOL ..................................... 129<br />
Thank you for purchasing an <strong>Olympus</strong><br />
Digital Voice Recorder.<br />
Please read these instructions for information<br />
about using the product correctly and safely.<br />
Keep the instructions handy for future reference.<br />
To ensure successful recordings, we recommend that<br />
you test the record function and volume before use.<br />
EN
Introduction<br />
• The contents of this document may be changed in the future without advanced notice. Contact our<br />
Customer Support Center for the latest information relating to product names and model numbers.<br />
• The illustration of the screen and the recorder shown in this manual may differ from the actual product.<br />
The utmost care has been taken to ensure the integrity of this document, but if you find a questionable<br />
item, error or omission, please contact our Customer Support Center.<br />
• Any liability for passive damages or damage of any kind occurred due to data loss incurred by a defect of<br />
the product, repair performed by the third party other than <strong>Olympus</strong> or an <strong>Olympus</strong> authorized service<br />
station, or any other reason is excluded.<br />
Trademarks<br />
• Microsoft and Windows are registered trademarks of Microsoft Corporation.<br />
• Macintosh is a trademark of Apple Inc.<br />
• Intel and Pentium are registered trademarks of Intel Corporation.<br />
• SD and SDHC are trademarks of SD Card Association.<br />
Other product and brand names mentioned herein may be the trademarks or registered trademarks of their<br />
respective owners.<br />
EN<br />
2
INDEX<br />
Table of contents P.4<br />
Safe and proper usage P.5<br />
PLAY/OK<br />
Getting started P.8<br />
Basic operations P.22<br />
Advanced operations P.36<br />
Managing files on your PC P.53<br />
Other practical use methods P.59<br />
Other information P.60<br />
1<br />
2<br />
3<br />
4<br />
5<br />
6<br />
EN<br />
3
Table of contents<br />
EN<br />
4<br />
Introduction<br />
Table of contents ................................................4<br />
Safe and proper usage ........................................5<br />
Getting started<br />
Main features .....................................................8<br />
Memory card ......................................................9<br />
Identification of parts ...................................... 10<br />
Display status indicators (LCD panel) ....................... 11<br />
Power supply ................................................... 12<br />
Inserting batteries ................................................... 12<br />
Cautions concerning the battery.............................. 12<br />
Battery settings ....................................................... 13<br />
Charging by connecting to a computer via USB ....... 14<br />
Connecting the USB-type AC adapter<br />
(optional) to charge ............................................ 15<br />
Turning on/off the power ......................................... 17<br />
Power Save Mode (Power Save) ............................... 17<br />
HOLD ................................................................ 18<br />
Inserting and ejecting a SD card........................ 19<br />
Setting time and date [Time & Date] ................. 20<br />
Changing the time and date.....................................21<br />
Basic operations<br />
Recording ........................................................22<br />
New recording ..........................................................23<br />
Overwrite recording ................................................. 24<br />
Insert recording ........................................................25<br />
Recording modes [Rec Mode] ............................ 26<br />
Microphone sensitivity [Mic Sense] ................... 27<br />
Using the Variable Control Voice Actuator [VCVA] ....28<br />
Recording monitor ........................................... 29<br />
Playback .......................................................... 30<br />
Erasing ............................................................. 32<br />
Erasing a file .............................................................32<br />
Erasing all files in a folder ........................................33<br />
Partially erasing a file ..............................................34<br />
Advanced operations<br />
Selecting folders and files ................................ 36<br />
Displaying file information [Information] ......... 37<br />
Index marks ..................................................... 38<br />
Menu list .......................................................... 39<br />
Learning to use the menu ................................. 41<br />
Locking files [Lock] ........................................... 42<br />
Backlight [Backlight] ........................................43<br />
LCD Contrast adjustment [Contrast] ..................44<br />
LED [LED] .......................................................... 45<br />
Language [Language] .......................................46<br />
System sounds [Beep] ....................................... 47<br />
Changing the USB class [USB Settings] ..............48<br />
Formatting the card [Format] ........................... 50<br />
Check system information [System info.] .......... 52<br />
Managing files on your PC<br />
<strong>DS</strong>S Player software ......................................... 53<br />
Minimum requirement ............................................53<br />
Installing software ..........................................54<br />
Uninstalling software ...................................... 55<br />
Using online help ............................................. 55<br />
Connecting recorder to PC ................................56<br />
Connecting to your PC using the USB cable .............56<br />
Disconnecting from your PC .....................................57<br />
Running <strong>DS</strong>S Player Software ...........................58<br />
Other practical use methods<br />
Using as external memory of the computer ....... 59<br />
Other information<br />
Alarm message list ...........................................60<br />
Troubleshooting............................................... 61<br />
Technical assistance and support ......................62<br />
Accessories (optional) .......................................63<br />
Specifications ..................................................64
Safe and proper usage<br />
Before using your new recorder, read this manual<br />
carefully to ensure that you know how to operate<br />
it safely and correctly. Keep this manual in an<br />
easily accessible location for future reference.<br />
• The warning symbols indicate important<br />
safety related information. To protect yourself<br />
and others from personal injury or damage to<br />
property, it is essential that you always read the<br />
warnings and information provided.<br />
f Danger<br />
If the product is used without observing<br />
the information given under this symbol,<br />
serious injury or death may result.<br />
f Warning<br />
If the product is used without observing<br />
the information given under this symbol,<br />
injury or death may result.<br />
f Caution<br />
If the product is used without observing<br />
the information given under this symbol,<br />
minor personal injury, damage to the<br />
equipment, or loss of valuable data may<br />
result.<br />
Convention used in this manual<br />
• The word “card” is used to refer to the SD card.<br />
• The word “<strong>DS</strong>S Player” is used to refer to<br />
the <strong>DS</strong>S Player Standard Dictation Module<br />
in Windows environment and <strong>DS</strong>S Player in<br />
Apple Macintosh environment.<br />
• The Notes at the bottom of a page are used for<br />
additional information, exceptions, or related<br />
events.<br />
• Words in uppercase form such as PLAY or REC<br />
are used to describe a function or button on<br />
the recorder.<br />
Caution for usage environment<br />
• To protect the high-precision technology<br />
contained in this product, never leave the<br />
recorder in the places listed below, no matter<br />
if in use or storage:<br />
• Places where temperatures and/or humidity<br />
are high or go through extreme changes. Direct<br />
sunlight, beaches, locked cars, or near other heat<br />
sources (stove, radiator, etc.) or humidifiers.<br />
• Near flammable items or explosives.<br />
• In wet places, such as bathrooms or in the rain.<br />
• In places prone to strong vibrations.<br />
• Never drop the recorder or subject it to<br />
severe shocks or vibrations.<br />
• The recorder may malfunction if it is used in<br />
a location where it is subject to a magnetic/<br />
electromagnetic field, radio waves, or high<br />
voltage, such as near a TV set, microwave,<br />
video game, loud speakers, large monitor unit,<br />
TV/radio tower, or transmission towers. In such<br />
cases, turn the recorder off and on again before<br />
further operation.<br />
• Avoid recording or playing back near cellular<br />
phones or other wireless equipment, as they<br />
may cause interference and noise. If you<br />
experience noise, move to another place, or<br />
move the recorder further away from such<br />
equipment.<br />
• Do not use organic solvents such as alcohol<br />
and lacquer thinner to clean the unit.<br />
Warning regarding data loss:<br />
• Recorded content in memory may be destroyed or<br />
erased by operating mistakes, unit malfunction, or<br />
during repair work. It is recommended to back up<br />
and save important content to other media such<br />
as a computer hard disk.<br />
• Any liability for passive damages or damage of<br />
any kind occurred due to data loss incurred by a<br />
defect of the product, repair performed by the<br />
third party other than <strong>Olympus</strong>, an <strong>Olympus</strong><br />
authorized service station or any other reason is<br />
excluded from the <strong>Olympus</strong> liability.<br />
EN<br />
5
Safe and proper usage<br />
EN<br />
6<br />
Handling the recorder<br />
f Warning:<br />
• Keep the recorder out of the reach of children<br />
and infants to prevent the following dangerous<br />
situation that could cause serious injury:<br />
1 Accidentally swallowing the battery, cards or<br />
other small parts.<br />
2 Accidentally being injured by the moving parts<br />
of the recorder.<br />
• Do not disassemble, repair or modify the unit<br />
yourself.<br />
• Use SD/SDHC memory cards only. Never use<br />
other types of cards.<br />
If you accidentally insert another type of<br />
card into the recorder, contact an authorized<br />
distributor or service center. Do not try to<br />
remove the card by force.<br />
• Do not operate the unit while operating a<br />
vehicle.<br />
f Caution:<br />
• Stop using the recorder immediately if you<br />
notice any unusual odors, noise, or smoke<br />
around it.<br />
Never remove the battery with bare hands,<br />
which may cause a fire or burn your hands.<br />
• Do not leave the recorder in places where<br />
it may be subject to extremely high<br />
temperatures.<br />
Doing so may cause parts to deteriorate and,<br />
in some circumstances, cause the recorder to<br />
catch fire. Do not use the charger or AC adapter<br />
if it is covered. This could cause overheating,<br />
resulting in fire.<br />
• Handle the recorder with care to avoid<br />
getting a low-temperature burn.<br />
• When the recorder contains metal parts,<br />
overheating can result in a low-temperature<br />
burn. Pay attention to the following:<br />
• When used for a long period, the recorder will<br />
get hot. If you hold on to the recorder in this<br />
state, a low-temperature burn may be caused.<br />
• In places subject to extremely cold<br />
temperatures, the temperature of the<br />
recorder’s body may be lower than the<br />
environmental temperature. If possible, wear<br />
gloves when handling the recorder in cold<br />
temperatures.<br />
Battery handling precautions<br />
f Danger:<br />
• Do not solder lead wires or terminals directly<br />
onto a battery or modify it.<br />
• Do not connect the = and - terminals<br />
together. This may cause fire, overheating or<br />
electric shock.<br />
• When carrying or storing the battery, be sure<br />
to put it in the provided case to protect its<br />
terminals. Do not carry or store the battery<br />
with any metal objects (such as key rings). If<br />
this warning is not followed, fire, overheating<br />
or electric shock may occur.<br />
• Do not connect the batteries directly to a<br />
power outlet or a cigarette lighter of an<br />
automobile.<br />
• Do not insert the batteries with their = and<br />
- terminals reversed.<br />
• If any liquid from a battery gets into your eyes,<br />
promptly wash it off with clean water and<br />
consult your doctor at once.<br />
• There is a hole from which gas escapes on the<br />
= terminal. Do not cover or block it.<br />
f Warning:<br />
• The battery should never be exposed to flame,<br />
heated, short-circuited or disassembled.<br />
• Do not attempt to recharge alkaline, lithium<br />
or any other non-rechargeable batteries.<br />
• Never use any battery with a torn or cracked<br />
outer cover.
Safe and proper usage<br />
• Keep batteries out of the reach of children.<br />
• I f y o u n o t i c e a ny t h i n g u n u s u a l w h e n u s i n g t h i s<br />
product, such as abnormal noise, heat, smoke,<br />
or a burning odor:<br />
1 remove the battery immediately, taking care<br />
not to burn yourself, and;<br />
2 call your dealer or local <strong>Olympus</strong><br />
representative for service.<br />
• Do not expose the rechargeable batteries<br />
to water. Do not allow water to contact the<br />
terminals.<br />
• Do not remove or damage the battery<br />
insulating sheet.<br />
• Do not use the batteries if you find something<br />
wrong with them such as leakage, color<br />
change or deformity.<br />
• Unplug the charger if the charging is still<br />
incomplete after the specified time it should<br />
take.<br />
• Should any battery liquid get on skin or<br />
clothing, promptly wash it off with clean<br />
water.<br />
• Keep batteries away from fire.<br />
LCD monitor<br />
• The LCD used for the monitor is made with<br />
high-precision technology. However, black<br />
spots or bright spots of light may appear on<br />
the LCD monitor. Due to its characteristics<br />
or the angle at which you are viewing the<br />
monitor, the spot may not be uniform in color<br />
and brightness. This is not a malfunction.<br />
Memory Card<br />
f Warning:<br />
• Do not touch the card contacts. This may<br />
damage the card.<br />
• Do not place the card in locations with<br />
static electricity.<br />
• Store the card in a location that is out of<br />
the reach of children. In case of accidental<br />
ingestion, consult a physician immediately.<br />
f Caution:<br />
• Do not subject batteries to strong shocks.<br />
• Do not use batteries of different types,<br />
voltages, and/or brand names.<br />
• Rechargeable battery is exclusively for use with<br />
<strong>Olympus</strong> digital voice recorder <strong>DS</strong>-<strong>2500</strong>.<br />
• There is a risk of explosion if the battery is<br />
replaced with the incorrect battery type.<br />
• Dispose of the used battery following the<br />
instructions.<br />
• Please recycle batteries to help save our<br />
planet’s resources. When you throw away dead<br />
batteries, be sure to cover their terminals and<br />
always observe local laws and regulations.<br />
• Always charge a rechargeable battery when<br />
using it for the first time, or if it has not been<br />
used for a long period.<br />
• Rechargeable batteries have limited lifetime.<br />
When the operating time becomes shorter even<br />
if the rechargeable battery is fully charged,<br />
replace it with a new one.<br />
EN<br />
7
Getting started<br />
M a i n fe at u r e s<br />
1<br />
Main features<br />
s Support type of memory: SD card ( ☞ P.9).<br />
s Three programmable smart buttons F1, F2 and F3.<br />
s Recording and storing voice in Digital Speech Standard Pro (<strong>DS</strong>2 format).<br />
s Two recording modes, QP (Quality Playback) mode or SP (Standard Playback) mode<br />
( ☞ P. 26).<br />
s Overwrite Recording and Insert Recording (partial insertion) available (☞ P.24, P.25).<br />
s Supports USB 2.0. High-Speed, which enables high-speed data transmission from the<br />
recorder to your computer.<br />
s Five folders and up to 200 files per folder, for a maximum of 1,000 recordings ( ☞ P.22).<br />
s It has a built-in Variable Control Voice Actuator (VCVA) function (☞ P.28).<br />
s Large LCD screen with backlight.<br />
s Index mark function which is useful to search particular points in the dictation files<br />
( ☞ P.38).<br />
s <strong>DS</strong>S Player software included ( ☞ P.53).<br />
EN<br />
8
Memory card<br />
This recorder uses memory in the form of SD card<br />
memory.<br />
Compatible cards<br />
The recorder supports cards with memory<br />
capacity between 512 MB to 32 GB.<br />
Settings and operating environment relating to the<br />
card<br />
Check the latest operating information on the<br />
<strong>Olympus</strong> homepage (http://www.olympus.<br />
com) when using cards other than the included<br />
card. In addition, refer to the following pages<br />
as well when handling the card.<br />
• Inserting and ejecting a SD card (☞ P.19).<br />
• Formatting the card [Format] (☞ P.50).<br />
1<br />
SD card<br />
SD card<br />
1 Card lock<br />
SD card is equipped with a lock function.<br />
When the lock function is used, important<br />
data is protected by preventing it from being<br />
accidentally overwritten or erased.<br />
When the lock function is set [ ] will appear on<br />
the display.<br />
2 Index area<br />
For writing down information identifying card<br />
or content.<br />
3 Contact area<br />
Comes into contact with the recorder’s signal<br />
read contacts.<br />
3<br />
2<br />
Check card information [Card Info.]<br />
Information such as the memory capacity and<br />
remaining memory for installed cards can be<br />
displayed on the recorder ( ☞ P.40).<br />
Notes<br />
Card Info.<br />
SD<br />
Remain<br />
Capacity<br />
BACK<br />
540MB<br />
2.0GB<br />
EXIT<br />
• When initializing (formatting) a card,<br />
confirm that no necessary data is stored on<br />
the memory card beforehand. Initialization<br />
completely erases the existing data on the<br />
card.<br />
• In some cases cards which have been formatted<br />
(initialized) by another device, such as a computer,<br />
cannot be recognized. Be sure to format them<br />
with this recorder before using.<br />
• The card has a service life. When reaching the end<br />
of its life, writing or erasing data on the card will<br />
be disabled. In this case, replace the card.<br />
• If you use a PC card adapter compatible with the<br />
card to save or delete some data on the card, the<br />
maximum recording time on the card may be<br />
decreased. To recover the original recording time,<br />
initialize/format the card in the recorder.<br />
• <strong>Olympus</strong> will not be held liable for any data<br />
corruption or loss due to misuse of the media<br />
card.<br />
1<br />
EN<br />
9<br />
Memory card
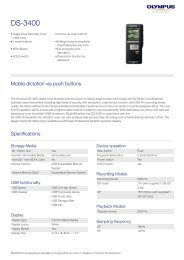
Identification of parts<br />
1<br />
Identification of parts<br />
&<br />
*<br />
(<br />
0<br />
!<br />
@<br />
#<br />
)<br />
$<br />
%<br />
^<br />
1<br />
2<br />
3<br />
4<br />
5<br />
6<br />
7<br />
8<br />
9<br />
w<br />
q =<br />
-<br />
1 SD card slot<br />
2 Built-in microphone<br />
3 NEW button<br />
4 REC button<br />
5 REW button<br />
6 FF button<br />
7 STOP button<br />
8 POWER/HOLD switch<br />
9 ERASE button<br />
0 EAR (Earphone) jack<br />
! MIC (Microphone) jack<br />
@ Record indicator light<br />
# Display (LCD panel)<br />
$ + (Volume) button<br />
% Fast Forward (9) button<br />
^ PLAY/OK button<br />
& Smart button (F1,F2,F3)<br />
* Rewind (0) button<br />
( – (Volume) button<br />
) Built-in speaker<br />
- Battery cover<br />
= PC (USB) terminal<br />
q Cradle connector<br />
w Battery cover release button<br />
EN<br />
10
Identification of parts<br />
Display status indicators (LCD panel)<br />
7<br />
8<br />
1<br />
2<br />
3<br />
4<br />
5<br />
6<br />
QP DICT<br />
<strong>DS</strong><strong>2500</strong><br />
E<br />
DISPLY<br />
INDEX<br />
Display in the recording mode<br />
1 Record mode indicator<br />
2 Current folder<br />
3 Memory remaining indicator (E/F bar)<br />
4 Record indicator<br />
5 Remaining recording time<br />
6 Level meter indicator<br />
7 Microphone sensitivity indicator<br />
8 Current file number<br />
Ni<br />
025 / 030 9<br />
F<br />
00 M 10 S 0<br />
15 H 22 M 30S<br />
025 / 030<br />
!<br />
@ 02 M 50 S %<br />
#<br />
12M 05 S<br />
$<br />
QP DICT<br />
<strong>DS</strong><strong>2500</strong><br />
VCVA<br />
Ni<br />
INSERT SPEED INDEX<br />
Display in the playback mode<br />
9 Total number of files in the folder<br />
0 Recording elapsed time<br />
! Playback position bar indicator<br />
@ Play indicator<br />
# Total recording time of the selected file<br />
$ Button guide display<br />
% Current playback time<br />
1<br />
Identification of parts<br />
[ ] Author ID indicator<br />
[ õú] Battery indicator<br />
[ VCVA ] VCVA (Variable Control Voice<br />
Actuator) indicator<br />
[ ] Card lock indicator<br />
[ ] Erase lock indicator<br />
EN<br />
11
1<br />
Power supply<br />
Power supply<br />
Inserting batteries<br />
This recorder can be used with either Ni-MH<br />
rechargeable batteries or AAA alkaline batteries.<br />
• When charging with the recorder,<br />
be sure to use the supplied Ni-MH<br />
rechargeable batteries (BR404).<br />
• The supplied rechargeable batteries<br />
are not fully charged. Before using<br />
the recorder or after long periods of<br />
disuse, it is recommended that you<br />
continuously charge them until full<br />
(☞ P.14, P.15).<br />
1 Lightly press down on the battery cover<br />
release button, then open the battery<br />
cover.<br />
Cautions concerning the battery<br />
f Warning:<br />
• Using batteries for which part<br />
or all of the external coating<br />
(insulating sheath) is peeling<br />
off or batteries which have<br />
ruptured may cause fluid leaks,<br />
overheating, and explosions.<br />
For this reason such batteries<br />
should absolutely not be used.<br />
• Commercially available<br />
batteries for which part or all of<br />
the external coating (insulation<br />
sheath) has been peeled off<br />
should absolutely not be used.<br />
Unusable batteries<br />
2 Insert batteries, observing the correct<br />
polarity as shown in the illustration<br />
below, then close the battery cover.<br />
Batteries for which the entire external coating<br />
(insulating sheath) is peeled off (naked<br />
batteries), or those where it has partially been<br />
peeled off.<br />
EN<br />
12
Power supply<br />
Notes<br />
• Manganese batteries may not be used in this<br />
recorder.<br />
• When changing batteries, AAA alkaline batteries<br />
or <strong>Olympus</strong> Ni-MH rechargeable batteries are<br />
recommended.<br />
• Be sure to turn OFF the recorder before<br />
replacing the batteries. Removing the batteries<br />
while the recorder is in use may corrupt the card.<br />
If you are recording into a file and the batteries<br />
run out, you will lose your currently recorded file<br />
since the file header will not be written. It is crucial<br />
to replace the batteries when one hash mark is<br />
shown in the battery icon.<br />
• Be sure to replace both batteries at the same time.<br />
• Never mix old and new batteries, or batteries<br />
of different types and/or brands.<br />
• If it takes longer than 15 minutes to replace the<br />
dead batteries or if you take the batteries in and<br />
out repeatedly at short intervals, you may have<br />
to redo the battery and time settings. In this case,<br />
the [Battery] screen will appear. For more details,<br />
see “Battery settings”.<br />
• Remove the batteries if you are not going to use<br />
the recorder for an extended period of time.<br />
• When replacing rechargeable batteries, be sure to<br />
use Ni-MH rechargeable batteries (optional). The<br />
use of other manufacturers’ products can damage<br />
the recorder and should be avoided.<br />
Battery settings<br />
Select to match the battery you are using.<br />
1 Replace the batteries and turn on the<br />
recorder (☞ P.12).<br />
2 Press the + or − button to change the<br />
setting.<br />
Battery<br />
Ni-MH<br />
Alkaline<br />
BACK<br />
EXIT<br />
[Ni-MH] (õ):<br />
Select when using the <strong>Olympus</strong> Ni-MH<br />
rechargeable batteries (BR404).<br />
[Alkaline] (ú):<br />
Select when using alkaline batteries.<br />
3 Press the PLAY/OK button to complete<br />
the setting.<br />
• If the “Hour” indicator flashes in the display,<br />
see “Setting time and date [Time & Date]”<br />
(☞ P.20).<br />
1<br />
Power supply<br />
Battery indicator<br />
The battery indicator on the display changes as the<br />
batteries lose power.<br />
Note<br />
• When playing a voice file, the recorder may be<br />
reset due to the reduction of the voltage output of<br />
the batteries depending on the volume level even<br />
if [º] is displayed in the battery indicator. In this<br />
case, lower the volume of the recorder.<br />
• When this [ ] indicator appears on the display,<br />
replace the batteries as soon as possible.<br />
When the batteries are too weak, [ s ] and<br />
[ Battery Low ] appears on the display and the<br />
recorder shuts down.<br />
EN<br />
13
Power supply<br />
1<br />
Power supply<br />
Charging by connecting to a computer via<br />
USB<br />
You can charge the batteries by connecting to a<br />
PC’s USB port. When charging, be sure to correctly<br />
place the rechargeable batteries (supplied) into the<br />
recorder (☞ P.12).<br />
Before connecting the USB cable, exit HOLD<br />
mode (☞ P.18).<br />
Do not charge primary batteries such as alkaline<br />
or lithium batteries. It may cause battery<br />
leakage or heating, which may cause the<br />
recorder to malfunction.<br />
1 Boot the PC.<br />
2 Connect the USB cable to the USB port<br />
of the PC.<br />
4 Press the PLAY/OK button to start<br />
charging.<br />
Press OK to<br />
start charging<br />
Remote<br />
(Storage)<br />
• While [Press OK to start charging] is flashing, press<br />
the PLAY/OK button.<br />
5 Charging is completed when battery<br />
indication becomes to [¿].<br />
Battery Full<br />
Remote<br />
(Storage)<br />
Charging time: approximately 3 hours *<br />
* It shows the approximate time when<br />
charging rechargeable batteries fully from no<br />
remaining power at the room temperature.<br />
The charging time will be changed depending<br />
on the remaining amount and the state of<br />
batteries.<br />
3 While the recorder is in stop mode or<br />
turned off, connect the USB cable to the<br />
connecting terminal on the bottom of<br />
the recorder.<br />
Notes<br />
• The recorder cannot be charged when the PC is<br />
not turned on. It may not also be charged when<br />
the PC is in standby, hibernate, or sleep mode.<br />
• Do not charge the recorder with the USB hub<br />
connected.<br />
EN<br />
14
Power supply<br />
Connecting the USB-type AC adapter<br />
(optional) to charge<br />
It can be charged by connecting to the USB<br />
connecting AC adapter (A514) (optional).<br />
3 While the recorder is in stop mode or<br />
turned off, connect the USB cable to the<br />
connecting terminal on the bottom of<br />
the recorder.<br />
• Before connecting the AC adapter,<br />
switch the USB connection setting to<br />
[AC Adapter] (☞ P.48).<br />
• Before connecting the USB cable, exit<br />
HOLD mode (☞ P.18).<br />
1 Plug the recorder’s USB cable into the<br />
AC adapter.<br />
To the USB<br />
connector<br />
4 Press the PLAY/OK button to start<br />
charging.<br />
1<br />
Power supply<br />
To the USB<br />
connecting AC<br />
adapter’s (A514)<br />
USB connector.<br />
Press OK to<br />
start charging<br />
2 Plug the AC adapter into AC outlet.<br />
• While [Press OK to start charging] is flashing, press<br />
the PLAY/OK button.<br />
5 Charging is completed when [Battery<br />
Full] is displayed.<br />
To the<br />
AC outlet<br />
Battery Full<br />
EN<br />
15
Power supply<br />
1<br />
Power supply<br />
Notes<br />
• Insert the supplied rechargeable battery and<br />
set [Battery] to [Ni-MH]. If [Battery] is set to<br />
[Alkaline], you cannot recharge (☞ P.13).<br />
• You cannot charge when [ø]*1 or [√]*2<br />
blinks. Charge the batteries at a temperature in<br />
the range of 5°C to 35°C (41°F to 95°F).<br />
*1 [ø]: When the surrounding temperature is low.<br />
*2 [√]: When the surrounding temperature is<br />
high.<br />
• When using time becomes notably short even<br />
after the batteries are fully charged, replace them<br />
with new ones.<br />
• Be sure to push the USB connector all the way in.<br />
Otherwise, the recorder may not operate properly.<br />
• Be sure to use the included dedicated USB cable.<br />
If any other company’s cable is used, it may lead<br />
to malfunction of the recorder. Also, never use<br />
this dedicated cable with any other company’s<br />
products.<br />
• If selecting [Composite] in the USB connection<br />
settings:<br />
- Charge will not be possible if the recorder is<br />
operating. Charge will start 1 minute after the<br />
end of the operation.<br />
- Charge may not be possible depending on the<br />
application in use on the computer connected.<br />
• In case you would like to charge using the<br />
[Composite] setting, select [Optional] in the USB<br />
connection settings, then connect the USB cable<br />
to the recorder. Selecting [AC Adapter] at the<br />
[USB Connect] display will enable you to charge<br />
(☞ P.48).<br />
Cautions concerning the rechargeable batteries<br />
Read the following descriptions carefully when you<br />
use the Ni-MH rechargeable batteries.<br />
Discharging:<br />
Rechargeable batteries self-discharge while not in<br />
use. Be sure to charge them regularly before use.<br />
Operating temperature:<br />
The rechargeable batteries are chemical products.<br />
The rechargeable batteries efficiency may fluctuate<br />
even when operating within the recommended<br />
temperature range. This is an inherent nature of such<br />
products.<br />
Recommended temperature range:<br />
When operating appliance:<br />
0°C - 42°C/ 32°F - 107.6°F<br />
Charging:<br />
5°C - 35°C/ 41°F - 95°F<br />
Storage for a long period:<br />
–20°C - 30°C/ –4°F - 86°F<br />
Using the rechargeable batteries outside the above<br />
temperature range may result in declining efficiency<br />
and shorter battery life. In order to prevent battery<br />
leakage or rust, remove the rechargeable batteries<br />
from the products when you will not be using them<br />
for a long time, and store them separately.<br />
Notes<br />
• This recorder is designed to fully charge batteries<br />
regardless of their energy level. However, for<br />
best results when charging newly purchased<br />
rechargeable batteries or batteries that have not<br />
been used for a long time (more than one month),<br />
it is recommended to fully charge the batteries<br />
then discharge repeatedly for 2 to 3 times.<br />
• When disposing rechargeable batteries, always<br />
observe the local laws and regulations. Contact<br />
your local recycling center for proper disposal<br />
methods.<br />
• If Ni-MH rechargeable batteries are not fully<br />
discharged, protect against short-circuiting (e.g.<br />
by taping the contacts) before disposing.<br />
EN<br />
16
Power supply<br />
Turning on/off the power<br />
When the recorder is not being used, turn the power<br />
off to reduce battery consumption to a minimum.<br />
Even if the power is turned off, existing data, mode<br />
settings, and clock settings will be maintained.<br />
Turning on the power<br />
While the recorder is turned off, slide the<br />
POWER/HOLD switch to the direction of the<br />
arrow.<br />
• The display will turn on, and after [System Check]<br />
appears, the power will be turned on. The resume<br />
function will bring the recorder back to the stop<br />
position in memory before power was turned off.<br />
Power Save Mode (Power Save)<br />
When the recorder is ON but not in use for 10<br />
minutes, by default, it will switch to power save<br />
mode automatically. To reactivate the recorder again,<br />
operate any button or the slide switch.<br />
Power Save Setting<br />
You can set the time to enter Power Save mode<br />
from among [5 minutes], [10 minutes], [30<br />
minutes], [1 hour], and [Off].<br />
To exit power save, press any button.<br />
The [Power Save] setting can be changed from<br />
the Menu. For more details, refer to “Menu<br />
list” (☞ P.39) and “Learning to use the menu”<br />
(☞ P.41).<br />
1<br />
Power supply<br />
Turning off the power<br />
Slide the POWER/HOLD switch to the<br />
direction of the arrow, and hold it for 0.5<br />
seconds or longer.<br />
• The display shuts off and the power will be turned<br />
off. The resume function remembers the stop<br />
position before the power is turned off.<br />
Power Save<br />
5 minutes<br />
10 minutes<br />
30 minutes<br />
1 hour<br />
Off<br />
BACK<br />
EXIT<br />
EN<br />
17
HOLD<br />
If you bring the POWER/HOLD switch to the HOLD<br />
position, the current conditions will be preserved,<br />
and all buttons and switches will be disabled.<br />
This feature is useful when the recorder has to be<br />
carried in a bag or pocket.<br />
1<br />
HOLD<br />
Set the recorder to HOLD mode<br />
Slide the POWER/HOLD switch to the HOLD<br />
position.<br />
• After [Hold] appears on the display, the recorder<br />
is set to HOLD mode.<br />
Exit HOLD mode<br />
Slide the POWER/HOLD switch to the A position.<br />
EN<br />
18
Inserting and ejecting a SD card<br />
Inserting a SD card<br />
Insert the SD card fully into the card slot with the<br />
card facing the direction shown in the illustration<br />
below, until it clicks into place.<br />
• When inserting SD card into the SD card slot, the<br />
recorder message [Please Wait] will flash on the<br />
LCD display for a few seconds while validating the<br />
SD card.<br />
• Insert the card keeping it straight.<br />
N o t e s<br />
• The card stops with a click when it is inserted<br />
all the way.<br />
• Inserting the card the wrong way or at an angle<br />
could damage the contact area or cause the<br />
card to jam.<br />
• If the card is not inserted all the way, data may<br />
not be written to the card.<br />
• Hold the card straight and pull it out.<br />
• If an unformatted card is installed, the recorder<br />
will automatically display the menu format option<br />
(☞ P.37).<br />
• Never use any card in the recorder unless it has<br />
been formatted on this unit (☞ P.50).<br />
• Never remove the card while the recorder is in<br />
operation. This may damage the data.<br />
• Releasing your finger quickly after pushing the<br />
card inward may cause it to eject forcefully out of<br />
the slot.<br />
1<br />
Inserting and ejecting a SD card<br />
Ejecting a SD card<br />
Push the SD card inward once to unlock it, and<br />
let it eject.<br />
EN<br />
19
Setting time and date [Time & Date]<br />
1<br />
Setting time and date<br />
Setting the correct time and date on the recorder<br />
is very important since every file recorded on the<br />
recorder will have the time and date information<br />
as part of the file header. This will simplify the file<br />
management aspects later on.<br />
The hour indicator will flash automatically<br />
when you load batteries before using the<br />
recorder for the first time, or after the<br />
recorder hasn’t been used for a long time.<br />
PLAY/OK<br />
F1, F2, F3 button<br />
PLAY/OK button<br />
+, − button<br />
9, 0 button<br />
1 Press the 9 or 0 button to select<br />
the item to set.<br />
• Select the item from the “ hour ”, “ minute ”,<br />
“ year ”, “ month ” and “ day ” with a flashing<br />
point.<br />
Time & Date<br />
01 M 01 D 2012 Y<br />
BACK<br />
24H<br />
EXIT<br />
2 Press the + or − button to set.<br />
• Follow the same steps by pressing the 9 or<br />
0 button to select the next item, and press<br />
the + or − button to set.<br />
Time & Date<br />
1: 00 AM<br />
10 M 14 D 2012 Y<br />
5 : 45 PM<br />
BACK<br />
24H<br />
EXIT<br />
• You can select between 12 and 24 hour display<br />
by pressing the F2([24H] or [12H])* button<br />
while setting the hour and minute.<br />
Example: 5:45 P.M<br />
5:45 PM (Initial setting) 17:45<br />
EN<br />
20
• You can choose the order of the year,<br />
month, day by pressing the F2([M]/[D]/[Y]<br />
or [D]/[M]/[Y] or [Y]/[M]/[D])* button while<br />
setting them.<br />
Example: October 14, 2012<br />
10M 14D 2012Y<br />
(Initial setting)<br />
14D 10M 2012Y<br />
2012Y 10M 14D<br />
* T h e d i s p l a y w i l l v a r y d e p e n d i n g o n t h e s t a t u s o f t h e<br />
settings.<br />
3 Press the PLAY/OK button to complete<br />
the setting.<br />
• The clock will start from the set date and time.<br />
Press the PLAY/OK button according to the<br />
time signal.<br />
N o t e s<br />
• If you press the STOP button during the setup<br />
operation, the settings are cancelled, and the<br />
recorder returns to the previous screen.<br />
• You can set the time and date from your PC using<br />
<strong>DS</strong>S Player software (☞ P.53).<br />
Setting time and date [Time & Date]<br />
Changing the time and date<br />
When the recorder’s POWER/HOLD switch is turned<br />
ON the [Time & Date] will be displayed for two<br />
seconds. If the time and date is not correct, set it<br />
using the procedure below.<br />
1 Press the + or − button in the [Device<br />
Menu] screen, then select [Time & Date].<br />
• Refer to P.41 regarding each menu item<br />
settings.<br />
Device Menu<br />
Beep<br />
Power Save<br />
Time & Date<br />
Battery<br />
USB Settings<br />
Reset Settings<br />
BACK<br />
EXIT<br />
2 Press the PLAY/OK or 9 button.<br />
• The time and date screen appears. The hour<br />
indicator flashes, indicating the start of the<br />
time and date setup process. The following<br />
steps are the same as Step 1 through Step 3 of<br />
“Setting time and date [Time & Date]” (☞<br />
P.20).<br />
3 P r e s s t h e F3(EXIT) or 0 button to<br />
complete the setting.<br />
1<br />
Setting time and date<br />
EN<br />
21
2<br />
Recording<br />
Basic operations<br />
Recording<br />
The recorder has five folders, [ A ], [ B ], [C], [D],<br />
[E] and you can select a folder by pressing the<br />
F1 (FOLDER) button. These five folders can be<br />
selectively used to distinguish the kind of recording;<br />
for example, Folder [ A ] might be used to store<br />
private information, while Folder [ B ] might be<br />
dedicated to holding business information.<br />
Up to 200 messages can be recorded per folder.<br />
By default, the Recording Mode is [QP].<br />
Record function<br />
By default, the RECORD function is configured to<br />
record at the current position (overwrite).<br />
However, that can be changed to any of the<br />
following settings:<br />
• Append: Appends the recording to the end of the<br />
current file (☞ P.23).<br />
• Overwrite: Overwrites the recording starting at<br />
the current position in the file (☞ P.24).<br />
• Insert: Inserts the recording at the current<br />
position in the file (☞ P.25).<br />
Recording related settings<br />
Recording related settings can be configured<br />
to provide a suitable recording environment.<br />
• Recording modes [Rec Mode] (☞ P.26).<br />
• Microphone sensitivity [Mic Sense]<br />
(☞ P.27).<br />
• Using the Variable Control Voice Actuator<br />
[VCVA] (☞ P.28).<br />
• Recording monitor (☞ P.29).<br />
EN<br />
22
Recording<br />
1<br />
2<br />
2<br />
3<br />
New recording<br />
Create a new file to record in.<br />
1 Press the NEW button to create a new<br />
file.<br />
a Selected Author ID<br />
b New file number<br />
c Remaining recording time<br />
2 Press the REC button to start recording.<br />
• The record indicator light glows orange and<br />
[ ] (Record indicator) appears on the<br />
display. Aim the microphone at the sound<br />
source. When you press the F1 (DISPLY)<br />
button during recording, you can change the<br />
LCD screen displays.<br />
d Record indicator<br />
3 Press the STOP button to stop recording.<br />
• If you want to append additional recordings to<br />
the same file, press the REC button again.<br />
a<br />
b<br />
QP DICT<br />
<strong>DS</strong><strong>2500</strong><br />
Ni<br />
031 / 030<br />
E<br />
F<br />
New File<br />
Remain<br />
c 15 H 22 M 40 s<br />
FOLDER INFO MENU<br />
d<br />
QP DICT<br />
<strong>DS</strong><strong>2500</strong><br />
E<br />
DISPLY<br />
Ni<br />
031 / 031<br />
F<br />
00 M 10 s<br />
15 H 22 M 30 s<br />
INDEX<br />
QP DICT VCVA Ni<br />
<strong>DS</strong><strong>2500</strong><br />
031 / 031<br />
30 H 02 M 20 s<br />
15 H 02 M 20 s<br />
E<br />
2<br />
Recording<br />
FOLDER<br />
INFO<br />
MENU<br />
N o t e s<br />
• A beep will sound when the remaining recording time reaches 60<br />
seconds, 30 seconds, and 10 seconds while recording.<br />
• When remaining recording time is less than 60 seconds, the record<br />
indicator light starts flashing in orange. When the recording time is<br />
decreasing to 30 or 10 seconds, the light flashes faster.<br />
• [Memory Full] or [Folder Full] will be displayed when the memory or<br />
folder capacity is full.<br />
- Delete unnecessary files before recording any further ( ☞ P.32) or<br />
transfer dictation files to your PC (☞ P.53).<br />
EN<br />
23
Recording<br />
2<br />
Recording<br />
2<br />
2<br />
3<br />
Overwrite recording<br />
You can overwrite a previously recorded file from any point within the file.<br />
Note that the overwritten recordings will be erased.<br />
1 Select and play the file you want to<br />
overwrite.<br />
• Stop the playback at the point you want to<br />
start overwriting.<br />
2 Press the REC button to start overwriting.<br />
• The record indicator light glows orange and<br />
[ ] (Record indicator) appears on the<br />
display.<br />
a Recording elapsed time<br />
b Total recording time of the selected file<br />
a<br />
b<br />
QP DICT<br />
Ni<br />
<strong>DS</strong><strong>2500</strong><br />
101 / 133<br />
E<br />
F<br />
10 M 25 s<br />
DISPLY<br />
00H 14 M 00 s<br />
INDEX<br />
3 Press the STOP button to stop overwriting.<br />
Note<br />
• You cannot select a different recording mode ([QP], [SP]) than that of the<br />
original file before overwrite recording.<br />
EN<br />
24
Recording<br />
1<br />
Insert recording<br />
Additional recording can be inserted into previously recorded file.<br />
PLAY/OK<br />
1 Select and play the file you want to<br />
insert an additional recording into.<br />
PLAY/OK<br />
2<br />
2<br />
3<br />
2 While playing the file, press the F1 (INSERT)<br />
button to insert an additional recording.<br />
• [Insert Rec?] appears on the display.<br />
3 Press the REC button to start inserting<br />
an additional recording.<br />
• The record indicator light glows orange and<br />
[ ] (Record indicator) appears on the<br />
display.<br />
[Insert Rec] and the remaining recording time<br />
will alternate on the display.<br />
QP DICT VCVA Ni<br />
<strong>DS</strong><strong>2500</strong><br />
134 / 134<br />
00 H 00 M 10 s<br />
33 M 25 s<br />
Insert Rec?<br />
EXIT<br />
QP DICT<br />
<strong>DS</strong><strong>2500</strong><br />
E<br />
DISPLY<br />
Ni<br />
134 / 134<br />
F<br />
00 M 12s<br />
Insert Rec<br />
INDEX<br />
2<br />
Recording<br />
4<br />
4 Press the STOP button to stop inserting<br />
the additional recording.<br />
QP DICT<br />
<strong>DS</strong><strong>2500</strong><br />
E<br />
Ni<br />
134 / 134<br />
F<br />
00 M 11s<br />
4 H 33 M 06 S<br />
DISPLY<br />
INDEX<br />
Notes<br />
• The recording time and date of the file is updated to the time and date of<br />
the inserted recording.<br />
• You cannot select a different recording mode ([QP], [SP]) than that of the<br />
original file before inserting.<br />
EN<br />
25
Recording modes<br />
2<br />
Recording modes [Rec Mode]<br />
The recording mode can choose between [QP]<br />
(Quality Playback) and [SP] (Standard Playback).<br />
F1, F3 button<br />
PLAY/OK button<br />
+, − button<br />
9, 0 button<br />
1 Select [Rec Mode] at the [Record Menu]<br />
screen, then press the PLAY/OK or 9<br />
button.<br />
• Refer to P.41 regarding each menu item<br />
settings.<br />
Record Menu<br />
Rec Mode<br />
Mic Sense<br />
VCVA<br />
12<br />
BACK<br />
EXIT<br />
2 Press the + or – button to select [QP] or<br />
[SP].<br />
Rec Mode<br />
QP<br />
SP<br />
PLAY/OK<br />
3 Press the PLAY/OK button to complete<br />
the setting.<br />
• [Setting fixed] will light up on the display,<br />
and it will return to the [Record Menu] screen.<br />
• If you press the 0 or F1 (BACK) button the<br />
setting will be cancelled and it will return to<br />
the [Record Menu] screen.<br />
• Pressing the F3 (EXIT) button will cancel the<br />
contents being set and take you out of the<br />
MENU.<br />
Rec Mode<br />
QP<br />
SP<br />
Setting<br />
fixed<br />
BACK<br />
EXIT<br />
4 Press the F3 (EXIT) or 0 button to<br />
close the menu screen.<br />
• Set recording mode is displayed when<br />
creating the new file and during recording.<br />
• The recording mode of file recording is<br />
displayed during playback and in stop mode.<br />
SP DICT Ni<br />
<strong>DS</strong><strong>2500</strong><br />
031 / 030<br />
E<br />
F<br />
New File<br />
Remain<br />
FOLDER<br />
15 H 22 M 40 s<br />
INFO<br />
Note<br />
• Choose [QP] mode for recording meetings or<br />
lectures with crisp clarity.<br />
BACK<br />
EXIT<br />
EN<br />
26
Microphone sensitivity [Mic Sense]<br />
You can switch between two microphone<br />
sensitivities to meet recording needs: [Dictation] for<br />
oral dictation and [Conference] which is suited for<br />
situations like meetings and conferences with a small<br />
number of people.<br />
The setting status will appear on the display as<br />
[CONF] or [ DICT ].<br />
2 Press the + or – button to select<br />
[Conference] or [Dictation].<br />
[Conference]: High-sensitivity mode that records<br />
sounds in all directions.<br />
[Dictation]: Low-sensitivity mode suited for<br />
d i c t a t i o n .<br />
Mic Sense<br />
Conference<br />
Dictation<br />
F1, F3 button<br />
2<br />
PLAY/OK<br />
PLAY/OK button<br />
+, − button<br />
9, 0 button<br />
1 Select [Mic Sense] at the [Record Menu]<br />
screen, then press the PLAY/OK or 9<br />
button.<br />
• Refer to P.41 regarding each menu item<br />
settings.<br />
Record Menu<br />
Rec Mode<br />
Mic Sense<br />
VCVA<br />
12<br />
BACK<br />
EXIT<br />
BACK<br />
EXIT<br />
3 Press the PLAY/OK button to complete<br />
the setting.<br />
• [Setting fixed] will light up on the display,<br />
and it will return to the [Record Menu] screen.<br />
• If you press the 0 or F1 (BACK) button the<br />
setting will be cancelled and it will return to<br />
the [Record Menu] screen.<br />
• Pressing the F3 (EXIT) button will cancel the<br />
contents being set and take you out of the<br />
MENU.<br />
Mic Sense<br />
Conference<br />
Dictation<br />
Setting<br />
fixed<br />
BACK<br />
EXIT<br />
4 Press the F3 (EXIT) or 0 button to<br />
close the menu screen.<br />
Microphone sensitivity<br />
QP DICT<br />
<strong>DS</strong><strong>2500</strong><br />
E<br />
Ni<br />
025 / 030<br />
New File02 M 10 s<br />
3 H 08 M 05 s<br />
FOLDER INFO MENU<br />
EN<br />
27
Using the Variable Control Voice Actuator [VCVA]<br />
2<br />
Using the Variable Control Voice Actuator<br />
The Variable Control Voice Actuator (VCVA) is a<br />
function that starts recording automatically when<br />
the microphone senses that sounds have reached<br />
a preset threshold volume level, and automatically<br />
pauses when the volume drops below the threshold.<br />
The VCVA feature allows you to conserve memory by<br />
automatically stopping recording in instances like<br />
long silent periods during meetings.<br />
When this is enabled, [ VCVA] will appear on the<br />
display.<br />
PLAY/OK<br />
REC button<br />
F1 button<br />
PLAY/OK button<br />
9, 0 button<br />
1 Set the VCVA in the menu to [On].<br />
• Refer to P.41 regarding each menu item<br />
settings.<br />
2 Press the REC button to start recording.<br />
• When the sound volume is lower than the preset<br />
actuation sound level, recording automatically<br />
stops after 1 second approximately, and “Stand<br />
by” flashes on the display. The record indicator<br />
light glows orange and [ ] (Record indicator)<br />
appears when recording starts and flashes when<br />
recording pauses.<br />
QP DICT VCVA Ni<br />
<strong>DS</strong><strong>2500</strong><br />
134 /134<br />
E<br />
F<br />
1 H 25 M 01 s<br />
Standby<br />
DISPLY<br />
INDEX<br />
Adjust the start/stop actuation level:<br />
While the recorder is in recording mode, press the<br />
9 or 0 button to adjust the actuation level.<br />
• The VCVA level can be set to any of 15 different<br />
values. The higher the value is, the more sensitive<br />
the recorder can react to sounds. At the highest<br />
value, even the faintest sound will activate<br />
recording.<br />
• The VCVA actuation level can be adjusted<br />
according to the ambient (background) noise.<br />
QP DICT VCVA Ni<br />
<strong>DS</strong><strong>2500</strong><br />
134 /134<br />
E<br />
F<br />
1 H 25 M 02 s<br />
VCVA Level 05<br />
DISPLY<br />
b<br />
INDEX<br />
a<br />
a Start level (Varies<br />
according to the<br />
sound volume being<br />
recorded)<br />
b Level meter indicator<br />
(moves to the left/right<br />
according to the set<br />
level)<br />
EN<br />
28<br />
Notes<br />
• The start/stop actuation level also varies<br />
depending on the selected microphone<br />
sensitivity mode (☞ P.27).<br />
• To ensure successful recordings, prior testing and<br />
adjustment of the start/stop actuation level is<br />
recommended.
Recording monitor<br />
It is possible to monitor your recording by listening<br />
to the recording while recording is in progress. Insert<br />
the earphone plug into the earphone jack and use<br />
the + or – button to control the volume level.<br />
2<br />
+, − (Volume) button<br />
Recording monitor<br />
Note<br />
• Insert the plugs in to the end as shown in the<br />
illustration when inserting the earphone or<br />
external microphone.<br />
EN<br />
29
Playback<br />
You can start playing a file at any point.<br />
PLAY/OK<br />
1<br />
2<br />
1 Select the file, then press the PLAY/OK<br />
button to start playback.<br />
• The [ ] (Play indicator) appears on the<br />
display.<br />
a Play indicator<br />
a<br />
QP DICT<br />
<strong>DS</strong><strong>2500</strong><br />
Ni<br />
101 / 133<br />
00 M 05 s<br />
27 M 58 s<br />
INSERT SPEED INDEX<br />
2<br />
Playback<br />
PLAY/OK<br />
3<br />
2 Press the + or – button to adjust the<br />
volume.<br />
• The display shows the volume level. You can<br />
choose between [00] to [30].<br />
b Volume level<br />
QP DICT<br />
Ni<br />
<strong>DS</strong><strong>2500</strong><br />
101 / 133<br />
00 M 07 s<br />
b Volume 15<br />
INSERT SPEED INDEX<br />
3 Press the STOP button at any point you<br />
want to stop the playback.<br />
EN<br />
30
Playback<br />
Playback functions Operation How to cancel<br />
Fast Forward<br />
(FF)<br />
Press the 9 or FF button once while stopped.<br />
Press the PLAY/OK or STOP button.<br />
Rewind<br />
(REW)<br />
Press the 0 or REW button once while stopped.<br />
Press the PLAY/OK or STOP button.<br />
Cue<br />
(CUE)<br />
Press and hold the 9 or FF button while stopped<br />
or playing a file.<br />
Release the button.<br />
Review<br />
(REV)<br />
Playback<br />
Speed<br />
Press and hold the 0 or REW button while<br />
stopped or playing a file.<br />
Press the F2 (SPEED) button during playback.<br />
• Every time the F2 (SPEED) button is pressed, the<br />
playback speed will switch.<br />
Play (playback):<br />
Playback at normal speed.<br />
Slow Play (slow playback):<br />
Playback speed slows down (-50%), and “Slow<br />
play” will turn on.<br />
Fast Play (fast playback):<br />
Playback speed becomes faster (+50%), and “Fast<br />
play” will turn on.<br />
Release the button.<br />
2<br />
Playback<br />
Notes<br />
• If you press the 9 or FF button once while fast-forwarding or twice while stopped, the recorder will stop<br />
at the end of the file (F.Skip).<br />
• If you press the 0 or REW button once while rewinding or twice while stopped, the recorder will stop at<br />
the beginning of the file (B.Skip). If the 0 or REW button is pressed within 2 seconds, the recorder skips<br />
to the beginning of the previous file.<br />
EN<br />
31
Erasing<br />
PLAY/OK<br />
2<br />
Erasing a file<br />
Erasing or deleting a file from any of the folder on the recorder is a very<br />
simple process.<br />
2<br />
Erasing<br />
PLAY/OK<br />
3<br />
4<br />
1 Select the file you want to erase.<br />
2 Press the ERASE button.<br />
3 Press the + button to select [File Erase],<br />
then press the PLAY/OK button.<br />
QP DICT<br />
<strong>DS</strong><strong>2500</strong><br />
Erase in Folder<br />
File Erase<br />
Cancel<br />
Erase in Folder<br />
File Erase<br />
Cancel<br />
Ni<br />
029 / 031<br />
EXIT<br />
PLAY/OK<br />
4 Press the + button to select [Start], then<br />
press the PLAY/OK button.<br />
• The display changes to [Erase !] and erasing<br />
will start.<br />
QP DICT<br />
<strong>DS</strong><strong>2500</strong><br />
File Erase<br />
Start<br />
Cancel<br />
Ni<br />
029 / 031<br />
[Erase Done] is displayed when the file is erased.<br />
File numbers will be reassigned automatically.<br />
BACK<br />
Erase !<br />
QP DICT<br />
<strong>DS</strong><strong>2500</strong><br />
Ni<br />
029 / 030<br />
Erase Done<br />
EN<br />
32<br />
Notes<br />
• An erased file cannot be restored.<br />
• Files cannot be erased in the following cases.<br />
- File being set [Lock] (☞ P.42).<br />
- Files stored on a locked SD card (☞ P.9).
Erasing<br />
Erasing all files in a folder<br />
PLAY/OK<br />
2<br />
All files in a folder can be erased simultaneously.<br />
1 Select the file you want to erase.<br />
PLAY/OK<br />
3<br />
2 Press the ERASE button.<br />
QP DICT<br />
<strong>DS</strong><strong>2500</strong><br />
Erase in Folder<br />
File Erase<br />
Cancel<br />
Ni<br />
029 / 030<br />
2<br />
4<br />
3 Press the + button to select [Erase in<br />
Folder], then press the PLAY/OK button.<br />
Erase in Folder<br />
File Erase<br />
Cancel<br />
EXIT<br />
Erasing<br />
PLAY/OK<br />
4 Press the + button to select [Start], then<br />
press the PLAY/OK button.<br />
• The display changes to [Erase !] and erasing<br />
will start.<br />
QP DICT<br />
<strong>DS</strong><strong>2500</strong><br />
E<br />
Erase in Folder<br />
Start<br />
Cancel<br />
Ni<br />
/ 030<br />
BACK<br />
[Erase Done] is displayed when the files are erased.<br />
Any locked files in the folder will be reassigned new<br />
file numbers in ascending order.<br />
Erase !<br />
QP DICT<br />
<strong>DS</strong><strong>2500</strong><br />
E<br />
Ni<br />
000 / 000<br />
Erase Done<br />
Notes<br />
• The erasing process may take up to 10 seconds. Do not interrupt this<br />
process or data may be damaged.<br />
• Files cannot be erased in the following cases.<br />
- File being set [Lock] (☞ P.42).<br />
- Files stored on a locked SD card (☞ P.9).<br />
EN<br />
33
Erasing<br />
Partially erasing a file<br />
2<br />
3<br />
You can erase a selected file in part.<br />
1 Playback the file you would like to<br />
partially erase.<br />
2<br />
Erasing<br />
PLAY/OK<br />
2 Press the ERASE button at the point to<br />
start erasing.<br />
• While playback continues, [Erase start] will<br />
appear on the display.<br />
• If you press the F2 ( ) button, playback will<br />
skip (F.Skip) to the end of the file and then<br />
stop. That will be set automatically as the<br />
ending point of the partial erase.<br />
• If you press the F1 ( ) button, playback will<br />
skip back (B. Skip) and restart from the partial<br />
erase starting point.<br />
Playback will continue until the end of the<br />
file or until the partial erase ending point is<br />
confirmed.<br />
QP DICT<br />
<strong>DS</strong><strong>2500</strong><br />
Ni<br />
134 / 134<br />
45 M 02 s<br />
01 H 55 M 25 s<br />
INSERT SPEED INDEX<br />
45 M 02 s<br />
01H 55 M 23 s<br />
Erase start<br />
EXIT<br />
3 Press the ERASE button at the point to<br />
end erasing.<br />
• The erase starting point (time) set in step 2<br />
and the ending point (time) set in this step will<br />
alternate on the display for 8 seconds.<br />
QP DICT<br />
Ni<br />
<strong>DS</strong><strong>2500</strong><br />
134 / 134<br />
05 M 01 s<br />
01 H 55 M 25 s<br />
Start point<br />
EXIT<br />
QP DICT<br />
<strong>DS</strong><strong>2500</strong><br />
Ni<br />
134 / 134<br />
45 M 32 s<br />
01 H 15 M 25 s<br />
End point<br />
EXIT<br />
EN<br />
34
Erasing<br />
4<br />
4 Press the ERASE button to confirm erase.<br />
• The display changes to [Partial erasing !] and<br />
erasing will start.<br />
QP DICT<br />
<strong>DS</strong><strong>2500</strong><br />
134 / 134<br />
1 H 20 M 35 s<br />
Partial<br />
erasing !<br />
Ni<br />
PLAY/OK<br />
When [Partial erase completed.] appears on the<br />
display, partial erase is complete.<br />
QP DICT<br />
<strong>DS</strong><strong>2500</strong><br />
Ni<br />
134 / 134<br />
2<br />
1 H 20 M 35 s<br />
Partial erase<br />
completed.<br />
Erasing<br />
Notes<br />
• If the ERASE button is not pressed within 8 seconds after the [Start<br />
point] and [End point] are alternately displayed, the recorder will revert<br />
to stop status.<br />
• An erased file cannot be restored.<br />
• Files cannot be partially erased in the following cases.<br />
- File being set [Lock] (☞ P.42).<br />
- The SD card lock is turned on (☞ P.9).<br />
EN<br />
35
Advanced operations<br />
Selecting folders and files<br />
3<br />
Selecting folders and files<br />
PLAY/OK<br />
Changing folders<br />
F1, F3 button<br />
PLAY/OK button<br />
+, − button<br />
9, 0 button<br />
1 While the recorder is stopped, press the<br />
F1 (FOLDER) button.<br />
• The folder list screen will be displayed.<br />
QP DICT<br />
A Folder A<br />
B Folder B<br />
C Folder C<br />
D Folder D<br />
E Folder E<br />
Ni<br />
Changing file<br />
1 While the file is being displayed, press<br />
the 9 or 0 button.<br />
• This will change and display the file number<br />
order for files within the folder.<br />
QP DICT VCVA Ni<br />
<strong>DS</strong><strong>2500</strong><br />
C 001 / 010<br />
00M 00 s<br />
05 M 00 s<br />
FOLDER INFO MENU<br />
a<br />
b<br />
a Current file number<br />
b Total number of<br />
recorded files in the<br />
folder<br />
FOLDER<br />
EXIT<br />
2 Press the + or – button to select the<br />
folder, then press the PLAY/OK button.<br />
• This will change the folder.<br />
• You can switch folders by pressing the<br />
F1 (FOLDER) button.<br />
EN<br />
36<br />
QP DICT<br />
A Folder A<br />
B Folder B<br />
C Folder C<br />
D Folder D<br />
E Folder E<br />
FOLDER<br />
Ni<br />
EXIT
Displaying file information [Information]<br />
The recorder can display a variety of information<br />
related to the current file.<br />
F2, F3 button<br />
The displayed information<br />
The following information will be displayed.<br />
[ File Name ]:<br />
F i l e n a m e .<br />
[ Rec Time ]:<br />
Time and date the file was recorded.<br />
[ Author ID ]:<br />
Display the Author ID of file.<br />
PLAY/OK<br />
1 Select the file containing the<br />
information to display.<br />
• Refer to P.36 regarding file selection.<br />
QP DICT<br />
<strong>DS</strong><strong>2500</strong><br />
Ni<br />
029 / 030<br />
00M 00 s<br />
22 M 40 s<br />
FOLDER INFO MENU<br />
Note<br />
• When the file that Work Type or the Option<br />
Item is set is transferred from PC to this unit,<br />
the information will be displayed on the File<br />
Information.<br />
3<br />
Displaying file information<br />
2 Press the F2 (INFO) button.<br />
• The file information is displayed.<br />
• You can display the file information by<br />
pressing the F3 (MENU) button and selecting<br />
[Information] from [File Menu].<br />
029/030 Ni<br />
File Name<br />
<strong>DS</strong><strong>2500</strong>06.<strong>DS</strong>2<br />
Rec Time<br />
2012Y09M23D 12:23PM<br />
Author ID<br />
<strong>DS</strong><strong>2500</strong><br />
EXIT<br />
EN<br />
37
Index marks<br />
3<br />
Index marks<br />
Index marks can be placed in a file during recording<br />
or playback. Index marks are used to provide a quick<br />
and easy way to identify important or significant<br />
parts within the file.<br />
PLAY/OK<br />
Setting an index mark<br />
F3 button<br />
9, 0 button<br />
ERASE button<br />
1 While the recorder is recording or in<br />
playback mode, press the F3 (INDEX)<br />
button to set an index mark.<br />
• An index number appears on the display.<br />
QP DICT<br />
<strong>DS</strong><strong>2500</strong><br />
Ni<br />
029 / 030<br />
3H 10 M 56 s<br />
Index 01 22M 40 s<br />
Set<br />
INSERT SPEED INDEX<br />
Locating an index mark<br />
2 While playing back a file, press and hold<br />
the 9 or 0 button.<br />
• The recorder stops for 1 second when it<br />
reaches the index mark.<br />
QP DICT<br />
<strong>DS</strong><strong>2500</strong><br />
029 / 030<br />
3H 10 M 56 s<br />
22M 40 s<br />
Index 01<br />
INSERT SPEED INDEX<br />
Clearing an index mark<br />
Ni<br />
3 Locate the index mark you want to clear.<br />
4 While the index number appears for<br />
approximately 2 seconds on the display,<br />
press the ERASE button.<br />
• The index mark is erased.<br />
QP DICT<br />
<strong>DS</strong><strong>2500</strong><br />
Ni<br />
029 / 030<br />
3H 10 M 56 s<br />
Index 01 22 M 40 s<br />
Clear<br />
INSERT SPEED INDEX<br />
Notes<br />
• Up to 32 index marks can be set with in a file.<br />
• When a file is locked or set to read-only, or when<br />
the SD card lock is enabled index mark cannot be<br />
erased. Clear the settings before erasing.<br />
EN<br />
38
Menu list<br />
sMenu setting (While the recorder is stopped, press the F3 (MENU) button)<br />
Main menu Second layer Setting Ref.page<br />
Lock<br />
[Off], [On]<br />
P.42<br />
File Menu<br />
Information The file information is displayed. P.37<br />
Record Menu<br />
Rec Mode<br />
[QP], [SP]<br />
P.26<br />
Mic Sense [Dictation], [Confeuyn.rence] P.27<br />
VCVA<br />
[Off], [On]<br />
P.28<br />
3<br />
Menu list<br />
Backlight<br />
[On], [Off]<br />
P.43<br />
Display Menu<br />
Contrast<br />
Program contrast level [01]~[12] (Default is [06]).<br />
P.44<br />
LED<br />
[On], [Off]<br />
P.45<br />
Languages<br />
[English], [Deutsch], [Français], [Español], [Italiano],<br />
[Русском]<br />
P.46<br />
Device Menu<br />
(To the next page)<br />
EN<br />
39
Menu list<br />
Main menu Second layer Setting Ref.page<br />
Beep<br />
[On], [Off]<br />
P.47<br />
Devices Menu<br />
Power Save<br />
[5 minutes], [10 minutes], [30 minutes], [1hour],<br />
[Off].<br />
P.17<br />
Time & Date In order of hour, minute, year, month and day.<br />
P.20<br />
3<br />
Battery<br />
[ Ni-MH ] [ A l k a l i n e ]<br />
P.13<br />
Menu list<br />
USB Settings<br />
[USB Connect]: [PC], [AC Adapter], [Optional]<br />
[USB Class]: [Composite], [Storage]<br />
P.48<br />
Reset Settings<br />
Returns the menu settings to their initial state.<br />
P.51<br />
Format<br />
Initializes the card.<br />
P.50<br />
Card Info.<br />
[Remain], [Capacity]<br />
P.9<br />
System Info.<br />
[Model Name], [Version], [Serial]<br />
P.52<br />
File Menu<br />
(To the page 39)<br />
Notes<br />
• The selectable language varies depending on the countries where the product was<br />
purchased.<br />
• Items appear in bold letters in the “Setting” column to indicate that they are the initial<br />
settings.<br />
EN<br />
40
Learning to use the menu<br />
To navigate through the different options in the<br />
menu, use the menu list flow chart (☞ P.39, P.40) and<br />
the following steps to modify or change any settings.<br />
PLAY/OK<br />
F1, F3 button<br />
PLAY/OK button<br />
+, − button<br />
9, 0 button<br />
1 Press the F3 (MENU) button.<br />
• The [Main Menu] screen will appear on the<br />
display.<br />
Main Menu<br />
File Menu<br />
Record Menu<br />
Display Menu<br />
Device Menu<br />
2 Press the + or – button to move to [Main<br />
Menu] item to be set.<br />
Main Menu<br />
File Menu<br />
Record Menu<br />
Display Menu<br />
Device Menu<br />
EXIT<br />
3 Press the PLAY/OK or 9 button.<br />
• Move to the setting of the selected menu<br />
items.<br />
4 Press the + or – button to move to the<br />
menu item to be set.<br />
Record Menu<br />
Rec Mode<br />
Mic Sense<br />
VCVA<br />
BACK<br />
5 Press the PLAY/OK or 9 button.<br />
• Move to the setting of the selected item.<br />
Rec Mode<br />
QP<br />
SP<br />
BACK<br />
EXIT<br />
EXIT<br />
6 Press the + or – button to change the<br />
setting.<br />
7 Press the PLAY/OK button to complete<br />
the setting.<br />
• If you press the 0 or F1 (BACK) button, the<br />
setting will be cancelled and it will return to<br />
the menu.<br />
• Pressing the F3 (EXIT) button will cancel the<br />
contents being set and take you out of the<br />
MENU.<br />
8 Press the F3 (EXIT) or 0 button to<br />
close the menu screen.<br />
3<br />
Learning to use the menu<br />
EXIT<br />
EN<br />
41
Locking files [Lock]<br />
When a file is set to [Lock], [ ] will appear on the<br />
display, allowing you to prevent important files from<br />
accidental erase. Moreover, the file will not be erased<br />
even when all files within a folder are erased.<br />
3 Press the + or – button to select [On] or<br />
[Off].<br />
[On]: Locks the file and prevents it from being<br />
erased. [ ] appears on the display.<br />
[Off]: Unlocks the file and allows it to be erased.<br />
Lock<br />
3<br />
Locking files<br />
PLAY/OK<br />
F1, F3 button<br />
PLAY/OK button<br />
+, − button<br />
9, 0 button<br />
1 Select the file you want to lock.<br />
2 Select [Lock] at the [File Menu] screen,<br />
then press the PLAY/OK or 9 button.<br />
• Refer to P.41 regarding each menu item<br />
settings.<br />
OnC<br />
Off<br />
BACK<br />
029 / 030<br />
EXIT<br />
4 Press the PLAY/OK button to complete<br />
the setting.<br />
• [File Lock On] or [File Lock Off] will light up<br />
on the display, and it will return to the [File<br />
Menu] screen.<br />
• If you press the 0 or F1 (BACK) button the<br />
setting will be cancelled and it will return to<br />
the [File Menu].<br />
• Pressing the F3 (EXIT) button will cancel the<br />
contents being set and take you out of the MENU.<br />
Lock<br />
File Menu<br />
Lock<br />
Information<br />
OnC<br />
Off<br />
BACK<br />
File 029 Lock / 030<br />
On<br />
EXIT<br />
BACK<br />
EXIT<br />
5 Press the F3 (EXIT) or 0 button to<br />
close the menu screen.<br />
QP CONF<br />
<strong>DS</strong><strong>2500</strong><br />
E<br />
Ni<br />
029 / 030<br />
EN<br />
42<br />
New File02 M 10 s<br />
3 H 08 M 05 s<br />
FOLDER INFO MENU
Backlight [Backlight]<br />
When the display backlight is set to [On], the<br />
backlight will light up for about 10 seconds when a<br />
button is pressed.<br />
This is useful in that it allows you to check the display<br />
even in dark locations.<br />
2 Press the + or – button to select [On] or<br />
[Off].<br />
[On]: Backlight is enabled.<br />
[Off]: Backlight is disabled.<br />
Backlight<br />
On<br />
Off<br />
F1, F3 button<br />
BACK<br />
EXIT<br />
PLAY/OK<br />
PLAY/OK button<br />
+, − button<br />
9, 0 button<br />
1 Select [Backlight] at the [Display Menu]<br />
screen, then press the PLAY/OK or 9<br />
button.<br />
• Refer to P.41 regarding each menu item<br />
settings.<br />
Display Menu<br />
Backlight<br />
Contrast<br />
LED<br />
Language 12<br />
3 Press the PLAY/OK button to complete<br />
the setting.<br />
• [Setting fixed] will light up on the display,<br />
and it will return to the [Display Menu]<br />
screen.<br />
• If you press the 0 or F1 (BACK) button the<br />
setting will be cancelled and it will return to<br />
the [Display Menu] screen.<br />
• Pressing the F3 (EXIT) button will cancel the<br />
contents being set and take you out of the<br />
MENU.<br />
Backlight<br />
On<br />
Off<br />
Setting<br />
fixed<br />
BACK<br />
EXIT<br />
3<br />
Backlight<br />
BACK<br />
EXIT<br />
4 Press the F3 (EXIT) or 0 button to<br />
close the menu screen.<br />
EN<br />
43
LCD contrast adjustment [Contrast]<br />
Display contrast can be adjusted from level [01] to<br />
[12].<br />
2 Press the + or – button to set the<br />
contrast level.<br />
• You can adjust the LCD display contrast level<br />
from [01] to [12].<br />
F1, F3 button<br />
Contrast<br />
+<br />
3<br />
LCD contrast adjustment<br />
PLAY/OK<br />
PLAY/OK button<br />
+, − button<br />
9, 0 button<br />
1 Select [Contrast] at the [Display Menu]<br />
screen, then press the PLAY/OK or 9<br />
button.<br />
• Refer to P.41 regarding each menu item<br />
settings.<br />
BACK<br />
-<br />
Level<br />
06<br />
EXIT<br />
3 Press the PLAY/OK button to complete<br />
the setting.<br />
• The set contrast level lights up and will return<br />
to the [Display Menu] screen.<br />
• If you press the 0 or F1 (BACK) button the<br />
setting will be cancelled and it will return to<br />
the [Display Menu] screen.<br />
• Pressing the F3 (EXIT) button will cancel the<br />
contents being set and take you out of the<br />
MENU.<br />
Display Menu<br />
Backlight<br />
Contrast<br />
LED<br />
Language 12<br />
BACK<br />
EXIT<br />
Contrast<br />
BACK<br />
+<br />
Setting<br />
fixed<br />
-<br />
Level<br />
06<br />
EXIT<br />
4 Press the F3 (EXIT) or 0 button to<br />
close the menu screen.<br />
EN<br />
44
LED [LED]<br />
You can set it so the Record indicator light does not<br />
turn on.<br />
LED (Record<br />
indicator light)<br />
2 Press the + or – button to select [On] or<br />
[Off].<br />
[On]: LED light will be set.<br />
[Off] : L E D l i g h t w i l l b e c a n c e l l e d .<br />
LED<br />
On<br />
Off<br />
PLAY/OK<br />
F1, F3 button<br />
PLAY/OK button<br />
+, − button<br />
9, 0 button<br />
1 Select [LED] at the [Display Menu] screen,<br />
then press the PLAY/OK or 9 button.<br />
• Refer to P.41 regarding each menu item<br />
settings.<br />
Display Menu<br />
Backlight<br />
Contrast<br />
LED<br />
Language 12<br />
BACK<br />
3 Press the PLAY/OK button to complete<br />
the setting.<br />
• [Setting fixed] will light up on the display,<br />
and it will return to the [Display Menu]<br />
screen.<br />
• If you press the 0 or F1 (BACK) button the<br />
setting will be cancelled and it will return to<br />
the [Display Menu] screen.<br />
• Pressing the F3 (EXIT) button will cancel the<br />
contents being set and take you out of the<br />
MENU.<br />
LED<br />
On<br />
Off<br />
BACK<br />
Setting<br />
fixed<br />
EXIT<br />
EXIT<br />
3<br />
LED<br />
BACK<br />
EXIT<br />
4 Press the F3 (EXIT) or 0 button to<br />
close the menu screen.<br />
EN<br />
45
Language [Language]<br />
You can select the display language for this recorder.<br />
The selectable language varies depending on the<br />
countries where the product was purchased.<br />
Language<br />
English<br />
BACK<br />
EXIT<br />
3<br />
Language<br />
PLAY/OK<br />
F1, F3 button<br />
PLAY/OK button<br />
+, − button<br />
9, 0 button<br />
1 Select [Language] at the [Display Menu]<br />
screen, then press the PLAY/OK or 9<br />
button.<br />
• Refer to P.41 regarding each menu item<br />
settings.<br />
3 Press the PLAY/OK button to complete<br />
the setting.<br />
• The displayed language is changed and will<br />
return to the [Display Menu] screen.<br />
• If you press the 0 or F1 (BACK) button the<br />
setting will be cancelled and it will return to<br />
the [Display Menu] screen.<br />
• Pressing the F3 (EXIT) button will cancel the<br />
contents being set and take you out of the<br />
MENU.<br />
Language<br />
English<br />
Setting<br />
fixed<br />
Display Menu<br />
Backlight<br />
Contrast<br />
LED<br />
Language 12<br />
BACK<br />
EXIT<br />
4 Press the F3 (EXIT) or 0 button to<br />
close the menu screen.<br />
BACK<br />
EXIT<br />
EN<br />
46<br />
2 Press the + or – button to set the<br />
language.<br />
[English]: Displays in English.<br />
[Deutsch]: Displays in German.<br />
[Français]: Displays in French.<br />
[Español] : D i s p l a y s i n S p a n i s h .<br />
[Italiano]: Displays in Italian.<br />
[Русском]: Displays in Russian.<br />
Note<br />
• The selectable language varies depending on the<br />
countries where the product was purchased.
System sounds [Beep]<br />
When this is set to [On], the recorder beeps to alert<br />
you to button operations or warn you of errors.<br />
2 Press the + or – button to select [On] or<br />
[Off].<br />
[On]: System sounds are enabled.<br />
[Off] : Sy s t e m s o u n d s a r e d i s a b l e d .<br />
F1, F3 button<br />
Beep<br />
On<br />
Off<br />
PLAY/OK<br />
PLAY/OK button<br />
+, − button<br />
9, 0 button<br />
1 Select [Beep] at the [Device Menu]<br />
screen, then press the PLAY/OK or 9<br />
button.<br />
• Refer to P.41 regarding each menu item<br />
settings.<br />
BACK<br />
EXIT<br />
3 Press the PLAY/OK button to complete<br />
the setting.<br />
• [Setting fixed] will light up on the display,<br />
and it will return to the [Device Menu] screen.<br />
• If you press the 0 or F1 (BACK) button the<br />
setting will be cancelled and it will return to<br />
the [Display Menu] screen.<br />
• Pressing the F3 (EXIT) button will cancel the<br />
contents being set and take you out of the<br />
MENU.<br />
3<br />
System sounds<br />
Device Menu<br />
Beep<br />
Power Save<br />
Time & Date<br />
Battery 12<br />
USB Settings<br />
Reset Settings<br />
BACK<br />
EXIT<br />
Beep<br />
On<br />
Off<br />
BACK<br />
Setting<br />
fixed<br />
EXIT<br />
4 Press the F3 (EXIT) or 0 button to<br />
close the menu screen.<br />
EN<br />
47
Changing the USB class [USB Settings]<br />
Besides setting to [PC] (Connect to PC to transfer<br />
files) or [AC Adapter] (Connect to AC adapter to<br />
recharge the battery), you can switch the USB class<br />
according to your usage.<br />
[USB Connect]: Setting for connecting to the PC.<br />
[USB Class] : S e t t i n g f o r U S B c l a s s .<br />
3 Press the PLAY/OK button.<br />
• If you select [USB Class], proceed to the<br />
operation of Step 6.<br />
F1, F3 button<br />
3<br />
Changing the USB class<br />
PLAY/OK<br />
1 Select [USB Settings] at the [Device<br />
Menu] screen, then press the PLAY/OK or<br />
9 button.<br />
• Refer to P.41 regarding each menu item<br />
settings.<br />
Device Menu<br />
Beep<br />
Power Save<br />
Time & Date<br />
Battery<br />
USB Settings<br />
Reset Settings<br />
BACK<br />
EXIT<br />
PLAY/OK button<br />
+, − button<br />
9, 0 button<br />
When [USB Connect] is selected:<br />
4 Press the + or − button to change the<br />
setting.<br />
USB Connect<br />
PC<br />
AC Adapter<br />
Optional<br />
BACK<br />
EXIT<br />
[PC]: Setting for when the recorder is connected<br />
to the PC and used as a storage device or<br />
composite device. Connected as storage or<br />
composite.<br />
[AC Adapter]: Setting for when the recorder is<br />
connected to the PC for charging or to the AC<br />
Adapter (A514) (optional).<br />
[Optional]: Setting to confirm the connection<br />
method each time a USB connection is made.<br />
2 Press the + or – button to select [USB<br />
Connect] or [USB Class].<br />
USB Settings<br />
USB Connect<br />
USB Class<br />
5 Press the PLAY/OK button to complete<br />
the setting.<br />
• If you select [USB Connect], proceed to the<br />
operation of Step 8.<br />
EN<br />
48<br />
BACK<br />
EXIT
Changing the USB class [USB Settings]<br />
When [USB Class] is selected:<br />
6 Press the + or − button to change the<br />
setting.<br />
USB Class<br />
Composite<br />
Storage<br />
BACK<br />
EXIT<br />
[Composite]: Setting when connected to the PC<br />
and used as an external memory device, USB<br />
speaker or microphone.<br />
[Storage]: Recognized as an external memory<br />
device from the PC.<br />
7 Press the PLAY/OK button to complete<br />
the setting.<br />
8 Press the F3 (EXIT) or 0 button to<br />
close the menu screen.<br />
3<br />
Changing the USB class<br />
Notes<br />
• When you first connect the recorder to your PC<br />
as an external storage device, the driver for the<br />
recorder will be automatically installed in your PC.<br />
• The PC cannot recognize when the recorder is<br />
connected to the PC when setting for the [USB<br />
Connect] is set to [AC Adapter].<br />
EN<br />
49
3<br />
Formatting the card<br />
Formatting the card [Format]<br />
Cards that have been used in non-<strong>Olympus</strong> devices,<br />
or cards that are not recognized by the recorder,<br />
must be formatted before they can be used with the<br />
recorder.<br />
To familiarize yourself with the formatting process,<br />
read the steps below.<br />
In terms of formatting, only selected cards can be<br />
formatted, the recorder’s menu settings cannot be<br />
initialized. The initialization of menu items should be<br />
set up through <strong>DS</strong>S Player or the recorder’s [Reset<br />
Settings].<br />
PLAY/OK<br />
PLAY/OK button<br />
+, −, 9 button<br />
2 Press the + or – button to select [Start]<br />
option.<br />
Format<br />
Start<br />
Cancel<br />
BACK<br />
3 Press the PLAY/OK button to confirm<br />
[Start] selection.<br />
Format<br />
Data will be<br />
cleared<br />
EXIT<br />
4 Press the + or – button again to select<br />
[Start] option.<br />
1 Select [Device Menu] at the [Format]<br />
screen, then press the PLAY/OK or 9<br />
button.<br />
• Refer to P.41 regarding each menu item<br />
settings.<br />
Device Menu<br />
Power Save<br />
Time & Date<br />
Battery<br />
USB 12 Settings<br />
Reset Settings<br />
Format<br />
BACK<br />
EXIT<br />
Format<br />
Are You Sure?<br />
Start<br />
Cancel<br />
BACK<br />
EXIT<br />
5 Press the PLAY/OK button again to<br />
initiate the formatting process.<br />
Format<br />
Format !<br />
Format<br />
Format Done<br />
EN<br />
50<br />
• [Format Done] displays when formatting<br />
ends.
Formatting the card [Format]<br />
Initializing the recorder’s menu settings<br />
[Reset Settings]<br />
To return the recorder’s menu settings to their<br />
original status from the time of purchase (initial<br />
settings), perform the setting from [Reset<br />
Settings] in the [Device Menu], or perform the<br />
same operation by using <strong>DS</strong>S Player.<br />
Device Menu<br />
Power Save<br />
Time & Date<br />
Battery<br />
USB Settings<br />
Reset Settings<br />
Format<br />
BACK<br />
EXIT<br />
Notes<br />
• The time required to format cards differs<br />
depending on the capacity of cards. Do not<br />
interrupt the formatting process by the following<br />
operations. Doing so will damage the data or card.<br />
- Remove the card.<br />
- Remove the batteries.<br />
• When the card is formatted, all the stored data,<br />
including locked files, are erased.<br />
• If an unformatted card is inserted, the recorder<br />
automatically displays the format option in the<br />
menu.<br />
• SD cards for which the SD card lock is enabled<br />
cannot be initialized.<br />
• Formatting on the recorder will be quick format.<br />
If you format the card, information of file<br />
management is refreshed and the data inside the<br />
card is not deleted completely. When handing<br />
over and disposing the card, be careful about the<br />
data leakage from the card. We recommend the<br />
card to be destroyed when you dispose the card.<br />
3<br />
Formatting the card<br />
EN<br />
51
Check system information [System info.]<br />
System information about the recorder like its<br />
[Model Name], [Version] and [Serial] can be<br />
displayed.<br />
In this recorder, you can check the card Information<br />
(☞ P.9) and file Information (☞ P.37).<br />
F1, F3 button<br />
3<br />
Check system information<br />
PLAY/OK<br />
PLAY/OK button<br />
9, 0 button<br />
1 Select [System info.] at the [Device<br />
Menu] screen, then press the PLAY/OK or<br />
9 button.<br />
• [Model Name] [Version] [Serial] will appear.<br />
• Refer to P.41 regarding each menu item<br />
settings.<br />
Device Menu<br />
Battery<br />
USB Settings<br />
Reset Settings<br />
Format 12<br />
Card info.<br />
System info.<br />
BACK<br />
EXIT<br />
System Info.<br />
Model Name<br />
<strong>DS</strong>-<strong>2500</strong><br />
Version<br />
1.00<br />
Serial<br />
123456789<br />
BACK<br />
EXIT<br />
2 Press the PLAY/OK, 0 or F1 (BACK)<br />
button.<br />
3 Press the F3(EXIT) or 0 button to close<br />
the menu screen.<br />
EN<br />
52
Managing files on your PC<br />
<strong>DS</strong>S Player Software<br />
The <strong>DS</strong>S Player is a fully featured software tool<br />
that provides a simple to use but sophisticated<br />
method of managing your recordings. Some of<br />
the features of the <strong>DS</strong>S Player are:<br />
• Automatic startup of the application by connecting<br />
the device.<br />
• Automatic download of Dictation by connecting<br />
the device.<br />
• Voice recorder’s menu setting.<br />
• Direct recording and editing of existing Dictation<br />
through Voice recorder’s button.<br />
Make sure that your computer meets the minimum<br />
requirements listed below.<br />
Minimum requirement<br />
Windows<br />
Operating System:<br />
Microsoft® Windows® XP:<br />
Professional / Home Edition SP3 x86<br />
Professional / Home Edition SP2 x64<br />
Microsoft® Windows Vista®:<br />
Ultimate / Enterprise / Business / Home<br />
Premium / Home Basic SP2 (both x86/64)<br />
Microsoft® Windows 7®:<br />
Ultimate / Enterprise / Professional / Home<br />
Premium (both x86/64)<br />
Ultimate / Enterprise / Professional / Home<br />
Premium SP1 (both x86/64)<br />
C P U :<br />
Microsoft® Windows® XP / Vista / 7: 1 GHz or higher<br />
R A M :<br />
Microsoft® Windows® XP:<br />
256 MB or more<br />
Microsoft® Windows Vista®:<br />
1 GB or more<br />
Microsoft® Windows 7®:<br />
1 GB or more (32 bit) / 2 GB or more (64 bit)<br />
Hard drive space:<br />
2 GB or more<br />
B r o w s e r :<br />
Microsoft Internet Explorer 6.0 or later<br />
D r i v e :<br />
CD-ROM, CD-R, CD-RW, DVD-ROM drive<br />
Display:<br />
800 x 600 pixels or more, 65,536 colors or more<br />
(16,770,000 colors or more is recommended)<br />
U S B p o r t :<br />
One or more free ports<br />
O t h e r s :<br />
With the Dictation Module, Transcription Module:<br />
A Microsoft WDM- or MME-compliant and<br />
Windows-compatible sound device<br />
Macintosh<br />
Operating System:<br />
Mac OS X 10.4.11 - 10.7<br />
C P U :<br />
PowerPC® G3 500 MHz or more,<br />
or Intel Core Solo/Duo 1.5 GHz or more<br />
R A M :<br />
256 MB or more (512 MB or more is recommended)<br />
Hard drive space:<br />
200 MB or more<br />
D r i v e :<br />
CD-ROM, CD-R, CD-RW, DVD-ROM drive<br />
B r o w s e r :<br />
Macintosh Safari 3.0.4 or later,<br />
mozilla Firefox 3.6.20 or later<br />
Display:<br />
1024 x 768 pixels or more, 32,000 colors or more<br />
USB port:<br />
One or more free ports<br />
O t h e r s :<br />
Audio device<br />
Notes<br />
• Even if the above conditions are satisfied,<br />
self-modified computers, self-upgraded OS or<br />
multiple OS environments are not supported.<br />
• Macintosh version does not support voice<br />
recognition software.<br />
• For information on the latest OS upgrades<br />
compatibility, visit the <strong>Olympus</strong> Web page at<br />
http://www.olympus-global.com/en/global/ .<br />
4<br />
<strong>DS</strong>S Player Software<br />
EN<br />
53
Installing software<br />
Be sure to confirm the following before installation:<br />
• Exit all running applications.<br />
• Eject the floppy disk if you are using one.<br />
• If you are running Windows XP/Vista/7 or Mac OS X on the network, you need to log on as an Administrator.<br />
4<br />
Installing software<br />
W i n d o w s<br />
For the Windows version, there is an installation<br />
method for individuals and one for administrators to<br />
install on multiple client PCs.<br />
An explanation of the installation method for<br />
individuals installing the software on a single PC will<br />
be provided here.<br />
1 Insert <strong>Olympus</strong> <strong>DS</strong>S Player CD into the<br />
CD-ROM drive.<br />
• The installation program will start<br />
automatically.<br />
If the installation program does not start<br />
automatically, browse your CD-ROM drive and<br />
execute [launcher.exe].<br />
2 The launcher will startup.<br />
• Select the language you would like to install<br />
from the upper-left pull-down menu and click<br />
[<strong>DS</strong>S Player Standard Installation].<br />
3 The Install Wizard will begin.<br />
• Once you have consented to the licensing<br />
agreement, enter your name, company name,<br />
and license ID number (serial number).<br />
The license ID number is printed on the license<br />
ID card included inside the recorder package.<br />
4 Proceed with the installation according<br />
to the instructions on the screen.<br />
Macintosh<br />
1 Insert <strong>Olympus</strong> <strong>DS</strong>S Player CD into the<br />
CD-ROM drive.<br />
2 Double-click the CD icon.<br />
3 Double-click the setup icon.<br />
• The Install Wizard will begin.<br />
Once you have consented to the<br />
licensingagreement, follow the instructions<br />
on the screen to complete the installation.<br />
4 Proceed with the installation according<br />
to the instructions on the screen.<br />
5 You will be requested to restart, so<br />
conduct a restart by following the<br />
instructions.<br />
EN<br />
54
Uninstalling software<br />
Using online help<br />
Window<br />
1 Exit <strong>DS</strong>S Player program.<br />
2 Click the [start] button on the taskbar.<br />
3 Select [Add/Remove programs] from the<br />
[Control Panel].<br />
• A list of installed applications is displayed.<br />
4 Select [<strong>Olympus</strong> <strong>DS</strong>S Player Standard],<br />
then click the [Change/Remove] button.<br />
5 Proceed with the uninstallation<br />
according to the instructions on the<br />
screen.<br />
Macintosh<br />
1 Exit <strong>DS</strong>S Player program.<br />
2 Double-click [<strong>DS</strong>S Uninstaller] in<br />
[Application] { [<strong>DS</strong>S Player] folder.<br />
• An uninstaller is displayed.<br />
3 Proceed with the uninstallation<br />
according to the instructions on the<br />
screen.<br />
Note<br />
• The dictation files you made are stored in the<br />
[MESSAGE] folder. If you don’t need them, delete<br />
them.<br />
You can confirm the location of the [MESSAGE]<br />
folder by clicking on [Options] in the [Tools]<br />
menu before uninstalling.<br />
For information on the <strong>DS</strong>S Player usage and<br />
features, refer to the Online help.<br />
To start online Help:<br />
Windows<br />
1 Click the [start] button, then select<br />
[All Programs], [<strong>Olympus</strong> <strong>DS</strong>S Player<br />
Standard], [Dictation Module Help].<br />
2 While <strong>DS</strong>S Player is running, select the<br />
[Help] menu, [Contents].<br />
3 While <strong>DS</strong>S Player is running, press F1 on<br />
the keyboard.<br />
Macintosh<br />
1 While <strong>DS</strong>S Player software is running,<br />
select [ <strong>DS</strong>S Player Help ] from the [ Help ]<br />
menu.<br />
Note<br />
• The Online help will be available after <strong>DS</strong>S Player<br />
software installation.<br />
4<br />
Uninstalling software / Using online help<br />
EN<br />
55
Connecting recorder to PC<br />
Connecting to your PC using the USB cable<br />
1 Boot the PC.<br />
2 Connect the USB cable to the USB port of the PC.<br />
3 Connect the USB cable to the connecting terminal on the<br />
bottom of the recorder.<br />
• [ Remote (Composite)] is displayed on the recorder if the USB cable is<br />
connected.<br />
Once you connect the recorder to your PC, the recorder will be powered<br />
through the USB cable.<br />
While PC connection, the SD card is recognized as the respective<br />
removable disk drive.<br />
4<br />
Connecting recorder to PC<br />
Notes<br />
• NEVER remove the card or disconnect the USB cable while the record<br />
indicator light is flashing. If you do, the data will be destroyed.<br />
• Some PC’s may not supply sufficient power and the recorder fails to<br />
connect. Refer to your PC user’s manual regarding the USB port on your<br />
PC.<br />
• Do not connect the recorder to a PC by using a USB hub. Make sure to<br />
connect to a USB port on your PC.<br />
• Make sure to push the cable connector all the way in. Otherwise, the<br />
recorder may not operate properly.<br />
EN<br />
56
Connecting recorder to PC<br />
Disconnecting from your PC<br />
Windows<br />
1 Click [ ] on the task bar located at the<br />
lower-right corner of the screen. Click<br />
[Safely remove USB Mass Storage<br />
Device].<br />
• The drive letter will differ depending on the<br />
PC being used.<br />
2 Confirm that the record indicator light<br />
turns off before disconnecting the USB<br />
cable.<br />
Macintosh<br />
1 Move the icon of the recorder's drive<br />
displayed on desktop to trash box by<br />
drag and drop.<br />
2 Disconnect the USB cable.<br />
Notes<br />
• NEVER remove the card or disconnect the USB<br />
cable while the record indicator light is flashing. If<br />
you do, the data on the card will get destroyed.<br />
• Some PC’s may not supply sufficient power and<br />
the recorder fails to connect. Refer to your PC<br />
user’s manual regarding the USB port on your PC.<br />
• Do not connect the recorder to a PC by using a<br />
USB hub. Make sure to connect to a USB port on<br />
your PC.<br />
• Make sure to push the cable connector all the<br />
way in. Otherwise, the recorder may not operate<br />
properly.<br />
• This is an operational environment for saving the<br />
files recorded by this recorder to your PC with USB<br />
connection.<br />
• Even if operational environment is satisfied, we<br />
do not support upgraded OS, the multi-boot<br />
environment or self-modified computers.<br />
4<br />
Connecting recorder to PC<br />
EN<br />
57
Running <strong>DS</strong>S Player Software<br />
4<br />
Running <strong>DS</strong>S Player Software<br />
By default, connecting the recorder to your PC, will<br />
start the application automatically.<br />
Windows<br />
Disabling automatic start:<br />
1 Right-click the Device Detector in the<br />
System Tray in the lower right-hand<br />
corner of the screen, then select<br />
[Settings startup application].<br />
2 Click [<strong>DS</strong>S Player Standard].<br />
• The check mark on [<strong>DS</strong>S Player Standard]<br />
disappears.<br />
Manual start:<br />
1 Click the [start] button, then select [All<br />
Programs].<br />
• All program menu will be displayed.<br />
2 Select [<strong>Olympus</strong> <strong>DS</strong>S Player Standard],<br />
then click [Dictation Module].<br />
Macintosh<br />
Disabling automatic start:<br />
1 Click the Dock’s System Preferences.<br />
2 Click Device Detector.<br />
3 Turn the automatic startup setting Off.<br />
Manual start:<br />
1 Double click the <strong>DS</strong>S Player icon for the<br />
folder in [Application] { [<strong>DS</strong>S Player].<br />
• All program menu will be displayed.<br />
2 Register user information.<br />
• The user’s registration screen will be displayed<br />
at the time of initial startup. Please input the<br />
serial number. Please see the seal attached<br />
to the CD-ROM package included with the<br />
<strong>DS</strong>S Player, for the serial number. After the<br />
input has ended, click [OK] to complete the<br />
registration.<br />
EN<br />
58
Other practical use methods<br />
Using as external memory of the computer<br />
When the recorder is connected to your PC, it will be<br />
recognized on your PC as a removable drive.<br />
You can view and access the recorder card from My<br />
Computer and download data from the card to your<br />
PC using standard windows copy/move and delete<br />
commands. You can also upload data from the PC to<br />
the card in the recorder in the same way.<br />
Example: Copying Data from PC to Card Using Explorer<br />
or Finder<br />
1 Connecting the recorder to your PC.<br />
• For connection procedure, refer to<br />
“Connecting to Your PC Using the USB<br />
Cable” (☞ P.56).<br />
2 Open Windows Explorer or Finder<br />
window.<br />
• [Removable disk] is displayed.<br />
3 Copy the data.<br />
• The recorder will appear as a removable drive<br />
icon.<br />
4 Unplug the recorder from a computer.<br />
Note<br />
• NEVER remove the card or disconnect the USB<br />
cable while the record indicator light is flashing.<br />
If you do, the data on the card will get destroyed.<br />
5<br />
Using as external memory of the computer<br />
EN<br />
59
Other information<br />
Alarm message list<br />
M e s s a g e E x p l a n a t i o n A c t i o n<br />
[Battery Low]<br />
Battery power is getting low.<br />
Charge the batteries or replace with new<br />
batteries (☞ P.12, P.14, P.15).<br />
[File Protected] Attempt to delete a locked file. Unlock the file from the file menu (☞ P.42).<br />
[Index Full]<br />
The file is full of index marks (maximum of 32<br />
marks).<br />
Erase index marks that are no longer required<br />
(☞ P.38).<br />
[Folder Full]<br />
[Erase Error]<br />
The folder is full of files (maximum of 200 files).<br />
The destination folder already has the maximum<br />
number of files (200).<br />
An error occurred while erasing.<br />
Erase unnecessary files (☞ P.32).<br />
Erase unnecessary files (☞ P.32).<br />
Erase once again.<br />
When an Erase Error occurs format the card .<br />
[Card Error] An incompatible card was inserted. Insert a compatible card (☞ P.19).<br />
6<br />
Alarm message list<br />
[Unsupported Card] The card cannot be used with this recorder. Please remove the card.<br />
[Memory Full]<br />
The card has no remaining memory.<br />
Erase files that are no longer required or insert<br />
another card.<br />
[Format Error] There was an error while formatting the card. Reformat the card (☞ P.50).<br />
[System Error]<br />
System error detected in the recorder.<br />
[Insert Card] There is no card inserted. Insert a card (☞ P.19).<br />
This is a malfunction. Contact the place of<br />
purchase or <strong>Olympus</strong> Service Center for repair.<br />
[Can’t make the system<br />
file. Connect to PC<br />
and delete<br />
unnecessary file]<br />
The management file cannot be created due to<br />
insufficient space on the card.<br />
Connect the recorder to a computer and delete<br />
unnecessary files.<br />
EN<br />
60
Troubleshooting<br />
Sy m p t o m P r o b a b l e c a u s e A c t i o n<br />
Nothing appears on<br />
the display<br />
Won’t start<br />
Unable to record<br />
The batteries are not loaded properly.<br />
The batteries are dead.<br />
The recorder is in power off mode.<br />
The recorder is in power off mode.<br />
The batteries are dead.<br />
The card does not have enough memory.<br />
The card is unformatted.<br />
The maximum number of files has been<br />
reached.<br />
The SD card is locked.<br />
Verify polarity is correct ( ☞ P.12).<br />
Charge the batteries or replace with new<br />
batteries (☞ P.12, P.14, P.15).<br />
Turn the power on ( ☞ P.17).<br />
Turn the power on ( ☞ P.17).<br />
Charge the batteries or replace with new<br />
batteries (☞ P.12, P.14, P.15).<br />
Erase unnecessary files or insert another card<br />
(☞ P.19, P.32).<br />
Format the card (☞ P.50).<br />
Change to any other folder (☞ P.36).<br />
Unlock the SD card lock.<br />
No playback tone<br />
heard<br />
Unable to erase<br />
Noise heard during<br />
playback<br />
Recording level too<br />
low<br />
The earphone is connected.<br />
The volume level is set to [00].<br />
The file is locked.<br />
The SD card is locked.<br />
Unplug the earphones to use the internal<br />
speaker.<br />
Adjust the volume level ( ☞ P.30).<br />
Unlock the file from the file menu (☞ P.42).<br />
Unlock the SD card lock.<br />
The recorder was shaken during recording. ———<br />
The recorder was placed near a cell phone or<br />
fluorescent lamp while recording or during<br />
playback.<br />
The microphone sensitivity is too low.<br />
Move the recorder.<br />
Set the microphone sensitivity to Conference<br />
mode and try again (☞ P.27).<br />
6<br />
Troubleshooting<br />
EN<br />
61
Troubleshooting/Technical assistance and support<br />
Sy m p t o m P r o b a b l e c a u s e A c t i o n<br />
Unable to set index<br />
marks<br />
The maximum number of index marks (32) has<br />
been reached.<br />
The file is locked.<br />
The SD card is locked.<br />
Erase unnecessary index marks (☞ P.38).<br />
Unlock the file from the file menu (☞ P.42).<br />
Unlock the SD card lock.<br />
Cannot recharge<br />
[Battery] is set to [Alkaline].<br />
You have not pressed the PLAY/OK button.<br />
[USB Class] is set to [Composite].<br />
When using the supplied rechargeable batteries,<br />
set the battery setting to [Ni-MH]. Also,<br />
please avoid using the batteries outside the<br />
recommended temperature range (☞ P.13, P.16).<br />
When using the USB connection, follow the<br />
confirmation display and press the PLAY/OK<br />
button.<br />
Stop the operation on the recorder. Charge will<br />
start 1 minute after the end of the operation.<br />
Please close the applications in use.<br />
6<br />
Troubleshooting/<br />
Technical assistance and support<br />
EN<br />
62<br />
Cannot find the<br />
recorded file<br />
Cannot connect to<br />
a PC<br />
Wrong folder.<br />
Sometimes a connection cannot be made with<br />
some PCs running Windows XP or Vista.<br />
Technical assistance and support<br />
Switch to the right folder (☞ P.36).<br />
You need to change the PC’s USB settings. See<br />
<strong>DS</strong>S Player Online help for details (☞ P.55).<br />
The following are contact information for technical support for <strong>Olympus</strong> recorders and software only.<br />
s Technical Hotline Number in the U.S. and Canada<br />
1-888-553-4448<br />
s User Support E-mail address in the U.S. and Canada<br />
distec@olympus.com<br />
s Technical Hotline Number in Europe<br />
Toll free number: 00800 67 10 83 00<br />
available for Austria, Belgium, Denmark, Finland, France, Germany, Italy, Luxemburg, Netherlands, Norway,<br />
Portugal, Spain, Sweden, Switzerland, United Kingdom<br />
Charged numbers for the Rest of Europe<br />
+ 49 180 567 1083<br />
+ 49 40 23773 4899<br />
s User Support E-mail address in Europe<br />
Audio.Support@olympus-europa.com
Accessories (optional)<br />
s Headset: E62, E102<br />
Stereo headset for your PC. A helpful tool for PC<br />
based transcription.<br />
s Monaural binaural earphone: E20<br />
s Noise-cancellation microphone: ME12<br />
(Dictation microphone)<br />
Used to get crisp recordings of your own voice by<br />
reducing the effects of ambient noise.<br />
Recommended to improve the accuracy when<br />
using voice-recognition software.<br />
s External microphone: ME15<br />
A lavalier omni-directional microphone that clips<br />
to clothing. Used to record your own voice or<br />
people near you.<br />
s Highly sensitive noise-cancellation<br />
monaural microphone: ME52W<br />
This microphone is used to record sound at a<br />
distance while minimizing surrounding noise.<br />
s Connecting cord: KA333<br />
Use to connect the microphone jack of the<br />
recorder to a radio or other sound source.<br />
s Telephone pickup microphone: TP8<br />
Earphone type microphone can be plugged into<br />
your ear while phoning. The voice or conversation<br />
over the phone can be clearly recorded.<br />
s Ni-MH rechargeable battery and charger<br />
set: BC400 (Europe only)<br />
BC400 comes with an Ni-MH rechargeable battery<br />
charger (BU-400) and 4 Ni-MH rechargeable<br />
batteries (BR401) as a pack. This charger can quick<br />
charge <strong>Olympus</strong> AA or AAA Ni-MH rechargeable<br />
batteries.<br />
s Ni-MH rechargeable battery: BR404<br />
High-efficiency rechargeable long life batteries.<br />
s USB connecting AC adapter: A514<br />
DC5V AC Adapter for USB connection.<br />
s Docking Station: CR10<br />
6<br />
Accessories (optional)<br />
EN<br />
63
Specifications<br />
6<br />
Specifications<br />
EN<br />
64<br />
G e n e r a l p o i n t s<br />
4 Recording format:<br />
<strong>DS</strong>2 (Digital Speech Standard Pro)<br />
4 Recording media:<br />
SD-card: 512 MB to 32 GB<br />
4 Input level:<br />
- 70 dBv<br />
4 Sampling frequency:<br />
[ QP ] mode: 16 kHz<br />
[ SP ] mode: 12 kHz<br />
4 Overall frequency response:<br />
[ QP ] mode: 200 Hz to 7,000 Hz<br />
[ SP ] mode: 200 Hz to 5,000 Hz<br />
4 Recording time (2 GB Card):<br />
[QP ] mode: 148 h.<br />
[ SP ] mode: 303 h.<br />
4 Guide to battery life<br />
The following values are strictly references.<br />
Alkaline batterie<br />
During recording mode<br />
(Built-in microphone):<br />
[QP ] mode: Approx. 40 h.<br />
[ SP ] mode: Approx. 50 h.<br />
During playback mode<br />
(Earphone playback):<br />
All mode: Approx. 48 h.<br />
Ni-MH rechargeable batteries<br />
During recording mode<br />
(Built-in microphone):<br />
[QP ] mode: Approx. 30 h.<br />
[ SP ] mode: Approx. 37 h.<br />
During playback mode<br />
(Earphone playback):<br />
All mode: Approx. 35 h.<br />
4 Speaker:<br />
Built-in ø23mm round dynamic speaker<br />
4 MIC/EAR jack:<br />
ø3.5 mm mini-jack, impedance<br />
MIC 2 kΩ, EAR 8 Ω or more<br />
4 Maximum working output (3 V DC):<br />
300 mW or more (8 Ω speaker)<br />
4 Maximum headphone output:<br />
≤_ 150 mV (according to EN 50332-2)<br />
4 Input power requirement:<br />
Batteries: Two AAA batteries (LR03) or<br />
two Ni-MH rechargeable batteries<br />
External power supply:<br />
USB connecting AC adapter (A514) 5 V<br />
4 External dimensions:<br />
113.5 mm × 50.0 mm × 17 mm<br />
(without protrusions)<br />
4 Weight:<br />
105 g (Including alkaline batteries)<br />
4 Operating temperature:<br />
0°C - 42°C/ 32°F - 107.6°F<br />
Memory sizes of cards and approximate recording<br />
times *1<br />
Memory size [QP] mode [SP] mode<br />
512 MB 37.5 hr. 77 hr.<br />
1 GB 73 hr. 150 hr. *2<br />
2 GB 148 hr. *2 303 hr. *2<br />
4 GB 290 hr. *2 595 hr. *2<br />
8 GB 588 hr. *2 1205 hr. *2<br />
16 GB 1178 hr. *2 2413 hr. *2<br />
32 GB 2363 hr. *2 4843 hr. *2<br />
The above are the standard times, and the available<br />
recording time will vary depending on the card.<br />
*1: Available recording time for one continuous file.<br />
Available recording time may be shorter if many<br />
short recordings are made.<br />
*2: Total recording time of several files. The maximum<br />
recording time per file is 99 hours 59 minutes.<br />
Specifications and design are subject to change<br />
without notice.<br />
Battery life is measured by <strong>Olympus</strong>. It varies<br />
greatly according to the type of batteries used<br />
and the conditions of use.
OLYMPUS IMAGING CORP.<br />
Shinjuku Monolith, 3-1 Nishi-Shinjuku 2-chome, Shinjuku-ku, Tokyo 163-0914, Japan.<br />
Tel. +81 (0)3-3340-2111<br />
http://www.olympus.com<br />
OLYMPUS IMAGING AMERICA INC.<br />
3500 Corporate Parkway, P.O. Box 610, Center Valley, PA 18034-0610, U.S.A. Tel. 1-888-553-4448<br />
http://www.olympusamerica.com<br />
U1-BS1123-02<br />
AP1203