4 6 5 - Support Home Page - Kodak
4 6 5 - Support Home Page - Kodak
4 6 5 - Support Home Page - Kodak

You also want an ePaper? Increase the reach of your titles
YUMPU automatically turns print PDFs into web optimized ePapers that Google loves.
CAMEO<br />
SHARP FOCUS<br />
CÁMERA<br />
Need help with your camera? Call <strong>Kodak</strong> (United States only) toll<br />
free from 8:00 a.m. to 8:00 p.m. (Eastern time) Monday through<br />
Friday at 1 (800) 242-2424.<br />
ENGLISH<br />
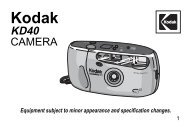
Congratulations! And thank you for buying a KODAK CAMEO<br />
Camera. Your new compact, auto-focus 35 mm camera with<br />
motorized film advance and auto-film rewind, makes taking<br />
pictures easy. The camera uses any DX/DXN, 35 mm color or<br />
black-and-white print film with a speed of ISO 100, 200, 400,<br />
or 1000.<br />
For warranty purposes, please keep your sales receipt<br />
as proof of the date of purchase.<br />
SPECIFICATIONS<br />
Type: Compact, auto-focus 35 mm camera<br />
LCD Panel: Display indicators for red-eye reduction, fill-flash/<br />
flash-charging, flash-off, infinity-focus, self-timer, and the<br />
frame number and battery symbol<br />
Lens: 28 mm, f/4.5; 3-element glass lens<br />
Focus System: 4 zone active infrared AF system with focus<br />
lock; optional infinity-focus mode<br />
Viewfinder: Reverse-Galilean with bright line field of view and<br />
AF aiming indicator; panoramic masking in panoramic mode<br />
Film Speed: DX (ISO) 100 – 1000 for color or black-andwhite<br />
print film<br />
Focus Range: Daylight: 2.5 ft. (0.8 m) to infinity<br />
Flash Unit: Electronic with ISO 100/21˚, guide number of<br />
26 ft (8 m); flash automatically turns on at low-light levels<br />
Aperture: f/13 – f/4.5<br />
Shutter: 1/150 to 1.2 sec<br />
Power Source: one 3-volt lithium KODAK K123LA (or<br />
equivalent) Battery<br />
Dimensions: 4.9 x 2.7 x 1.3 in. (123.5 x 68.8 x 32.7 mm)<br />
Weight: 6 oz. (170 g)<br />
This device complies with part 15 of the FCC Rules. Operation<br />
is subject to the following two conditions:<br />
(1) this device may not cause harmful interference, and<br />
(2) this device must accept any interference received,<br />
including interference that may cause undesired operation.<br />
NOTE: Your model camera has been tested and found to comply<br />
with the limits for a Class B digital device, pursuant to Part 15 of<br />
the FCC Rules. These limits provide reasonable protection<br />
against interference in residential use. The camera generates,<br />
uses and can radiate radio frequency energy and, if not used in<br />
accordance with the instructions, may cause interference to radio<br />
communications. There is no guarantee that interference will not<br />
occur. If this camera does cause interference to radio or<br />
television reception, which can be determined by turning the<br />
camera off and on, you may reduce the interference by the<br />
following:<br />
— Reorient or relocate the receiving antenna.<br />
— Increase the separation between the camera and the<br />
receiver.<br />
— Consult the dealer or an experienced radio/television<br />
technician for help.<br />
Changes or modifications not approved by the party responsible<br />
for compliance could void the user’s authority to operate the<br />
equipment.<br />
© Eastman <strong>Kodak</strong> Company, 1997<br />
Consumer Imaging<br />
EASTMAN KODAK COMPANY • Rochester, NY 14650<br />
<strong>Kodak</strong> and Cameo 1-97<br />
Pt. No. 8B9641 are trademarks. Printed in China.<br />
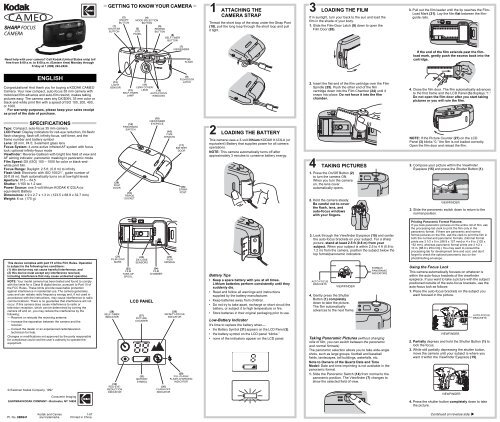
GETTING TO KNOW YOUR CAMERA<br />
(2)<br />
ON/OFF<br />
BUTTON<br />
(1)<br />
SHUTTER<br />
BUTTON<br />
(13)<br />
LIGHT<br />
SENSOR<br />
(20)<br />
FILM<br />
DOOR<br />
(26)<br />
SELF-TIMER<br />
INDICATOR<br />
F I L M T I P<br />
(21)<br />
FILM-LOAD<br />
MARK<br />
(32)<br />
RED-EYE-<br />
REDUCTION<br />
INDICATOR<br />
ON/OFF<br />
(12)<br />
SELF-TIMER<br />
LAMP<br />
(14)<br />
PANORAMIC<br />
SWITCH<br />
(19)<br />
TRIPOD<br />
SOCKET<br />
P<br />
C<br />
(22)<br />
FILM<br />
TAKE-UP<br />
SPOOL<br />
(4)<br />
MODE-SELECTION<br />
BUTTON<br />
(3)<br />
LCD<br />
PANEL<br />
P<br />
C<br />
LCD PANEL<br />
(27)<br />
PICTURE<br />
COUNTER<br />
(31)<br />
BATTERY<br />
SYMBOL<br />
( )<br />
MODE<br />
(11)<br />
LENS COVER/<br />
LENS<br />
( )<br />
(23)<br />
DX-CODE<br />
SENSORS<br />
(5)<br />
REWIND<br />
BUTTON<br />
(6)<br />
SELF-TIMER<br />
BUTTON<br />
(10)<br />
AUTO-FOCUS<br />
WINDOWS<br />
(15)<br />
VIEWFINDER<br />
EYEPIECE<br />
(24)<br />
FILM<br />
CHAMBER<br />
(16)<br />
FILM<br />
WINDOW<br />
(25)<br />
FILM<br />
SPINDLE<br />
(7)<br />
VIEWFINDER<br />
(17)<br />
BATTERY<br />
DOOR<br />
(18)<br />
STRAP<br />
POST<br />
(28)<br />
INFINITY-FOCUS<br />
INDICATOR<br />
(8)<br />
FLASH<br />
(9)<br />
FILM-DOOR<br />
LATCH<br />
(29)<br />
FILL-FLASH/<br />
FLASH-CHARGING<br />
INDICATOR<br />
(30)<br />
FLASH-OFF<br />
INDICATOR<br />
1<br />
ATTACHING THE<br />
CAMERA STRAP<br />
Thread the short loop of the strap under the Strap Post<br />
(18); pull the long loop through the short loop and pull<br />
it tight.<br />
2<br />
LOADING THE BATTERY<br />
This camera uses a 3-volt lithium KODAK K123LA (or<br />
equivalent) Battery that supplies power for all camera<br />
operations.<br />
NOTE: This camera automatically turns off after<br />
approximately 3 minutes to conserve battery energy.<br />
Battery Tips<br />
• Keep a spare battery with you at all times.<br />
Lithium batteries perform consistently until they<br />
suddenly die.<br />
• Read and follow all warnings and instructions<br />
supplied by the battery manufacturer.<br />
• Keep batteries away from children.<br />
• Do not try to take apart, recharge or short circuit the<br />
battery, or subject it to high temperature or fire.<br />
• Store batteries in their original packaging prior to use.<br />
Low-Battery Indicator<br />
It’s time to replace the battery when—<br />
• the Battery Symbol (31) appears on the LCD Panel (3).<br />
• the battery symbol on the LCD panel “blinks.”<br />
• none of the indicators appear on the LCD panel.<br />
3<br />
LOADING THE FILM<br />
If in sunlight, turn your back to the sun and load the<br />
film in the shade of your body.<br />
1. Slide the Film-Door Latch (9) down to open the<br />
Film Door (20).<br />
2. Insert the flat end of the film cartridge over the Film<br />
Spindle (25). Push the other end of the film<br />
cartridge down into the Film Chamber (24) until it<br />
snaps into place. Do not force it into the film<br />
chamber.<br />
4<br />
F I L M T I P<br />
P<br />
C<br />
TAKING PICTURES<br />
1. Press the On/Off Button (2)<br />
to turn the camera ON.<br />
When you turn the camera<br />
on, the lens cover<br />
automatically opens.<br />
2. Hold the camera steady.<br />
Be careful not to cover<br />
the flash, lens, and<br />
auto-focus windows<br />
with your fingers.<br />
3. Look through the Viewfinder Eyepiece (15) and center<br />
the auto-focus brackets on your subject. For a sharp<br />
picture, stand at least 2.5 ft (0.8 m) from your<br />
subject. When your subject is within 2.5 to 4 ft (0.8 to<br />
1.2 m) from the camera, position the subject below the<br />
top format/panoramic indicators.<br />
AUTO-FOCUS<br />
BRACKETS<br />
4. Gently press the Shutter<br />
Button (1) completely<br />
down to take the picture.<br />
The film automatically<br />
advances to the next frame.<br />
( )<br />
VIEWFINDER<br />
P<br />
C<br />
MODE<br />
ON/OFF<br />
FORMAT/<br />
PANORAMIC<br />
INDICATORS<br />
Taking Panoramic Pictures (without changing<br />
rolls of film, you can switch between the panoramic<br />
and normal formats)<br />
The panoramic selection allows you to take wide-angle<br />
shots, such as large groups, football and baseball<br />
fields, landscapes, tall buildings, waterfalls, etc.<br />
Note to Owners of the Quartz Date and Time<br />
Model: Date and time imprinting is not available in the<br />
panoramic format.<br />
1. Slide the Panoramic Switch (14) from normal to the<br />
panoramic position. The Viewfinder (7) changes to<br />
show the selected field of view.<br />
ON/OFF<br />
3. Pull out the film leader until the tip reaches the Film-<br />
Load Mark (21). Lay the film flat between the filmguide<br />
rails.<br />
F I L M T I P<br />
P<br />
C<br />
If the end of the film extends past the filmload<br />
mark, gently push the excess back into the<br />
cartridge.<br />
4. Close the film door. The film automatically advances<br />
to the first frame and the LCD Panel (3) displays “1.”<br />
Do not open the film door after you start taking<br />
pictures or you will ruin the film.<br />
P<br />
C<br />
NOTE: If the Picture Counter (27) on the LCD<br />
Panel (3) blinks “0,” the film is not loaded correctly.<br />
Open the film door and reload the film.<br />
2. Compose your picture within the Viewfinder<br />
Eyepiece (15) and press the Shutter Button (1).<br />
VIEWFINDER<br />
3. Slide the panoramic switch down to return to the<br />
normal position.<br />
( )<br />
Printing Panoramic Format Pictures:<br />
If you took panoramic pictures on the entire roll of film, ask<br />
the processing-lab clerk to print the film only in the<br />
panoramic format. If there are panoramic and normal<br />
format pictures on the film, ask the clerk to print the film in<br />
both the normal and panoramic formats. (Normal format<br />
prints are 3 1/2 x 5 in. [88.9 x 127 mm] or 4 x 6 in. [102 x<br />
152 mm], whereas panoramic format prints are 3 1/2 x<br />
10 in. [88.9 x 254 mm].) You may want to consult the<br />
processing lab for development time and cost, and don’t<br />
forget to check the optional panoramic box on the<br />
photofinishing envelope.<br />
Using the Focus Lock<br />
This camera automatically focuses on whatever is<br />
within the auto-focus brackets of the viewfinder<br />
eyepiece. If you want to take a picture with the subject<br />
positioned outside of the auto-focus brackets, use the<br />
auto-focus lock as follows:<br />
1. Place the auto-focus brackets on the subject you<br />
want focused in the picture.<br />
VIEWFINDER<br />
2. Partially depress and hold the Shutter Button (1) to<br />
lock the focus.<br />
3. While still partially depressing the shutter button,<br />
move the camera until your subject is where you<br />
want it within the Viewfinder Eyepiece (15).<br />
VIEWFINDER<br />
4. Press the shutter button completely down to take<br />
the picture.<br />
Continued on reverse side<br />
MODE<br />
ON/OFF<br />
▼<br />
AUTO-FOCUS<br />
BRACKETS
4 TAKING PICTURES<br />
TAKING FLASH PICTURES 6 UNLOADING THE FILM<br />
(Continued)<br />
Using the Self-Timer<br />
When you want to include yourself in the picture, use the<br />
self-timer feature.<br />
1. Use the Tripod Socket (19) to attach the camera to a<br />
tripod, or place the camera on another firm support.<br />
2. Press the On/Off Button (2) to turn the camera ON.<br />
3. Press the Self-Timer Button (6). The Self-Timer<br />
Indicator (26) appears on the LCD Panel (3) and the<br />
Self-Timer Lamp (12) glows red.<br />
4. Compose your picture and press the Shutter<br />
Button (1).The self-timer lamp “blinks” approximately<br />
10 seconds before the picture is taken. After you<br />
take the picture, the self-timer automatically turns off.<br />
ON/OFF<br />
( )<br />
NOTE: If you want to stop the self-timer operation before<br />
the picture is taken, repress the self-timer button or turn<br />
the camera off.<br />
Using the Infinity-Focus Mode<br />
To capture sharp, distant scenery, use the infinity-focus<br />
mode.<br />
1. Press the On/Off Button (2) to turn the camera ON.<br />
2. Press the Mode-Selection Button (4) to select infinity<br />
focus. Make sure the Infinity-Focus Indicator (28)<br />
appears on the LCD Panel (3).<br />
MODE<br />
( )<br />
MODE<br />
3. Press the Shutter Button (1) to take the picture.<br />
NOTE: The camera automatically returns to the<br />
auto-flash/start position after you take the picture.<br />
Tips for Better Pictures<br />
• Keep you pictures simple. Move close enough to your<br />
subject so it fills the viewfinder but not closer than<br />
2.5 ft (0.8 m) .<br />
• Take pictures at the subject’s level. Kneel down to take<br />
pictures of children and pets.<br />
• Hold your camera vertically to capture tall, narrow<br />
subjects, such as a waterfall, skyscraper, or single<br />
person.<br />
• Add interest to your picture by framing it with a tree<br />
branch, a window, or even the rails of a fence.<br />
• Keep the sun behind you. This provides best subject<br />
illumination.<br />
MODE<br />
ON/OFF<br />
ON/OFF<br />
5<br />
In dim light, such as indoors or outdoors in heavy<br />
shade or on dark overcast days, you need flash. Your<br />
camera features automatic flash that fires when you<br />
need it.<br />
1. Press the On/Off Button (2) to turn the camera ON.<br />
2. Keep the subject within the distance range for the<br />
speed of the film in your camera (see table below).<br />
Be careful not to cover the flash, lens, and autofocus<br />
windows with your fingers.<br />
3. Press the Shutter Button (1) partway down. If the<br />
Flash-Charging Indicator (29) on the LCD Panel (3)<br />
“blinks,” the flash is not fully charged. Wait for the<br />
blinking to stop and the indicator to disappear before<br />
you take the picture.<br />
4. Press the shutter button completely down to take<br />
the picture.<br />
Flash-to-Subject Distance<br />
ISO Film Speed Flash-to-Subject Distance<br />
100 2.5 to 12 ft (0.8 to 3.7 m)<br />
200 2.5 to 13 ft (0.8 to 4.0 m)<br />
400 3.3 to 18 ft (1.0 to 5.6 m)<br />
1000 5.2 to 29 ft (1.6 to 8.9 m)<br />
Using the Red-Eye Reduction<br />
Some people’s eyes (and some pets’) can reflect flash<br />
with a red glow. To minimize red eye in flash or fillflash<br />
pictures, use the red-eye-reduction feature.<br />
1. Press the On/Off Button (2) to turn the camera ON.<br />
2. Press the Mode-Selection Button (4) once to move<br />
to the red-eye-reduction position. Make sure the<br />
Red-Eye-Reduction Indicator (32) appears on the<br />
LCD Panel (3).<br />
MODE<br />
( )<br />
ON/OFF<br />
ON/OFF<br />
3. Press the Shutter Button (1) to take the picture.<br />
4. To cancel the red-eye-reduction feature, turn the<br />
camera off or press the mode-selection button to<br />
return to the auto-flash/start position.<br />
NOTE: When you take flash pictures using this<br />
feature, the camera fires a short flash before the<br />
picture is taken. The subject’s eye pupil closes<br />
partially to reduce the red-eye effect.<br />
Using the Fill Flash and Flash Off<br />
Fill Flash — Bright light indoors or outdoors from<br />
backlit subjects can create dark shadows (especially<br />
on faces) in high-contrast scenes. Use fill flash to<br />
lighten these shadows.<br />
Flash Off — When you do not want to use the<br />
flash, especially indoors where flash is prohibited,<br />
such as in theaters and museums, or in dim lighting<br />
situations, use flash off. Use a tripod (tripod<br />
socket [19]) or place the camera on another firm<br />
support.<br />
1. Press the On/Off Button (2) to turn the camera ON.<br />
2. Press the Mode-Selection Button (4) to select fill<br />
flash (29) or flash off (30). Make sure the correct<br />
indicator for the selected mode appears on the LCD<br />
Panel (3).<br />
3. Press the Shutter Button (1) to take the picture.<br />
NOTE: The camera automatically returns to the autoflash/start<br />
position after you take the picture.<br />
Flash Tips<br />
• Turn on room lights and have the subject face the<br />
lights to minimize red eyes in pictures.<br />
• Stand at an angle to shiny surfaces like windows or<br />
mirrors to avoid flash reflection and bright spots in<br />
your pictures.<br />
• Keep your fingers and other objects away from the<br />
picture-taking lens, flash, and auto-focus windows<br />
to avoid dark or light pictures.<br />
Within a few seconds after the last picture is taken, the<br />
film automatically starts to rewind. The Picture Counter<br />
(27) on the LCD Panel (3) blinks “0” when the film is<br />
finished rewinding. Wait for the camera motor to stop<br />
before you open the film door and remove the film.<br />
Reload the camera with fresh <strong>Kodak</strong> film.<br />
Using the Rewind Button<br />
If you don’t want to take pictures on the entire roll of<br />
film, you can automatically rewind the film by pressing<br />
the Rewind Button (5).<br />
MODE<br />
( )<br />
CARING FOR YOUR CAMERA<br />
1. Protect the camera from dust, moisture, sudden impact, and<br />
excessive heat.<br />
CAUTION: Do not use solvents or harsh or abrasive cleaners<br />
on the camera body.<br />
2. If the lens appears dirty, breathe on it to form a mist and wipe<br />
the surface gently with a soft, lintless cloth or lens-cleaning<br />
tissue. Do not apply pressure or you will scratch the lens. Never<br />
wipe a dry lens.<br />
CAUTION: Do not use solvents or solutions not designed for<br />
cleaning camera lenses. Do not use chemically treated tissues<br />
intended for cleaning eyeglasses.<br />
3. Remove the battery when you store the camera for a long time.<br />
CAUTION: To prevent possible damage and electrical shock,<br />
do not try to take apart or repair the camera or flash unit by<br />
yourself.<br />
TROUBLESHOOTING<br />
What happened Probable cause Solution<br />
Camera will<br />
not operate<br />
Power off Press on/off button<br />
Flash not ready Wait for the flashcharging<br />
indicator on<br />
LCD panel to stop<br />
blinking<br />
Film not loaded See LOADING<br />
THE FILM<br />
There are no more<br />
pictures remaining<br />
Remove the film<br />
Battery weak, dead, Replace or reload the<br />
missing, or improperly battery; see LOADING<br />
inserted THE BATTERY<br />
Film does Battery weak, dead, Replace or reload the<br />
not advance missing, or improperly battery; see LOADING<br />
inserted THE BATTERY<br />
Film completely See LOADING<br />
used (LCD panel<br />
has steady “0”)<br />
THE FILM<br />
Film not loaded See LOADING<br />
properly THE FILM<br />
Film does Film did not load See LOADING<br />
not rewind properly THE FILM<br />
Battery weak, dead, Replace or reload the<br />
missing, or improperly battery; see LOADING<br />
inserted THE BATTERY<br />
LCD panel Battery weak, dead, Replace or reload the<br />
is blank missing, or improperly battery; see LOADING<br />
inserted THE BATTERY<br />
ON/OFF<br />
FOR OWNERS OF THE QUARTZ<br />
DATE & TIME MODEL<br />
SETTING THE DATE AND TIME<br />
The date and time feature enables you to record the date in a<br />
choice of four formats: (month/day/year, day/month/year,<br />
year/month/day) or time (day/hour/minute) directly onto the film. It<br />
features a quartz clock and automatic calendar through the year<br />
2019, including leap years. With the camera held horizontally, the<br />
data is recorded onto the lower right portion of the picture; in the<br />
vertical format with the shutter release up, imprinting occurs on<br />
the lower left portion but positioned horizontally on the picture.<br />
Date and Time Imprinting<br />
Press the Mode Button (b), located on the film door (20), to select<br />
the desired data type; then take the picture. Following the<br />
exposure, the Print Indicator (a) blinks in the data panel for<br />
approximately two-to-three seconds to confirm imprinting.<br />
NOTE: The imprinted data may be difficult to read if the subject<br />
area over which it is superimposed is bright or non-uniform. If the<br />
data panel is consistently dim, replace the date-back battery (see<br />
Replacing the Date-Back Battery below).<br />
Mode Selection<br />
Use the Mode Button (b) to change the data display as shown.<br />
Setting Data<br />
1. Press the Mode Button (b) to select the desired data type.<br />
2. Use the Select Button (c) to move between different parts of<br />
the displayed data. With the data displayed, pressing the select<br />
button in succession causes the settings for year, month, and<br />
then day to blink. On the data panel, the letter “M” indicates the<br />
location for the month and the apostrophe “ ’ “ for the year.<br />
In time mode, pressing the select button successively<br />
causes the hour, minute, and then the colon to blink.<br />
3. Press the Set Button (d) to change the blinking display.<br />
Replacing the Date-Back Battery<br />
1. Open the Film Door (20).<br />
2. Slide the Film-Pressure Plate (e) to the right until the silver<br />
spring clears the Retaining Ears (f) and reveals the Battery<br />
Cover (g).<br />
3. Remove the screw from the battery cover using a small Phillips<br />
screwdriver.<br />
4. Insert a new 3-volt lithium CR2025 (+ side up) battery. Replace<br />
the battery cover making sure the square Tab (h) is under the<br />
top retaining ear.<br />
5. Reattach the screw and slide the film-pressure plate back,<br />
making sure it engages into the Center Notch (i) and is under<br />
both retaining ears on the film door.<br />
NOTE: After you replace the battery, you will need to reset the<br />
date and time.<br />
(g)<br />
(h)<br />
(i)<br />
(g)<br />
(f)<br />
(f)<br />
Date back subject to minor appearance and specification<br />
changes.<br />
(f)<br />
(f)<br />
MODE/SELECT/SET<br />
(e)<br />
(e)<br />
SERVICE INFORMATION<br />
Where to Get Help<br />
If you have any questions about your camera or difficulty<br />
in using it, reread the camera manual and check the<br />
TROUBLESHOOTING section.<br />
If you purchased this camera in the United States and<br />
have difficulty that isn’t covered in the TROUBLESHOOTING<br />
section of the camera manual, obtain help from one of these<br />
resources:<br />
1. Take the camera, the film you were using, and any sample<br />
prints to your photo dealer.<br />
2. Call <strong>Kodak</strong> toll free (in the United States) from 8:00 a.m. to<br />
8:00 p.m. (Eastern Time Zone) Monday through Friday at<br />
1 (800) 242-2424.<br />
Packing Instructions<br />
1. Include a note with your camera, giving all details: model, date<br />
of purchase, place of purchase, a description of the problem,<br />
sample negatives and prints, a copy of the dated sales<br />
receipt, and your name and address. If possible, include a<br />
telephone number where you can be reached between 8:00<br />
a.m. and 5:00 p.m. (Eastern Time Zone).<br />
2. Place the camera in a plastic bag to keep out dirt and packing<br />
material.<br />
3. Use a sturdy carton that is large enough for you to surround<br />
the camera completely with packing material such as crumpled<br />
newspaper.<br />
4. Securely fasten the carton with tape. Clearly write the address<br />
of the repair location and your name and address on the top<br />
and bottom of the carton. Be sure to verify a repair location<br />
before you ship the camera by calling <strong>Kodak</strong> toll free (in the<br />
United States) from 9:00 a.m. to 8:00 p.m. (Eastern Time<br />
Zone) Monday through Friday at 1 (800) 242-2424.<br />
5. When you ship the carton, it is a good idea to insure the<br />
camera for replacement value.<br />
WARRANTY INFORMATION<br />
Full One-Year Warranty<br />
THIS WARRANTY APPLIES ONLY TO CAMERAS<br />
PURCHASED IN THE UNITED STATES.<br />
Warranty Time Period<br />
This 35 mm KODAK Camera is warranted by <strong>Kodak</strong> to function<br />
properly for one year from the date of purchase. This warranty<br />
covers the purchaser of this camera and anyone else who owns it<br />
during the warranty period.<br />
Warranty Coverage<br />
If this camera does not function properly within the warranty<br />
period, upon submission of a copy of a dated product sales<br />
receipt (keep the original for your records), <strong>Kodak</strong> will repair it<br />
without charge. If <strong>Kodak</strong> is unable to repair the camera, the option<br />
of replacement or refund of the purchase price will be offered.<br />
How to Obtain Service<br />
For assistance in using the camera, contact a dealer in <strong>Kodak</strong><br />
products. For service on this camera, return it through a dealer in<br />
<strong>Kodak</strong> products, or call 1 (800) 242-2424 for the authorized<br />
warranty repair location nearest you. When sending a camera for<br />
service, enclose a note giving details of the problem and your<br />
complete name and address and phone number where you can be<br />
reached during the day to help the repair location return the<br />
camera promptly.<br />
Limitations<br />
This warranty does not apply to the battery used in this<br />
camera.<br />
This warranty does not cover circumstances beyond <strong>Kodak</strong>’s<br />
control, nor problems caused by failure to follow the care and<br />
operating instructions in the manual.<br />
Warranty service will not be provided without a copy of a<br />
dated product sales receipt (always keep the original for your<br />
records).<br />
<strong>Kodak</strong> makes no other express warranty for this product.<br />
Repair and the option of replacement or refund, in the event<br />
that <strong>Kodak</strong> is unable to repair the camera, are <strong>Kodak</strong>’s only<br />
obligations. <strong>Kodak</strong> will not be responsible for any consequential<br />
or incidental damages resulting from the sale or use of<br />
this camera, regardless of the cause of such damages.<br />
Your Rights under State Law<br />
Some states do not allow the exclusion or limitation of incidental<br />
or consequential damages, so the above limitation or exclusion<br />
may not apply to you. This warranty gives you specific legal rights,<br />
and you may also have other rights which vary from state to state.<br />
Outside the United States<br />
In countries other than the United States, the terms of this<br />
warranty may be different. Unless a specific <strong>Kodak</strong> warranty is<br />
communicated to the purchaser in writing by a <strong>Kodak</strong> company, no<br />
warranty or liability exists beyond any minimum requirements<br />
imposed by law, even though defect, damage, or loss may be by<br />
negligence or other act.