

AxSOS Targeting System Distal Lateral Femur Operative - Stryker
AxSOS Targeting System Distal Lateral Femur Operative - Stryker
AxSOS Targeting System Distal Lateral Femur Operative - Stryker

You also want an ePaper? Increase the reach of your titles
YUMPU automatically turns print PDFs into web optimized ePapers that Google loves.
<strong>Operative</strong> Technique<br />
Step 5 – Metaphyseal Plate Fixation<br />
Locking Screws cannot act as lag<br />
screws. Should an interfragmentary<br />
compression effect be required for<br />
metaphyseal fragments, a partially<br />
threaded 6.5mm standard cancellous<br />
screw must first be placed in one of the<br />
unthreaded metaphyseal plate holes<br />
prior to the placement of any Locking<br />
Screws.<br />
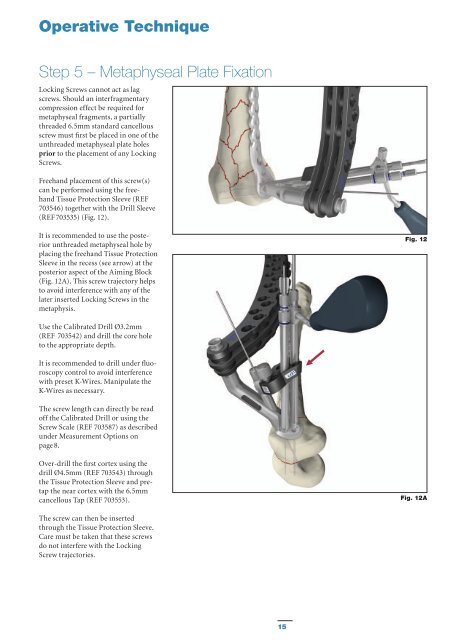
Freehand placement of this screw(s)<br />
can be performed using the freehand<br />
Tissue Protection Sleeve (REF<br />
703546) together with the Drill Sleeve<br />
(REF 703535) (Fig. 12).<br />
It is recommended to use the posterior<br />
unthreaded metaphyseal hole by<br />
placing the freehand Tissue Protection<br />
Sleeve in the recess (see arrow) at the<br />
posterior aspect of the Aiming Block<br />
(Fig. 12A). This screw trajectory helps<br />
to avoid interference with any of the<br />
later inserted Locking Screws in the<br />
metaphysis.<br />
Fig. 12<br />
Use the Calibrated Drill Ø3.2mm<br />
(REF 703542) and drill the core hole<br />
to the appropriate depth.<br />
It is recommended to drill under fluoroscopy<br />
control to avoid interference<br />
with preset K-Wires. Manipulate the<br />
K-Wires as necessary.<br />
The screw length can directly be read<br />
off the Calibrated Drill or using the<br />
Screw Scale (REF 703587) as described<br />
under Measurement Options on<br />
page 8.<br />
Over-drill the first cortex using the<br />
drill Ø4.5mm (REF 703543) through<br />
the Tissue Protection Sleeve and pretap<br />
the near cortex with the 6.5mm<br />
cancellous Tap (REF 703553).<br />
Fig. 12A<br />
The screw can then be inserted<br />
through the Tissue Protection Sleeve.<br />
Care must be taken that these screws<br />
do not interfere with the Locking<br />
Screw trajectories.<br />
15


