

AxSOS Targeting System Distal Lateral Femur Operative - Stryker
AxSOS Targeting System Distal Lateral Femur Operative - Stryker
AxSOS Targeting System Distal Lateral Femur Operative - Stryker

Create successful ePaper yourself
Turn your PDF publications into a flip-book with our unique Google optimized e-Paper software.
<strong>Operative</strong> Technique<br />
b) Locking Screws<br />
5.0mm Locking Screws can be placed<br />
in the threaded shaft holes or holes<br />
with pre-placed Locking Inserts.<br />
For the placement of these screws,<br />
follow the same procedure detailed<br />
in step a). For Locking Screws use<br />
appropriate instrumentation outlined<br />
as follows:<br />
• Drill Sleeve Ø4.3mm (REF 703534)<br />
• Trocar Ø4.3mm (REF 703524)<br />
• Calibrated Drill Ø4.3mm<br />
(REF 703541)<br />
• Screwdriver T20 (REF 703539)<br />
• Screwdriver Bit T20 (REF 703540)<br />
• Tap 5mm Locking (REF 703554)<br />
• 6Nm Torque Limiter (702751)<br />
Note:<br />
If an uncommonly thick cortex<br />
is identified during preoperative<br />
planning, pretap both cortices<br />
using the Tap for Locking Screws<br />
(REF 703554) before screw insertion.<br />
If power tapping is selected,<br />
use low speed only and do not<br />
apply axial pressure on the power<br />
tool.<br />
It is also recommended, to<br />
predrill and pretap the threaded<br />
hole before exchanging the Frame<br />
Fixator for a Locking Screw in the<br />
last shaft hole.<br />
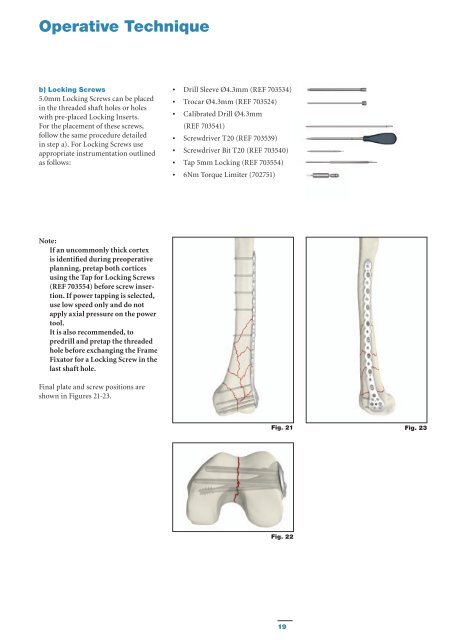
Final plate and screw positions are<br />
shown in Figures 21-23.<br />
Fig. 21 Fig. 23<br />
Fig. 22<br />
19


