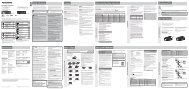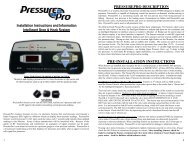
pressurepro description pre-installation instructions - Pana-Pacific
pressurepro description pre-installation instructions - Pana-Pacific
pressurepro description pre-installation instructions - Pana-Pacific

You also want an ePaper? Increase the reach of your titles
YUMPU automatically turns print PDFs into web optimized ePapers that Google loves.
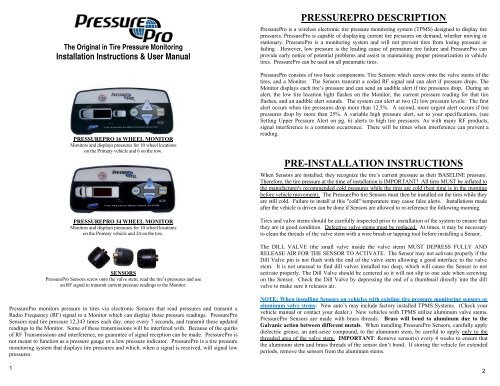
The Original in Tire Pressure Monitoring<br />
Installation Instructions & User Manual<br />
PRESSUREPRO 16 WHEEL MONITOR<br />
Monitors and displays <strong>pre</strong>ssures for 10 wheel locations<br />
on the Primary vehicle and 6 on the tow.<br />
PRESSUREPRO 34 WHEEL MONITOR<br />
Monitors and displays <strong>pre</strong>ssures for 10 wheel locations<br />
on the Primary vehicle and 24 on the tow.<br />
SENSORS<br />
PressurePro Sensors screw onto the valve stem, read the tire’s <strong>pre</strong>ssures and use<br />
an RF signal to transmit current <strong>pre</strong>ssure readings to the Monitor.<br />
PressurePro monitors <strong>pre</strong>ssure in tires via electronic Sensors that read <strong>pre</strong>ssures and transmit a<br />
Radio Frequency (RF) signal to a Monitor which can display those <strong>pre</strong>ssure readings. PressurePro<br />
Sensors read tire <strong>pre</strong>ssure 12,343 times each day, once every 7 seconds, and transmit these updated<br />
readings to the Monitor. Some of these transmissions will be interfered with. Because of the quirks<br />
of RF Transmissions and interference, no guarantee of signal reception can be made. PressurePro is<br />
not meant to function as a <strong>pre</strong>ssure gauge or a low <strong>pre</strong>ssure indicator. PressurePro is a tire <strong>pre</strong>ssure<br />
monitoring system that displays tire <strong>pre</strong>ssures and which, when a signal is received, will signal low<br />
<strong>pre</strong>ssures.<br />
1<br />
PRESSUREPRO DESCRIPTION<br />
PressurePro is a wireless electronic tire <strong>pre</strong>ssure monitoring system (TPMS) designed to display tire<br />
<strong>pre</strong>ssures. PressurePro is capable of displaying current tire <strong>pre</strong>ssures on demand, whether moving or<br />
stationary. PressurePro is a monitoring system and will not <strong>pre</strong>vent tires from losing <strong>pre</strong>ssure or<br />
failing. However, low <strong>pre</strong>ssure is the leading cause of <strong>pre</strong>mature tire failure and PressurePro can<br />
provide early notice of potential problems and assist in maintaining proper <strong>pre</strong>ssurization in vehicle<br />
tires. PressurePro can be used on all pneumatic tires.<br />
PressurePro consists of two basic components: Tire Sensors which screw onto the valve stems of the<br />
tires, and a Monitor. The Sensors transmit a coded RF signal and can alert if <strong>pre</strong>ssure drops. The<br />
Monitor displays each tire’s <strong>pre</strong>ssure and can send an audible alert if tire <strong>pre</strong>ssures drop. During an<br />
alert, the low tire location light flashes on the Monitor, the current <strong>pre</strong>ssure reading for that tire<br />
flashes, and an audible alert sounds. The system can alert at two (2) low <strong>pre</strong>ssure levels: The first<br />
alert occurs when tire <strong>pre</strong>ssures drop more than 12.5%. A second, more urgent alert occurs if tire<br />
<strong>pre</strong>ssures drop by more than 25%. A variable high <strong>pre</strong>ssure alert, set to your specifications, (see<br />
Setting Upper Pressure Alert on pg. 6) alerts to high tire <strong>pre</strong>ssures. As with many RF products,<br />
signal interference is a common occurrence. There will be times when interference can <strong>pre</strong>vent a<br />
reading.<br />
PRE-INSTALLATION INSTRUCTIONS<br />
When Sensors are installed, they recognize the tire’s current <strong>pre</strong>ssure as their BASELINE <strong>pre</strong>ssure.<br />
Therefore, the tire <strong>pre</strong>ssure at the time of <strong>installation</strong> is IMPORTANT! All tires MUST be inflated to<br />
the manufacturer's recommended cold <strong>pre</strong>ssures while the tires are cold (best time is in the morning<br />
before vehicle movement). The PressurePro tire Sensors must then be installed on the tires while they<br />
are still cold. Failure to install at this "cold" temperature may cause false alerts. Installations made<br />
after the vehicle is driven can be done if Sensors are allowed to re-reference the following morning.<br />
Tires and valve stems should be carefully inspected prior to <strong>installation</strong> of the system to ensure that<br />
they are in good condition. Defective valve stems must be replaced. At times, it may be necessary<br />
to clean the threads of the valve stem with a wire brush or tapping tool before installing a Sensor.<br />
The DILL VALVE (the small valve inside the valve stem) MUST DEPRESS FULLY AND<br />
RELEASE AIR FOR THE SENSOR TO ACTIVATE. The Sensor may not activate properly if the<br />
Dill Valve pin is not flush with the end of the valve stem allowing a good interface to the valve<br />
stem. It is not unusual to find dill valves installed too deep, which will cause the Sensor to not<br />
activate properly. The Dill Valve should be centered so it will not slip to one side when screwing<br />
on the Sensor. Check the Dill Valve by de<strong>pre</strong>ssing the end of a thumbnail directly into the dill<br />
valve to make sure it releases air.<br />
NOTE: When installing Sensors on vehicles with existing tire <strong>pre</strong>ssure monitoring sensors or<br />
aluminum valve stems: New auto’s may include factory installed TPMS Systems. (Check your<br />
vehicle manual or contact your dealer.) New vehicles with TPMS utilize aluminum valve stems.<br />
PressurePro Sensors are made with brass threads. Brass will bond to aluminum due to the<br />
Galvanic action between different metals. When installing PressurePro Sensors, carefully apply<br />
dielectric grease, an anti-seize compound, to the aluminum stem, be careful to apply only to the<br />
threaded area of the valve stem. IMPORTANT: Remove sensor(s) every 4 weeks to ensure that<br />
the aluminum stem and brass threads of the sensor don’t bond. If storing the vehicle for extended<br />
periods, remove the sensors from the aluminum stems.<br />
2
INSTALLATION INSTRUCTIONS<br />
1. DO NOT PUT SENSORS ON TIRES! First, position the Monitor temporarily at<br />
the desired mounting location (so it can be moved for best signal reception). Plug the<br />
power cord into the cigarette lighter socket (or use optional hard wire). When power<br />
is on, the green light below the “SET” button flashes once every 5 seconds.<br />
2. PLACE THE SYSTEM IN “PROGRAM MODE”: Press and Hold the "PROG"<br />
Button for 5 seconds; Release “PROG” when the small green power light shifts<br />
from flashing and become a continuous green light. The front left (driver’s side) tire<br />
location light on the Monitor display will begin to flash. You are now in Program<br />
Mode. (The words "no SEn Sor" will scroll across the digital display on a new<br />
<strong>installation</strong>.) Note: The system will exit the "Program Mode" if there is no activity<br />
for 10 minutes. If this happens, simply place the Monitor back into the "Program<br />
Mode" when you are ready to continue.<br />
MONITOR – FEATURES<br />
• Normal Mode – Monitor is in Normal Mode when first powered up. Monitor is<br />
listening for Sensor updates and alerts in Normal Mode. Green light below<br />
“SET” button flashes every 5 seconds when in Normal Mode. Tire <strong>pre</strong>ssures can<br />
be displayed by selecting a tire with “UP” or “DOWN” arrow.<br />
• Program Mode – Used for programming Sensors to the Monitor. (See<br />
“Installation Instructions” step #2) When in Program Mode, green light is solid,<br />
tire location selected is flashing and display shows 3 dashes (- - -) for locations<br />
programmed <strong>pre</strong>viously. Non-programmed locations will flash when selected and<br />
will display “No SEn Sor” message – (displays over 3 flashes). When a new<br />
Sensor is installed, a <strong>pre</strong>ssure value displays on the Monitor.<br />
3. SCREW A SENSOR ONTO THE VALVE STEM of the tire at the location<br />
denoted by the flashing location light. Tighten firmly by hand, or with the optional<br />
PressurePro Sensor <strong>installation</strong> tool. Using any tools (other than PressurePro tool)<br />
can damage the Sensor and voids the Warranty. IMPORTANT - Listen for the<br />
“release” of air when screwing on the Sensor. (It is not unusual for the dill valve to<br />
be seated too deeply in the valve stem. Check dill level by testing with thumb nail –<br />
placing nail straight onto the plunger to ensure it opens and a burst of air is released.)<br />
4. WAIT FOR THE MONITOR TO DISPLAY A PRESSURE READING. This can<br />
take up to 60 seconds and is the only time a <strong>pre</strong>ssure reading will be displayed while<br />
the Monitor is in “Program Mode”. This initial <strong>pre</strong>ssure reading from the Sensor is<br />
your BASELINE <strong>pre</strong>ssure. Alerts are based off this BASELINE <strong>pre</strong>ssure.<br />
5. ONCE A PRESSURE READING IS DISPLAYED, LOCK IN SENSOR by<br />
<strong>pre</strong>ssing and holding the “PROG” button until the flashing tire location light on the<br />
Monitor moves to the next tire location, this normally takes about two seconds. This<br />
locks that Sensor’s code to that wheel position in the Monitor and must be done to<br />
retain that Sensor’s ID. If you do not want to install a Sensor to the next wheel<br />
location, use the “UP” or “DOWN” arrow buttons to move the flashing light to the<br />
next location desired and install (repeat from step 3 forward). Do not forget to lock<br />
in the final position. It is OK if this next location is one with a Sensor already<br />
installed, the screen will simply display 3 dashes (---).<br />
3<br />
6. TAKE MONITOR OUT OF PROGRAM MODE. To get Monitor out of<br />
“Program Mode”, tap the “SET” button. The sensor(s) are now installed and<br />
operating.<br />
7. COMPLETE INSTALLATION: Check for leaks by coating the Sensor, extension<br />
and valve stem with a solution of 1 part liquid soap to 2 parts water - look for bubbles<br />
which indicate a leak. Complete a permanent <strong>installation</strong> of the Monitor with<br />
provided Velcro or purchased mounting accessories. If using the Optional Antenna<br />
Kit, complete the permanent <strong>installation</strong> of the antenna.<br />
IMPORTANT: Products using RF signals are subject to interference causing a loss of<br />
signal. Reception depends on the environment and conditions <strong>pre</strong>sent at the time of use.<br />
PressurePro has been designed to be as reliable as possible with the use of RF<br />
transmissions. There is no guarantee of signal reception. This device complies with part<br />
15 of the FCC rules. Operation is subject to the following two conditions: (1) This device<br />
may not cause harmful interference, and (2) this device must accept any interference<br />
received, including interference that may cause undesired operation.<br />
4
MONITOR BUTTON FUNCTIONS<br />
"SET" Button<br />
• When in Normal Mode – Pushing and/or holding “SET” button will light up all<br />
tire locations that have been programmed.<br />
• When in Program Mode -- Pushing “SET” button exits Program Mode.<br />
“F/B” Button – (separating a vehicle from a tow)<br />
When separating the main vehicle from the tow, push F/B button. All tires with<br />
Sensors will light and display on the Monitor. Press F/B button until just the vehicle<br />
you want to use is active (lit on the Monitor display). System will monitor that vehicle<br />
only. Use the F/B button to reattach both vehicles. Press F/B button until vehicles<br />
you want active are lit. (Press F/B button until all programmed lights are lit putting<br />
system in monitoring mode for both vehicle and tow.)<br />
“UP” & “DOWN” Buttons<br />
In Both Normal and Program Mode – Push “UP” arrow to rotate selected tire<br />
location clockwise. Push “DOWN” arrow to rotate selected tire location<br />
counterclockwise.<br />
“PROG” Button<br />
Entering Program Mode from Normal Mode: Hold “PROG” button (approx 5<br />
seconds) until the green flashing light below the “SET” button remains solid (lit).<br />
Deleting a Single Sensor/Location: With a tire location selected, holding “PROG”<br />
button for approx. 10 seconds (while in “Normal Mode”), will delete that tire location<br />
from the active list. Note: After approx. 5 seconds, green light will remain on;<br />
continue to hold “PROG” until the green light and the selected tire location turn off<br />
(approx. 10 seconds). Display will show “dEL”. Deletion of Sensor is complete.<br />
Deleting all Sensors/Locations at one time: All installed Sensors can be deleted<br />
simultaneously by holding the “PROG” button for 45 seconds. (When holding<br />
“PROG” button, the following will happen: After 5 seconds, the green light will go<br />
solid; hold for another 10 seconds and “dEL” appears on Monitor face; continuing to<br />
hold for 30 seconds deletes all readings and Monitor to display “No Sen Sor”.)<br />
SENSOR ALERTS<br />
• FIRST STAGE LOW PRESSURE ALERT - (alerts at 12.5% <strong>pre</strong>ssure loss from<br />
initial <strong>pre</strong>ssure at <strong>installation</strong>). A first stage alert level will “beep,” and flash tire<br />
location, and display low <strong>pre</strong>ssure - once per second – until the low <strong>pre</strong>ssure is<br />
corrected or the “SET” button is <strong>pre</strong>ssed putting Monitor in “reminder mode” or<br />
Monitor is unplugged. Pull over, inspect tire and repair. If no button is <strong>pre</strong>ssed to<br />
mute system – system will continue to alert.<br />
• SECOND STAGE LOW PRESSURE ALERT - (alerts at 25% <strong>pre</strong>ssure loss initial<br />
<strong>pre</strong>ssure at <strong>installation</strong>). A second stage alert level will “beep”, flash tire location and<br />
<strong>pre</strong>ssure value twice per second. If no button is <strong>pre</strong>ssed to mute system – system will<br />
alert until low <strong>pre</strong>ssure is corrected or for a total of 15 hours. Pull over and repair.<br />
• HIGH PRESSURE ALERTS (Variable) – Alerts at determined percentage over<br />
initial <strong>pre</strong>ssure at <strong>installation</strong>. The level of the alert can be set by end user to OFF or<br />
at 10%, 15%, 19%, 24%, 28%, 33%, 40% and 45% over the set level. Note: Sensors<br />
come from the factory set to trigger at 24% high.<br />
SETTING UPPER PRESSURE ALERT<br />
1. Unplug the power cord from the Monitor (mini-USB connector).<br />
2. While holding down the UP Arrow button, plug the power cord back into the Monitor and<br />
it will advance to the next alert level higher (new alert level will display on the screen).<br />
3. Release the UP button.<br />
4. If the Monitor displays the upper alert <strong>pre</strong>ssure you desire, setting the upper alert is<br />
completed. If it is not the upper alert you desire, repeat steps #1 and #2 until you see the<br />
desired alert level.<br />
5. The high alert function can be turned OFF by repeating steps #1 and #2 after the 45% level<br />
is reached.<br />
6. To turn the high alert function back ON, repeat steps #1 and #2 going to the 10% alert<br />
level which will display.<br />
• REMINDER MODE – To “mute” the audible alert, place into “reminder” mode by<br />
<strong>pre</strong>ssing the “SET” button briefly. Audible alert will sound periodically.<br />
• MULTIPLE LOW PRESSURE ALERTS – In the unlikely event that multiple<br />
alerts occur, the Monitor will flash all low locations with low <strong>pre</strong>ssures. When<br />
selected, a tire location with an alert will flash its <strong>pre</strong>ssure and position while the alert<br />
sounds. (Non-selected low <strong>pre</strong>ssure tires will flash their wheel location every 2<br />
seconds.)<br />
• “SIGNAL CHECK IN” FEATURE – A Patent Pending feature of the PressurePro<br />
system is the “check-in” feature. Sensors send short millisecond “check-in” signal<br />
bursts regularly. As with all RF devices, a signal may be lost or interrupted. If a<br />
signal is lost or interrupted, the Monitor will light that wheel location with a solid<br />
light – (there is no alert beep). If this type alert continues, it may indicate a Sensor<br />
has been removed, lost or damaged or a signal is not being received - check that<br />
Sensor’s location.<br />
5<br />
6
HOW TO GUIDE<br />
CHECKING TIRE PRESSURES – Sensors send an updated <strong>pre</strong>ssure reading approx.<br />
every 5 minutes. Pressing the “UP” or “DOWN” button, (Monitor in Normal Mode),<br />
will select a tire location to display. To reset baseline <strong>pre</strong>ssure, remove Sensor for 60<br />
seconds, then reinstall. REMOVING AND REPLACING A SENSOR ON THE<br />
VALVE STEM IMMEDIATELY AFTER DRIVING CAN RESULT IN “FALSE”<br />
ALERTS. ALLOW TIRES TO COOL TO AMBIENT TEMPERATURE.<br />
MANUALLY CHECK TIRE PRESSURES AND INFLATE TIRES – It is<br />
recommended that tire <strong>pre</strong>ssures be checked regularly with a quality <strong>pre</strong>ssure gauge with<br />
tire at ambient temperatures. Remove Sensor, (Monitor will now read “00” and give an<br />
audible alert), check <strong>pre</strong>ssure, and inflate if necessary. Leaving a Sensor off for 60<br />
seconds sets a new <strong>pre</strong>ssure level – alert level will now be based on new <strong>pre</strong>ssure.<br />
INSTALLATION INTERRUPTION – If, during <strong>installation</strong>, an interruption occurs<br />
and the installer is delayed (no button pushed for 10 minutes) the system exits Program<br />
Mode. To restart <strong>installation</strong>, refer to step #2 in “Installation Instructions”.<br />
MUTING THE AUDIBLE “ALERT” – Press “SET” button after the alert sounds.<br />
This will put the alert in the ‘reminder’ mode. When the lights turn off, an “alert” beep<br />
will continue periodically as a reminder of a low-<strong>pre</strong>ssure situation. If no button is<br />
<strong>pre</strong>ssed within 15 minutes, ‘reminder’ mode activates automatically.<br />
REMOVING SENSORS TO ROTATE OR REPLACE TIRES: When Sensors are<br />
installed, they are programmed to a specific tire position. If rotating tires or installing new<br />
tires, Sensors must be removed. Do one of the following:<br />
• MARK EACH SENSOR to identify its wheel location. (This can be done by placing<br />
Sensors into marked containers, such as envelopes or baggies.) When putting the<br />
Sensors back onto the valve stem, screw the Sensors back onto the Sensor’s original<br />
wheel location. By doing this, you eliminate the need to reprogram the Sensor to the<br />
Monitor. System will now be ready to operate.<br />
OR<br />
• IF YOU CHOOSE NOT TO IDENTIFY EACH SENSOR TO A LOCATION. delete<br />
each Sensor from the Monitor. When reinstalling Sensors, they must be<br />
reprogrammed. To Delete a Sensor, see “Deleting a Location” in the “Monitor Button<br />
Functions” section.<br />
RECEIVING PRESSURE READINGS IN PSI, kPa & BAR: Monitors come set from<br />
the factory to read in psi, but can also read in BAR and kPa. To switch <strong>pre</strong>ssure modes,<br />
remove Monitor’s power source and re-power while holding the “SET” button. The<br />
Monitor will briefly display the mode on the screen, and switch first to BAR, then to kPa.<br />
Repeat process as needed.<br />
7<br />
FREQUENTLY ASKED QUESTIONS<br />
CAN I STORE MY VEHICLE WITH THE MONITOR ON? The Monitor draws 25mA<br />
to 150mA of power. It’s possible the Monitor could drain the vehicle's battery over an<br />
extended period of time. If storing vehicle for more than two months, unplug Monitor and<br />
remove Sensors (see “Tips Section” – Vehicle Storage).<br />
DOES MONITOR NEED TO BE POWERED BY LIGHTER ACCESSORY? No.<br />
Hardwiring is actually a <strong>pre</strong>ferred method of powering as it reduces back feed interference.<br />
Connect the red wire to a 12-volt DC positive power source (direct wire to the battery is not<br />
required). The black wire should be connected to a ground or chassis.<br />
CAN MONITOR BE USED INDEPENDENTLY ON FRONT/BACK VEHICLE?<br />
Yes - see “F/B” Button in “Monitor Button Functions” Section.<br />
WHAT HAPPENS WHEN I REMOVE A SENSOR TO INFLATE A TIRE? Monitor<br />
will display “00” reading. After 5 minutes, the Monitor displays 3 dashes (- - -). Removing<br />
Sensors for 60 seconds allows a new “BASELINE” reading to be accepted.<br />
WHAT IS THE “REMINDER” ALERT? After an “Alert” has been acknowledged with a<br />
button <strong>pre</strong>ss (or 15 minutes have passed) and the location lights have turned off, the audible<br />
alert will periodically “sound” for a short duration to remind you of the alert.<br />
HOW DO I DELETE A SENSOR? See “Deleting a Location” in the “Monitor Button<br />
Functions” section.<br />
CAN I DELETE ALL SENSORS AT ONCE? Yes, holding the “PROG” button down for<br />
45 seconds will erase all Sensors installed.<br />
WHAT DO I DO ABOUT A LOW SENSOR BATTERY ALERT? When you receive a<br />
low Sensor Battery alert, the Sensor should be replaced. Contact your dealer/distributor for<br />
information and replacement.<br />
CAN I USE A SEALANT OR EQUALIZER POWDER IN THE TIRE WITH<br />
PRESSUREPRO? We do not recommend using sealants or liquids inside the tire. If<br />
necessary, it’s recommended to use a filtered Dill Valve if using sealants or equalizing<br />
substances. Sealant can plug up the valve core and shut off <strong>pre</strong>ssures in stems.<br />
WHAT SHOULD BE DONE IF A LOW PRESSURE ALERT IS SOUNDED?<br />
Immediately pull over and check low tire. Physically check tire and repair. Be sure to check<br />
valve stem for damage. Soap the entire area to check for any leaks.<br />
TIRE PRESSURES INCREASE WHILE DRIVING - DO I NEED TO DO<br />
ANYTHING? No. While driving, tires become hot, increasing <strong>pre</strong>ssure. A <strong>pre</strong>ssure<br />
increase of 10% to 20% is common, especially in hot weather at high speeds.<br />
DO I NEED TO REBALANCE MY TIRES WHEN USING A SENSOR? The 2/3 oz.<br />
Sensors, on large tires (RV/Truck), seldom necessitates a tire be balanced. Smaller tires may<br />
require a ½ ounce stick-on balancing weight opposite the Sensor.<br />
WHAT SHOULD I DO IF A SENSOR IS LOST OR DAMAGED? Contact your Dealer<br />
or Distributor to order a new Sensor.<br />
8
WHEN DO MY SENSORS TRANSMIT?<br />
1. Within 60 seconds of screwing Sensor onto the valve stem.<br />
2. Every 5 minutes while updating, under normal conditions.<br />
3. At a 12.5% drop from baseline <strong>pre</strong>ssure.<br />
4. At a 25% drop from baseline <strong>pre</strong>ssure.<br />
5. At the Upper Pressure alert level<br />
6. When a Sensor is removed from its valve stem.<br />
IF I UNPLUG OR LOSE POWER, MUST I REPROGRAM MONITOR? No, settings<br />
are always retained unless physically deleted. Monitor displays 3 dashes (- - -) until Sensors<br />
send a new updated reading within the normal 5 minute reporting period.<br />
DURING INSTALLATION, NO SIGNAL WAS RECEIVED FROM THE SENSOR.<br />
Higher radio frequency (RF) transmissions propagate mostly via straight lines and along lineof-sight<br />
pathways. PressurePro Sensors are required to accomplish a daunting task – transmit<br />
from a vehicle’s tires to the Monitor. If a Sensor fails to give a <strong>pre</strong>ssure reading, slightly move<br />
the Monitor and way 5 minutes for new signals to report.<br />
AFTER INSTALLATION, PRESSURE READINGS DROP ON DISPLAY – ACTUAL<br />
TIRE PRESSURE REMAINS CORRECT. The probable cause is poor interaction between<br />
the Sensor and dill valve. Try the following procedures separately, in order, until the problem is<br />
resolved: 1) Unscrew the Sensor and again, hand-tighten and listen for the release of air to the<br />
Sensor. (Be sure the Sensor and valve stem are not cross-threaded.) 2) Make sure the proper dill<br />
valve is installed in your valve stem and that the dill pin is flush with the top of the valve stem.<br />
Replace the dill valve if necessary, as it can be worn or defective. 3) If condition still persists,<br />
contact your Distributor/Dealer.<br />
WHY DOESN’T MY MONITOR TURN ON? Make sure the lighter receptacle has power.<br />
Some vehicles only have power when the vehicle is running. Check that the power cord is<br />
plugged in securely to the receptacle on the Monitor. If the cigarette receptacle is always “hot”,<br />
be sure all connections are secure. A red LED light on the plug is lit when cord is powered.<br />
Check fuse located in the lighter plug-in end of the cord by unscrewing the black ring (at the<br />
silver tip) of the plug. Replace only with a 2 Amp fast-blow fuse. Check the vehicle fuse<br />
controlling the power source.<br />
HOW DO I CHANGE TO kPa AND BAR READINGS The Monitor has the capability of<br />
offering <strong>pre</strong>ssure values in kPa and BAR as well as PSI units. To change from PSI, unplug the<br />
Monitor and re-power while simultaneously holding down the “SET” button. The alternate unit<br />
abbreviations will briefly show in the Monitor’s read-out window each time you plug in the<br />
Monitor. Remember to wait 5 minutes for all Sensors to send and update <strong>pre</strong>ssure readings.<br />
The observation of erroneous <strong>pre</strong>ssure values for all locations can sometimes be an indication<br />
that the Monitor has been placed into an alternate Metric <strong>pre</strong>ssure unit<br />
CAN MY MONITOR READ TEMPERATURE? Yes. PressurePro Monitors with RS232<br />
capabilities can display temperature measurements if it is operating in conjunction with tire<br />
management software. The Sensor can display the temperature of the interior of the Sensor to<br />
the tire management program. While a Sensor is screwed onto the tire, the dill valve in the<br />
stem is open and allows air from the tire to enter the Sensor. The temperature reading will be<br />
“relatively equivalent” to the air inside the tire. The outside/ambient temperature will affect<br />
the temperature but not enough to be 'significant'.<br />
9<br />
IMPORTANT NOTES<br />
Once Monitor is programmed, it retains all programmed settings. Turning off the<br />
vehicle or removing power from the Monitor will not delete or change settings.<br />
When a Sensor is installed, it records the tire <strong>pre</strong>ssure at the time of <strong>installation</strong> as its<br />
BASELINE <strong>pre</strong>ssure setting. If you remove and reinstall a Sensor while the tires are<br />
warm, the Sensor will record the elevated WARM <strong>pre</strong>ssure when reinstalled, as its new<br />
BASELINE <strong>pre</strong>ssure from which to trigger an alert. When the tires cool, the <strong>pre</strong>ssure<br />
could fall enough to cause an alert. If possible, wait to reinstall the Sensor until the tire<br />
is cold and at the manufacturer specified cold <strong>pre</strong>ssure.<br />
Cold temperatures and high altitudes reduce tire <strong>pre</strong>ssures. If a tire is close to its low<br />
<strong>pre</strong>ssure, an alert can be sounded when the <strong>pre</strong>ssure drops overnight due to the cooler<br />
temperatures. To correct this problem, remove Sensor and inflate tire to its manufacturer<br />
specified <strong>pre</strong>ssure in the morning while the tires are still cold. Make sure Sensor is off of<br />
the stem for at least 60 seconds to allow Sensor to “reset”, then screw back on<br />
A visual inspection of tires on a regular basis is recommended. PressurePro does not<br />
PREVENT low tire <strong>pre</strong>ssure – but it can alert if tire <strong>pre</strong>ssure becomes low, allowing<br />
corrective action to be taken. A damaged Sensor or valve stem can cause <strong>pre</strong>ssure loss.<br />
Inspect regularly. If repeated faults are observed, discontinue use of the system and<br />
contact your dealer/distributor.<br />
PressurePro cannot <strong>pre</strong>vent tire/wheel overload. Overloading any tire is EXTREMELY<br />
dangerous and can cause failure of ANY SUSPENSION COMPONENT, not just tires!<br />
The ONLY way to detect overloading is to weigh the vehicle! A vehicle should<br />
NEVER be operated if the weight on ANY wheel is greater than the design<br />
specifications! Even a correctly inflated tire can fail if overloaded!<br />
If you are carrying a heavy load on your vehicle, whether on the full vehicle or a single<br />
side, tire <strong>pre</strong>ssures should be adjusted upwardly, appropriate to the load.<br />
Tires can fail for other reasons besides low <strong>pre</strong>ssure or overloading. Always be on the<br />
alert for any OTHER tire problems as indicated by unusual noises, vibration, uneven<br />
tread wear, or bulges on the tire! If any of these symptoms occur, have the tires checked<br />
IMMEDIATELY by a professional!<br />
VALVE STEM AND EXTENSION RECOMMENDATIONS<br />
• PressurePro recommends the use of metal valve stems in conjunction with<br />
PressurePro Sensors.<br />
• PressurePro recommends the use of fastener brackets to anchor valve stem<br />
extensions. Extensions add length and weight, adding greater centrifugal forces<br />
and putting added stress on the stem. When using PressurePro Sensors with an<br />
extension on the valve stem, securing the stem to <strong>pre</strong>vent vibration and<br />
movement is important for safety.<br />
• PressurePro recommends regular maintenance and upkeep on all valve stems, and<br />
replacement of older stems.<br />
10
TESTING SIGNAL STRENGTH<br />
1. TO SEE SENSOR PACKET COUNTS - Press “PROG” button until flashing<br />
green power light turns solid (5 sec.) then release. You are in Program Mode.<br />
2. Use the UP or DOWN ARROWS to select a tire location with a Sensor. Monitor<br />
will display three dashes (---). Hold ‘SET’ button down until a number appears on<br />
the display, then release the button. The display will go blank With release of the<br />
'SET' button - unit will change to DIAGNOSTIC DISPLAY MODE.<br />
3. Scroll to tire locations with UP & DOWN arrows. The number displayed for each<br />
tire location is the current transmission packet count for that selected tire (00. to<br />
255 at which time it rolls over and begins again).<br />
4. Note - while in diagnostic mode, entry into programming mode and delete<br />
functions is disabled.<br />
5. To get to Signal Strength Testing - Press and hold the “PROG” button to change<br />
the diagnostic display contents from packet counts to the background “signal”<br />
level. While holding the “PROG” button, 3 digits will appear. The left two digits<br />
indicate the RF ‘noise level’ the monitor is experiencing at that time, and the righthand<br />
digit display which shows as “A” (meaning Ambient). This tells you how<br />
much RF interference is <strong>pre</strong>sent at that time and location. Levels over 5 can be<br />
considered 'noisy' and will make it more difficult to receive Sensor packets. The<br />
lower the number, the less interference. Once the “PROG” button is released, the<br />
SIGNAL LEVEL STATUS of the Sensor selected is displayed.<br />
6. Signal strength of 1 or 2 is marginal reception; some signals will not be received.<br />
Signal strength above 4 is good. Average signal strength is 5 to 6.<br />
7. The monitor will pick up transmissions from both the Sensor on the tire and from<br />
the Echo Repeater. If the transmission is from the Echo Repeater, the reading<br />
could come in with a decimal point between the signal strength reading and<br />
temperature reading. For example, a signal strength reading of 5, coming from an<br />
Echo Repeater, with a temperature reading of 4 would appear as 5.4. If the signal is<br />
a Sensor strength signal, it would read as 54 (with no decimal).<br />
8. The toggle sequence between packet counts and signal level can be repeated as<br />
desired with each <strong>pre</strong>ss of “PROG”. Toggle sequence is:<br />
a. Packet count (decimal point).<br />
b. Background noise level while “PROG” held.<br />
c. Sensor signal strength (no decimal point) or repeater signal<br />
strength (second decimal point) depending which was the last signal to<br />
be received for that programmed Sensor.<br />
d. Background noise level while “PROG” held.<br />
e. Cycle repeats.<br />
9. Pressing “SET” at any time cancels diagnostic mode.<br />
TEMPERATURE<br />
When in DIAGNOSTIC DISPLAY MODE, (see above – Testing Signal Strength) the left<br />
two digits give an indication of the RF signal strength level above the background ‘noise’<br />
level - measured during the latest packet. The right-most digit is the temperature code<br />
received from the sensor. 0= -58 to -22°F; 1= -22 to 14°F; 2 = 14 to 59°F; 3= 50 to 86°F; 4=<br />
86 to 122°F; 5= 122 to 158°F; 6= 158 to 194°F; 7 = 194 to 230°F (sensor melting range).<br />
11<br />
CAUSE OF RANDOM RED SENSOR-LOCATION LIGHTS<br />
On rare occasion, you might notice your Monitor display a solid red light at a specific<br />
location. If you scroll to that location it will display 3 dashes (---), emit an audible beep<br />
and commence a slow blinking of the tire’s depicted location light. This event occurs<br />
when there has been interference or your Sensor is in a poor rotational pathway, and your<br />
Senor’s signal has been blocked from your Monitor. As with all devices utilizing radio<br />
frequency (RF), interference is normal and can be expected from time to time. If this event<br />
happens frequently however, you need to check your Sensor’s signal strength.<br />
Note: It is important to understand how PressurePro Sensors operate and the difference<br />
between an Update Pressure Transmission and a Low Pressure Alert Transmission to<br />
understand the significance of a random red Sensor location light. PressurePro Sensors<br />
take a sample of your tire <strong>pre</strong>ssure every 7 seconds, and report new Update Pressure<br />
readings to your Monitor every 5 minutes. In order to send this many <strong>pre</strong>ssure readings<br />
without significant battery life loss, Sensors send Update signals through short bursts.<br />
If at any time your <strong>pre</strong>ssure hits a low or high <strong>pre</strong>ssure alert level, it will override the 5<br />
minute Update alert and timing, and send a reading immediately to your Monitor. A Low<br />
Pressure Alert Transmission is much different than that of a regular update alert in that it<br />
sends a longer, stronger RF transmission that emits continuously white the wheel rotates a<br />
number of times. This stronger and longer transmission helps assure that a Alert Signal<br />
will be received, even during a red location light occurrence.<br />
If inconvenienced by the red light indicators or dashes (---), the use of our optional<br />
“Extended Antenna Kit” or our “Echo Repeater” should be considered.<br />
___________________________________________________________________________________________<br />
IMPORTANT: When an alert is given that one or more of your tires is underinflated,<br />
stop and check your tires as soon as possible and inflate them to the proper<br />
<strong>pre</strong>ssure. Driving on a significantly under-inflated tire causes the tire to overheat<br />
and can lead to tire failure. Under-inflation also reduces fuel efficiency, tire tread life<br />
and may affect the vehicle’s handling and stopping ability. Each tire, including the<br />
spare, should be checked monthly. Check <strong>pre</strong>ssures when tire is cold and fill to the<br />
recommended inflation <strong>pre</strong>ssure as specified on the vehicle or in the owner’s manual.<br />
This device complies with part 15 of the FCC rules. Operation is subject to the<br />
following two conditions: (1) This device may not cause harmful interference, and (2)<br />
this device must accept any interference received, including interference that may<br />
cause undesired operation.<br />
PressurePro is a device meant for displaying tire <strong>pre</strong>ssures. As with all devices that<br />
use RF signals, the signal can be interrupted. PressurePro has been designed to work<br />
optimally to overcome the interference that can block signals. As with most RF<br />
products, no guarantee of signals can be made.<br />
___________________________________________________________________________________________<br />
PressurePro – “Reliable Under Pressure” <br />
12
13<br />
TIPS<br />
VEHICLE STORAGE: If storing your vehicle for extended periods, remove the<br />
Sensors. Mark each Sensor’s location so it can be replaced on the same tire location from<br />
where it was removed (eliminating the need for reprogramming). When putting the<br />
system back on, power up Monitor first, next screw Sensors onto their original wheel<br />
locations. Pressure readings will display on Monitor (can take up to 1 minute for new<br />
readings to report). PressurePro system is now active.<br />
CAUTIONS: (1) Know the general condition of all tires before moving the vehicle.<br />
Running on deflated tires can quickly ruin the tire. (2) The 2/3 oz. Sensor, on a typical<br />
RV or large truck, normally will not require the tire be rebalanced. Smaller tires may<br />
require attention. (3) It is important to make sure valve stems are a quality stem in good<br />
condition.<br />
ROTATING OR REPLACING TIRES: Remove each Sensor until the tire work is<br />
completed, then return each Sensor to its original wheel location. Mark the Sensors to<br />
their wheel location so you do not have to “Delete” the Sensor positions on the Monitor to<br />
reinstall the Sensors. See “Removing Sensors to Rotate or Replace Tires” section.<br />
REMOTE ANTENNA FOR UNIQUE APPLICATIONS: Due to the unique features<br />
of RF signals and the construction and interference from electronics on some vehicles, an<br />
Optional Antenna Kit or Repeater may be needed. Contact your Dealer/Distributor.<br />
RF (Radio Frequency) PRODUCTS: PressurePro utilizes RF technology to transmit a<br />
signal between the Sensor and the Monitor. RF signals are subject to interference from<br />
many types of signals and products which can interfere with the operation of the product.<br />
As with cell phones and other types of electronics using RF signals, signal interruption<br />
can occur, causing a lost signal transmission. PressurePro Monitors are continually<br />
searching for signals from the Sensors. RF signals can be interrupted in many ways and<br />
PressurePro has been designed to overcome interruptions in most cases.<br />
CHANGING TIRE PRESSURES: PressurePro Sensors adjust automatically to the<br />
<strong>pre</strong>ssure in a tire when the Sensor is screwed onto the valve stem. Removing the Sensor<br />
from the valve stem for 60 seconds will “blank” the old reading and allow the<br />
Sensor to accept a new <strong>pre</strong>ssure reading when screwed back onto the valve stem.<br />
The Sensor uses the new <strong>pre</strong>ssure as its “Baseline” point from which to trigger a low<strong>pre</strong>ssure<br />
alert.<br />
3 DASHES (- - -): If unplugged or when powering off the Monitor, the Monitor retains<br />
all settings and displays 3 dashes (- - -) until Sensors send an updated reading within the<br />
normal 5 minute reporting period.<br />
NOTE: AFTER A VEHICLE HAS BEEN MOVING, TIRE PRESSURE BUILDS DUE TO<br />
HEAT IN THE TIRE. IF A SENSOR IS REMOVED, THEN REPLACED, IT USES THE<br />
CURRENT (HIGHER) PRESSURE AS THE “BASELINE” POINT FROM WHICH TO<br />
ALERT. THIS COULD LEAD TO UNNECESSARY ALERTS WHEN TIRES COOL AND<br />
PRESSURES DROP (USUALLY IN THE MIDDLE OF THE NIGHT). ALWAYS FILL TIRES<br />
AT AMBIENT TEMPERATURE, EARLY IN THE DAY. REMOVE SENSORS, (CHECK<br />
AND FILL PRESSURE IF NEEDED).<br />
SPECIFICATIONS<br />
SENSOR<br />
Sensor Transmit Range Approx. 300 feet (Line-of-Sight)<br />
Operating Frequency 433.92 MHz FM<br />
Operating Temperature Range -40°C / -40F to +104°C / 220F<br />
Sensor Weight 2/3 oz. or 17 grams<br />
Sensor Dimensions 1.01" H x 1.11" Dia.<br />
Sensor Batteries Internal, non-rechargeable/not replaceable<br />
Sensor Pressure Range 8 to 299 psi<br />
55 to 1999 kPa<br />
1 to 20.3 BAR<br />
Sensor Low Voltage Shutdown 2.2 Volts<br />
Accuracy +/- 3% range up to 120 psi<br />
+/- 5% from 120 up<br />
MONITOR<br />
Monitor Power Requirements<br />
12VDC; typically draws 125 mA in<br />
standby. Less than 250mA with Led’s on.<br />
Monitor Dimensions 6.5” W x 3.0” H x 0.5” D<br />
Monitor Weight 4 oz.<br />
Monitor Power Cord Plug Type USB Mini B – 8 ft. cord<br />
Monitor Tire Positions 1 to 64 wheel positions<br />
Sensor Alarm Trigger Settings 12.5% and 25% below the original tire<br />
inflation level; upper alert set at 24%<br />
variable by user from 10% to 45%<br />
J1708 Capable Intelligent Monitor/Bridge/Repeater<br />
RS232 Capable All standard Monitors<br />
J1939 Capable CANbus<br />
J2497 PLC for trucks<br />
US Letter Patent # 6,453,737<br />
PressurePro systems comply with Part 15, Class B of the FCC Rules.<br />
This device complies with part 15 of the FCC rules. Operation is subject to the<br />
following two conditions: (1) this device may not cause harmful interference,<br />
and (2) this device must accept any interference received, including interference<br />
that may cause undesired operation. PressurePro is a device meant for displaying<br />
tire <strong>pre</strong>ssures. As with all devices that use RF signals, the signal can be<br />
interrupted. PressurePro has been designed to work optimally to overcome the<br />
interference that can block signals. As with most RF products, no guarantee of<br />
signals can be made.<br />
14
LIMITED WARRANTY<br />
ONE YEAR LIMITED WARRANTY: Subject to the limitations and exclusions set forth in this<br />
Limited Warranty, PressurePro is warranted by Advantage PressurePro, LLC (hereinafter “APP”)<br />
against defects in material or workmanship that result in a product failure during the one-year period<br />
following the date of purchase. This Limited Warranty applies only to claims made by the original<br />
end user (hereinafter “you”) and cannot be assigned, transferred or conveyed to any subsequent<br />
users.<br />
EXCLUSIONS FROM COVERAGE: This Warranty does not apply to any claims arising from<br />
misuse, abuse, unauthorized repair or alteration, circumstances where PressurePro is improperly<br />
installed or improperly wired contrary to PressurePro product <strong>instructions</strong>; or damage or defect<br />
attributable to fire or other casualty, including, without limitation, acts of God or exposure to<br />
abrasive or corrosive materials or pollutants, or attributable to collision or other accidents<br />
involving vehicles upon which the PressurePro is installed. Removal or alteration of labels voids<br />
product Warranty. Only PressurePro accessories may be used with PressurePro products. The<br />
use of other accessories with PressurePro product is prohibited and can damage the PressurePro<br />
product. Warranty problems caused by use of accessories not supplied by APP will not be<br />
covered under the warranty.<br />
LIMITATIONS: APP ex<strong>pre</strong>ssly limits the applicability of the implied warranty of merchantability<br />
and the implied warranty of fitness for a particular purpose to the one-year warranty period as<br />
provided herein. Some states don’t allow limitations on how long an implied warranty lasts, so the<br />
above limitation may not apply.<br />
To the extent permitted by state law, the remedy of repair or replacement discussed below is the sole<br />
remedy available to the end user under this Limited Warranty. THIS LIMITED WARRANTY<br />
SPECIFICALLY EXCLUDES ALL INCIDENTAL, SPECIAL, OR CONSEQUENTIAL<br />
DAMAGES. SOME STATES DO NOT ALLOW THE EXCLUSION OR LIMITATION OF<br />
INCIDENTAL OR CONSEQUENTIAL DAMAGES, SO THE ABOVE LIMITATION OR<br />
EXCLUSION MAY NOT APPLY TO YOU. To the extent permitted by state law, APP’s liability<br />
for PressurePro will not exceed the purchase price paid for the product.<br />
NOTICE: This warranty gives you specific legal rights, and you may also have other rights, which<br />
vary from state to state.<br />
EXCLUSIVE AGREEMENT: To the extent permitted by state law, this One Year Limited<br />
Warranty is a complete and exclusive statement of the warranties, which apply to the PressurePro;<br />
there are no ex<strong>pre</strong>ss or implied warranties beyond those ex<strong>pre</strong>ssly stated above. No employee,<br />
agent, dealer or other person is authorized to give any warranties on behalf of the APP, except as<br />
authorized in writing.<br />
STATUTE OF LIMITATIONS: To the extent permitted by state law, in purchasing the<br />
PressurePro you agree that any action for breach of contract or warranty must be commenced within<br />
one year after the cause of action has accrued.<br />
PROCEDURE: In the event that a product failure covered by this warranty occurs while this<br />
warranty is in effect, APP will, at its option, either: (a) repair the defective unit; (b) replace the<br />
defective unit with a new unit; or (c) replace the defective unit with a refurbished unit. APP will<br />
ship your repaired, new, or refurbished unit to you without charge for parts, service, or any other<br />
cost (except shipping and handling) incurred by APP or its re<strong>pre</strong>sentatives in connection with the<br />
performance of this warranty. Failed units covered under this warranty must be sent by you to<br />
APP with shipping <strong>pre</strong>paid by you. You are responsible for all costs incurred in the removal,<br />
re<strong>installation</strong>, and shipping of the unit. A copy of the sales slip received by you at the point of<br />
purchase of the unit must accompany the returned unit. Call APP for Warranty Return<br />
Authorization.<br />
15<br />
TIRE PRESSURE MONITORING SYSTEM<br />
CORPORATE OFFICES:<br />
ADVANTAGE PRESSUREPRO, LLC<br />
205 W. WALL STREET; HARRIS0NVILLE, MO 64701<br />
TEL: 816-887-3505 FAX: 816-887-3705<br />
Website: www.advantage<strong><strong>pre</strong>ssurepro</strong>.com<br />
FOR ORDERING OR TECHNICAL ASSISTANCE, CONTACT YOUR DEALER.<br />
WARRANTY AUTHORIZATION:<br />
FOR RETURN AUTHORIZATION ON WARRANTY ISSUES<br />
CALL PRESSUREPRO TOLL FREEAT: 800-959-3505<br />
IMPORTANT: Please return your warranty card to PressurePro<br />
(address above) to register and activate your warranty. Customers must<br />
retain their original purchase receipt as a copy will be required for<br />
warranty or service work on your PressurePro product.<br />
Developed and Manufactured in the USA<br />
2-25-10 16