Delphi AM/FM Stereo and CD Receivers - Pana-Pacific
Delphi AM/FM Stereo and CD Receivers - Pana-Pacific
Delphi AM/FM Stereo and CD Receivers - Pana-Pacific

Create successful ePaper yourself
Turn your PDF publications into a flip-book with our unique Google optimized e-Paper software.
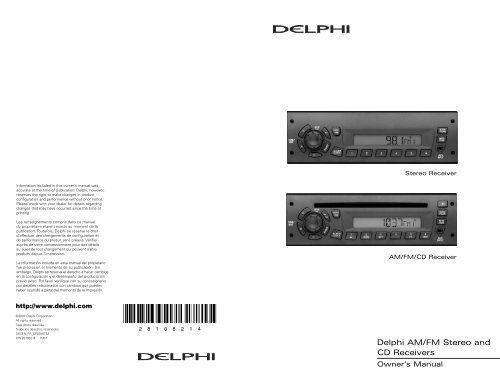
<strong>Stereo</strong> Receiver<br />
Information included in this owner’s manual was<br />
accurate at the time of publication. <strong>Delphi</strong>, however,<br />
reserves the right to make changes in product<br />
configuration <strong>and</strong> performance without prior notice.<br />
Please check with your dealer for details regarding<br />
changes that may have occurred since the time of<br />
printing.<br />
Les renseignements compris dans ce manuel<br />
du propriétaire étaient exacts au moment de la<br />
publication. Toutefois, <strong>Delphi</strong> se réserve le droit<br />
d’effectuer des changements de configuration et<br />
de performance du produit sans préavis. Vérifier<br />
auprès de votre concessionnaire pour des détails<br />
au sujet de tout changement qui peuvent s’être<br />
produits depuis l’impression.<br />
La información incluida en este manual del propietario<br />
fue precisa en el momento de su publicación. Sin<br />
embargo, <strong>Delphi</strong> se reserva el derecho a hacer cambios<br />
en la configuración y el desempeño del producto sin<br />
previo aviso. Por favor verifique con su concesionario<br />
por detalles relacionados con cambios que pueden<br />
haber ocurrido a partir del momento de la impresión.<br />
<strong>AM</strong>/<strong>FM</strong>/<strong>CD</strong> Receiver<br />
http://www.delphi.com<br />
©2007 <strong>Delphi</strong> Corporation.<br />
All rights reserved<br />
Tous droits réservés.<br />
Todos los derechos reservados.<br />
DESEN_FR_SP0700732<br />
P/N 28108214 11/07<br />
2 8 1 0 8 2 1 4<br />
<strong>Delphi</strong> <strong>AM</strong>/<strong>FM</strong> <strong>Stereo</strong> <strong>and</strong><br />
<strong>CD</strong> <strong>Receivers</strong><br />
Owner’s Manual
TABLE OF CONTENTS<br />
In this manual you will find out how to operate the receiver included in your<br />
vehicle. Be sure to read about the specific unit supplied with your vehicle.<br />
Introduction . . . . . . . . . . . . . . . . . . . . . . . . . . . . . . . . . . . . . . . . . . . . . . . . . . . . . . . . . . . . . . . .2<br />
Radio Receiver Layout . . . . . . . . . . . . . . . . . . . . . . . . . . . . . . . . . . . . . . . . . . . . . . . . . . . . .2<br />
Vehicle Damage Warnings . . . . . . . . . . . . . . . . . . . . . . . . . . . . . . . . . . . . . . . . . . . . . . . .4<br />
Operating Instructions<br />
Using the Clock . . . . . . . . . . . . . . . . . . . . . . . . . . . . . . . . . . . . . . . . . . . . . . . . . . . . . . . . . . . . . . .4<br />
Setting the Clock . . . . . . . . . . . . . . . . . . . . . . . . . . . . . . . . . . . . . . . . . . . . . . . . . . . . . . . . . . . .4<br />
Using the Alarm . . . . . . . . . . . . . . . . . . . . . . . . . . . . . . . . . . . . . . . . . . . . . . . . . . . . . . . . . . . . . . .5<br />
Setting the Alarm . . . . . . . . . . . . . . . . . . . . . . . . . . . . . . . . . . . . . . . . . . . . . . . . . . . . . . . . . . .5<br />
Turning the Alarm Off . . . . . . . . . . . . . . . . . . . . . . . . . . . . . . . . . . . . . . . . . . . . . . . . . . . . . . . .6<br />
Activating Snooze . . . . . . . . . . . . . . . . . . . . . . . . . . . . . . . . . . . . . . . . . . . . . . . . . . . . . . . . . . .6<br />
General Radio Receiver Functions . . . . . . . . . . . . . . . . . . . . . . . . . . . . . . . . . . . . . . . . . . . . . . . . .6<br />
Turning the Power On . . . . . . . . . . . . . . . . . . . . . . . . . . . . . . . . . . . . . . . . . . . . . . . . . . . . . . . .6<br />
Adjusting the Volume . . . . . . . . . . . . . . . . . . . . . . . . . . . . . . . . . . . . . . . . . . . . . . . . . . . . . . . .6<br />
One-Hour Timer . . . . . . . . . . . . . . . . . . . . . . . . . . . . . . . . . . . . . . . . . . . . . . . . . . . . . . . . . . . . .6<br />
Display . . . . . . . . . . . . . . . . . . . . . . . . . . . . . . . . . . . . . . . . . . . . . . . . . . . . . . . . . . . . . . . . . . . .6<br />
Setting a Default Display . . . . . . . . . . . . . . . . . . . . . . . . . . . . . . . . . . . . . . . . . . . . . . . . .7<br />
Auxiliary Mode . . . . . . . . . . . . . . . . . . . . . . . . . . . . . . . . . . . . . . . . . . . . . . . . . . . . . . . . . . . . .7<br />
Adjusting the Receiver Settings . . . . . . . . . . . . . . . . . . . . . . . . . . . . . . . . . . . . . . . . . . . . . . . .7<br />
Using the Radio . . . . . . . . . . . . . . . . . . . . . . . . . . . . . . . . . . . . . . . . . . . . . . . . . . . . . . . . . . . . . . . .8<br />
Finding a Station . . . . . . . . . . . . . . . . . . . . . . . . . . . . . . . . . . . . . . . . . . . . . . . . . . . . . . . . . . . .8<br />
Setting Presets . . . . . . . . . . . . . . . . . . . . . . . . . . . . . . . . . . . . . . . . . . . . . . . . . . . . . . . . . . . . .9<br />
Using the Weatherb<strong>and</strong> . . . . . . . . . . . . . . . . . . . . . . . . . . . . . . . . . . . . . . . . . . . . . . . . . . . . . . . .10<br />
Using the Compact Disc Player . . . . . . . . . . . . . . . . . . . . . . . . . . . . . . . . . . . . . . . . . . . . . . . . . .10<br />
Playing a Compact Disc . . . . . . . . . . . . . . . . . . . . . . . . . . . . . . . . . . . . . . . . . . . . . . . . . . . . . .10<br />
Button Functions . . . . . . . . . . . . . . . . . . . . . . . . . . . . . . . . . . . . . . . . . . . . . . . . . . . . . . . . . . .11<br />
Troubleshooting . . . . . . . . . . . . . . . . . . . . . . . . . . . . . . . . . . . . . . . . . . . . . . . . . . . . . . . . . . .11<br />
Operating Tips<br />
Tips About Your Audio System . . . . . . . . . . . . . . . . . . . . . . . . . . . . . . . . . . . . . . . . . . . . . . . . .12<br />
Underst<strong>and</strong>ing Radio Reception . . . . . . . . . . . . . . . . . . . . . . . . . . . . . . . . . . . . . . . . . . . . . . . .12<br />
Care of Your Compact Discs . . . . . . . . . . . . . . . . . . . . . . . . . . . . . . . . . . . . . . . . . . . . . . . . . . .13<br />
1
Cuidado de sus discos compactos<br />
Trate sus discos con cuidado. Guárdelos en sus estuches originales u otros<br />
estuches protectores y alejados de la luz solar directa y el polvo. Si la superficie<br />
del disco se mancha, humedezca un trapo limpio y suave con una solución de<br />
detergente suave y neutro. Limpie el disco frot<strong>and</strong>o del centro hacia el borde.<br />
Nunca toque la superficie grabada cu<strong>and</strong>o maneje los discos. Levante los discos<br />
sujet<strong>and</strong>o los bordes exteriores o el borde del hueco y el borde exterior.<br />
No pegue una etiqueta o cinta en la superficie de un disco porque puede<br />
dañar el disco y/o el reproductor.<br />
AVISO:<br />
Antes de agregar cualquier equipo de sonido a su vehículo – como radio CB,<br />
teléfono celular o radios de dos vías– asegúrese de poder agregar lo que desea.<br />
Si puede, es muy importante hacerlo correctamente. El equipo de sonido<br />
agregado puede interferir con, e incluso dañar, el funcionamiento del motor, radio<br />
u otros sistemas de su vehículo. Los sistemas de su vehículo pueden interferir<br />
con la operación del equipo de sonido que se agregue de forma incorrecta. Antes<br />
de agregar equipo de sonido, verifique con su concesionario y asegúrese de<br />
revisar todos los reglamentos federales relacionados con las unidades de radio<br />
y teléfonos móviles.<br />
AVISO:<br />
Solamente un concesionario autorizado debe instalar o desmontar este sistema.<br />
La garantía se anula si la instalación o remoción es realizada por alguien que no<br />
es un concesionario autorizado.<br />
INTRODUCTION<br />
Your <strong>Delphi</strong> Receiver has been designed to operate easily <strong>and</strong> give you years of<br />
listening pleasure. To get the most enjoyment out of your receiver, read this<br />
manual <strong>and</strong> acquaint yourself with the receiver before you use it. Find out what it<br />
can do <strong>and</strong> how to operate all of its controls. By doing so you can be sure you are<br />
getting the most out of the advanced technology that has been designed into it.<br />
3<br />
4<br />
2<br />
1<br />
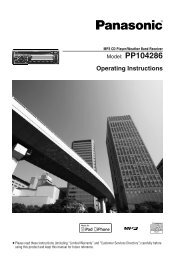
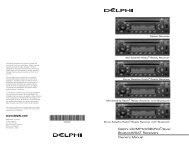
<strong>Delphi</strong> <strong>Stereo</strong> Receiver<br />
10<br />
5<br />
6 7 8<br />
9<br />
Button Function Page<br />
1. DSPL/TIME Switches to time set mode/changes display . . . . . . .4,6<br />
2. AUX Switches to auxiliary input mode . . . . . . . . . . . . . . . . .7<br />
3. Turns the radio on <strong>and</strong> off . . . . . . . . . . . . . . . . . . . . . .6<br />
4. SETUP push Turns radio on/controls volume/adjusts bass, treble,<br />
balance, fade, seek sensitivity, dim, <strong>and</strong> speakers . . .7<br />
5. TUNE/SEEK Switches to next radio station . . . . . . . . . . . . . . . . . . .8<br />
6. TUNE/SEEK Switches to previous radio station . . . . . . . . . . . . . . . .8<br />
7. BAND Switches b<strong>and</strong>s . . . . . . . . . . . . . . . . . . . . . . . . . . . . . .8<br />
8. ALARM CLOCK Switches to alarm set mode . . . . . . . . . . . . . . . . . . . .5<br />
9. Pushbuttons 1-6 Presets stations . . . . . . . . . . . . . . . . . . . . . . . . . . . . . .9<br />
10. AUX INPUT Auxiliary input for external audio devices . . . . . . . . . . .7<br />
11. AUTO STORE Stores strongest stations to presets . . . . . . . . . . . . . .9<br />
12. SCAN/PSCAN Scans stations/presets in current b<strong>and</strong> . . . . . . . . . . . .9<br />
12<br />
11<br />
41<br />
2
3<br />
4<br />
2<br />
5<br />
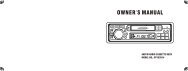
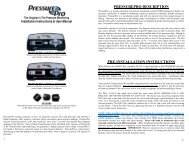
<strong>Delphi</strong> <strong>CD</strong> Receiver<br />
Button Function Page<br />
1. DSPL/TIME Switches to time set mode/changes display . . . . . . .4,6<br />
2. /AUX Switches to <strong>CD</strong>/Auxiliary input mode . . . . . . . . . . . . . .7<br />
3. Turns radio on <strong>and</strong> off . . . . . . . . . . . . . . . . . . . . . . . . . .6<br />
4. SETUP push Turns radio on/controls volume/adjusts audio, bass,<br />
treble, balance, fade, seek sensitivity, dim <strong>and</strong><br />
speakers. . . . . . . . . . . . . . . . . . . . . . . . . . . . . . . . . . . .7<br />
5. TUNE/SEEK Increments to next radio station/<strong>CD</strong> track . . . . . . . .8,11<br />
6. TUNE/SEEK Increments to previous radio station/<strong>CD</strong> track . . . . .8,11<br />
7. BAND Switches between <strong>AM</strong>, <strong>FM</strong>1, <strong>FM</strong>2, <strong>FM</strong>3 <strong>and</strong><br />
Weather (WX) b<strong>and</strong>s . . . . . . . . . . . . . . . . . . . . . . . . . .8<br />
8. ALARM CLOCK Switches to alarm set mode . . . . . . . . . . . . . . . . . . . .5<br />
9. Plays <strong>and</strong> pauses <strong>CD</strong>s or auxiliary audio inputs . . . . .11<br />
10. RDM Plays <strong>CD</strong> tracks r<strong>and</strong>omly . . . . . . . . . . . . . . . . . . . . . .11<br />
11. RPT Repeats the same <strong>CD</strong> track until cancelled . . . . . . . . .11<br />
12. Pushbuttons 1-6 Presets stations . . . . . . . . . . . . . . . . . . . . . . . . . . . . . .9<br />
13. FF Fast forwards <strong>CD</strong> track . . . . . . . . . . . . . . . . . . . . . . . .11<br />
14. REV Fast reverses <strong>CD</strong> track . . . . . . . . . . . . . . . . . . . . . . . .11<br />
15. AUX INPUT Auxiliary input for external audio devices . . . . . . . . . . .7<br />
16. AUTO STORE Stores strongest stations to presets . . . . . . . . . . . . . .9<br />
17. SCAN/PSCAN Scans stations, presets <strong>and</strong> <strong>CD</strong> tracks . . . . . . . . . . 9,11<br />
18. Ejects <strong>CD</strong>s. . . . . . . . . . . . . . . . . . . . . . . . . . . . . . . . . . 11<br />
3<br />
1<br />
6 7 8 9 10 11 12 13 14 15<br />
18<br />
16<br />
17<br />
TRACKING<br />
(ajuste):<br />
Pérdida del control de ajuste. Las razones posibles incluyen:<br />
– El disco está sucio, rayado o húmedo – intente limpiarlo.<br />
– El lente está sucio – limpie el lente del disco con un<br />
limpiador de lentes.<br />
– El disco está atascado y no puede girar – contacte<br />
al concesionario.<br />
LOAD (carga): Problema con motor de carga/descarga – comuníquese<br />
con su concesionario.<br />
NOTA: La calidad del sonido, saltos de pista, dificultad para encontrar pistas<br />
y/o dificultad para cargar/expulsar un <strong>CD</strong>-R se pueden ver afectados<br />
por la calidad del <strong>CD</strong>-R, el método de grabación, la calidad de la música<br />
grabada o la forma en que se ha manejado el <strong>CD</strong>-R. Si estos problemas<br />
ocurren, trate de reproducir un <strong>CD</strong> que usted sepa que esté en buenas<br />
condiciones y verifique si el error se corrige. Si un error ocurre<br />
repetidamente o si no puede corregirlo, comuníquese con su<br />
concesionario. Si el radio indica un mensaje de error, escríbalo<br />
y entréguelo a su concesionario cu<strong>and</strong>o reporte el problema.<br />
PRECAUCIÓN:<br />
El rayo laser de un reproductor de discos compactos causa daños a la vista.<br />
No intente desarmar el reproductor. Esto le puede causar lesiones a usted<br />
o a otras personas y/o anular la garantía del reproductor.<br />
SUGERENCIAS PARA EL FUNCION<strong>AM</strong>IENTO<br />
Sugerencias sobre su sistema de sonido<br />
PRECAUCIÓN:<br />
Los daños en el oído causados por ruidos fuertes son casi indetectables<br />
hasta que es demasiado tarde. Su oído se puede adaptar a altos volúmenes<br />
de sonido. El sonido que parece normal puede ser muy alto y dañino para<br />
su oído. Tome sus precauciones ajust<strong>and</strong>o el volumen del radio a un nivel<br />
seguro de sonido antes de que su oído se ajuste a él.<br />
Para ayudar a prevenir la pérdida del oído:<br />
• Ajuste el control del volumen en el nivel más bajo.<br />
• Incremente el volumen lentamente hasta que pueda escuchar cómoda<br />
y claramente.<br />
Comprensión de la recepción del radio<br />
<strong>FM</strong> STEREO (<strong>FM</strong> estéreo): <strong>FM</strong> estéreo ofrece mejor sonido que <strong>AM</strong>, pero las<br />
señales de <strong>FM</strong> sólo tienen un alcance de entre 16 y 65 kms (10 y 40 millas).<br />
Los edificios o colinas altas pueden interferir con las señales de <strong>FM</strong>,<br />
ocasion<strong>and</strong>o que el sonido sea intermitente.<br />
<strong>AM</strong>: El rango para la mayoría de las estaciones de <strong>AM</strong> es mayor que las de<br />
<strong>FM</strong>, especialmente en la noche. A mayor rango, sin embargo, las estaciones<br />
pueden servir de interferencia entre ellas. <strong>AM</strong> puede tomar ruido de cosas<br />
como tormentas y cables de alta tensión. Intente reducir los agudos si<br />
experimenta interferencia.<br />
40
Funciones de los botones<br />
DSPL/TIM: Presione DSPL/TIME para alternar entre el número de pista/tiempo<br />
transcurrido y la hora. Para cambiar el display, vea la sección del Display en<br />
este manual.<br />
TUNE/SEEK (Sintonizar/búsqueda): Presione para avanzar a la pista<br />
siguiente. Aparecen el número de pista y el tiempo transcurrido.<br />
TUNE/SEEK (Sintonizar/búsqueda): Presione para regresar al inicio de<br />
la pista que está escuch<strong>and</strong>o. Presione este botón dentro de los primeros<br />
8 segundos de escuchar una pista para regresar al inicio de la pista anterior.<br />
Aparecen el número de pista y el tiempo transcurrido.<br />
1/PAUSE (pausa): Presione el botón 1/ para pausar un <strong>CD</strong>. PAU aparece<br />
en el display y se silencia el audio. Presione el botón de nuevo para continuar<br />
escuch<strong>and</strong>o el <strong>CD</strong>.<br />
2/RDM: Presione el botón RDM para activar la selección aleatoria de pistas.<br />
El display indica RDM y las pistas en el <strong>CD</strong> cargado se reproducen en orden<br />
aleatorio. Presione otra vez el botón RDM para descontinuar el modo aleatorio.<br />
3/RPT (repetir): Presione el botón RPT para repetir la pista que está escuch<strong>and</strong>o.<br />
RPT aparece en el display y la pista que está escuch<strong>and</strong>o se repetirá hasta que<br />
presione otra vez el botón RPT.<br />
5/AVANCE RÁPIDO: Mantenga presionado el botón FF para avanzar dentro<br />
de una pista. Cu<strong>and</strong>o suelte el botón se escucha el audio a la velocidad normal.<br />
El número de pista y el tiempo transcurrido aparecen durante 5 segundos<br />
antes de que aparezca el display predeterminado.<br />
6/RETROCESO: Mantenga presionado el botón REV para retroceder rápidamente.<br />
Cu<strong>and</strong>o suelte el botón se escucha el audio a la velocidad normal. El número<br />
de pista y el tiempo transcurrido aparecen durante 5 segundos antes de que<br />
aparezca el display predeterminado.<br />
EXPLORACIÓN DE PISTA: Presione SCAN/PSCAN para explorar todas las pistas<br />
en el <strong>CD</strong>. El reproductor irá automáticamente a la pista siguiente después<br />
de tocar cada pista por 10 segundos. Para terminar la exploración de pistas,<br />
presione nuevamente SCAN/PSCAN.<br />
EXPULSIÓN DE DISCO: Presione el botón<br />
39<br />
para expulsar un <strong>CD</strong>.<br />
Localización y resolución de problemas<br />
Los siguientes mensajes de error pueden aparecer durante la reproducción<br />
de un disco compacto:<br />
NO <strong>CD</strong>:<br />
FOCUS<br />
(enfoque):<br />
No hay ningún <strong>CD</strong> cargado en el reproductor.<br />
El lente no puede enfocarse en el disco.<br />
Las razones pueden incluir:<br />
– El disco está insertado al revés – sáquelo e insértelo de nuevo.<br />
– El disco está sucio, rayado o húmedo – intente limpiarlo.<br />
– El lente está sucio – limpie el lente del disco con un<br />
limpiador de lentes.<br />
– El clima está muy húmedo – espere una hora e intente<br />
de nuevo.<br />
VEHICLE D<strong>AM</strong>AGE WARNING<br />
In this manual you will find the following Cautions <strong>and</strong> Notices:<br />
CAUTION:<br />
These mean there is something that<br />
could hurt you or others.<br />
NOTICE:<br />
These mean there is something that<br />
could damage your vehicle.<br />
In the CAUTION area, you are informed of what hazard exists. Then you are told<br />
what to do to help avoid or reduce the hazard. Please read <strong>and</strong> follow these<br />
cautions. If you do not, you or others could be hurt.<br />
In the NOTICE area, you are informed of something that can damage your<br />
vehicle. Many times this damage would not be covered by your warranty <strong>and</strong><br />
could be costly. The notice will tell you what to do to help avoid the damage.<br />
NOTE: Other manuals may use CAUTION <strong>and</strong> NOTICE differently.<br />
OPERATING INSTRUCTIONS<br />
To learn how to get the most from your <strong>Delphi</strong> receiver, read all of the<br />
instructions that follow.<br />
CAUTION:<br />
When driving, always keep your eyes on the road <strong>and</strong> h<strong>and</strong>s on the steering<br />
wheel, paying careful attention to normal driving tasks. As always, the driver<br />
is responsible for safe vehicle operation. Not keeping your eyes on the road<br />
<strong>and</strong> h<strong>and</strong>s on the wheel while driving could result in injury to you or others.<br />
Using the Clock<br />
Your clock can function in a 12-hour or 24-hour mode. The 12-hour mode<br />
distinguishes between <strong>AM</strong> <strong>and</strong> PM. The 24-hour mode operates as military<br />
time. To change from 12- to 24-hour mode:<br />
1. Turn the ignition on.<br />
2. Press <strong>and</strong> hold the DSPL/TIME button until the hours <strong>and</strong> minutes digits<br />
flash <strong>and</strong> you hear a beep. This indicates you are in the time set mode.<br />
3. Press <strong>and</strong> release pushbutton 5 to toggle between 12- <strong>and</strong> 24-hour mode.<br />
After 5 seconds of inactivity, the display will return to the default display, <strong>and</strong> the<br />
current mode will be set.<br />
Setting the Clock<br />
1. Turn the ignition on.<br />
2. Press <strong>and</strong> hold the DSPL/TIME button until the hours <strong>and</strong> minutes digits<br />
flash <strong>and</strong> you hear a beep. This indicates you are in the time set mode.<br />
3. Press the DSPL/TIME button again until the hours digits flash.<br />
4. Rotate the SETUP knob to change the hour. Rotating the knob clockwise<br />
will increase the hour; rotating counterclockwise will decrease the hour.<br />
4
5. Press the DSPL/TIME button again causing the minutes digits to flash.<br />
Rotate the SETUP knob to change the minutes. Rotating the knob<br />
clockwise will increase the minutes; rotating counterclockwise will<br />
decrease the minutes.<br />
6. Press the DSPL/TIME button again to complete the time set procedure. The<br />
display will return to the default display.<br />
At any time during the time set process, not pressing a button or rotating the<br />
knob for 5 seconds will cancel time set mode, return the radio to normal<br />
operation <strong>and</strong> keep whatever changes you have made.<br />
CAUTION:<br />
Only set the clock when you are not operating your vehicle. Setting the clock<br />
while operating the vehicle could result in injury to you or others. As always,<br />
the driver is responsible for safe vehicle operation.<br />
Using the Alarm<br />
The alarm activates the radio at a set time. Momentarily pressing the ALARM<br />
CLOCK button will display the alarm set time.<br />
Setting the Alarm<br />
1 With the radio on, press <strong>and</strong> hold the ALARM CLOCK button until you see<br />
the “ALARM” icon <strong>and</strong> SET. You are now in alarm set mode. The hour digits<br />
for the alarm time will begin to flash.<br />
2. Rotate the SETUP knob until the desired hour appears on the display.<br />
Rotating the knob clockwise will increase the hour; rotating<br />
counterclockwise will decrease the hour.<br />
3. Press the ALARM CLOCK button again until the minutes digits flash.<br />
4. Rotate the SETUP knob to change the minutes.<br />
5. Press the ALARM CLOCK button again until SET TONE appears on the<br />
display.<br />
6. Press the ALARM button again until VOL appears on the display. Press<br />
the button again <strong>and</strong> you will hear the alarm tone. To increase the alarm<br />
volume, rotate the SETUP knob clockwise. To decrease the alarm volume,<br />
rotate the SETUP knob counterclockwise.<br />
7. Press the ALARM CLOCK button again to finish <strong>and</strong> return the display to<br />
normal operation. The icon will appear on the display to indicate that<br />
the alarm is active.<br />
NOTE:<br />
5<br />
If you do not press any button or rotate the knob for 5 seconds during<br />
the alarm set process, alarm clock setup will be cancelled <strong>and</strong> the radio<br />
will return to normal operation, keeping whatever setting changes have<br />
been made.<br />
CAUTION:<br />
Only set the alarm when you are not operating your vehicle. Setting the alarm<br />
while operating the vehicle could result in injury to you or others. As always,<br />
the driver is responsible for safe vehicle operation.<br />
Utiliz<strong>and</strong>o la b<strong>and</strong>a meteorológica<br />
El radio meteorológico NOAA (Administración oceánica y atmosférica nacional)<br />
es un servicio del Servicio meteorológico nacional. Ofrece transmisiones<br />
continuas con la información meteorológica más reciente directamente desde<br />
las instalaciones del Servicio meteorológico nacional. Se repiten mensajes<br />
meteorológicos grabados cada cuatro a seis minutos y se actualizan cada hora<br />
hasta tres horas o con más frecuencia en caso de ser necesario. La mayoría<br />
de las estaciones transmiten las 24 horas del día.<br />
El clima para el área donde usted esté se puede encontrar en una de las 7<br />
estaciones. Cu<strong>and</strong>o se encuentre en la modalidad de la b<strong>and</strong>a meteorológica,<br />
el display muestra WEATHER, WX y el número del canal. El canal se puede<br />
cambiar con los botones TUNE/SEEK y también se pueden programar<br />
estaciones en los botones.<br />
Las frecuencias relacionadas con los canales meteorológicos son las siguientes:<br />
1. 162.400 MHz 5. 162.500 MHz<br />
2. 162.425 MHz 6. 162.525 MHz<br />
3. 162.450 MHz 7. 162.550 MHz<br />
4. 162.475 MHz<br />
El servicio meteorológico nacional transmite aproximadamente 372 estaciones.<br />
Casi el 90 por ciento de la población nacional se encuentra dentro de la<br />
cobertura de alguna transmisión del radio meteorológico de NOAA.<br />
Uso del reproductor de discos compactos (si así está equipado)<br />
El reproductor de <strong>CD</strong> integrado reproduce discos compactos de tamaño gr<strong>and</strong>e.<br />
AVISO:<br />
Nunca introduzca algo que no sea un <strong>CD</strong> en el reproductor. Esto puede dañar<br />
al reproductor, resultar en reparaciones innecesarias y/o nulificar la garantía<br />
dela unidad.<br />
Reproducción de un disco compacto<br />
1. Conecte el encendido y encienda el radio.<br />
2. Inserte un disco parcialmente en la ranura, con su etiqueta hacia arriba. El<br />
reproductor automáticamente inserta el disco después de haberlo insertado<br />
parcialmente. El ícono de <strong>CD</strong> y la palabra LOADING aparecen en el display<br />
seguidos por el número de pista y el tiempo transcurrido. Entonces el disco<br />
comienza a tocar.<br />
3. Si está escuch<strong>and</strong>o <strong>AM</strong>/<strong>FM</strong>/WX, presione el botón /AUX para reproducir<br />
un disco que esté cargado en el reproductor. Si no hay discos cargados,<br />
el display indica“NO <strong>CD</strong>”durante cinco segundos y regresa al display<br />
predeterminado. Si se ha cargado un disco, el display muestra el número<br />
de pista y el tiempo transcurrido.<br />
Si se expulsa un <strong>CD</strong> y no se saca en 16 segundos, el <strong>CD</strong> se carga de nuevo,<br />
pero no comienza su reproducción hasta que se presione el botón /AUX.<br />
38
37<br />
2. Para aumentar la frecuencia del radio, presione el botón para<br />
ir a la siguiente estación más alta.<br />
3. Para reducir la frecuencia del radio, presione el botón para<br />
ir a la siguiente estación más baja.<br />
BÚSQUEDA: Presion<strong>and</strong>o los botones o por más de medio segundo<br />
activa la modalidad de búsqueda (SEEK) y aparece SEEK en el display. La<br />
modalidad de búsqueda (SEEK) termina cu<strong>and</strong>o se alcanza una estación<br />
que se puede sintonizar y se escuchará esa estación.<br />
Si SEEK no encuentra una estación que se pueda sintonizar después de<br />
buscar en la b<strong>and</strong>a dos veces, se termina la búsqueda y aparece NOT<br />
FOUND por 5 segundos en el display. Después de 5 segundos aparece el<br />
display predeterminado de fábrica y el radio continuará reproduciendo la<br />
estación que se estaba escuch<strong>and</strong>o antes de activar la búsqueda.<br />
Para cancelar la búsqueda presione otra vez o .<br />
PROGR<strong>AM</strong>ACIÓN AUTOMÁTICA: AUTO STORE almacena automáticamente las<br />
6 estaciones más fuertes en los botones 1-6. Mantenga presionado el botón<br />
AUTO STORE hasta que aparezcan AUTO y el ícono AS en el display. AUTO<br />
STORE tendrá efecto solamente en la b<strong>and</strong>a que está escuch<strong>and</strong>o. Por ejemplo:<br />
Si presiona AUTO STORE mientras escucha <strong>FM</strong>1, las estaciones programadas<br />
de <strong>AM</strong>, <strong>FM</strong>2, <strong>FM</strong>3 y WX no cambian. Mantener presionado AUTO STORE<br />
durante más de 2 segundos cancela la programación automática, y las<br />
estaciones programadas originales se restablecen.<br />
EXPLORACIÓN: Presione SCAN/PSCAN para explorar todas las estaciones en la<br />
b<strong>and</strong>a que esté us<strong>and</strong>o. Cu<strong>and</strong>o se encuentra una estación con una frecuencia<br />
alta, se escucha el radio por 5 segundos y continúa explor<strong>and</strong>o hasta que se<br />
presiona otra vez el botón SCAN/PSCAN. El display indica SCAN (exploración)<br />
y la frecuencia que está siendo explorada.<br />
EXPLORACIÓN DE LA PROGR<strong>AM</strong>ACIÓN: Presione SCAN/PSCAN por más<br />
de 2 segundos para explorar las estaciones programadas en la b<strong>and</strong>a que<br />
está escuch<strong>and</strong>o. (<strong>FM</strong> explora <strong>FM</strong>1, <strong>FM</strong>2 y <strong>FM</strong>3) Cu<strong>and</strong>o se encuentra una<br />
frecuencia suficientemente alta, el radio toca esa estación por 5 segundos y<br />
luego continúa la exploración. El display indica PSCN (exploración de estaciones<br />
programadas), la frecuencia, el número de estación programada y la b<strong>and</strong>a<br />
que se está escuch<strong>and</strong>o. La exploración de estaciones programadas continúa<br />
hasta que presione SCAN/PSCAN otra vez.<br />
Programación de estaciones<br />
Los seis botones numerados le permiten programar 6 de sus estaciones<br />
favoritas por b<strong>and</strong>a y regresar a ellas fácilmente con el toque de un botón.<br />
Para programar las estaciones:<br />
1. Encienda el radio.<br />
2. Elija la b<strong>and</strong>a.<br />
3. Sintonice la estación deseada.<br />
4. Mantenga presionado uno de los 6 botones numerados durante más<br />
de 2 segundos para programar la estación elegida. Cu<strong>and</strong>o la estación<br />
ha sido programada con el número de su elección, escuchará un<br />
“beep” y verá el número en el display.<br />
5. Repita los pasos del 1 al 4 para cada botón.<br />
Presionar un botón numerado en el futuro sintoniza el radio en la estación<br />
que programó en la b<strong>and</strong>a que esté escuch<strong>and</strong>o.<br />
Turning the Alarm Off<br />
Press <strong>and</strong> hold the ALARM CLOCK button until you hear a beep <strong>and</strong> the<br />
on the display disappears.<br />
Activating Snooze<br />
To use SNOOZE, press any button when the alarm is sounding. The alarm will<br />
sound again in 9 minutes.<br />
General Radio Receiver Functions<br />
Your receiver is equipped with:<br />
– An <strong>AM</strong> b<strong>and</strong> with 6 <strong>AM</strong> presets<br />
– Three <strong>FM</strong> b<strong>and</strong>s with a total of 18 <strong>FM</strong> presets<br />
– One weather b<strong>and</strong> with 6 WX presets<br />
Turning the Power On<br />
With the ignition on, the receiver can be turned on <strong>and</strong> off by pressing the<br />
button. Pressing the SETUP knob also turns on the receiver.<br />
Adjusting the Volume<br />
To increase volume, rotate the SETUP knob clockwise. To decrease volume,<br />
rotate the knob counterclockwise.<br />
One-Hour Timer<br />
With the ignition off, pressing the button or the SETUP knob will turn on the<br />
receiver <strong>and</strong> activate the receiver’s one-hour timer. The receiver will turn off after<br />
one hour. Pressing the button or the SETUP knob again reactivates the onehour<br />
timer.<br />
Display<br />
Your receiver’s default display is the time of day. It can also display additional<br />
information that changes depending upon the mode you are in. By pressing the<br />
DSPL/TIME button when the receiver is on, you can toggle between the available<br />
displays.<br />
Radio Mode Displays<br />
When you are using the radio, press the DSPL/TIME button to toggle between<br />
two displays:<br />
Display 1: Clock<br />
Display 2: Frequency<br />
<strong>CD</strong> Mode Displays<br />
When you are using the <strong>CD</strong> player, press the DSPL/TIME button to toggle<br />
between two displays:<br />
Display 1: Clock<br />
Display 2: Track number <strong>and</strong> elapsed time<br />
icon<br />
6
Setting a Default Display<br />
To change the default display:<br />
1. Turn the radio on.<br />
2. To change the radio or <strong>CD</strong> mode default display, you must be in the mode<br />
where you want to make a change.<br />
- Press the BAND button to enter radio mode.<br />
- Press the button to enter <strong>CD</strong> mode.<br />
3. Press <strong>and</strong> hold the DISPL/TIME button for 2 seconds until the hours <strong>and</strong><br />
minutes digits flash.<br />
4. While the hours <strong>and</strong> minutes digits are flashing, press pushbutton 6 until<br />
the display you want to be your default appears.<br />
Adjusting Display Brightness<br />
If the dash dimmer does not control the brightness of the receiver display or<br />
the receiver is operating in one-hour timer mode, press the SETUP knob until<br />
DIM <strong>and</strong> the brightness level appear on the display. Rotate the SETUP knob<br />
clockwise to increase the brightness of the receiver <strong>and</strong> counterclockwise to<br />
decrease it.<br />
Auxiliary Mode<br />
In Auxiliary Mode, you can play an external device like your iPOD or an MP3<br />
player that you have connected via the auxiliary input jack on the front of the<br />
receiver.<br />
To use an external device:<br />
1. Connect the device via the auxiliary input jack.<br />
2. Press the /AUX button until AUX IN appears on the display.<br />
When an external device is connected <strong>and</strong> turned on, you will be able to listen<br />
to it. If the /AUX button is pressed <strong>and</strong> no device is connected, the radio will<br />
display “NO AUX”.<br />
To mute auxiliary mode, press pushbutton 1. Press pushbutton 1 again to<br />
resume listening to the external device you have connected.<br />
To turn off auxiliary mode:<br />
1. Press the /AUX or BAND button until the radio changes to the mode<br />
you want to use.<br />
2. Unplug the auxiliary line from the AUX IN jack.<br />
Adjusting the Receiver Settings<br />
To adjust the volume, bass, treble, balance, fade, seek sensitivity, dim <strong>and</strong><br />
speakers, press <strong>and</strong> release the SETUP knob. Each time you press the knob<br />
you will advance to the next setting <strong>and</strong> vol, bass, treble, balance, fade, seek<br />
sensitivity, dim, or speakers will appear on the display.<br />
VOLUMEN: Gire la perilla SETUP en el sentido de las manecillas del reloj para<br />
incrementar el volumen y a contrarreloj para reducirlo. El display indica VOL<br />
y el nivel de volumen.<br />
GRAVES: Presione la perilla SETUP hasta que BASS y la configuración actual<br />
aparezcan en el display. Gire la perilla en el sentido de las manecillas del reloj<br />
para incrementar el volumen y a contrarreloj para reducirlo.<br />
AGUDOS: Presione la perilla SETUP hasta que TREBLE y la configuración<br />
actual aparezcan en el display. Gire la perilla en el sentido de las manecillas<br />
del reloj para incrementar los agudos y a contrarreloj para reducirlos.<br />
BALANCE: Presione la perilla SETUP hasta que BALANCE y la configuración<br />
actual aparezcan en el display. Gire la perilla en el sentido de las manecillas<br />
del reloj para mover el sonido a las bocinas derechas y a contrarreloj para<br />
moverlo a las bocinas izquierdas.<br />
ATENUACIÓN: Presione la perilla SETUP hasta que FADE y la configuración<br />
actual aparezcan en el display. Gire la perilla en el sentido de las manecillas<br />
del reloj para mover el sonido a las bocinas delanteras y a contrarreloj para<br />
mover el sonido a las bocinas traseras.<br />
SENSIBILIDAD DE BÚSQUEDA: Presione la perilla SETUP hasta que SEEK y<br />
el nivel de sensibilidad aparezcan en el display. Gire la perilla en el sentido<br />
de las manecillas del reloj para incrementar la sensibilidad de búsqueda y a<br />
contrarreloj para reducirla. Aument<strong>and</strong>o la sensibilidad le ayuda a encontrar<br />
más estaciones incluyendo algunas algo más débiles. Reduciéndola hará<br />
que encuentre menos estaciones pero éstas serán más fuertes.<br />
ATENUACIÓN: Presione la perilla SETUP hasta que aparezca DIM en el display.<br />
Gire la perilla SETUP hacia la derecha para incrementar la intensidad de brillo<br />
del display y hacia la izquierda para disminuir el brillo.<br />
BOCINAS: Presione la perilla SETUP hasta que aparezca SPEAKER4 o<br />
SPEAKER2 en el display. Gire la perilla para alternar las funciones de<br />
2 bocinas a la de 4 bocinas.<br />
Uso del radio<br />
Para encontrar una estación<br />
BAND (BANDA): Presione este botón para cambiar entre <strong>FM</strong>1, <strong>FM</strong>2, <strong>FM</strong>3,<br />
<strong>AM</strong> y WX. Su selección aparece en el display.<br />
SINTONIZAR/BÚSQUEDA: Mantenga presionado los botones y BAND<br />
durante 2 segundos para cambiar entre los modos de sintonización manual<br />
y búsqueda. En el display se verá TUNE (sintonía) o SEEK (búsqueda). Usted<br />
se encuentra en la modalidad que se ve en el display.<br />
SINTONÍA manual:<br />
1. Mantenga presionados los botones y BAND hasta que aparezca<br />
TUNE en el display.<br />
7<br />
36
Configuración del display predeterminado<br />
Para cambiar el display predeterminado de fábrica:<br />
1. Encienda el radio.<br />
2. Para cambiar el display predeterminado de fábrica del radio o <strong>CD</strong>,<br />
usted debe estar en la modalidad que quiere cambiar.<br />
- Presione el botón BAND para entrar en la modalidad del radio.<br />
- Presione el botón para entrar en la modalidad <strong>CD</strong>.<br />
3. Mantenga presionado el botón DSPL/TIME durante 2 segundos hasta<br />
que los dígitos de las horas parpadeen.<br />
4. Mientras parpadean las horas y los minutos, presione el botón 6 hasta<br />
que aparezca el display predeterminado que usted quiere.<br />
Ajuste de brillantez del display<br />
Si el atenuador del tablero no controla la brillantez del display del radio o el<br />
radio está funcion<strong>and</strong>o en el modo del cronómetro de una hora, mantenga<br />
presionada la perilla SETUP hasta que “DIM” (atenuador) y el nivel de<br />
atenuación aparezcan en el display. Gire la perilla SETUP en el sentido de<br />
las manecillas del reloj para incrementar la intensidad del brillo del display<br />
o a contrarreloj para disminuir el brillo.<br />
Modo auxiliar<br />
En el modo auxiliar puede reproducir desde un dispositivo externo, tal como<br />
su iPOD o un reproductor MP3 que haya conectado por medio del enchufe<br />
de conexiones de entradas auxiliares al frente del radio.<br />
Para usar un dispositivo externo:<br />
1. Conecte el dispositivo al conector auxiliar de entrada.<br />
2. Presione el botón /AUX hasta que aparezca AUX IN en el display.<br />
Usted podrá escuchar el dispositivo externo cu<strong>and</strong>o éste está conectado y<br />
encendido. El radio muestra “NO AUX” si se presiona /AUX sin que<br />
haya un dispositivo conectado.<br />
Para silenciar la modalidad auxiliar, presione el botón 1. Presione otra vez el<br />
botón 1 para volver a escuchar el dispositivo externo que tenga conectado.<br />
Para desconectar la modalidad auxiliar:<br />
1. Presione el botón /AUX o BAND hasta que el radio cambie<br />
a la modalidad deseada.<br />
2. Desconecte el dispositivo auxiliar del conector AUX IN.<br />
Ajuste de configuraciones del radio<br />
Presione y suelte la perilla SETUP para ajustar el volumen, los tonos graves<br />
o agudos, el balance, la atenuación, la sensibilidad de búsqueda, la intensidad<br />
de brillo y las bocinas. Cada vez que presione la perilla avanzará a la siguiente<br />
configuración de graves, agudos, balance, atenuación, sensibilidad de búsqueda,<br />
intensidad de brillo, bocinas o volumen, los cuales aparecerán en la pantalla.<br />
VOLUME: Rotate the SETUP knob clockwise to increase the volume <strong>and</strong><br />
counterclockwise to decrease it. The display will show VOL <strong>and</strong> the volume<br />
level.<br />
BASS: Press the SETUP knob until BASS <strong>and</strong> the current setting appear on<br />
the display. Rotate the knob clockwise to increase the bass <strong>and</strong><br />
counterclockwise to decrease it.<br />
TREBLE: Press the SETUP knob until TREBLE <strong>and</strong> the current setting appear<br />
on the display. Rotate the knob clockwise to increase the treble sound <strong>and</strong><br />
counterclockwise to decrease it.<br />
BALANCE: Press the SETUP knob until BALANCE <strong>and</strong> the current setting<br />
appear on the display. Rotate the knob clockwise to move the sound to the<br />
right speakers <strong>and</strong> counterclockwise to move it to the left speakers.<br />
FADE: Press the SETUP knob until FADE <strong>and</strong> the current setting appear on the<br />
display. Rotate the knob clockwise to move the sound to the front speakers<br />
<strong>and</strong> counterclockwise to move the sound to the rear speakers.<br />
SEEK SENSITIVITY: Press the SETUP knob until SEEK <strong>and</strong> the sensitivity<br />
level appears on the display. Rotate the knob clockwise to increase the seek<br />
sensitivity <strong>and</strong> counterclockwise to decrease it. Increasing the sensitivity will<br />
help you find more stations, including slightly weaker ones. Decreasing it will<br />
cause fewer, but stronger stations to be found.<br />
DIMMING: Press the SETUP knob until DIM appears on the display. Rotate<br />
the SETUP knob clockwise to increase the brightness of the display <strong>and</strong><br />
counterclockwise to decrease the brightness.<br />
SPEAKERS: Press the SETUP knob until SPEAKER4 or SPEAKER2 appears on<br />
the display. Rotate the knob to toggle from 2-speaker to 4-speaker functionality.<br />
Using the Radio<br />
Finding a Station<br />
BAND: Press this button to switch between <strong>FM</strong>1, <strong>FM</strong>2, <strong>FM</strong>3, <strong>AM</strong> <strong>and</strong> WX. Your<br />
selection will appear on the display.<br />
TUNE/SEEK: Press <strong>and</strong> hold the <strong>and</strong> BAND buttons for 2 seconds to switch<br />
between manual tune <strong>and</strong> seek modes. The display will show TUNE or SEEK.<br />
You are in the mode that appears.<br />
Manual TUNE:<br />
1. Press <strong>and</strong> hold the <strong>and</strong> BAND buttons until TUNE appears on your<br />
display.<br />
35<br />
8
2. To increase the radio frequency, press the button to go to the next<br />
higher station.<br />
3. To decrease the frequency, press the button to go to the next lower<br />
station.<br />
SEEK: Pressing the or buttons for more than half a second turns SEEK<br />
mode on <strong>and</strong> SEEK appears on the display. The SEEK mode ends when you<br />
reach a tunable station <strong>and</strong> that station will play.<br />
If SEEK doesn’t find a tunable station after searching the b<strong>and</strong> twice, SEEK<br />
ends <strong>and</strong> NOT FOUND appears on the display for 5 seconds. After 5 seconds,<br />
the default display will appear, <strong>and</strong> the radio will continue to play the station<br />
it was playing before SEEK was activated.<br />
To cancel SEEK, press the or button again.<br />
AUTO STORE: AUTO STORE automatically stores the 6 strongest stations onto<br />
pushbuttons 1-6. Press <strong>and</strong> hold the AUTO STORE button until AUTO <strong>and</strong> the AS<br />
icon appear on the display. AUTO STORE will affect only the b<strong>and</strong> you are listening<br />
to. For example: if you press AUTO STORE while listening to <strong>FM</strong>1, the presets on<br />
<strong>AM</strong>, <strong>FM</strong>2, <strong>FM</strong>3 <strong>and</strong> WX will not change. Pressing <strong>and</strong> holding AUTO STORE for<br />
more than 2 seconds will cancel AUTO STORE, <strong>and</strong> the original presets will be<br />
restored.<br />
SCAN: Press SCAN/PSCAN to scan all of the stations on the b<strong>and</strong> you are using.<br />
When a station with a strong enough frequency is found, the radio will play for 5<br />
seconds <strong>and</strong> then continue scanning until you press SCAN/PSCAN again. The<br />
display will show SCAN <strong>and</strong> the frequency being scanned.<br />
PSCAN: Press SCAN/PSCAN for more than 2 seconds to scan the presets on the<br />
b<strong>and</strong> you are using. (<strong>FM</strong> will scan <strong>FM</strong>1, <strong>FM</strong>2, <strong>and</strong> <strong>FM</strong>3.) When a strong enough<br />
frequency is found, the radio will play that station for 5 seconds <strong>and</strong> then continue<br />
scanning. The display will show PSCN, the frequency, preset number, <strong>and</strong> the<br />
current b<strong>and</strong>. Preset scan will continue until you press SCAN/PSCAN again.<br />
Setting the Presets<br />
The six numbered pushbuttons allow you to preset 6 of your favorite stations<br />
per b<strong>and</strong> <strong>and</strong> easily return to them with the touch of a button. To set the<br />
presets:<br />
1. Turn the receiver on.<br />
2. Select the b<strong>and</strong>.<br />
3. Tune to the desired station.<br />
4. Press <strong>and</strong> hold one of the 6 numbered buttons for more than 2 seconds to<br />
store the selected station. When the station has been set to the preset<br />
number you chose, you will hear a beep <strong>and</strong> the preset number will be<br />
visible.<br />
5. Repeat steps 1-4 for each pushbutton.<br />
Para apagar la alarma<br />
Mantenga presionado el botón ALARM CLOCK hasta que escuche un “beep”<br />
y desaparezca el ícono en el display.<br />
Activación de la repetición de la alarma<br />
Para esta función, presione cualquier botón mientras se escucha la alarma.<br />
La alarma se escucha otra vez en 9 minutos.<br />
Funciones generales del radio<br />
Su radio está equipado con:<br />
– B<strong>and</strong>a <strong>AM</strong> con 6 estaciones <strong>AM</strong> que se pueden programar<br />
– Tres b<strong>and</strong>as <strong>FM</strong> con un total de 18 estaciones <strong>FM</strong> que se pueden programar<br />
– Una b<strong>and</strong>a con información meteorológica con 6 estaciones WX que se<br />
pueden programar<br />
Encendido<br />
Puede encender y apagar el radio presion<strong>and</strong>o el botón cu<strong>and</strong>o el encendido<br />
está conectado. También se enciende el radio presion<strong>and</strong>o la perilla SETUP.<br />
Ajuste del volumen<br />
Para aumentar el volumen, gire la perilla SETUP en el sentido de las manecillas<br />
del reloj. Para reducir el volumen, gire la perilla a contrarreloj.<br />
Cronómetro de una hora<br />
El presionar el botón o la perilla SETUP con el encendido desconectado,<br />
enciende el radio y activa el cronómetro de una hora. El radio se apaga después<br />
de una hora. Presion<strong>and</strong>o otra vez el botón o la perilla SETUP reactiva el<br />
cronómetro de una hora.<br />
Display<br />
El display predeterminado de fábrica es la hora del reloj. El radio también puede<br />
mostrar información adicional que cambia dependiendo de la modalidad en que<br />
se encuentra. Usted puede desplazarse por los displays que están disponibles<br />
presion<strong>and</strong>o el botón DSPL/TIME mientras el radio está encendido.<br />
Displays de la modalidad del radio<br />
Mientras el radio está encendido, presione el botón DSPL/TIME para alternar<br />
entre dos displays.<br />
Display 1: Reloj<br />
Display 2: Frecuencia radial<br />
Displays de modalidad <strong>CD</strong><br />
Mientras el reproductor de <strong>CD</strong> está encendido, presione el botón DSPL/TIME<br />
para alternar entre tres displays.<br />
Display 1: Reloj<br />
Display 2: Número de la pista y tiempo de reproducción<br />
Pressing a preset button in the future will tune the radio to the station you set<br />
on the b<strong>and</strong> to which you are listening.<br />
9<br />
34
5. Presione el botón DSPL/TIME de nuevo ocasion<strong>and</strong>o que los dígitos de<br />
los minutos parpadeen. Gire la perilla de SETUP para cambiar los minutos.<br />
Gir<strong>and</strong>o la perilla en el sentido de las manecillas del reloj aumenta los<br />
minutos; girándola a contrarreloj se reducen los minutos.<br />
6. Presione el botón DSPL/TIME de nuevo para completar el proceso<br />
de configuración de la hora. El display regresa a la configuración<br />
predeterminada de fábrica.<br />
En cualquier momento durante el proceso de configuración de la hora, si no se<br />
presiona ningún botón o no se gira ninguna perilla por 5 segundos, se cancelará<br />
el modo de configuración y el radio regresará a su funcionamiento normal,<br />
y cualquier cambio realizado quedará programado.<br />
PRECAUCIÓN:<br />
Programe el reloj únicamente cu<strong>and</strong>o no esté manej<strong>and</strong>o su vehículo. No se<br />
debe ajustar el reloj mientras el vehículo está circul<strong>and</strong>o porque puede resultar<br />
en un accidente que le puede producir lesiones a usted o a otros. Como<br />
siempre, el conductor es responsable de operar el vehículo de forma segura.<br />
Uso de la alarma<br />
La alarma activa el radio a una hora programada. La hora programada para la<br />
alarma se ve si se presiona el botón ALARM CLOCK momentáneamente.<br />
Configuración de la alarma<br />
1. Con el radio encendido, mantenga presionado el botón ALARM CLOCK<br />
hasta que vea el ícono “ALARM”y SET. Usted se encuentra ahora en el<br />
modo de programación de la alarma. Comenzará a parpadear los números<br />
de la hora para la alarma.<br />
2. Gire la perilla SETUP hasta que aparezca la hora deseada en el display.<br />
Gir<strong>and</strong>o la perilla en el sentido de las manecillas del reloj aumenta la hora;<br />
girándola a contrarreloj se reduce la hora.<br />
3. Presione otra vez el botón ALARM CLOCK hasta que parpadeen los<br />
números de los minutos.<br />
4. Gire la perilla de SETUP para cambiar los minutos.<br />
5. Presione otra vez el botón ALARM CLOCK hasta que aparezca SET TONE<br />
en el display.<br />
6. Presione otra vez el botón ALARM hasta que aparezca el número de<br />
VOL en el display. Presione otra vez el botón y escuchará la alarma. Para<br />
aumentar el volumen de la alarma, gire la perilla SETUP en el sentido de<br />
las manecillas del reloj. Para reducir el volumen de la alarma, gire la perilla<br />
SETUP a contrarreloj.<br />
7. Presione otra vez el botón ALARM CLOCK para terminar y para que el<br />
display regrese a funcionamiento normal. El ícono aparece en el display<br />
para indicar que se activó la alarma.<br />
NOTA:<br />
Si no presiona ningún botón ni gira la perilla por 5 segundos durante<br />
el procedimiento de configuración de la alarma, se cancela la<br />
configuración del reloj y el radio regresa a funcionamiento normal<br />
manteniendo cualquier cambio que se haya hecho.<br />
PRECAUCIÓN:<br />
Programe la alarma únicamente cu<strong>and</strong>o no esté manej<strong>and</strong>o su vehículo. No se<br />
debe programar la alarma mientras el vehículo está circul<strong>and</strong>o porque puede<br />
resultar en un accidente que le puede producir lesiones a usted o a otros. Como<br />
siempre, el conductor es responsable de operar el vehículo de forma segura.<br />
33<br />
Using the Weather B<strong>and</strong><br />
NOAA Weather Radio is a service of the National Weather Service. It provides<br />
continuous broadcasts of the latest weather information directly from the<br />
National Weather Service. Taped weather messages are repeated every four to<br />
six minutes <strong>and</strong> are revised every one to three hours or more frequently if<br />
needed. Most stations operate 24 hours a day.<br />
The weather for the area you are in can be found on one of 7 stations. When in<br />
Weatherb<strong>and</strong> mode, the display will show WEATHER, WX <strong>and</strong> the channel<br />
number. The channel can be changed using the TUNE/SEEK / buttons <strong>and</strong><br />
can also be preset to the pushbuttons.<br />
The frequencies associated with weatherb<strong>and</strong> channels are as follows:<br />
1. 162.400 MHz 5. 162.500 MHz<br />
2. 162.425 MHz 6. 162.525 MHz<br />
3. 162.450 MHz 7. 162.550 MHz<br />
4. 162.475 MHz<br />
The National Weather Service operates approximately 372 stations. Close to 90<br />
percent of the nation’s population is within listening range of an NOAA Weather<br />
Radio broadcast.<br />
Using the Compact Disc Player (if equipped)<br />
Your integral <strong>CD</strong> player plays full size compact discs.<br />
NOTICE:<br />
Never insert anything other than a <strong>CD</strong> into your <strong>CD</strong> player. Doing so could<br />
damage your <strong>CD</strong> player, result in unnecessary repairs <strong>and</strong>/or void the unit’s<br />
warranty.<br />
Playing a Compact Disc<br />
1. Turn the ignition <strong>and</strong> receiver on.<br />
2. Insert a disc partway into the slot, label-side up. The player will automatically<br />
pull the disc in once it has been partially inserted. The <strong>CD</strong> icon <strong>and</strong><br />
LOADING will appear on the display followed by the track number <strong>and</strong><br />
elapsed time. Then, the disc will begin to play.<br />
3. If you are listening to <strong>AM</strong>/<strong>FM</strong>/WX radio, press the /AUX button to play a<br />
<strong>CD</strong> that has been loaded into the player. If no <strong>CD</strong> has been loaded, the<br />
display will show “NO <strong>CD</strong>” for five seconds <strong>and</strong> return to the default display.<br />
If a <strong>CD</strong> has been loaded, the track number <strong>and</strong> the elapsed time will be<br />
displayed.<br />
If a <strong>CD</strong> is ejected <strong>and</strong> not removed within 16 seconds, the <strong>CD</strong> will reload but<br />
will not start playing until the /AUX button is pressed.<br />
10
Button Functions<br />
DSPL/TIME: Press DSPL/TIME to toggle between the track number/elapsed<br />
time <strong>and</strong> time of day. To change the display, see the Display section of this<br />
manual.<br />
TUNE/SEEK : Press to forward to the next track. The track number <strong>and</strong><br />
elapsed time will appear.<br />
TUNE/SEEK : Press to go to the beginning of the track being played. Press<br />
this button within the first 8 seconds of the track to go to the beginning of the<br />
previous track. The track number <strong>and</strong> elapsed time will appear.<br />
1/PAUSE: Press the 1/ button to pause a <strong>CD</strong>. PAU will appear on the display<br />
<strong>and</strong> the audio will be muted. Press the button again to resume play of the <strong>CD</strong>.<br />
2/RDM: Press the RDM button to activate r<strong>and</strong>om track selection. RDM will<br />
appear on the display <strong>and</strong> the tracks on the loaded disc will play in r<strong>and</strong>om order.<br />
Press the RDM button to turn off r<strong>and</strong>om play.<br />
3/RPT: Press the RPT button to repeat the track you are playing. RPT will appear<br />
on the display <strong>and</strong> the track you are playing will be repeated until you press the<br />
RPT button again.<br />
5/FF: Press <strong>and</strong> hold the FF button to fast-forward through a track. When you<br />
release the button, play will resume at normal speed. The track number <strong>and</strong><br />
elapsed time will appear for 5 seconds before the default display reappears.<br />
6/REV: Press <strong>and</strong> hold the REV button to fast reverse. When you release the<br />
button, play will resume at normal speed. The track number <strong>and</strong> elapsed time will<br />
appear for 5 seconds before the default display reappears.<br />
TRACK SCAN: Press SCAN/PSCAN to scan all tracks on the <strong>CD</strong>. After playing 10<br />
seconds of the current track, the player will automatically go to the next track. To<br />
end track scan, press SCAN/PSCAN again.<br />
EJECT: Press the<br />
11<br />
button to eject a <strong>CD</strong>.<br />
Troubleshooting<br />
The following error messages may appear while playing a compact disc:<br />
NO <strong>CD</strong>:<br />
FOCUS:<br />
No <strong>CD</strong> has been loaded in the player.<br />
Lens could not focus on disc. Possible reasons include:<br />
– Disc is inserted upside down – Eject <strong>and</strong> reinsert disc.<br />
– Disc is dirty, scratched, or wet – Try cleaning disc.<br />
– Lens is dirty – Clean disc lens with a lens cleaner.<br />
– It is very humid – Wait an hour <strong>and</strong> try again.<br />
ADVERTENCIAS DE DAÑOS AL VEHÍCULO<br />
En este manual encontrará las siguientes Precauciones y Avisos:<br />
PRECAUCIÓN:<br />
Significa que hay algo que podría<br />
lastimarle a usted o a otros.<br />
AVISO:<br />
En el área de PRECAUCIÓN se le informa qué peligro existe. Después se<br />
le indica qué hacer para evitar o reducir el riesgo. Por favor lea y siga estas<br />
precauciones. Podrían lastimarse usted u otros si no lo hace.<br />
En el área de AVISO se le informa de algo que podría dañar el vehículo. En<br />
muchas ocasiones este daño no está cubierto por su garantía y podría ser<br />
costoso. El aviso le indica qué hacer para evitar el daño.<br />
NOTA: Es posible que otros manuales utilicen PRECAUCIÓN y AVISO de<br />
forma distinta.<br />
INSTRUCCIONES DE FUNCION<strong>AM</strong>IENTO<br />
Significa que hay algo que podría<br />
dañar su vehículo.<br />
Para aprender cómo aprovechar su radio <strong>Delphi</strong> al máximo lea todas las<br />
siguientes instrucciones.<br />
PRECAUCIÓN:<br />
Al manejar, siempre mantenga sus ojos en el camino y sus manos en el<br />
volante, poniendo atención a las operaciones de manejo. Como siempre,<br />
el conductor es responsable de operar el vehículo de forma segura. El no<br />
mantener su vista en el camino y sus manos en el volante mientras maneja<br />
puede resultar en lesiones para usted y para otras personas.<br />
Uso del reloj<br />
Su reloj puede funcionar en modo de 12 ó 24 horas. El modo de 12 horas<br />
distingue entre <strong>AM</strong> y PM. El modo de 24 horas funciona en el horario militar.<br />
Para cambiar del sistema de 12 horas al de 24 horas:<br />
1. Conecte el encendido.<br />
2. Mantenga presionado el botón DSPL/TIME hasta que parpadeen las horas<br />
y los minutos y escuche un “beep”. Así se indica que está en el modo de<br />
configuración del reloj.<br />
3. Presione y suelte el botón 5 para cambiar entre los modos de 12 y 24 horas.<br />
El display regresa a su función predeterminada después de 5 segundos de<br />
inactividad y el modo actual queda activado.<br />
Configuración del reloj<br />
1. Conecte el encendido.<br />
2. Mantenga presionado el botón DSPL/TIME hasta que parpadeen las horas<br />
y los minutos y escuche un “beep”. Así se indica que está en el modo de<br />
configuración del reloj.<br />
3. Presione otra vez el botón DSPL/TIME hasta que parpadee la hora.<br />
4. Gire la perilla SETUP para cambiar la hora. Gir<strong>and</strong>o la perilla en el sentido<br />
de las manecillas del reloj aumenta la hora; girándola a contrarreloj se<br />
reduce la hora.<br />
32
2<br />
1<br />
Reproductor <strong>CD</strong> <strong>Delphi</strong><br />
18<br />
TRACKING:<br />
LOAD:<br />
Loss of tracking control. Possible reasons include:<br />
– Disc is dirty or scratched – Try cleaning disc.<br />
– Lens is dirty – Clean disc lens with a lens cleaner.<br />
– Disc is stuck <strong>and</strong> could not spin – Contact dealer.<br />
Load/unload motor problem – Contact dealer.<br />
3<br />
4<br />
5<br />
6 7 8 9 10 11 12 13 14 15<br />
16<br />
17<br />
NOTE:<br />
The sound quality, skipping, difficulty in finding tracks, <strong>and</strong>/or difficulty in<br />
loading or ejecting a <strong>CD</strong>-R may be affected by a <strong>CD</strong>-R’s quality, the<br />
method of recording, the quality of the music that has been recorded or<br />
the way the <strong>CD</strong>-R has been h<strong>and</strong>led. If these problems occur, try playing<br />
a <strong>CD</strong> you know is good to see if the error corrects itself. If an error<br />
occurs repeatedly or if an error cannot be corrected, contact your dealer.<br />
If the radio displays an error message, write it down <strong>and</strong> provide it to<br />
your dealer when reporting the problem.<br />
Botón Función Página<br />
1. DSPL/TIME Cambia a modo de configuración<br />
del reloj/cambia el display . . . . . . . . . . . . . . . . . . .32,34<br />
2. /AUX Cambia a modo <strong>CD</strong>/entrada auxiliar . . . . . . . . . . . . . .35<br />
3. Enciende (ON) y apaga (OFF) el radio . . . . . . . . . . . .34<br />
4. SETUP push Enciende el radio/controla el volumen/ajusta<br />
el sonido, graves, agudos, balance, atenuación,<br />
sensibilidad de búsqueda, atenuador de<br />
intensidad de brillo y bocinas. . . . . . . . . . . . . . . . . . .35<br />
5. TUNE/SEEK Va a la siguiente estación de radio/pista del <strong>CD</strong> . .36,39<br />
6. TUNE/SEEK Va a la estación previa del radio/pista del <strong>CD</strong> . . . .36,39<br />
7. BAND Alterna entre <strong>AM</strong>, <strong>FM</strong>1, <strong>FM</strong>2, <strong>FM</strong>3 y las b<strong>and</strong>as<br />
meteorológicas (WX) . . . . . . . . . . . . . . . . . . . . . . . . .36<br />
8. ALARM CLOCK Cambia al modo de configuración de la alarma . . . . .33<br />
9. Reproduce y pausa <strong>CD</strong>s o entradas<br />
auxiliares de audio . . . . . . . . . . . . . . . . . . . . . . . . . . .39<br />
10. RDM Reproduce pistas de <strong>CD</strong> en forma aleatoria . . . . . . .39<br />
11. RPT Repite la misma pista hasta que se cancele<br />
manualmente . . . . . . . . . . . . . . . . . . . . . . . . . . . . . . .39<br />
12. Botones<br />
numerados 1-6 Programan las estaciones . . . . . . . . . . . . . . . . . . . . .37<br />
13. FF Avanza rápidamente la pista del <strong>CD</strong> . . . . . . . . . . . . .39<br />
14. REV Retrocede rápidamente la pista del <strong>CD</strong> . . . . . . . . . . .39<br />
15. AUX INPUT Entrada auxiliar para dispositivos<br />
de audio externos . . . . . . . . . . . . . . . . . . . . . . . . . . .35<br />
16. AUTO STORE Programa las estaciones de radio más fuertes . . . . .37<br />
17. SCAN/PSCAN Explora las estaciones, las estaciones<br />
programadas y las pistas del <strong>CD</strong> . . . . . . . . . . . . . .37,39<br />
18. Expulsa el <strong>CD</strong> . . . . . . . . . . . . . . . . . . . . . . . . . . . . . . .39<br />
CAUTION:<br />
The laser beam used in the compact disc player is harmful to the eyes. Do not<br />
attempt to disassemble the receiver unit. Doing so could be harmful to you or<br />
others <strong>and</strong>/or void the unit’s warranty.<br />
OPERATING TIPS<br />
Tips About Your Audio System<br />
CAUTION:<br />
Hearing damage from loud noise is almost undetectable until it is too late. Your<br />
hearing can adapt to high volumes of sound. Sound that seems normal can be<br />
loud <strong>and</strong> harmful to your hearing. Take precautions by adjusting your receiver’s<br />
volume to a safe sound level before your hearing adapts to it.<br />
To help avoid hearing loss:<br />
• Adjust the volume control to the lowest setting.<br />
• Increase the volume slowly until you hear comfortably <strong>and</strong> clearly.<br />
Underst<strong>and</strong>ing Radio Reception<br />
<strong>FM</strong> STEREO: <strong>FM</strong> stereo will give you better sound than <strong>AM</strong>, but <strong>FM</strong> signals will<br />
only reach between 10 <strong>and</strong> 40 miles (16-65 km). Tall buildings or hills can interfere<br />
with <strong>FM</strong> signals, causing the sound to come <strong>and</strong> go.<br />
<strong>AM</strong>: The range for most <strong>AM</strong> stations is greater than for <strong>FM</strong>, especially at night.<br />
The longer range, however, can cause stations to interfere with each other. <strong>AM</strong><br />
can pick up noise from things like storms <strong>and</strong> power lines. Try reducing the treble<br />
to reduce this noise if you experience it.<br />
31<br />
12
Care of Your Compact Discs<br />
H<strong>and</strong>le discs carefully. Store them in their original or other protective cases <strong>and</strong><br />
away from direct sunlight <strong>and</strong> dust. If the surface of a disc is soiled, dampen a<br />
clean, soft cloth in a mild, neutral detergent solution. Clean the disc, wiping from<br />
the center to the edge.<br />
Never touch the signal surface when h<strong>and</strong>ling discs. Pick up discs by grasping the<br />
outer edges or the edge of the hole <strong>and</strong> the outer edge.<br />
Do not attach a label or tape or write on the surface of a disc. Doing so could<br />
damage the disc <strong>and</strong>/or your <strong>CD</strong> player.<br />
NOTICE:<br />
Before you add any sound equipment to your vehicle – like a CB radio, mobile<br />
telephone or two-way radio – be sure you can add what you want. If you can, it’s<br />
very important to do it properly. Added sound equipment may interfere with the<br />
operation of your vehicle’s engine, radio or other systems, <strong>and</strong> even damage<br />
them. Your vehicle’s systems may interfere with the operation of sound<br />
equipment that has been added improperly. Before adding sound equipment,<br />
check with your dealer <strong>and</strong> be sure to check Federal Regulations covering mobile<br />
radio <strong>and</strong> telephone units.<br />
NOTICE:<br />
Only an authorized <strong>Delphi</strong> installer should install this receiver. Installation by other<br />
than an authorized installer will void the unit’s warranty.<br />
INTRODUCCIÓN<br />
Su radio <strong>Delphi</strong> ha sido diseñado para funcionar fácilmente y para darle años<br />
de deleite al escucharlo. Lea este manual y familiarícese con el radio antes de<br />
usarlo para disfrutarlo al máximo. Descubra lo que puede hacer su radio y cómo<br />
operar todos sus controles. De esta forma puede estar seguro de que aprovecha<br />
totalmente la avanzada tecnología con la que se diseñó.<br />
3<br />
4<br />
2<br />
5<br />
1<br />
Radio estéreo <strong>Delphi</strong><br />
6 7 8<br />
9<br />
Botón Función Página<br />
1. DSPL/TIME Cambia a modo de configuración del<br />
reloj/cambia el display . . . . . . . . . . . . . . . . . . . . . . 32,34<br />
2. AUX Cambia a modo de entrada auxiliar . . . . . . . . . . . . . . 35<br />
3. Enciende y apaga el radio. . . . . . . . . . . . . . . . . . . . . . 34<br />
4. SETUP push Enciende el radio/controla el volumen/ajusta el<br />
sonido, graves, agudos, balance, atenuación,<br />
sensibilidad de búsqueda, atenuador de la<br />
intensidad de brillo y bocinas. . . . . . . . . . . . . . . . . . . 35<br />
5. TUNE/SEEK Va a la estación de radio siguiente. . . . . . . . . . . . . . . 36<br />
6. TUNE/SEEK Va a la estación de radio previa . . . . . . . . . . . . . . . . . 36<br />
7. BAND Cambia de b<strong>and</strong>as . . . . . . . . . . . . . . . . . . . . . . . . . . . 36<br />
8. ALARM CLOCK Cambia al modo de configuración de la alarma . . . . . 33<br />
9. Botones<br />
numerados 1-6 Programan las estaciones . . . . . . . . . . . . . . . . . . . . . 37<br />
10. AUX INPUT Entrada auxiliar para dispositivos<br />
de audio externos. . . . . . . . . . . . . . . . . . . . . . . . . . . . 35<br />
11. AUTO STORE Programa las estaciones de radio más fuertes . . . . . 37<br />
12. SCAN/PSCAN Explora estaciones/estaciones programadas<br />
de la b<strong>and</strong>a activa . . . . . . . . . . . . . . . . . . . . . . . . . . . . 37<br />
11<br />
10<br />
12<br />
13<br />
30
ÍNDICE<br />
En este manual encontrará cómo utilizar el radio de su vehículo. Asegúrese<br />
de leer lo relacionado a la unidad específica instalada en su vehículo.<br />
Introducción . . . . . . . . . . . . . . . . . . . . . . . . . . . . . . . . . . . . . . . . . . . . . . . . . . . . . . . . . . . . . . . .30<br />
Diseños del radio . . . . . . . . . . . . . . . . . . . . . . . . . . . . . . . . . . . . . . . . . . . . . . . . . . . . . . . . . .30<br />
Advertencias de daños al vehículo . . . . . . . . . . . . . . . . . . . . . . . . . . . . . . . . . . . . . . .32<br />
Instrucciones de funcionamiento<br />
Uso del reloj . . . . . . . . . . . . . . . . . . . . . . . . . . . . . . . . . . . . . . . . . . . . . . . . . . . . . . . . . . . . . . . . . .32<br />
Configuración del reloj . . . . . . . . . . . . . . . . . . . . . . . . . . . . . . . . . . . . . . . . . . . . . . . . . . . . . . .32<br />
Uso de la alarma . . . . . . . . . . . . . . . . . . . . . . . . . . . . . . . . . . . . . . . . . . . . . . . . . . . . . . . . . . . . . . .33<br />
Configuración de la alarma . . . . . . . . . . . . . . . . . . . . . . . . . . . . . . . . . . . . . . . . . . . . . . . . . . . .33<br />
Para apagar la alarma . . . . . . . . . . . . . . . . . . . . . . . . . . . . . . . . . . . . . . . . . . . . . . . . . . . . . . . .34<br />
Activación de la repetición de la alarma . . . . . . . . . . . . . . . . . . . . . . . . . . . . . . . . . . . . . . . . .34<br />
Funciones generales del radio . . . . . . . . . . . . . . . . . . . . . . . . . . . . . . . . . . . . . . . . . . . . . . . . . . . .34<br />
Encendido . . . . . . . . . . . . . . . . . . . . . . . . . . . . . . . . . . . . . . . . . . . . . . . . . . . . . . . . . . . . . . . . . .34<br />
Ajuste del volumen . . . . . . . . . . . . . . . . . . . . . . . . . . . . . . . . . . . . . . . . . . . . . . . . . . . . . . . . . .34<br />
Cronómetro de una hora . . . . . . . . . . . . . . . . . . . . . . . . . . . . . . . . . . . . . . . . . . . . . . . . . . . . . .34<br />
Display . . . . . . . . . . . . . . . . . . . . . . . . . . . . . . . . . . . . . . . . . . . . . . . . . . . . . . . . . . . . . . . . . . . .34<br />
Configuración del display predeterminado . . . . . . . . . . . . . . . . . . . . . . . . . . . . . . . . . . . .35<br />
Modo auxiliar . . . . . . . . . . . . . . . . . . . . . . . . . . . . . . . . . . . . . . . . . . . . . . . . . . . . . . . . . . . . . . .35<br />
Ajuste de configuraciones del radio . . . . . . . . . . . . . . . . . . . . . . . . . . . . . . . . . . . . . . . . . . . . .35<br />
Uso del radio . . . . . . . . . . . . . . . . . . . . . . . . . . . . . . . . . . . . . . . . . . . . . . . . . . . . . . . . . . . . . . . . . .36<br />
Para encontrar una estación . . . . . . . . . . . . . . . . . . . . . . . . . . . . . . . . . . . . . . . . . . . . . . . . . . .36<br />
Programación de estaciones . . . . . . . . . . . . . . . . . . . . . . . . . . . . . . . . . . . . . . . . . . . . . . . . . . .37<br />
Utiliz<strong>and</strong>o la b<strong>and</strong>a meteorológica . . . . . . . . . . . . . . . . . . . . . . . . . . . . . . . . . . . . . . . . . . . . . . . .38<br />
Uso del reproductor de discos compactos . . . . . . . . . . . . . . . . . . . . . . . . . . . . . . . . . . . . . . . . . . .38<br />
Reproducción de un disco compacto . . . . . . . . . . . . . . . . . . . . . . . . . . . . . . . . . . . . . . . . . . . . .38<br />
Funciones de los botones . . . . . . . . . . . . . . . . . . . . . . . . . . . . . . . . . . . . . . . . . . . . . . . . . . . . .39<br />
Localización y resolución de problemas . . . . . . . . . . . . . . . . . . . . . . . . . . . . . . . . .39<br />
Sugerencias para el funcionamiento<br />
Sugerencias sobre su sistema de sonido . . . . . . . . . . . . . . . . . . . . . . . . . . . . . . . . . . . . . . . . . .40<br />
Comprensión de la recepción del radio . . . . . . . . . . . . . . . . . . . . . . . . . . . . . . . . . . . . . . . . . . . .40<br />
Cuidado de sus discos compactos . . . . . . . . . . . . . . . . . . . . . . . . . . . . . . . . . . . . . . . . . . . . . . . .41<br />
Récepteur stéréo<br />
Récepteur <strong>AM</strong>/<strong>FM</strong>/<strong>CD</strong><br />
29<br />
Récepteurs radio<br />
<strong>AM</strong>/<strong>FM</strong>/lecteur <strong>CD</strong><br />
Manuel du propriétaire
TABLE DES MATIÈRES<br />
Dans ce manuel, vous découvrirez comment utiliser le récepteur installé<br />
dans votre véhicule. Assurez-vous de lire les renseignements relatifs à<br />
l’unité spécifique fournie avec votre véhicule.<br />
Introduction . . . . . . . . . . . . . . . . . . . . . . . . . . . . . . . . . . . . . . . . . . . . . . . . . . . . . . . . . . . . . . . .16<br />
Schemas de récepteur radio . . . . . . . . . . . . . . . . . . . . . . . . . . . . . . . . . . . . . . . . . . . . . .16<br />
Mises en garde contre les dommages au véhicule . . . . . . . . . . . . . . . . . . . . . .18<br />
Notice d’utilisation<br />
Utilisation de l’horloge . . . . . . . . . . . . . . . . . . . . . . . . . . . . . . . . . . . . . . . . . . . . . . . . . . . . . . . . . .18<br />
Mettre le contact . . . . . . . . . . . . . . . . . . . . . . . . . . . . . . . . . . . . . . . . . . . . . . . . . . . . . . . . . . . .18<br />
Utilisation de l’avertisseur . . . . . . . . . . . . . . . . . . . . . . . . . . . . . . . . . . . . . . . . . . . . . . . . . . . . . . .19<br />
Réglage de l’avertisseur . . . . . . . . . . . . . . . . . . . . . . . . . . . . . . . . . . . . . . . . . . . . . . . . . . . . . .19<br />
Fermeture de l’avertisseur . . . . . . . . . . . . . . . . . . . . . . . . . . . . . . . . . . . . . . . . . . . . . . . . . . . .20<br />
Activation du rappel d’alarme . . . . . . . . . . . . . . . . . . . . . . . . . . . . . . . . . . . . . . . . . . . . . . . . . .20<br />
Fonctions générales du récepteur radio . . . . . . . . . . . . . . . . . . . . . . . . . . . . . . . . . . . . . . . . . . . . .20<br />
Mise en marche . . . . . . . . . . . . . . . . . . . . . . . . . . . . . . . . . . . . . . . . . . . . . . . . . . . . . . . . . . . . .20<br />
Réglage du volume . . . . . . . . . . . . . . . . . . . . . . . . . . . . . . . . . . . . . . . . . . . . . . . . . . . . . . . . . .20<br />
Minuterie d’une heure . . . . . . . . . . . . . . . . . . . . . . . . . . . . . . . . . . . . . . . . . . . . . . . . . . . . . . . .20<br />
Afficheur . . . . . . . . . . . . . . . . . . . . . . . . . . . . . . . . . . . . . . . . . . . . . . . . . . . . . . . . . . . . . . . . . .20<br />
Réglage d’un afficheur par défaut . . . . . . . . . . . . . . . . . . . . . . . . . . . . . . . . . . . . . . . . . .21<br />
Mode auxiliaire . . . . . . . . . . . . . . . . . . . . . . . . . . . . . . . . . . . . . . . . . . . . . . . . . . . . . . . . . . . . .21<br />
Ajustement des réglages du récepteur . . . . . . . . . . . . . . . . . . . . . . . . . . . . . . . . . . . . . . . . . . .21<br />
Utilisation de la radio . . . . . . . . . . . . . . . . . . . . . . . . . . . . . . . . . . . . . . . . . . . . . . . . . . . . . . . . . . .22<br />
Trouver une station . . . . . . . . . . . . . . . . . . . . . . . . . . . . . . . . . . . . . . . . . . . . . . . . . . . . . . . . . .22<br />
Préréglages . . . . . . . . . . . . . . . . . . . . . . . . . . . . . . . . . . . . . . . . . . . . . . . . . . . . . . . . . . . . . . .23<br />
Utilisation de la b<strong>and</strong>e météo . . . . . . . . . . . . . . . . . . . . . . . . . . . . . . . . . . . . . . . . . . . . . . . . . . . .24<br />
Utilisation du lecteur de disques compacts . . . . . . . . . . . . . . . . . . . . . . . . . . . . . . . . . . . . . . . . . .24<br />
Lecture d’un disque compact . . . . . . . . . . . . . . . . . . . . . . . . . . . . . . . . . . . . . . . . . . . . . . . . . .24<br />
Fonctions des touches . . . . . . . . . . . . . . . . . . . . . . . . . . . . . . . . . . . . . . . . . . . . . . . . . . . . . . . .25<br />
Radio estéreo<br />
Dépannage . . . . . . . . . . . . . . . . . . . . . . . . . . . . . . . . . . . . . . . . . . . . . . . . . . . . . . . . . . . . . . . . .25<br />
Conseils d’utilisation<br />
Conseils au sujet de votre système haute fidélité . . . . . . . . . . . . . . . . . . . . . . . . . . . . . . . . . . .26<br />
Comprendre la réception radio . . . . . . . . . . . . . . . . . . . . . . . . . . . . . . . . . . . . . . . . . . . . . . . . . .26<br />
Soins à apporter à vos disques compacts . . . . . . . . . . . . . . . . . . . . . . . . . . . . . . . . . . . . . . . . . .27<br />
Radio <strong>AM</strong>/<strong>FM</strong>/<strong>CD</strong><br />
15<br />
Radios estéreos<br />
<strong>AM</strong>/<strong>FM</strong>/<strong>CD</strong> <strong>Delphi</strong><br />
Manual del propietario
Soins à apporter à vos disques compacts<br />
Manipuler les disques avec soin. Gardez-les dans leur étui protecteur original et<br />
loin de la lumière directe du soleil et de la poussière. Si la surface d’un disque<br />
est sale, humidifier un linge propre et doux avec une solution neutre faiblement<br />
détergente. Nettoyer le disque en l’essuyant à partir du centre vers le pourtour.<br />
Ne jamais toucher la surface du signal en manipulant les disques. Prendre<br />
les disques en les tenant les bords extérieurs ou par le bord du trou et<br />
le bord extérieur.<br />
Ne pas coller d’étiquette ou de ruban ni écrire sur la surface d’un disque. Si<br />
c’est le cas, cela pourrait endommager le disque ou votre lecteur de <strong>CD</strong>.<br />
AVIS :<br />
Avant d’ajouter du matériel de sonorisation à votre véhicule – comme une radio<br />
BP, un téléphone mobile ou une radio avec émetteur-récepteur – vous assurer<br />
de pouvoir ajouter ce que vous voulez. Si vous le pouvez, il est très important<br />
de le faire correctement. Un équipement audio ajouté peut interférer avec le<br />
fonctionnement du moteur de votre véhicule, de la radio ou d’autres systèmes<br />
et même les endommager. Avant d’ajouter du matériel de sonorisation, vérifier<br />
auprès de votre concessionnaire et vous assurer de vérifier les règlements<br />
fédéraux relatifs aux postes de radio et de téléphone mobile.<br />
AVIS :<br />
Seul un dépositaire autorisé devrait installer ou démonter ce récepteur.<br />
L’installation ou le démontage par quelqu’un qui n’est pas un dépositaire autorisé<br />
annulera la garantie de l’appareil.<br />
INTRODUCTION<br />
Votre récepteur <strong>Delphi</strong> a été conçu pour fonctionner facilement et vous procurer<br />
des années de plaisir d’écoute. Pour obtenir le plus de satisfaction possible de<br />
votre récepteur, il vous faudra lire ce manuel et vous familiariser avec son<br />
fonctionnement avant de l’utiliser. Découvrez ce qu’il peut faire et comment<br />
utiliser toutes ses comm<strong>and</strong>es. Si vous suivez ces directives, vous pouvez être<br />
assuré d’obtenir le meilleur de la technologie de pointe qu’on y a incorporée.<br />
3<br />
4<br />
2<br />
5<br />
1<br />
Récepteur Stéréo <strong>Delphi</strong><br />
6 7 8<br />
9<br />
Touche Fonction Page<br />
1. DSPL/TIME Change en mode réglage de l’heure/change<br />
l’affichage . . . . . . . . . . . . . . . . . . . . . . . . . . . . . . . . . 18,20<br />
2. AUX Change en mode entrée auxiliaire . . . . . . . . . . . . . . . . 21<br />
3. Allume et éteint la radio . . . . . . . . . . . . . . . . . . . . . . . . 20<br />
4. SETUP push ALLUME la radio/contrôle le volume/règle la<br />
basse, les aigus, la balance, le fondu, la recherche<br />
de sensibilité, l’éclairage et les enceintes . . . . . . . . . . 21<br />
5. TUNE/SEEK Va à la station radio suivante. . . . . . . . . . . . . . . . . . . . . 22<br />
6. TUNE/SEEK Va à la station radio précédente . . . . . . . . . . . . . . . . . . 22<br />
7. BAND Change de b<strong>and</strong>e . . . . . . . . . . . . . . . . . . . . . . . . . . . . . . 22<br />
8. ALARM CLOCK Change en mode réveil . . . . . . . . . . . . . . . . . . . . . . . . . 19<br />
9. Boutons<br />
poussoirs 1 à 6 Effectue le préréglage des stations . . . . . . . . . . . . . . . . 23<br />
10. AUX INPUT Entrée auxiliaire pour dispositifs audio externes . . . . . . 21<br />
11. AUTO STORE Mémorise les stations les plus puissantes<br />
en préréglage . . . . . . . . . . . . . . . . . . . . . . . . . . . . . . . . . 23<br />
12. SCAN/PSCAN Balaie les stations et les préréglages sur<br />
la b<strong>and</strong>e en cours. . . . . . . . . . . . . . . . . . . . . . . . . . . . . . 23<br />
10<br />
12<br />
11<br />
27<br />
16
3<br />
4<br />
2<br />
5<br />
Récepteur <strong>CD</strong> <strong>Delphi</strong><br />
Touche Fonction Page<br />
1. DSPL/TIME Change en mode réglage de l’heure/change<br />
l’affichage . . . . . . . . . . . . . . . . . . . . . . . . . . . . . . . 18,20<br />
2. /AUX Change en mode <strong>CD</strong>/entrée auxiliaire . . . . . . . . . . . 21<br />
3. Allume et éteint la radio . . . . . . . . . . . . . . . . . . . . . . 20<br />
4. SETUP push ALLUME la radio/contrôle le volume/règle la<br />
basse, les aigus, la balance, le fondu, la recherche<br />
de sensibilité, l’éclairage et les enceintes. . . . . . . . . 21<br />
5. TUNE/SEEK Se déplace vers la station radio/piste<br />
<strong>CD</strong> suivante . . . . . . . . . . . . . . . . . . . . . . . . . . . . . 22,25<br />
6. TUNE/SEEK Se déplace vers la station radio/piste<br />
<strong>CD</strong> précédente . . . . . . . . . . . . . . . . . . . . . . . . . . . 22,25<br />
7. BAND Alterne entre les b<strong>and</strong>es <strong>AM</strong>, <strong>FM</strong>1, <strong>FM</strong>2,<br />
<strong>FM</strong>3 et météo (WX) . . . . . . . . . . . . . . . . . . . . . . . . . 22<br />
8. ALARM CLOCK Change en mode réglage de l’horloge . . . . . . . . . . . .19<br />
9. Lit et arrête les <strong>CD</strong> ou les entrées radio auxiliaires . . . .25<br />
10. RDM Lit les pistes <strong>CD</strong> aléatoirement . . . . . . . . . . . . . . . . 25<br />
11. RPT Répète la même piste <strong>CD</strong> jusqu’à annulation . . . . . 25<br />
12. Boutons<br />
poussoirs 1 à 6 Effectue le préréglage des stations . . . . . . . . . . . . . 23<br />
13. FF Avance rapide de la piste <strong>CD</strong> . . . . . . . . . . . . . . . . . . 25<br />
14. REV Recul rapide de la piste <strong>CD</strong> . . . . . . . . . . . . . . . . . . . 25<br />
15. AUX INPUT Entrée auxiliaire pour périphériques audio . . . . . . . . .21<br />
16. AUTO STORE Mémorise les stations les plus puissantes<br />
en préréglage . . . . . . . . . . . . . . . . . . . . . . . . . . . . . . .23<br />
17. SCAN/PSCAN Balaie les stations, les préréglages<br />
et les pistes <strong>CD</strong> . . . . . . . . . . . . . . . . . . . . . . . . . . 23,25<br />
18. Éjecte les <strong>CD</strong> . . . . . . . . . . . . . . . . . . . . . . . . . . . . . . 25<br />
17<br />
1<br />
6 7 8 9 10 11 12 13 14 15<br />
18<br />
16<br />
17<br />
REPÉRAGE Perte de contrôle du repérage. Les raisons possibles comprennent :<br />
(TRACKING): – Le disque est sale ou égratigné – Essayer de nettoyer le disque.<br />
– La lentille est sale – Nettoyer la lentille du disque avec un<br />
nettoyeur à lentille.<br />
– Le disque est collé et ne peut tourner – Contacter votre<br />
dépositaire.<br />
LOAD:<br />
NOTE:<br />
Problème de moteur de charge/décharge – Contacter votre<br />
dépositaire.<br />
La qualité du son, les sautillements, la difficulté à trouver des pistes,<br />
ou difficulté à charger ou éjecter un <strong>CD</strong>-R peuvent être affectés par la<br />
qualité des <strong>CD</strong>-R, le mode d’enregistrement, la qualité de la musique<br />
enregistrée ou la façon dont le <strong>CD</strong>-R a été manipulé. Si ces problèmes<br />
surviennent, essayer de lire un <strong>CD</strong> que vous savez être en bon état<br />
pour voir si l’erreur se corrige d’elle-même. Si une erreur survient de<br />
façon répétitive ou si une erreur ne peut être corrigée, contactez votre<br />
dépositaire. Si la radio affiche un message d’erreur, écrivez-le et<br />
montrez-le à votre dépositaire qu<strong>and</strong> vous lui expliquerai le problème.<br />
ATTENTION :<br />
Le rayon laser utilisé dans le lecteur de disque compact est dangereux pour les<br />
yeux. N’essayez pas de démonter le récepteur. Si c’était le cas, cela pourrait<br />
être dangereux pour vous et les autres ou annuler la garantie de l’appareil.<br />
CONSEILS POUR LE FONCTIONNEMENT<br />
Conseils au sujet de votre système haute fidélité<br />
ATTENTION :<br />
Les dommages auditifs dus aux bruits intenses sont pratiquement indétectables<br />
jusqu’à ce qu’il soit trop tard. Votre système auditif peut s’adapter à de forts<br />
volumes. Le son qui semble normal peut être intense et endommager votre<br />
système auditif. Prenez soin d’ajuster le volume de votre récepteur à un niveau<br />
sonore sécuritaire avant que votre système auditif s’y adapte.<br />
Pour vous aider à éviter une perte auditive :<br />
• Régler la comm<strong>and</strong>e du volume au plus bas niveau.<br />
• Monter lentement le volume jusqu’à ce que vous entendiez<br />
confortablement et clairement.<br />
Comprendre la réception radio<br />
STÉRÉO <strong>FM</strong> : La stéréo <strong>FM</strong> vous donnera un meilleur son que l’<strong>AM</strong>, mais les<br />
signaux <strong>FM</strong> n’ont qu’une portée de 16 à 65 km) 10 à 40 milles. Les gros building<br />
ou les collines peuvent faire obstacle aux signaux <strong>FM</strong>, créant un va-et-vient sonore.<br />
<strong>AM</strong> : La portée de la plupart des stations <strong>AM</strong> est supérieur à aux stations <strong>FM</strong>,<br />
spécialement la nuit. La portée la plus longue peut toutefois faire en sorte que<br />
les différentes stations interfèrent entre elles. Le <strong>AM</strong> peut ramasser des bruits<br />
comme ceux des orages et des lignes de transmission électrique. Essayer de<br />
diminuer les aigus pour diminuer ces bruits si vous les entendez.<br />
26
Fonctions des touches<br />
DSPL/TIME: Appuyer sur DSPL/TIME pour alterner entre le numéro de piste/la<br />
durée et l’heure du jour. Pour changer l’affichage, consulter la section Afficheur<br />
de votre manuel.<br />
TUNE/SEEK : Appuyer sur pour avancer à la piste suivante. Le numéro<br />
de piste et la durée apparaîtront.<br />
TUNE/SEEK : Appuyer sur pour aller au début de la piste courante.<br />
Appuyer sur ce bouton pendant les 8 premières secondes de la piste pour<br />
passer au début de la piste précédente. Le numéro de piste et la durée<br />
apparaîtront.<br />
1/PAUSE: Appuyer sur la touche 1/ pour arrêter un <strong>CD</strong>. PAU apparaîtra sur<br />
l’afficheur et le son sera mis en sourdine. Appuyer sur la touche à nouveau<br />
pour continuer l’écoute du <strong>CD</strong>.<br />
2/RDM: Appuyer sur la touche RDM pour active le choix aléatoire de piste.<br />
RDM apparaîtra sur l’afficheur et les pistes du disque chargé joueront dans un<br />
ordre aléatoire. Appuyer sur la touche RDM pour éteindre la lecture aléatoire.<br />
3/RPT: Appuyer sur la touche RPT pour répéter la piste que vous écoute. RPT<br />
apparaîtra sur l’afficheur et la piste que vous écoutez sera répétée jusqu’à<br />
ce que vous poussiez RPT à nouveau.<br />
5/FF: Appuyer et maintenir la touche FF enfoncée pour avancer rapidement<br />
sur une piste. Qu<strong>and</strong> vous relâchez la touche, la lecture continuera à la vitesse<br />
normale. Le numéro de piste et la durée apparaîtront pendant 5 secondes<br />
avant que l’affichage par défaut n’apparaisse.<br />
6/REV: Appuyer et maintenir la touche enfoncée pour reculer rapidement.<br />
Qu<strong>and</strong> vous relâchez le bouton, la lecture continue à vitesse normale. Le<br />
numéro de piste et la durée apparaîtront pendant 5 secondes avant que<br />
l’affichage par défaut n’apparaisse.<br />
TRACK SCAN: Appuyer sur SCAN/PSCAN pour balayer toutes les pistes du<br />
<strong>CD</strong>. Après avoir joué pendant 10 secondes de la piste en cous, le lecteur ira<br />
automatiquement à la piste suivante. Pour arrêter le balayage, appuyer sur<br />
SCAN/PSCAN à nouveau.<br />
EJECT: Appuyer sur la touche<br />
25<br />
pour éjecter un <strong>CD</strong>.<br />
Dépannage<br />
Les messages d’erreur suivants peuvent apparaître pendant la lecture d’un<br />
disque compact :<br />
NO <strong>CD</strong>: Aucun <strong>CD</strong> n’a été chargé dans le lecteur.<br />
FOCUS: La lentille n’est pas au foyer sur le disque. Les raisons possible sont :<br />
– Le disque est inséré à l’envers – Éjecter et insérer le disque à nouveau.<br />
– Le disque est sale, égratigné ou huminde – Essayer de nettoyer le disque.<br />
– La lentille est sale – Nettoyer la lentille du disque avec un nettoyeur<br />
à lentille.<br />
– Il est très humide – Attendre une heure et essayer à nouveau.<br />
AVERTISSEMENTS DE DOMMAGES AU VÉHICULE<br />
Dans ce manuel, vous trouverez les avertissements et avis suivants:<br />
ATTENTION :<br />
Cela signifie que quelque chose pourrait<br />
vous blesser ou quelqu’un d’autre.<br />
AVIS :<br />
Cela signifie que quelque chose<br />
pourrait endommager votre véhicule.<br />
Dans la zone ATTENTION, vous êtes informé qu’il y a un risque. Ensuite, on vous<br />
indique ce qu’il faut faire pour aider à éviter ou réduire le risque. Veuillez lire et<br />
respecter ces avertissements. Sinon, vous ou quelqu’un d’autre, pourrait être blessé.<br />
Dans la section AVIS, on vous informe que quelque chose est susceptible<br />
d’endommager votre véhicule. Très souvent, ces dommages ne seraient pas<br />
couverts par votre garantie et coûteraient cher. L’avis vous dit quoi faire pour<br />
vous aider à éviter les dommages.<br />
NOTE: D’autres manuels peuvent utiliser ATTENTION et AVIS différemment.<br />
NOTICE D’UTILISATION<br />
Pour savoir comment tirer le maximum de votre récepteur <strong>Delphi</strong>, lisez toutes<br />
les instructions qui suivent.<br />
ATTENTION :<br />
Qu<strong>and</strong> vous conduisez, gardez toujours vos yeux sur la route et vos mains sur<br />
le volant, tout en prêtant attention aux tâches normales de conduite. Comme<br />
toujours, le conducteur est responsable du fonctionnement sécuritaire du<br />
véhicule. Si vous ne gardez pas les yeux sur la route et les mains sur le volant,<br />
il pourrait en résulter des blessures pour vous ou les autres.<br />
Utilisation de l’horloge<br />
Votre horloge peut fonctionner en mode 12 ou 24 heures. Le mode 12 heures<br />
fait la différence entre <strong>AM</strong> et PM. Le mode 24 heures fonctionne selon le<br />
système des 24 heures :<br />
1. Mettre le contact.<br />
2. Appuyer et maintenir la touche DSPL/TIME enfoncée jusqu’à ce que les<br />
chiffres des heures et des minutes clignotent et que vous entendiez un bip.<br />
Cela indique que vous êtes en mode de réglage de l’heure.<br />
3. Appuyer et relâcher le bouton-poussoir 5 pour alterner entre les modes<br />
12 et 24 heures.<br />
Après 5 secondes d’inactivité, l’afficheur revient à l’affiche par défaut, et le<br />
mode en cours sera réglé.<br />
Mettre le contact<br />
1. Mettre le contact.<br />
2. Appuyer et maintenir la touche DSPL/TIME enfoncée jusqu’à ce que les<br />
chiffres des heures et des minutes clignotent et que vous entendiez un bip.<br />
Cela indique que vous êtes en mode de réglage de l’heure.<br />
3. Appuyer sur le bouton DSPL/TIME à nouveau jusqu’à ce que les chiffres<br />
des heures clignotent.<br />
4. Tourner le bouton SETUP pour changer l’heure. La rotation dans le sens<br />
horaire avance l’heure; la rotation dans le sens antihoraire recule l’heure.<br />
18
5. Appuyer sur le bouton DSPL/TIME à nouveau jusqu’à ce que les chiffres<br />
des minutes clignotent. Tourner le bouton SETUP pour changer les minutes.<br />
La rotation dans le sens horaire avance les minutes; la rotation dans le sens<br />
antihoraire recule les minutes.<br />
6. Appuyer sur le bouton DSPL/TIME à nouveau pour terminer le processus<br />
de réglage de l’heure. L’afficheur reviendra en fonctionnement par défaut.<br />
En tout temps pendant le processus de réglage de l’heure, si vous ne poussez<br />
pas une touche ou si vous ne tournez pas le bouton pendant 5 secondes, cela<br />
annulera le mode de réglage de l’heure, la radio reviendra à son fonctionnement<br />
normal et conservera tous les changements que vous avez faits.<br />
ATTENTION :<br />
Régler l’horloge seulement qu<strong>and</strong> vous ne conduisez pas le véhicule.<br />
Régler l’horloge en conduisant le véhicule pourrait entraîner des blessures<br />
à vous ou à d’autres. Comme toujours, le conducteur est responsable du<br />
fonctionnement sécuritaire du véhicule.<br />
Utilisation de l’avertisseur<br />
L’avertisseur active la radio à une heure prédéterminée. Si vous poussez la touche<br />
ALARM CLOCK momentanément, cela affichera l’heure du réglage de l’avertisseur.<br />
Réglage de l’avertisseur<br />
1. Qu<strong>and</strong> la radio est allumée, appuyer et maintenir la touche ALARM CLOCK<br />
enfoncée jusqu’à ce que vous voyiez l’icône « ALARM » et SET. Vous êtes<br />
en mode de réglage de l’avertisseur. Les chiffres de l’heure de l’avertisseur<br />
commenceront à clignoter.<br />
2. Tourner le bouton SETUP jusqu’à ce que l’heure désirée apparaisse sur<br />
l’afficheur. Tourner le bouton dans le sens horaire avance l’heure; tourner<br />
dans le sens antihoraire recule l’heure.<br />
3. Appuyer sur la touche ALARM CLOCK jusqu’à ce que les chiffres des<br />
minutes clignotent.<br />
4. Tourner le bouton SETUP pour changer les minutes.<br />
5. Appuyer sur la touche ALARM CLOCK à nouveau jusqu’à ce que SET TONE<br />
apparaisse sur l’afficheur.<br />
6. Appuyer sur la touche ALARM à nouveau jusqu’à ce que les chiffres du<br />
VOL apparaissent sur l’afficheur. Appuyer sur la touche à nouveau et vous<br />
entendrez le son de l’avertisseur. Pour monter le volume de l’avertisseur,<br />
tourner le bouton SETUP dans le sens horaire. Pour baisser le volume de<br />
l’avertisseur, tourner le bouton SETUP dans le sens antihoraire.<br />
7. Appuyer sur la touche ALARM CLOCK à nouveau pour terminer et revenir<br />
au fonctionnement normal de l’afficheur. L’icône apparaîtra sur l’afficheur<br />
pour indiquer que l’avertisseur est activé.<br />
NOTE : Si vous ne poussez aucune touche ou ne tournez aucun bouton<br />
pendant 5 secondes pendant le processus de réglage de l’avertisseur,<br />
le réglage du réveil sera annulé et la radio reviendra à son mode de<br />
fonctionnement normal, conservant tous les changements effectués,<br />
quels qu’ils soient.<br />
Utilisation de la b<strong>and</strong>e météo<br />
La radio météo NOAA est un service offert par le service de météo national.<br />
Il offre des prévisions en continu obtenues directement du service de météo<br />
national. Des messages enregistrés sont répétés tous les quatre à six minutes<br />
et sont révisés toutes les une à trois heures ou plus souvent si nécessaire.<br />
La plupart des stations fonctionnent 24 heures sur 24.<br />
La météo pour la région dans laquelle vous êtes peut être trouvée sur une des<br />
sept stations. Lorsqu’en mode météo, l’afficheur indiquera WEATHER, WX et<br />
le numéro du canal. Le canal peut être changé à l’aide des boutons TUNE/SEEK<br />
/ et peut aussi être préréglé aux boutons poussoirs.<br />
Les fréquences associées aux canaux de la b<strong>and</strong>e météo sont les suivantes :<br />
1. 162,400 MHz 5. 162,500 MHz<br />
2. 162,425 MHz 6. 162,525 MHz<br />
3. 162,450 MHz 7. 162,550 MHz<br />
4. 162,475 MHz<br />
Le service météorologique national opère environ 372 stations. Près de 90<br />
pourcent de la population nationale est située à portée d’écoute d’une radio<br />
émettrice météo NOAA.<br />
Utilisation d’un lecteur de disque compact (si équipé)<br />
Votre lecteur <strong>CD</strong> intégral lit des disques compacts pleine gr<strong>and</strong>eur.<br />
AVIS :<br />
Ne jamais insérer quoi que ce soit d’autre qu’un disque <strong>CD</strong> dans votre lecteur<br />
<strong>CD</strong>. Ce faisant, vous pourriez endommager votre lecteur <strong>CD</strong> et entraîner des<br />
réparations inutiles ou annuler la garantie de l’appareil.<br />
Lecture d’un disque compact<br />
1. Tourner la clé de contact et mettre le récepteur en marche.<br />
2. Insérer partiellement un disque dans la fente, avec l’étiquette vers le haut.<br />
Le lecteur tirera automatiquement le disque à l’intérieur une fois qu’il est<br />
partiellement inséré. L’icône du <strong>CD</strong> et LOADING apparaîtront sur l’afficheur<br />
suivis du numéro de piste et de la durée. Alors, le disque commencera à jouer.<br />
3. Si vous écoutez la radio <strong>AM</strong>/<strong>FM</strong>/WX, poussez le bouton /AUX pour lire un<br />
<strong>CD</strong> qui a été chargé dans le lecteur. Si aucun <strong>CD</strong> n’a été chargé, l’afficheur<br />
indiquera « NO <strong>CD</strong> » pendant cinq secondes et retournera à l’affichage par<br />
défaut. Si un <strong>CD</strong> a été chargé, le numéro de piste et la durée seront affichés.<br />
Si un <strong>CD</strong> est éjecté et non enlevé dans les 16 secondes, le <strong>CD</strong> sera rechargé<br />
mais ne commencera pas à jouer jusqu’à ce que la touche /AUX soit poussée.<br />
19<br />
24
23<br />
2. Pour accroître la fréquence radio, appuyer sur le bouton pour<br />
passer à la station supérieure suivante.<br />
3. Pour diminuer la fréquence, appuyer sur le bouton pour passer<br />
à la station inférieure suivante.<br />
SEEK : En appuyant sur les boutons ou pendant plus d’une demiseconde<br />
met le mode SEEK en marche, et SEEK apparaît sur l’afficheur.<br />
Le mode SEEK prend fin qu<strong>and</strong> vous atteignez une station pouvant être<br />
syntonisée et la station jouera.<br />
Si SEEK ne trouve pas une station pouvant être syntonisée, après avoir lu la<br />
b<strong>and</strong>e deux fois, la recherche prend fin et NO FOUND apparaît sur l’afficheur<br />
pendant 5 secondes. Après 5 secondes, l’affichage par défaut apparaîtra et<br />
la radio continuera à jouer la station qu’il jouait avant que SEEK ne soit activé.<br />
Pour annuler la recherche (SEEK) appuyer sur la touche ou à nouveau.<br />
AUTO STORE : AUTO STORE mémorise automatiquement les 5 stations les plus<br />
puissantes à l’aide des boutons 1 à 6. Appuyer et maintenir la touche AUTO<br />
STORE enfoncée jusqu’à ce que AUTO et l’icône AS apparaissent sur l’afficheur.<br />
AUTO STORE affectera seulement la b<strong>and</strong>e que vous écoutez. Par exemple, si<br />
vous poussez AUTO STORE en écoutant <strong>FM</strong>1, les préréglages de <strong>AM</strong>, <strong>FM</strong>2,<br />
<strong>FM</strong>3 et WX ne changeront pas. En poussant et en maintenant AUTO STORE<br />
pendant plus de 2 secondes, annulera AUTO STORE et les préréglages<br />
originaux seront restaurés.<br />
SCAN : Appuyer sur SCAN/PSCAN pour balayer toutes les stations de la b<strong>and</strong>e<br />
que vous écoutez. Qu<strong>and</strong> une station dont la fréquence assez forte est trouvée,<br />
la radio jouera pendant 5 secondes puis continuera à balayer jusqu’à ce que<br />
vous poussiez SCAN/PSCAN à nouveau. L’afficheur indiquera SCAN et la<br />
fréquence balayée.<br />
PSCAN : Appuyer sur SCAN/PSCAN pendant plus de 2 secondes pour balayer<br />
les préréglages de la b<strong>and</strong>e que vous utilisez. (<strong>FM</strong> balayera <strong>FM</strong>1, <strong>FM</strong>2, et <strong>FM</strong>3.)<br />
Qu<strong>and</strong> une fréquence assez forte est trouvée, la radio jouera la station pendant<br />
5 secondes puis continuera à balayer. L’afficheur indiquera PSCN, la fréquence,<br />
le numéro préréglé et la b<strong>and</strong>e courante. Le balayage préréglé continuera<br />
jusqu’à ce que vous poussiez SCAN/PSCAN à nouveau.<br />
Ajustement des préréglages<br />
Les six boutons poussoirs numérotés vous permettent de prérégler six de vos<br />
stations préférées par b<strong>and</strong>e et d’y retourner facilement au toucher d’un bouton.<br />
Pour ajuster les préréglages :<br />
1. Allumer le récepteur.<br />
2. Choisir une b<strong>and</strong>e.<br />
3. Régler à la station désirée.<br />
4. Appuyer et maintenir une des 6 touches numérotées enfoncées pendant<br />
plus de 2 secondes pour mémoriser la station choisie. Qu<strong>and</strong> la station a<br />
été placée au numéro préréglé choisi, vous entendrez un bip et le numéro<br />
préréglé sera visible.<br />
5. Répéter les étapes 1 à 4 pour chacun des boutons poussoirs.<br />
À l’avenir, en poussant sur le bouton préréglé, cela syntonisera la radio à la<br />
station que vous avez réglée sur la b<strong>and</strong>e que vous écoutez.<br />
ATTENTION :<br />
Régler l’avertisseur seulement qu<strong>and</strong> vous ne conduisez pas le véhicule.<br />
Régler l’avertisseur en conduisant le véhicule pourrait entraîner des blessures<br />
à vous ou à d’autres. Comme toujours, le conducteur est responsable du<br />
fonctionnement sécuritaire du véhicule.<br />
Éteindre l’avertisseur<br />
Appuyer et maintenir la touche ALARM CLOCK enfoncée jusqu’à ce que vous<br />
entendiez un bip et que l’icône disparaisse de l’afficheur.<br />
Activation du rappel d’alarme<br />
Pour utiliser le rappel d’alarme, appuyer sur n’importe quelle touche qu<strong>and</strong><br />
l’avertisseur sonne. L’avertisseur sonnera à nouveau dans 9 minutes.<br />
Fonctions générales du récepteur radio<br />
Votre récepteur est équipé de :<br />
– Une b<strong>and</strong>e <strong>AM</strong> à 6 préréglages <strong>AM</strong><br />
– Trois b<strong>and</strong>es <strong>FM</strong> avec un total de 18 préréglages <strong>FM</strong><br />
– Une b<strong>and</strong>e météo avec 6 préréglages WX<br />
Mise en marche<br />
Qu<strong>and</strong> le contact est ouvert, le récepteur peut être allumé ou éteint en poussant<br />
la touche . Appuyer sur la touche SETUP allume aussi le récepteur.<br />
Réglage du volume<br />
Pour monter le volume, tourner le bouton SETUP dans le sens horaire. Pour<br />
baisser le volume, tourner le bouton dans le sens antihoraire.<br />
Minuterie d’une heure<br />
Qu<strong>and</strong> le contact est fermé, si vous poussez sur la touche ou le bouton<br />
SETUP, cela allume le récepteur et active la minuterie d’une heure du récepteur.<br />
Le récepteur s’éteindra après une heure. En poussant sur la touche ou le<br />
bouton SETUP à nouveau, cela réactive la minuterie d’une heure.<br />
Afficheur<br />
L’afficheur par défaut de votre récepteur indique l’heure du jour. Le récepteur<br />
peut aussi afficher une information additionnelle qui change selon le mode choisi.<br />
En poussant sur la touche DSPL/TIME, qu<strong>and</strong> le récepteur est allumé, vous<br />
pouvez alterner entre les affichages disponibles.<br />
Afficheurs en mode radio<br />
Qu<strong>and</strong> vous utilisez la radio, appuyez sur la touche DSPL/TIME pour alterner<br />
entre les affichages :<br />
Affichage 1 : Horloge<br />
Affichage 2 : Fréquence<br />
Affichages en mode <strong>CD</strong><br />
Qu<strong>and</strong> vous utilisez le lecteur <strong>CD</strong>, appuyez sur la touche DSPL/TIME pour<br />
alterner entre les trois affichages :<br />
Affichage 1 : Horloge<br />
Affichage 2 : Numéro de piste et durée<br />
20
Réglage d’un affichage par défaut<br />
Pour changer l’affichage par défaut :<br />
1. Allumer la radio.<br />
2. Pour changer l’affichage par défaut en mode radio ou <strong>CD</strong>, vous devez<br />
être dans le mode où vous voulez faire un changement.<br />
- Appuyer sur la touche BAND pour entrer en mode radio.<br />
- Appuyer sur la touche pour entrer en mode <strong>CD</strong>.<br />
3. Appuyer et maintenir la touche DSPL/TIME enfoncée pendant<br />
2 secondes, jusqu’à ce que les chiffres des heures et des<br />
minutes clignotent.<br />
4. Pendant que les chiffres des heures et des minutes clignotent, appuyer<br />
sur le bouton 6 jusqu’à ce que l’affichage que vous voulez par défaut<br />
apparaisse.<br />
Ajustement de la brillance d’afficheur<br />
Si le gradateur d’éclairage du tableau de bord ne contrôle pas la brillance de<br />
l’afficheur du récepteur ou si le récepteur fonctionne en mode de minuterie<br />
d’une heure, appuyer sur le bouton SETUP jusqu’à ce que DIM et le niveau<br />
de brillance apparaissent sur l’afficheur. Tourner le bouton SETUP dans le sens<br />
horaire pour augmenter la brillance du récepteur et antihoraire pour la diminuer.<br />
Mode auxiliaire<br />
En mode auxiliaire, vous pouvez utiliser un périphérique comme un iPod ou un<br />
lecteur MP3 que vous avez branché à l’aide de la prise jack située à l’entrée à<br />
l’avant du récepteur.<br />
Pour utiliser un périphérique :<br />
1. Brancher le périphérique à l’aide de la prise jack auxiliaire.<br />
2. Appuyer sur le bouton /AUX jusqu’à ce que AUX IN apparaisse<br />
sur l’afficheur.<br />
Qu<strong>and</strong> un périphérique est branché et allumé, vous pourrez l’écouter. Si la<br />
touche /AUX est poussée et qu’aucun périphérique n’est branché, la radio<br />
affichera « NO AUX ».<br />
Pour mettre le mode en sourdine, appuyer sur le bouton 1. Appuyer sur 1 à<br />
nouveau pour continuer à écouter le périphérique que vous avez branché.<br />
Pour éteindre le mode auxiliaire :<br />
1. Appuyer sur le bouton /AUX ou BAND jusqu’à ce que la radio change<br />
au mode que vous voulez utiliser.<br />
2. Débrancher la ligne auxiliaire de la prise jack AUX IN.<br />
Ajustement des réglages du récepteur<br />
Pour ajuster le volume, la basse, les aigus, la balance, le fondu, la recherche de<br />
sensibilité, l’éclairage et les enceintes, pousser et relâcher le bouton SETUP.<br />
Chaque fois que vous poussez le bouton, vous avancez au réglage suivant<br />
et volume, basse, aigus, balance, fondu, recherche de sensibilité, éclairage,<br />
enceintes apparaissent sur l’afficheur.<br />
VOLUME : Tourner le bouton SETUP dans le sens horaire pour monter le<br />
volume et dans le sens antihoraire pour le baiser. L’afficheur indiquera VOL et le<br />
niveau du volume.<br />
BASS: Tourner le bouton SETUP jusqu’à ce que BASS et le réglage courant<br />
apparaissent sur l’afficheur. Tourner le bouton dans le sens horaire pour<br />
augmenter la basse et antihoraire pour la diminuer.<br />
AIGUS : Tourner le bouton SETUP jusqu’à ce que TREBLE et le réglage courant<br />
apparaissent sur l’afficheur. Tourner le bouton dans le sens horaire pour<br />
augmenter les aigus et antihoraire pour les diminuer.<br />
BALANCE: Appuyer sur le bouton SETUP jusqu’à ce que BALANCE et le<br />
réglage courant apparaissent sur l’afficheur. Tourner le bouton dans le sens<br />
horaire pour déplacer le son vers les enceintes de droite et antihoraire pour le<br />
déplacer vers les enceintes de gauche.<br />
FOND : Appuyer sur le bouton SETUP jusqu’à ce que FADE et le réglage<br />
courant apparaissent sur l’afficheur. Tourner le bouton dans le sens horaire pour<br />
déplacer le son vers les enceintes avant et antihoraire pour déplacer le son<br />
vers les enceintes arrière.<br />
RECHERCHE DE SENSIBILITÉ : Appuyer sur le bouton SETUP jusqu’à ce que<br />
SEEK et le niveau de sensibilité apparaissent sur l’afficheur. Tourner le bouton<br />
dans le sens horaire pour augmenter la recherche de sensibilité et antihoraire<br />
pour la diminuer. Augmenter la sensibilité vous aidera à trouver davantage de<br />
stations, incluant celles qui sont légèrement plus faibles. La diminuer fera<br />
décroître le nombre mais les stations les plus puissantes seront trouvées.<br />
GRADATION D’ÉCLAIRAGE: Appuyer sur le bouton SETUP jusqu’à ce que DIM<br />
apparaisse sur l’afficheur. Tourner le bouton SETUP dans le sens horaire pour<br />
augmenter la brillance de l’afficheur et antihoraire pour diminuer la brillance.<br />
ENCEINTES: Appuyer sur le bouton SETUP jusqu’à ce que SPEAKER4 ou<br />
SPEAKER2 apparaisse sur l’afficheur. Tourner le bouton pour alterner de la<br />
fonction 2 enceintes à 4 enceintes.<br />
Utilisation de la radio<br />
Trouver une station<br />
BAND : Appuyer sur cette touche pour changer entre <strong>FM</strong>1, <strong>FM</strong>2, <strong>FM</strong>3, <strong>AM</strong> et<br />
WX. Votre choix apparaîtra sur l’afficheur.<br />
TUNE/SEEK : Appuyer et maintenir les boutons et BAND enfoncés pendant<br />
2 secondes pour alterner entre la syntonisation manuelle et le mode recherche.<br />
L’afficheur indiquera TUNE ou SEEK. Vous êtes dans le mode affiché.<br />
SYNTONISATION manuelle :<br />
1. Appuyer et maintenir les boutons et BAND enfoncés jusqu’à ce<br />
que TUNE apparaisse sur l’afficheur.<br />
21<br />
22