
Create successful ePaper yourself
Turn your PDF publications into a flip-book with our unique Google optimized e-Paper software.
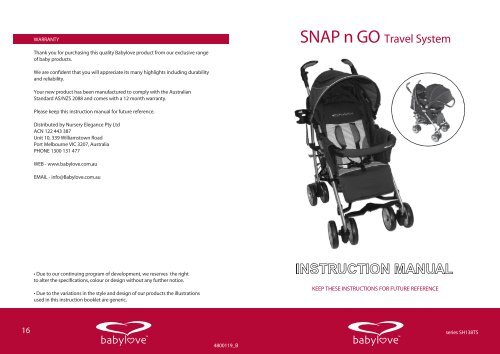
WARRANTY<br />
Thank you for purchasing this quality <strong>Babylove</strong> product from our exclusive range<br />
of baby products.<br />
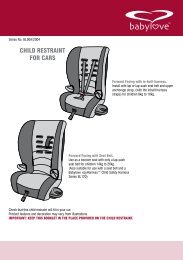
<strong>SNAP</strong> n <strong>GO</strong> <strong>Travel</strong> <strong>System</strong><br />
We are co dent that you will appreciate its many highlights including durability<br />
and reliability.<br />
Your new product has been manufactured to comply with the Australian<br />
Standard AS/NZS 2088 and comes with a 12 month warranty.<br />
Please keep this instruction manual for future reference.<br />
Distributed by Nursery Elegance Pty Ltd<br />
ACN 122 443 387<br />
Unit 10, 339 Williamstown Road<br />
Port Melbourne VIC 3207, Australia<br />
PHONE 1300 131 477<br />
WEB - www.babylove.com.au<br />
EMAIL - info@<strong>Babylove</strong>.com.au<br />
• Due to our continuing program of development, we reserves the right<br />
• Due to the variations in the style and design of our products the illustrations<br />
used in this instruction booklet are generic.<br />
KEEP THESE INSTRUCTIONS FOR FUTURE REFERENCE<br />
16 series SH138TS<br />
4800119_B
CLEANING<br />
IMPORTANT: RETAIN FOR FUTURE REFERENCE.<br />
READ THESE INSTRUCTIONS CAREFULLY AND KEEP THEM FOR FUTURE REFERENCE.<br />
THE CORRECT USE AND MAINTENANCE OF THIS PRODUCT IS ESSENTIAL.<br />
WARNINGS<br />
• Do not leave children unattended.<br />
• Follow the manufacturer’s instructions.<br />
• Ensure your child is secured with a correctly adjusted safety harness.<br />
• Do not carry additional children or bags on the stroller.<br />
• Do not allow children to stand on the seat, the stroller may tip over.<br />
• Do not hang bags or goods from the handle as this could cause the stroller to tip over.<br />
• Do not place more than 4kg in the basket, or 1kg in the canopy pocket (if supplied).<br />
• The weight of the child using this product should not exceed 17kg.<br />
• Do not use accessories other than those supplied and approved by <strong>Babylove</strong>.<br />
• When making adjustments to the stroller, ensure that your child’s body is clear of any moving<br />
parts on the stroller, otherwise they may be injured.<br />
• Always apply all of the brakes when parking the stroller. The stroller may roll away even if<br />
left unattended for a few moments.<br />
• Use the tether strap to prevent the stroller from rolling away.<br />
• Check that all safety locks are engaged before placing a child in the stroller.<br />
• Always raise the leg support to its highest position when transporting a baby. This will<br />
reduce the risk of the baby falling out through the front of the stroller.<br />
• Remove the child from the stroller before going up or down stairs and escalators.<br />
• To prevent the risk of the stroller catching fire, do not park it near an exposed heat source<br />
such as a radiator, an open fire or a barbecue, etc.<br />
• Do not run while using this product.<br />
• Do not lift the stroller by the bumper bar. It may disengage.<br />
• Always lock the front swivel wheel when on uneven surfaces to minimize wheel wobble.<br />
• To clean vinyl and metal parts wipe with a clean wet cloth and a mild soap and<br />
water solution.<br />
• To clean woven fabric use upholstery cleaner such as normally used on furniture or<br />
a mild soap and water solution. Allow fabrics to air dry, out of direct sunlight.<br />
• Never clean with abrasive, ammonia based, bleach based or spirit type cleaners.<br />
CARE AND MAINTENANCE<br />
• Check the main components and other parts operate freely and are secure. Check<br />
regularly for wear & tear, loose fasteners and damage. Tighten any loose fasteners.<br />
Replace any worn or damaged parts immediately using only <strong>Babylove</strong> approved<br />
parts.<br />
• Moving parts may require occasional lubrication with a dry lubricant or a silicon<br />
based spray lubricant. This will help to avoid squeaks.<br />
• Exposure to direct sunlight will fade most fabrics over time. To limit the effect of UV<br />
fading, avoid leaving the stroller in direct sunlight where practicable.<br />
MODEL VARIATIONS<br />
• Not all models will have features such as rain covers, canopy windows, etc.<br />
• Note that the fabric patterns and colours pictured on the stroller in this instruction<br />
manual may vary from that of the product that you have purchased.<br />
RECOMMENDATION<br />
Some strollers have backrests adjustable between an upright and reclined position. The upright<br />
positions are not suitable for use with children less than six months old. As a guide, the lowest recline<br />
position should be used to transport babies, the backrest can be adjusted to a more upright<br />
position as the child grows older and is able to support its head without assistance.<br />
SAFETY WARNING<br />
The sun is very strong. DO NOT LEAVE YOUR CHILD EXPOSED TO THE SUN. The canopy or hood<br />
on this product will not give your child total protection from the harmful rays of the sun.<br />
THIS PRODUCT IS NOT INTENDED FOR COMMERCIAL USE.<br />
02 www.babylove.com.au<br />
www.babylove.com.au<br />
15
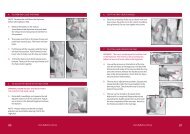
2. TO REMOVE THE ‘<strong>SNAP</strong> N <strong>GO</strong>’ INFANT CARRIER FROM THE STROLLER<br />
PARTS LIST<br />
NOTE - Ensure that the child is harnessed in the ‘Snap N Go’<br />
Infant Carrier according to the ‘Snap N Go’ instructions.<br />
A. 1 - Stroller frame<br />
B. 1 - Canopy<br />
A. Engage the brakes.<br />
C. 1 - Cup Holder<br />
B. Raise the ‘Snap N Go’ handle upright and lock it into<br />
position. Press both buttons and hold them in. Then<br />
continue to rotate the handle slightly forwards and then<br />
release. Rotate the handle up over the canopy. Check the<br />
handle is locked in the upright position.<br />
A<br />
D. 2 - Front wheels<br />
E. 2 - Rear wheels & brake cable<br />
F. 1 - Front footrest<br />
G. 1 - Footrest Cap and Cap Cover<br />
A<br />
C. To release the ‘Snap N Go’ from the stroller, locate the<br />
release latch on the back (head end) of the Infant Carrier.<br />
Squeeze up and hold in to release locks. Lift the Infant<br />
Carrier up by the handle and remove from the stroller.<br />
D. Replace the fabric covers over the mounting slots.<br />
B<br />
H. 1 - Armbar<br />
B<br />
C<br />
B<br />
D<br />
E<br />
D<br />
C<br />
C<br />
F<br />
G<br />
H<br />
14 www.babylove.com.au<br />
www.babylove.com.au<br />
03
1. ASSEMBLING THE STROLLER<br />
A. Release the storage latch on the side of the<br />
stroller frame. Squeeze the frame together if necessary.<br />
B. Lift the frame up by the handles, the stroller will partially<br />
open.<br />
C. Push down on the lower locking bar until the frame is fully<br />
opened and locked.<br />
1. TO CONNECT THE ‘<strong>SNAP</strong> N <strong>GO</strong>’ INFANT CARRIER TO THE STROLLER<br />
WARNING - The front bumper bar must be fitted and<br />
securely locked onto the armrests.<br />
NOTE - Ensure that the child is harnessed in the ‘Snap N Go’<br />
Infant Carrier according to the ‘Snap N Go’ instructions.<br />
A. Engage the brakes and place the stroller backrest into<br />
the fully reclined position.<br />
A<br />
D. Check that both the upper hinge and lower locking bar are<br />
fully engaged.<br />
A<br />
B. Open the fabric covers on each armrest of the stroller.<br />
The mounting slots for installing the ‘Snap N Go’ are<br />
now visible.<br />
C. Hold the ‘Snap N Go’ by the carry handle, and also if<br />
you prefer, by the front rebound bar. Face the feet end<br />
of the ‘Snap N Go’ towards the stroller backrest.<br />
B<br />
D. Lower the ‘Snap N Go’ into the exposed mounting slots.<br />
Press down firmly on both sides until you hear it click<br />
and it locks into place.<br />
B<br />
B<br />
NOTE - Ensure that the ‘Snap N Go’ is locked into place by<br />
pulling up on both sides. Do not use the Infant Carrier if it is<br />
not correctly installed.<br />
C<br />
E. Fold the ‘Snap N Go’ handle down if you prefer. Press<br />
both buttons and hold them in. Then rotate the handle<br />
slightly backwards and then release. Continue to rotate<br />
the handle back over the canopy. Push down until it<br />
locks.<br />
F. Adjust the canopy for child’s comfort.<br />
E<br />
C<br />
D<br />
E<br />
04 www.babylove.com.au<br />
www.babylove.com.au<br />
13
BABYLOVE INFANT CARRIER ATTACHMENT (WHERE APPLICABLE)<br />
WARNINGS - This stroller is only approved for use with <strong>Babylove</strong>’s ‘Snap N Go’ Infant Carrier.<br />
• Do not leave the child in the carrier for extended periods.<br />
• The carrier is designed to provide mobility outside of the car but it should not be used<br />
instead of an appropriate.<br />
• The carrier must be correctly fitted and locked into the stroller.<br />
• The carrier must only be used with a <strong>Babylove</strong> stroller with compatible attachments.<br />
• To be used only in a rearward facing position for a child weighing up to 9kgs and with a<br />
length of up to 700mm.<br />
In the event of doubt about the method of installation, contact <strong>Babylove</strong>.<br />
2. TO ASSEMBLE THE ARMBAR<br />
A. Locate the armbar end into the armrest slot. Push up the<br />
button on the underside of armrest and push the armbar in.<br />
Repeat for other side.<br />
B. To open one side only. Push up on button on underside of<br />
armrest. To remove, push up both buttons.<br />
A<br />
NOTE: The Infant Carrier must be removed from the frame before folding.<br />
NOTE: Do not use this Infant Carrier with any other stroller.<br />
NOTE: Ensure the baby is secured in the Infant Carrier with the harness at all times. The<br />
Infant Carrier has been fitted with a hood when using with the stroller. The hood may also<br />
be used in the car.<br />
NOTE: The ‘Snap N Go’ Infant Carrier cannot be fitted to the stroller if another child is seated<br />
in the stroller. Ensure that the child is harnessed in the ‘Snap N Go’ Infant Carrier according<br />
to the ‘Snap N Go’ instructions.<br />
3. TO ATTACH THE REAR WHEELS<br />
A. Roll the frame forward to lay the frame face down on<br />
the floor.<br />
B. Position the rear wheels on the rear legs, with the large<br />
RED brake lever on the right hand side of the stroller.<br />
C. Slide the wheels down the leg tubes until they reach<br />
the pin. Press in the pin and continue to slide the wheel<br />
over the pin until locked. Pull on the wheels to make<br />
sure they are locked on to the rear legs.<br />
D. Locate the brake cable on to the plastic clips on the rear<br />
frame bars.<br />
A<br />
B<br />
C<br />
C<br />
D<br />
12 www.babylove.com.au<br />
www.babylove.com.au<br />
05
4. TO ATTACH THE FOOTREST<br />
15. TO ADJUST THE HANDLE POSITION<br />
A. Align the footrest as shown over the two holes.<br />
Press the pins into the mouldings.<br />
B. Secure on the underside with the caps provided. Snap<br />
cap (1) onto the pins first, then engage cap cover (2).<br />
A<br />
B<br />
NOTE: THE PISTOL GRIP HANDLES ON THE STROLLER CAN BE<br />
ROTATED AROUND TO ANY ONE OF 16 DIFFERENT POSITIONS<br />
TO SUIT YOUR COMFORT.<br />
A. To adjust the handle position, pull upward on the lever<br />
directly below the pistol grip handle and then rotate the<br />
handle to the desired position. Release the lever again to<br />
lock the pistol grip handle. Repeat this method to adjust<br />
the other pistol grip handle to the same orientation.<br />
A<br />
16. TO FOLD THE STROLLER<br />
(2)<br />
(1)<br />
Before folding the stroller ensure that the canopy is back and<br />
the seat is in the fully upright position.<br />
5. TO ATTACH THE FRONT WHEELS<br />
A. Slide the front wheel assembly on to the front leg of the<br />
stroller. Ensure that the larger hole on the swivel housing is<br />
pushed on first (with the swivel lock lever toward the top).<br />
Push until the wheel clicks into position. Gently pull on<br />
the front wheel assembly to ensure it is correctly engaged.<br />
Repeat the procedure for the other front wheel assembly.<br />
B. To remove the front swivel wheels, depress the tab located<br />
under the front swivel post and slide the<br />
wheels off.<br />
A<br />
A. Lift the main fold lock upward with your foot<br />
to disengage<br />
B. Then push down with your foot to release the secondary<br />
safety lock then push the handles forward and downward<br />
to fold the stroller.<br />
C. Check that the storage hook has locked to the frame of the<br />
stroller to secure. Squeeze the frame together if necessary.<br />
A carry handle has been provided for convenience.<br />
A<br />
B<br />
Carry Handle<br />
B<br />
C<br />
Storage Hook<br />
06 www.babylove.com.au<br />
www.babylove.com.au<br />
11
13. TO ADJUST THE SEAT RECLINE<br />
NOTE: THE SEAT HAS 5 RECLINE POSITIONS.<br />
A. Press the release buttons on both backrest recline<br />
mechanisms and then lower the seat’s backrest to the<br />
desired position. Release the buttons to lock the backrest<br />
again.<br />
A<br />
6. TO LOCK THE FRONT SWIVEL WHEELS<br />
A. To prevent the front wheels from swivelling on uneven or<br />
rough surfaces, push down on the swivel lock on each pair<br />
of front wheels.<br />
Pull up on each swivel lock again to unlock the front swivel<br />
wheels.<br />
B. To raise the backrest again, push the seat upward until the<br />
desired position is reached.<br />
DO NOT ADJUST THE BACKREST WHILE YOUR CHILD IS IN THE<br />
STROLLER.<br />
7. TO ADJUST THE LEG REST<br />
A. To adjust the leg rest, lift up the end of the seat until it locks<br />
into place. To lower the leg rest, press the lever on both<br />
sides of the leg rest and then lower it.<br />
A<br />
14. TO USE THE TETHER STRAP<br />
A<br />
WARNING: Use the tether strap to prevent the stroller from<br />
rolling away.<br />
Lever<br />
NOTE: A tether strap is fitted to this stroller, place the loop over<br />
the desired wrist when using this stroller.<br />
A. Should you need to change wrist, remove the stroller strap<br />
and apply to the other handle. To ensure a tight fit, loop the<br />
tether strap around rather than over the handle. Open the<br />
end of the tether strap and insert the opposite end through<br />
opening created. Pull until tether strap tightens around<br />
handle.<br />
A<br />
8. TO ATTACH THE CANOPY<br />
A. Attach the canopy to the stroller by pushing the clips into<br />
the moulding as shown. Also attach the upper part of the<br />
canopy to the stroller with the hook and pile loop.<br />
B. Attach the canopy backflap to the hook and pile located<br />
behind the seat.<br />
C. To remove the canopy, pull up with some upward force on<br />
the clips and undo the hook and pile loop.<br />
A<br />
10 www.babylove.com.au<br />
www.babylove.com.au<br />
07
9. TO USE AND ADJUST THE CANOPY<br />
11. TO OPERATE THE BRAKES<br />
A. The canopy is hinged to allow it to open. Gently push the<br />
front of the canopy forward to open it as desired. Press<br />
the side hinges of the canopy down to lock it in the open<br />
position.<br />
Ensure the rear flap of the canopy is attached to the rear of<br />
the backrest with the hook and pile.<br />
B. To open the canopy window roll the flap away from the<br />
canopy. Attach with elastic loop and toggle.<br />
C. To extend the canopy visor pull the visor out from the<br />
canopy.<br />
A<br />
B<br />
NOTE: THE REAR BREAKS ARE DESIGNED TO BE ACTIVATED<br />
WITH YOUR FOOT.<br />
A. Lightly step on the brake lever of the right-side rear wheel<br />
and push it down to engage. The left-side brake will also<br />
engage via the cable link. Gently push the stroller forward<br />
to ensure brakes are fully engaged.<br />
B. To release the rear brakes lift the right-side brake lever<br />
upward.<br />
WARNING: ALWAYS APPLY REAR BRAKES WHEN PARKING THE<br />
STROLLER.<br />
A<br />
B<br />
12. TO SECURE YOUR CHILD IN THE HARNESS<br />
10. TO ATTACH THE CUP HOLDER<br />
A. Locate the cup holder over the frame moulding and push<br />
on by applying some downward force until locked on.<br />
C<br />
WARNING: Use this harness at all times.<br />
A five-point harness is provided to restrain your child. To secure<br />
the child in the harness, push buckle (A) and (B) into the buckle<br />
housing (C) until the buckle prongs snap into position. Carefully<br />
adjust the harness by pulling the slider (D) until the desired fit<br />
is achieved in the lap, shoulder and crotch straps. Always adjust<br />
the harness when changing the seating position of the child. To<br />
release the buckle, squeeze the top and bottom prongs.<br />
B. Reverse procedure to remove cup holder.<br />
A<br />
08 www.babylove.com.au<br />
www.babylove.com.au<br />
09