powercoil.com.au wire thread insert system
powercoil.com.au wire thread insert system
powercoil.com.au wire thread insert system

You also want an ePaper? Increase the reach of your titles
YUMPU automatically turns print PDFs into web optimized ePapers that Google loves.
® ® ®<br />
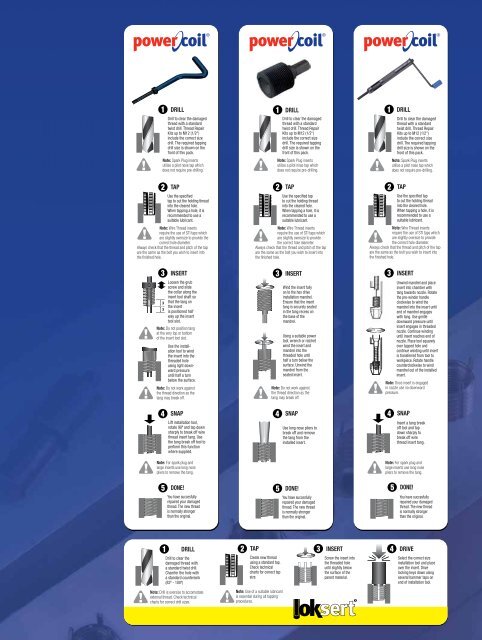
1<br />
DRILL<br />
Drill to clear the damaged<br />
<strong>thread</strong> with a standard<br />
twist drill. Thread Repair<br />
Kits up to M12 (1/2")<br />
include the correct size<br />
drill. The required tapping<br />
drill size is shown on the<br />
front of this pack.<br />
Note: Spark Plug <strong>insert</strong>s<br />
utilise a pilot nose tap which<br />
does not require pre-drilling.<br />
2<br />
TAP<br />
Use the specified<br />
tap to cut the holding <strong>thread</strong><br />
into the cleared hole.<br />
When tapping a hole, it is<br />
re<strong>com</strong>mended to use a<br />
suitable lubricant.<br />
Note: Wire Thread <strong>insert</strong>s<br />
require the use of STI taps which<br />
are slightly oversize to provide the<br />
correct hole diameter.<br />
Always check that the <strong>thread</strong> and pitch of the tap<br />
are the same as the bolt you wish to <strong>insert</strong> into<br />
the finished hole.<br />
3<br />
X<br />
X<br />
INSERT<br />
Loosen the grub<br />
screw and slide<br />
the collar along the<br />
<strong>insert</strong> tool shaft so<br />
that the tang on<br />
the <strong>insert</strong><br />
is positioned half<br />
way up the <strong>insert</strong><br />
tool slot.<br />
Note: Do not position tang<br />
at the very top or bottom<br />
of the <strong>insert</strong> tool slot.<br />
Use the installation<br />
tool to wind<br />
the <strong>insert</strong> into the<br />
<strong>thread</strong>ed hole<br />
using light downward<br />
pressure<br />
until half a turn<br />
below the surface.<br />
Note: Do not work against<br />
the <strong>thread</strong> direction as the<br />
tang may break off.<br />
1<br />
Drill to clear the damaged<br />
<strong>thread</strong> with a standard<br />
twist drill. Thread Repair<br />
Kits up to M12 (1/2")<br />
include the correct size<br />
drill. The required tapping<br />
drill size is shown on the<br />
front of this pack.<br />
Note: Spark Plug <strong>insert</strong>s<br />
utilise a pilot nose tap which<br />
does not require pre-drilling.<br />
2<br />
DRILL<br />
Use the specified tap<br />
to cut the holding <strong>thread</strong><br />
into the cleared hole.<br />
When tapping a hole, it is<br />
re<strong>com</strong>mended to use a<br />
suitable lubricant.<br />
Note: Wire Thread <strong>insert</strong>s<br />
require the use of STI taps which<br />
are slightly oversize to provide<br />
the correct hole diameter.<br />
Always check that the <strong>thread</strong> and pitch of the tap<br />
are the same as the bolt you wish to <strong>insert</strong> into<br />
the finished hole.<br />
3<br />
TAP<br />
INSERT<br />
Wind the <strong>insert</strong> fully<br />
on to the hex drive<br />
installation mandrel.<br />
Ensure that the <strong>insert</strong><br />
tang is securely seated<br />
in the tang recess on<br />
the base of the<br />
mandrel.<br />
Using a suitable power<br />
tool, wrench or ratchet<br />
wind the <strong>insert</strong> and<br />
mandrel into the<br />
<strong>thread</strong>ed hole until<br />
half a turn below the<br />
surface. Unwind the<br />
mandrel from the<br />
seated <strong>insert</strong>.<br />
Note: Do not work against<br />
the <strong>thread</strong> direction as the<br />
tang may break off.<br />
1<br />
2<br />
Drill to clear the damaged<br />
<strong>thread</strong> with a standard<br />
twist drill. Thread Repair<br />
Kits up to M12 (1/2")<br />
include the correct size<br />
drill. The required tapping<br />
drill size is shown on the<br />
front of this pack.<br />
Note: Spark Plug <strong>insert</strong>s<br />
utilise a pilot nose tap which<br />
does not require pre-drilling.<br />
Use the specified tap<br />
to cut the holding <strong>thread</strong><br />
into the cleared hole.<br />
When tapping a hole, it is<br />
re<strong>com</strong>mended to use a<br />
suitable lubricant.<br />
Note: Wire Thread <strong>insert</strong>s<br />
require the use of STI taps which<br />
are slightly oversize to provide<br />
the correct hole diameter.<br />
Always check that the <strong>thread</strong> and pitch of the tap<br />
are the same as the bolt you wish to <strong>insert</strong> into<br />
the finished hole.<br />
3<br />
DRILL<br />
TAP<br />
INSERT<br />
Unwind mandrel and place<br />
<strong>insert</strong> into chamber with<br />
tang towards nozzle. Rotate<br />
the pre-winder handle<br />
clockwise to wind the<br />
mandrel into the <strong>insert</strong> until<br />
end of mandrel engages<br />
with tang. Use gentle<br />
downward pressure until<br />
<strong>insert</strong> engages in <strong>thread</strong>ed<br />
nozzle. Continue winding<br />
until <strong>insert</strong> reaches end of<br />
nozzle. Place tool squarely<br />
over tapped hole and<br />
continue winding until <strong>insert</strong><br />
is transferred from tool to<br />
workpiece. Rotate handle<br />
counterclockwise to wind<br />
mandrel out of the installed<br />
<strong>insert</strong>.<br />
Note: Once <strong>insert</strong> is engaged<br />
in nozzle use no downward<br />
pressure.<br />
4<br />
SNAP<br />
Lift installation tool,<br />
rotate 90º and tap down<br />
sharply to break off <strong>wire</strong><br />
<strong>thread</strong> <strong>insert</strong> tang. Use<br />
the tang break off tool to<br />
perform this function<br />
where supplied.<br />
4<br />
SNAP<br />
Use long nose pliers to<br />
break off and remove<br />
the tang from the<br />
installed <strong>insert</strong>.<br />
4<br />
SNAP<br />
Insert a tang break<br />
off tool and tap<br />
down sharply to<br />
break off <strong>wire</strong><br />
<strong>thread</strong> <strong>insert</strong> tang.<br />
Note: For spark plug and<br />
large <strong>insert</strong>s use long nose<br />
pliers to remove the tang.<br />
Note: For spark plug and<br />
large <strong>insert</strong>s use long nose<br />
pliers to remove the tang.<br />
5<br />
DONE!<br />
You have succesfully<br />
repaired your damaged<br />
<strong>thread</strong>. The new <strong>thread</strong><br />
is normally stronger<br />
than the original.<br />
5<br />
DONE!<br />
You have succesfully<br />
repaired your damaged<br />
<strong>thread</strong>. The new <strong>thread</strong><br />
is normally stronger<br />
than the original.<br />
5<br />
DONE!<br />
You have succesfully<br />
repaired your damaged<br />
<strong>thread</strong>. The new <strong>thread</strong><br />
is normally stronger<br />
than the original.<br />
1 DRILL<br />
2 TAP<br />
INSERT<br />
Drill to clear the<br />
damaged <strong>thread</strong> with<br />
a standard twist drill.<br />
Chamfer the hole with<br />
a standard countersink<br />
(82º - 100º)<br />
Note: Drill is oversize to ac<strong>com</strong>odate<br />
external <strong>thread</strong>. Check technical<br />
charts for correct drill sizes.<br />
Create new <strong>thread</strong><br />
using a standard tap.<br />
Check technical<br />
charts for correct tap<br />
size.<br />
Note: Use of a suitable lubricant<br />
is essential during all tapping<br />
procedures.<br />
3<br />
Screw the <strong>insert</strong> into<br />
the <strong>thread</strong>ed hole<br />
until slightly below<br />
the surface of the<br />
parent material.<br />
4<br />
DRIVE<br />
Select the correct size<br />
installation tool and place<br />
over the <strong>insert</strong>. Drive<br />
locking keys down using<br />
several hammer taps on<br />
end of installation tool.