Faxem Personalised/Mail Merged Fax Instructions
Faxem Personalised/Mail Merged Fax Instructions
Faxem Personalised/Mail Merged Fax Instructions

Create successful ePaper yourself
Turn your PDF publications into a flip-book with our unique Google optimized e-Paper software.
<strong><strong>Fax</strong>em</strong> <strong>Personalised</strong>/<strong>Mail</strong> <strong>Merged</strong> <strong>Fax</strong> <strong>Instructions</strong><br />
1. Firstly, your customer database must be saved in Excel, in a CSV format, and to successfully<br />
send your database must be in the correct format. All of the fax numbers must:<br />
� Most important: be in international format (see chart below)<br />
� Include the area code (minus the leading “0”)<br />
� Have no text in the number column<br />
� Have no spacing between numbers<br />
� Have no hyphens, brackets, apostrophes etc- no - , ( ) “<br />
� Have only the word ‘<strong>Fax</strong>’ in the fax number column heading<br />
� NOTE: * When sorting Data, make sure the whole document is highlighted in order to keep the data in<br />
line with the original columns (all details match original data supplied- ie. fax number matches<br />
address, contact etc)<br />
All of this can be done by using short cut tools in Excel- you do not need to manually make changes.<br />
To remove any spacing, commas or brackets- select the fax number column.<br />
Go- Edit- Find- Find and Replace- type the item you wish to remove and leave the ‘Replace with’ blank.<br />
Or to put in international format select the fax number column.<br />
Go Format- Cells- Custom- then in General column put “61”0 for Australian numbers or “64”0 for NZ<br />
numbers.<br />
Here’s how it should look:<br />
<strong>Fax</strong>Number Company<br />
6476364150 Joan Samson<br />
61247591841 Harrison Bros<br />
61292670690 Bikes R Us<br />
61738497272 Flowers Today<br />
61 = Australia (Country Code)<br />
7 = QLD (Area Code)<br />
4759 1841 (<strong>Fax</strong> number)<br />
2. Open the document you are sending in Microsoft Word, the fields you are merging must be in ARIAL<br />
or TIMES NEW ROMAN font (mail merge is very sensitive, and other fonts can potentially cause<br />
errors), go Tools > Letter and <strong>Mail</strong>ing > <strong>Mail</strong> Merge.<br />
3. On the right hand side of the screen you will see the <strong>Mail</strong> Merge menu, click on the bottom step ><br />
Next: Starting document. Then click on the > Next: Select recipient’s option. Then click Browse.<br />
Select your appropriate CSV File.
4. Highlight the words/area where you want the merge to take place, then go to your Merge Toolbar<br />
(which should appear in your toolbars at the top of your screen- if not go View Toolbars- Merge<br />
Toolbar), click the 6 th Icon from the left> Insert Merge Fields. Click on the appropriate field you<br />
want to be merged in the area of the document. Click Insert. Then follow Step 4 for each other<br />
merge field you would like to insert.<br />
5. Check that you have inserted the correct merge fields by clicking on the 8 th Icon from the left of<br />
your merge toolbar> View <strong>Merged</strong> Data, then click on the Blue arrows to view the document with<br />
the merged fields. If all names/contacts etc appear in the document and the size/format etc does not<br />
affect the layout of your document then click >View <strong>Merged</strong> Data again to put the <strong>Merged</strong> document<br />
back to the for example instead of the actual company name.<br />
6. Once the appropriate fields have been merged and appear when you test them, you can proceed to<br />
save the file by > File, Print- select your Linotronic Print driver from your Printers drop down<br />
menu. Then click > Print to File, on the right hand side of your Print Menu. Then >OK. The document<br />
has now been saved as a PRN file, which is required to successfully upload your broadcast.<br />
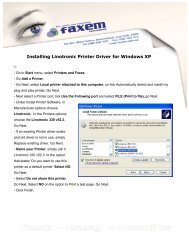
(If you do not have a Linotronic printer driver installed please download “<strong>Instructions</strong> for installing<br />
Linotronic printer driver” from the ‘<strong>Fax</strong> Broadcasting’ page under ‘<strong>Instructions</strong>’ link on our website<br />
www.faxem.com.au<br />
7. Go to our website, select to “<strong>Fax</strong> Login”, as per usual upload, see <strong><strong>Fax</strong>em</strong> <strong>Fax</strong> Marketing<br />
<strong>Instructions</strong> for further details. Select the merged document for your data, and ensure the document<br />
name has .prn at the end.<br />
8. Important: Then select the > <strong>Personalised</strong> option, (above the <strong>Fax</strong> Number File insertion section).<br />
Then insert the correct database CSV file. Enter the remaining details on the Job Insertion page as you<br />
would normally enter.<br />
9. Click > Accept. The Overview <strong>Fax</strong> Insert page will appear. If any writing appears in colour then<br />
an error has occurred. Always double check all information and if all details appear correct click ><br />
Send. Click > Yes on the confirmation for control fax. If the Data Control page reaches 100% the<br />
broadcast has been successfully upload. Click > OK. The broadcast is now ready to be started in the<br />
Job Administration page.<br />
10. Please contact your customer service team on 1300 667 355 if you cannot successfully upload your<br />
personalised/merged broadcast.