Setting up Outlook in iOS (iPhone or iPad) - Esade
Setting up Outlook in iOS (iPhone or iPad) - Esade
Setting up Outlook in iOS (iPhone or iPad) - Esade

Create successful ePaper yourself
Turn your PDF publications into a flip-book with our unique Google optimized e-Paper software.
<strong>Sett<strong>in</strong>g</strong> <strong>up</strong> <strong>Outlook</strong> <strong>in</strong> <strong>iOS</strong> (<strong>iPhone</strong> <strong>or</strong> <strong>iPad</strong>)<br />
Guide<br />
ICT Services<br />
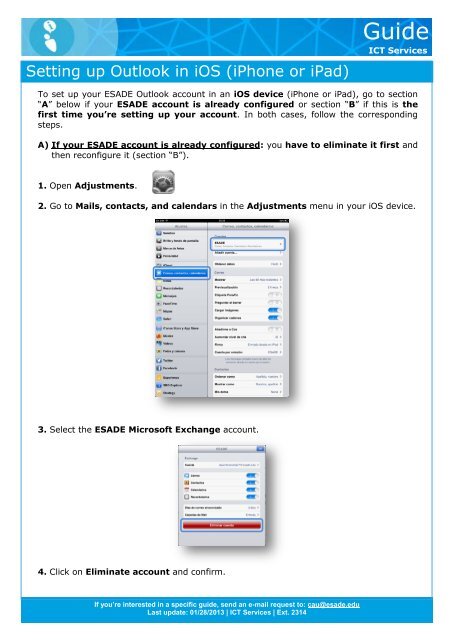
To set <strong>up</strong> your ESADE <strong>Outlook</strong> account <strong>in</strong> an <strong>iOS</strong> device (<strong>iPhone</strong> <strong>or</strong> <strong>iPad</strong>), go to section<br />
“A” below if your ESADE account is already configured <strong>or</strong> section “B” if this is the<br />
first time you’re sett<strong>in</strong>g <strong>up</strong> your account. In both cases, follow the c<strong>or</strong>respond<strong>in</strong>g<br />
steps.<br />
A) If your ESADE account is already configured: you have to elim<strong>in</strong>ate it first and<br />
then reconfigure it (section “B”).<br />
1. Open Adjustments.<br />
2. Go to Mails, contacts, and calendars <strong>in</strong> the Adjustments menu <strong>in</strong> your <strong>iOS</strong> device.<br />
3. Select the ESADE Microsoft Exchange account.<br />
4. Click on Elim<strong>in</strong>ate account and confirm.<br />
If you’re <strong>in</strong>terested <strong>in</strong> a specific guide, send an e-mail request to: cau@esade.edu<br />
Last <strong>up</strong>date: 01/28/2013 | ICT Services | Ext. 2314
<strong>Sett<strong>in</strong>g</strong> <strong>up</strong> <strong>Outlook</strong> <strong>in</strong> <strong>iOS</strong> (<strong>iPhone</strong> <strong>or</strong> <strong>iPad</strong>)<br />
Guide<br />
ICT Services<br />
B) If this is the first time you’re sett<strong>in</strong>g <strong>up</strong> your ESADE account <strong>or</strong> if you’ve<br />
elim<strong>in</strong>ated it:<br />
1. Open Adjustments.<br />
2. Go to Mails, contacts, and calendars <strong>in</strong> the Adjustments menu <strong>in</strong> your <strong>iOS</strong> device.<br />
3. Click on Add account.<br />
4. Select Microsoft Exchange as the type of account.<br />
If you’re <strong>in</strong>terested <strong>in</strong> a specific guide, send an e-mail request to: cau@esade.edu<br />
Last <strong>up</strong>date: 01/28/2013 | ICT Services | Ext. 2314
<strong>Sett<strong>in</strong>g</strong> <strong>up</strong> <strong>Outlook</strong> <strong>in</strong> <strong>iOS</strong> (<strong>iPhone</strong> <strong>or</strong> <strong>iPad</strong>)<br />
Guide<br />
ICT Services<br />
5. Introduce your set<strong>up</strong> data.<br />
Introduce the e-mail address you want to configure, your username, passw<strong>or</strong>d and a<br />
description to be able to identify the account (f<strong>or</strong> example, “ESADE”). You don’t have to<br />
fill <strong>in</strong> the doma<strong>in</strong> field.<br />
Depend<strong>in</strong>g on the <strong>iOS</strong> version <strong>in</strong>stalled on your device, you may be asked to <strong>in</strong>troduce<br />
the e-mail Server after click<strong>in</strong>g on the button Next. In this case <strong>in</strong>troduce:<br />
m.outlook.com.<br />
<strong>iOS</strong> 5 <strong>or</strong> earlier version <strong>iOS</strong> 6<br />
5. Select the data you want to synchronise.<br />
To f<strong>in</strong>ish you can <strong>in</strong>dicate which data you want to synchronise (e-mail, calendar, contacts<br />
and tasks) and close the wizard.<br />
6. Set<strong>up</strong> complete.<br />
The <strong>in</strong>itial synchronisation should only take a few seconds to complete.<br />
If you’re <strong>in</strong>terested <strong>in</strong> a specific guide, send an e-mail request to: cau@esade.edu<br />
Last <strong>up</strong>date: 01/28/2013 | ICT Services | Ext. 2314