Bailey Coffee table Cgnc C A B - Pottery Barn
Bailey Coffee table Cgnc C A B - Pottery Barn
Bailey Coffee table Cgnc C A B - Pottery Barn

Create successful ePaper yourself
Turn your PDF publications into a flip-book with our unique Google optimized e-Paper software.
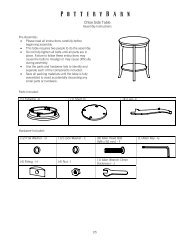
<strong>Bailey</strong> <strong>Coffee</strong> <strong>table</strong> <strong>Cgnc</strong><br />
Assembly Instructions<br />
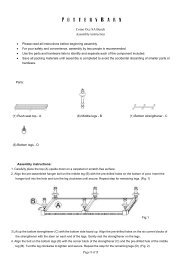
• Please read all instructions before beginning assembly.<br />
• For your safety and convenience, assembly by two people is recommended.<br />
• Use the parts and hardware lists to identify and separate each of the components included.<br />
• Save all packing materials until assembly is complete to avoid the accidental discarding of smaller parts or<br />
hardware.<br />
TOOLS:<br />
PARTS:<br />
(1) Wrench<br />
(1) Top with drawers -A (1) Shelf- B (4) Legs- C<br />
HARDWARE:<br />
(12) Nuts -a (12) Spring Washers –b (12) Flat Washers -c<br />
Assembly Instructions:<br />
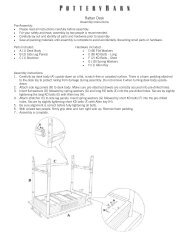
1. Pull the big drawer out. Carefully turn the <strong>table</strong> top (A) upside down on soft, scratch-free surface such as a<br />
carpet or rug. (See Fig.1)<br />
Fig.1<br />
A<br />
Drawer<br />
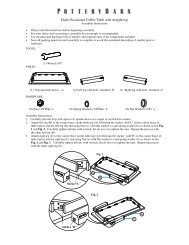
2. Attach one leg (C) to the top with drawer (A) using nut (a), spring washer (b) and flat washer (c). See Fig. 2.<br />
Fig. 2<br />
A<br />
C A<br />
B<br />
cba<br />
Wrench<br />
Page 1 of 2
3. Insert the bolt on the assembled leg (C) into the shelf (B), then loosely attach the shelf (B) to the leg(C) using nut<br />
(a), spring washer (b) and flat washer (c) . See Fig. 3.<br />
c b a<br />
Fig. 3<br />
C<br />
B<br />
A<br />
4. Attach the opposite leg (C) to the top with drawer (A) and shelf (B) using nut (a), spring washer (b) and flat<br />
washer (c). See Fig. 4.<br />
Fig. 4<br />
a b c<br />
C<br />
B<br />
A<br />
c<br />
b<br />
a<br />
Wrench<br />
5. Repeat the Step 4 to attach another two legs to the top with drawer (A) and shelf (B).<br />
6. Tighten all nuts securely by wrench, but do not over tighten the nuts.<br />
7. Grip the assembled <strong>table</strong> firmly at each end and carefully turn the assembled <strong>table</strong> to the upright position.<br />
8. Assembly is complete.<br />
Adjusting Levelers:<br />
Due to an uneven floor the furniture may not sit level due causing it to wobbles. If the piece wobbles, determine<br />
which corner does not touch the ground correctly. With two people follow these steps:<br />
(1) Carefully lift the item slightly to provide access to the levelers attached to the bottom. (Fig.5).<br />
Fig. 5<br />
Adjus<strong>table</strong><br />
Leveler<br />
(2) Turn the levelers until adequate contact will be made with the floor. Gently set down the piece and check<br />
stability.<br />
(3) Repeat steps until furniture sits firmly on the ground.<br />
Care Instructions:<br />
• Dust with a clean, soft damp cloth and wipe dry immediately.<br />
• Avoid the use of chemicals and harsh cleaning agents.<br />
thank you for your purchase.<br />
stores| catalog | www.potterybarn.com<br />
Page 2 of 2