PROFESSIONAL INSTALLATION REQUIRED ... - Pottery Barn
PROFESSIONAL INSTALLATION REQUIRED ... - Pottery Barn
PROFESSIONAL INSTALLATION REQUIRED ... - Pottery Barn

Create successful ePaper yourself
Turn your PDF publications into a flip-book with our unique Google optimized e-Paper software.
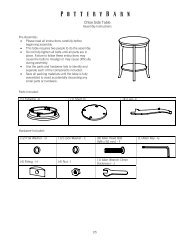
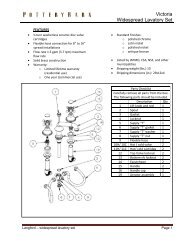
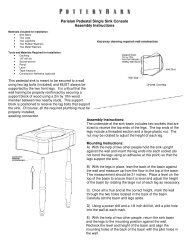
Luciana Single Sink Console<br />
<strong>PROFESSIONAL</strong> <strong>INSTALLATION</strong> <strong>REQUIRED</strong>- Contractor and Plumber needed for<br />
Installation<br />
Important Note: Please read all instructions carefully and completely before beginning assembly.<br />
Pre-Installation:<br />
• Remove all parts and hardware from boxes along with any protective packaging. Identify each part and each<br />
piece of hardware included. Do not discard any contents until after installation is complete to avoid<br />
accidentally discarding small parts or hardware. Keep all parts out of the reach of children.<br />
• A standard 8” spread faucet should be used with this Marble top console.<br />
Note: The Marble top and backsplash are fragile. In order to preserve their integrity, it is important to limit the amount<br />
of handling they get. Due to the nature of this natural material, slight chipping or cracking may result with excessive<br />
handling or if placed on a hard surface. The backsplash, due to its length and width is extremely fragile and special<br />
care should be used when handling this piece.<br />
The Marble top, even when it is still packed, should never lie flat, except for when it is placed on top of the console or<br />
during unpacking. Please note that arrows on the package indicate the side to be placed up while storing.<br />
Marble should be unpacked with extreme care. Once unpacked, the marble top should be placed directly on top of<br />
the console. If placing down, marble top should only be placed on its end and on a very soft, cushioned surface such<br />
as a rug or thick toweling.<br />
Note: Consoles usually need to be leveled and mounted to both wall and floor. Some hardware items needed for<br />
proper assembly and installation are not included: ex. shim, spacer, high quality silicone or acrylic based bath sealant,<br />
etc. DO NOT USE PLUMBERS PUTTY OR ANY OIL BASED SEALANT AS THIS WILL STAIN THE MARBLE<br />
Note: Some cutting and drilling may be necessary to mount console base to wall or to shape shelves for undersink<br />
hardware or plumbing.<br />
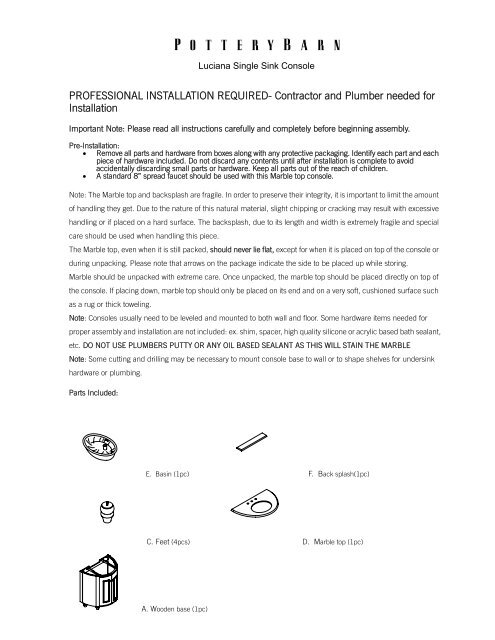
Parts Included:<br />
E. Basin (1pc) F. Back splash(1pc)<br />
C. Feet (4pcs) D. Marble top (1pc)<br />
A. Wooden base (1pc)
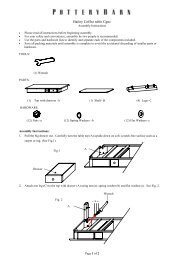
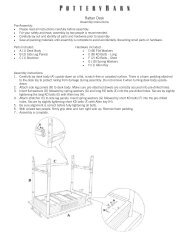
Luciana Single Sink Console<br />
Hardware (included) & Tool Required (not included):<br />
#1. Nut (4pcs) #2. Washer (4pcs)<br />
#3. Open wrench #4. L shaped long bracket (4pcs)<br />
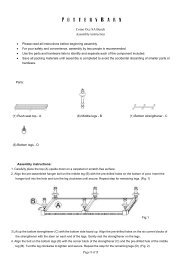
Step 1:<br />
1. Carefully lay console on its top on carpet or scratch-free surface.<br />
2. Align the pre-attached bolts on each foot to the pre-drilled holes at the bottom of<br />
console. Secure by threading the legs until fully tightened.<br />
C<br />
Step 2:<br />
1. Carefully position the marble countertop upside down on foam or soft padding to<br />
protect the surface.<br />
2. Position the basin (E) by placing over the marble top cutout. Remove nut (#1) and<br />
washer (#2) using a wrench. Carefully set the threadless anchor end into the predrilled<br />
holes at backside of countertop.<br />
3. Place the long L shaped bracket (#4), top washer and nut in succession through the other end<br />
of anchor.<br />
Secure by tightening the nut with a wrench.<br />
Note: position the basin (E) squarely under the cutout before fixing the long L shape bracket<br />
(#4) tightly, don’t tighten the brackets at this stage.
Luciana Single Sink Console<br />
4. Apply a continuous bead of high quality silicone or acrylic based bath sealant to the basin rim where it will contact the .<br />
countertop. DO NOT USE PLUMBERS PUTTY OR ANY OIL BASED SEALANT AS THIS WILL STAIN THE MARBLE<br />
Note: Don’t use adhesives or adhesive sealants.<br />
Draw the basin rim up to the countertop until it is snug.<br />
CAUTION: TO AVOID BREAKAGE, DON’T OVER-TIGHTEN WITH WRENCH.<br />
Immediately wipe away any excessive sealant.<br />
1<br />
2<br />
4<br />
3<br />
Note: Before installing marble top onto console base; console needs to be properly leveled, shimmed (if necessary),<br />
and secured to floor and wall as required.<br />
Step 3:<br />
1. Carefully lift up the marble top (D) with basin (E) attached and place it onto the console.<br />
Caution: For safe handling, 2-3 people are recommended.<br />
Note: Always carry any natural stone vertically; carrying stone products flat may cause cracking or breakage.<br />
2. Adjust the basin position to make sure drain holes are right on top of the cutout for the drainpipe. Now, secure<br />
the basin tightly.<br />
Avoid moving the top after it has been set into place. Allow the top to dry a minimum of 24 hours to allow for proper<br />
adhesion to the console. Use high quality silicone or acrylic based bath sealant to install back splash (F) in place,<br />
clean up any excess immediately with a clean damp rag. Wipe off any excess wax or residue that may have<br />
accumulated around sink area. DO NOT USE PLUMBERS PUTTY OR ANY OIL BASED SEALANT AS THIS WILL<br />
STAIN THE MARBLE
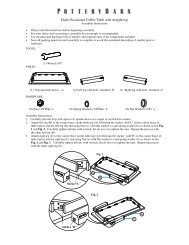
Luciana Single Sink Console<br />
Please note that the supporting rails are pre-assembled. If the supporting rail placement needs to be adjusted,<br />
follow the process below:<br />
1. Loosen screws to move the short L shape brackets up or down to adjust the height of supporting rails as needed.<br />
2. Secure the supporting rails to the front and back rails of cabinet with the short L shaped brackets and screws<br />
though the pre-drilled holes. If needed, mounting blocks should be centered on the sides and even with the top<br />
of the console.<br />
3. Use a dry cloth to wipe off any dirt or dust from the top edge of console.<br />
4. Apply high quality silicone or acrylic based bath sealant to top edge of console.<br />
DO NOT USE PLUMBERS PUTTY OR ANY OIL BASED SEALANT AS THIS WILL STAIN THE MARBLE<br />
Care Instructions:<br />
Console Care:<br />
Wipe cabinet with a soft, dry cloth. To protect the finish, avoid the use of all chemical and household cleaners and<br />
abrasives as they may damage finish.<br />
Marble Care: Marble is a natural material, the amount of veining and coloration will vary which is part of its inherent<br />
beauty. To maintain the marble top:<br />
Consult with a professional at your local home supply store regarding sealer. Re-apply sealer every two years.<br />
Clean frequently with a clean soft damp cloth. Use a mild liquid detergent and warm water.<br />
Avoid all types of abrasive cleaners and rough cleaning pads. Do not use any products that contain acids on the<br />
marble as this can cause the finish to dull. Liquid spills should be cleaned up promptly. Since marble is a natural<br />
stone consisting mainly of calcium carbonate it is sensitive to acid. Remove fruit juice or wine immediately from the<br />
surface of the marble top. We strongly advise avoiding all acidic cleansers.<br />
Placing protective pads on the bottom of any heavy objects will help prevent scratching of the marble surface.<br />
Do not place extremely heavy items on the marble top.<br />
thank you for your purchase<br />
stores | catalog | www.potterybarn.com
Luciana Single Sink Console<br />
Luciana Single Sink Console<br />
251 mm= from side of marble top to side of basin<br />
457 mm= from side of marble top to basin drain hole<br />
350.5 mm= from front of marble top to basin drain hole<br />
97 mm= from front of marble top to front of basin<br />
236.5 mm= from center of basin drain hole to back of marble top
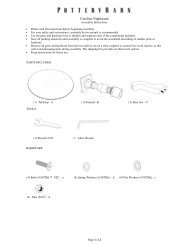
Luciana Sink Console
Luciana Single Sink Console<br />
VANITY TOP<br />
Handling Instructions<br />
CAUTION:<br />
Keep natural stone materials in its packaging until installation. Store on its edge.<br />
When removing natural stone product from its package, always ensure it is removed vertically on its long edge.<br />
* Always carry natural stone product vertically on its long edge.<br />
* Carrying natural stone flat WILL cause it to crack or break.<br />
* Place top as close as possible to the final desired location.<br />
NOTE: Avoid moving the top after it has been set into place.