
You also want an ePaper? Increase the reach of your titles
YUMPU automatically turns print PDFs into web optimized ePapers that Google loves.
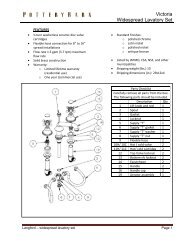
Studio wall shelf<br />
Assembly instruction<br />
• Please read all instructions before beginning assembly.<br />
• For your safety and convenience, assembly by two people is recommended.<br />
• Use the parts and hardware lists to identify and separate each of the component included.<br />
• Save all packing materials until assembly is completed to avoid the accidental discarding of smaller parts or<br />
hardware.<br />
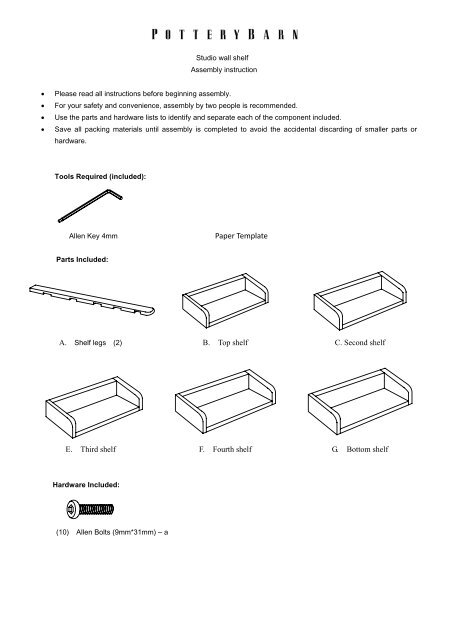
Tools Required (included):<br />
Allen Key 4mm<br />
<strong>Paper</strong> <strong>Template</strong><br />
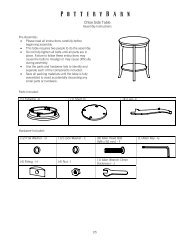
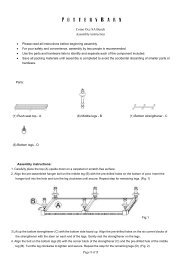
Parts Included:<br />
A. Shelf legs (2) B. Top shelf C. Second shelf<br />
E. Third shelf F. Fourth shelf G. Bottom shelf<br />
Hardware Included:<br />
(10) Allen Bolts (9mm*31mm) – a
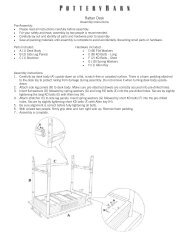
Assembly instructions:<br />
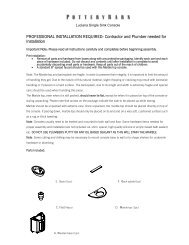
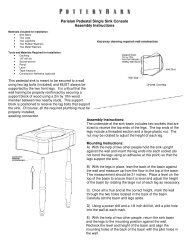
1. Lay one shelf leg (A) on a clean, scratch-free work surface. Be sure that the grooves and pre-drilled holes are<br />
facing up as shown. (Fig.1)<br />
2. Starting at the bottom end of the shelf leg carefully set the bottom shelf (F) in the allotted groove, align the<br />
pre-drilled hole in the shelf with the pre-drilled hole in the shelf leg. Insert an Allen bolt (a) through the shelf into the<br />
shelf leg. Tighten with the enclosed Allen key.<br />
Fig. 1<br />
F<br />
E<br />
D<br />
C<br />
B<br />
Allen<br />
Key<br />
a<br />
A<br />
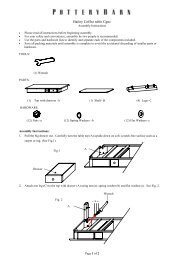
3. Repeat steps 2 with the remaining four shelves (B, C, D, E) until one side of each shelf is installed.<br />
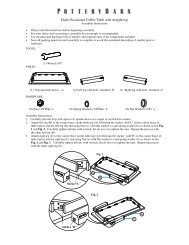
4. Carefully place the remaining leg (A) on top of the installed shelves (B, C, D, E, F) (Fig.2). Align the pre-drilled<br />
hole in the shelf with the pre-drilled hole in the shelf leg. Insert an Allen bolt (a) through the shelf into the shelf leg.<br />
Tighten with the enclosed Allen wrench ( Fig.3).<br />
Fig. 2<br />
A<br />
A<br />
F<br />
E<br />
D<br />
C<br />
B<br />
a<br />
Fig. 3<br />
Allen<br />
Key
5. Attach the paper template onto the wall noting the insertion points for the mounting hardware( not included). Both<br />
holes in the template should be exactly 73.5 inches from the ground vertically. To ensure proper<br />
installation, use a carpenter’s level Drill through the holes in the template and into the wall. insert your mounting<br />
hardware.<br />
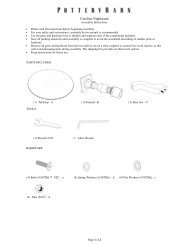
6. Gently lift the assembled wall shelf into standing position ( Fig.4) and raise the shelf slightly until the keyholes on<br />
the back of the shelf meet the screws placed in the wall from the previous step. Slide the shelf down until the<br />
screws are fully inserted in the tops of the keyholes. Be sure wall shelf is stable.<br />
7. Assembly is complete.<br />
Fig. 4<br />
Adjusting Levelers:<br />
Due to an uneven floor the furniture may not sit level due causing it to wobbles. If the piece wobbles, determine which<br />
corner does not touch the ground correctly. With two people follow these steps:<br />
1. Carefully elevate the item slightly to provide access to the levelers attached to the bottom. (Fig. 5).<br />
2. Turn the levelers until adequate contact will be made with the floor. Gently set down the piece and check stability.<br />
3. Repeat steps until furniture sits firmly on the ground.<br />
Adjustable<br />
Leveler<br />
Fig. 5<br />
Care Instructions:<br />
• Dust with a clean, soft damp cloth and wipe dry immediately.<br />
• Avoid the use of chemicals and harsh cleaning agents.<br />
thank you for your purchase<br />
stores | catalog | www.potterybarn.com