PROFESSIONAL INSTALLATION REQUIRED ... - Pottery Barn
PROFESSIONAL INSTALLATION REQUIRED ... - Pottery Barn
PROFESSIONAL INSTALLATION REQUIRED ... - Pottery Barn

Create successful ePaper yourself
Turn your PDF publications into a flip-book with our unique Google optimized e-Paper software.
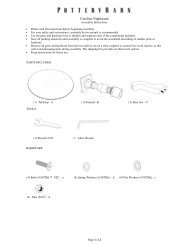
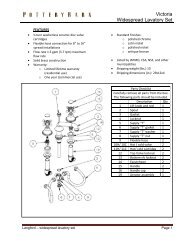
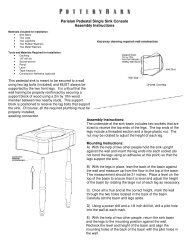
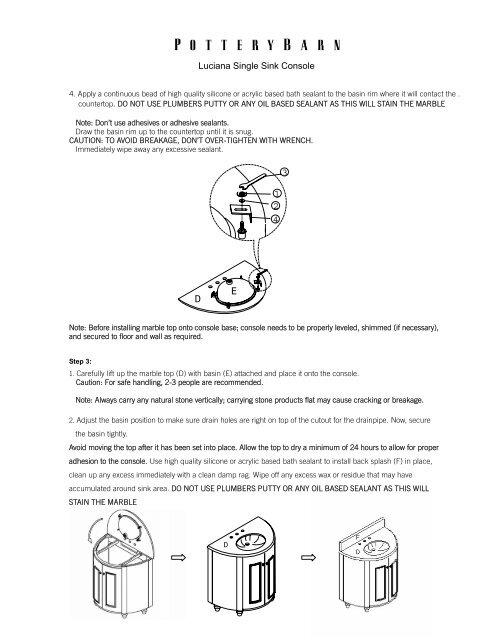
Luciana Single Sink Console<br />
4. Apply a continuous bead of high quality silicone or acrylic based bath sealant to the basin rim where it will contact the .<br />
countertop. DO NOT USE PLUMBERS PUTTY OR ANY OIL BASED SEALANT AS THIS WILL STAIN THE MARBLE<br />
Note: Don’t use adhesives or adhesive sealants.<br />
Draw the basin rim up to the countertop until it is snug.<br />
CAUTION: TO AVOID BREAKAGE, DON’T OVER-TIGHTEN WITH WRENCH.<br />
Immediately wipe away any excessive sealant.<br />
1<br />
2<br />
4<br />
3<br />
Note: Before installing marble top onto console base; console needs to be properly leveled, shimmed (if necessary),<br />
and secured to floor and wall as required.<br />
Step 3:<br />
1. Carefully lift up the marble top (D) with basin (E) attached and place it onto the console.<br />
Caution: For safe handling, 2-3 people are recommended.<br />
Note: Always carry any natural stone vertically; carrying stone products flat may cause cracking or breakage.<br />
2. Adjust the basin position to make sure drain holes are right on top of the cutout for the drainpipe. Now, secure<br />
the basin tightly.<br />
Avoid moving the top after it has been set into place. Allow the top to dry a minimum of 24 hours to allow for proper<br />
adhesion to the console. Use high quality silicone or acrylic based bath sealant to install back splash (F) in place,<br />
clean up any excess immediately with a clean damp rag. Wipe off any excess wax or residue that may have<br />
accumulated around sink area. DO NOT USE PLUMBERS PUTTY OR ANY OIL BASED SEALANT AS THIS WILL<br />
STAIN THE MARBLE