
Create successful ePaper yourself
Turn your PDF publications into a flip-book with our unique Google optimized e-Paper software.
www.bergab.ru Берг АБ bergab@ya.ru Тел. (495)-228-06-21, факс (495) 223-3071<br />
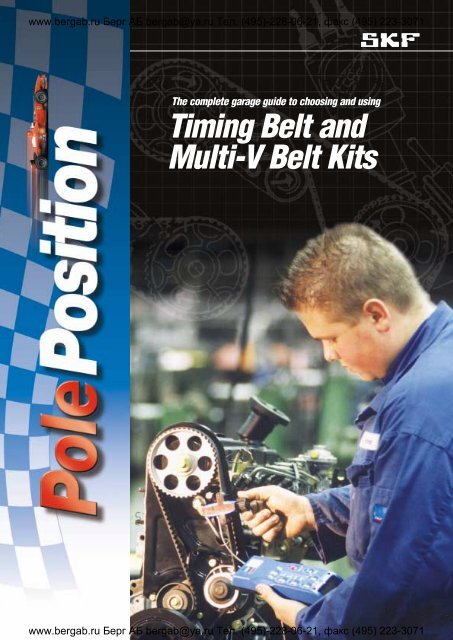
The complete garage guide to choosing <strong>and</strong> using<br />
<strong>Timing</strong> <strong>Belt</strong> <strong>and</strong><br />
<strong>Multi</strong>-V <strong>Belt</strong> <strong>Kits</strong><br />
www.bergab.ru Берг АБ bergab@ya.ru Тел. (495)-228-06-21, факс (495) 223-3071<br />
2
www.bergab.ru Берг АБ bergab@ya.ru Тел. (495)-228-06-21, факс (495) 223-3071<br />
Don’t take chances with the life<br />
of your customers’ engines.<br />
Become an expert in timing<br />
<strong>and</strong> multi-V belt inspection<br />
<strong>and</strong> installation.<br />
A number of factors put greater stress<br />
than ever on automotive belts:<br />
TABLE OF CONTENTS<br />
• Today’s automotive engines<br />
operate at higher temperatures<br />
<strong>and</strong> at greater.<br />
• Today’s engines generate more<br />
horsepower loads.<br />
• Today’s aerodynamic designs<br />
generate higher temperatures<br />
under the hood.<br />
• Today’s engines need to drive<br />
more auxiliary equipment<br />
• Pulley diameters have been made<br />
smaller to save space under the hood.<br />
For optimum performance <strong>and</strong> safety,<br />
SKF recommends that the belt, belt<br />
tensioner units <strong>and</strong> idler pulleys of the<br />
timing system or the auxiliary drive<br />
all be changed at the same time.<br />
Whatever the source of damage to<br />
the belt (too much or too little<br />
tension, vibration, high temperature,<br />
or misalignment, it is highly probable<br />
that other rotating components in the<br />
system have been affected. If they are<br />
not changed together with the belt,<br />
early breakdown may result.<br />
Even worse, a broken timing belt<br />
could destroy your customer’s engine!<br />
If a car has an “interference” engine,<br />
a broken timing belt an result in an<br />
open valve being struck by a moving<br />
piston. This can damage valves,<br />
pistons, cylinder head <strong>and</strong> walls.<br />
Protect your customers’ investment—<br />
<strong>and</strong> your garage’s reputation—by<br />
replacing the belt before it breaks—<br />
<strong>and</strong> by doing the complete job with<br />
high quality replacement components<br />
from SKF.<br />
Introduction .............................. 2-3<br />
Protection <strong>and</strong> profitability............ 4-5<br />
Technical overview .................... 6-9<br />
SKF br<strong>and</strong> kits<br />
<strong>and</strong> components ........................ 10-13<br />
Removal <strong>and</strong> fitting instructions......14-15<br />
<strong>Timing</strong> <strong>and</strong> mulit-V belts in the news 16-17<br />
Freqently asked questions ............ 18-19<br />
Fitting times.............................. 20-25<br />
Troubleshooting<br />
<strong>and</strong> failure analysis .................... 26-31<br />
Good practices<br />
<strong>and</strong> helpful hints ........................ 32-33<br />
Setting up automatic tensioners...... 34-37<br />
SKF Mounting Maunal .................. 38-39<br />
SKF multi-V belt kits....................40-41<br />
Setting correct belt tension............42-49<br />
Other SKF kits ............................ 50-51<br />
SKF website .............................. 52<br />
Keeping your customers’ cars running<br />
efficiently <strong>and</strong> safely is a good way to<br />
earn their trust <strong>and</strong> build your business.<br />
2 3<br />
www.bergab.ru Берг АБ bergab@ya.ru Тел. (495)-228-06-21, факс (495) 223-3071
www.bergab.ru Берг АБ bergab@ya.ru Тел. (495)-228-06-21, факс (495) 223-3071<br />
Protection for your<br />
customers. Profits for you.<br />
More timing belt applications.<br />
The world’s drivers have continued to press for more<br />
responsive, yet more efficient automobiles. The automotive<br />
industry has responded with efficient, overhead cam,<br />
multi-valve engines driven by timing belts. The dramatic<br />
increase in the use—<strong>and</strong> complexity—of these belts has<br />
created new profit opportunities for garages.<br />
New belt designs.<br />
Generic timing belts, made of st<strong>and</strong>ard materials with<br />
st<strong>and</strong>ard tooth profiles, are a thing of the past. New<br />
generation belts are vastly improved, providing the increased<br />
durability <strong>and</strong> smoother performance characteristics dem<strong>and</strong>ed<br />
by today’s engines—<strong>and</strong> your customers.<br />
Application-specific tooth profiles.<br />
The earliest timing belts had a trapezoidal tooth design. But the need to<br />
meet more dem<strong>and</strong>ing applications resulted in the development of belts with<br />
curvilinear <strong>and</strong> modified curvilinear profiles. These different tooth profiles<br />
are not interchangeable: it is critically important to select the correct belt for<br />
every application.<br />
Trapezoidal<br />
High-performance materials.<br />
Until 1985, the st<strong>and</strong>ard material for timing belts was<br />
neoprene. Today the preferred materials is HSN<br />
(highly-saturated nitrile). Though belts made of HSN<br />
appear no different from neoprene belts, they offer far<br />
better performance in the high-temperature engine<br />
compartments of today’s vehicles. All SKF timing<br />
belts are made of HSN.<br />
Fast Facts<br />
Increased engine dem<strong>and</strong>s required tougher, more durable timing belts.<br />
<strong>Belt</strong>s made of HSN cost more—but the added performance makes them<br />
the best value<br />
<strong>Belt</strong>s may look alike, but they are not interchangeable.<br />
Correct tooth profiles are critical.<br />
120<br />
100<br />
<strong>Timing</strong> belt failure can result in not just inconvenience, but<br />
costly engine damage<br />
The cost of the belt is only 5%-10% of changing the belt.<br />
Your customers will agree that it’s a small price<br />
to pay for peace of mind.<br />
80<br />
60<br />
40<br />
20<br />
0<br />
Cumulative New Applications 1986-1994<br />
New HSN Applications<br />
Exceed Neoprene Applications<br />
Since 1986<br />
(Based on USA Vehicle Sales)<br />
1986 1990 1994<br />
120<br />
100<br />
80<br />
60<br />
40<br />
20<br />
0<br />
Curvilinear<br />
Modified Curvilinear<br />
4 5<br />
www.bergab.ru Берг АБ bergab@ya.ru Тел. (495)-228-06-21, факс (495) 223-3071
www.bergab.ru Берг АБ bergab@ya.ru Тел. (495)-228-06-21, факс (495) 223-3071<br />
Technical Overview<br />
In today’s modern automotive engines, there has been a quiet revolution. The<br />
need to run more auxiliary equipment, combined with efficiency dem<strong>and</strong>s <strong>and</strong><br />
noise reduction, has caused new belt <strong>and</strong> tensioner systems to be developed.<br />
At first, tensioners were of a fixed nature, usually of metal design. The were<br />
simple to install: just set tension <strong>and</strong> tight. Today, tensioners more likely include<br />
an internal spring or external damper, <strong>and</strong> non-metallic components are<br />
becoming more common. This illustration provides an overview of a modern<br />
belt <strong>and</strong> tensioner system.<br />
Engine front end drive<br />
<strong>Belt</strong> tensioner unit<br />
The belt tensioner unit sets the right tension <strong>and</strong> provides guidance for the belt.<br />
The adjustment of tension during mounting is achieved by means of an eccentric or<br />
by means of a spring acting against a rear plate.<br />
The automatic belt tensioner unit, with its built-in spring <strong>and</strong> friction system,<br />
maintains a constant tension of the belt while the engine is running.<br />
Main designs currently used are shown here:<br />
Function <strong>and</strong><br />
Characteristics<br />
of <strong>Multi</strong>-V belts<br />
• High load-transmitting<br />
capacity<br />
• Optimised vibration<br />
<strong>and</strong> noise<br />
• Robust design<br />
• High flexibility<br />
• Crack <strong>and</strong> wear<br />
resistance<br />
• Temperature range<br />
of -40ºC to +120ºC<br />
<strong>Belt</strong> tensioner unit<br />
Camshaft pulley<br />
• <strong>Belt</strong> life of 160,000 km<br />
or 10 years<br />
Water pump pulley<br />
Idler pulley<br />
<strong>Timing</strong> belt<br />
Injection<br />
pump pulley<br />
<strong>Belt</strong> tensioner unit (BTU)<br />
with an eccentric<br />
Crankshaft<br />
Crankshaft pulley<br />
<strong>Belt</strong> tensioner unit<br />
<strong>Multi</strong>-V belt<br />
Power<br />
steering<br />
pump<br />
Alternator<br />
pulley<br />
Air conditioning<br />
compressor<br />
Automatic BTU with a built-in<br />
spring<strong>and</strong> friction system.<br />
Automatic BTU<br />
with a damper<br />
The crankshaft drives the camshaft(s) <strong>and</strong> actuates the valves via a belt or a<br />
chain. Due to its advantages compared with those of a chain, namely reduced<br />
space, as well as lighter <strong>and</strong> quieter running, the timing belt is widely used by<br />
car manufacturers.<br />
Auxiliary drive<br />
The crankshaft drives auxiliary components (alternator, air conditioning<br />
compressor, power steering pump, ...) via a V or multi-V belt.<br />
<strong>Belt</strong> tensioner unit (BTU) with a rear plate<br />
6 7<br />
www.bergab.ru Берг АБ bergab@ya.ru Тел. (495)-228-06-21, факс (495) 223-3071
www.bergab.ru Берг АБ bergab@ya.ru Тел. (495)-228-06-21, факс (495) 223-3071<br />
Technical Overview, continued<br />
Idler pulley<br />
The idler pulley is fixed <strong>and</strong> allows the belt to be correctly wound around the<br />
driven component. Main designs currently used are shown here:<br />
<strong>Timing</strong> <strong>Belt</strong><br />
The timing belt teeth are of eighter a curved or trapezoid section. Each individual<br />
design can be seen from the product list.<br />
Idler pulley<br />
Idler pulley with rear plate<br />
<strong>Multi</strong>-V belt tensioner pulley<br />
When the auxiliary belt drives several components, belt tensioner pulleys are<br />
used for guiding the belt <strong>and</strong> keeping correct tension along the whole length of<br />
the belt. The pulley profile is often characterised by one or more ribs.<br />
<strong>Timing</strong> belt construction<br />
The timing belt is manufactured with a fibre-glass or steel braided laminated inner<br />
core, coated with synthetic rubber or neoprene.<br />
Example of the designs are shown here:<br />
Idler pulley with multi-V<br />
Automatic BTU with a built-in spring <strong>and</strong><br />
friction system<br />
<strong>Multi</strong>-V belt<br />
An auxiliary belt may consist of one or more V. A multi-V belt is wider <strong>and</strong><br />
thinner than a single V belt <strong>and</strong> usually has between three <strong>and</strong> six ribs. As will be<br />
seen from the list, the belt designation describes each individual design.<br />
SKF belt tensioner pulleys for timing system <strong>and</strong><br />
auxiliary drive are based on state-of-the-art<br />
technology.The years of experience accumulated<br />
by SKF in the design <strong>and</strong> supply of belt<br />
tensioner pulleys to the world's automotive<br />
manufacturers, provide a guarantee of the high<br />
quality <strong>and</strong> performance of each belt tensioner<br />
unit included in the SKF product range.<br />
BTU with a rear plate<br />
8 9<br />
www.bergab.ru Берг АБ bergab@ya.ru Тел. (495)-228-06-21, факс (495) 223-3071
www.bergab.ru Берг АБ bergab@ya.ru Тел. (495)-228-06-21, факс (495) 223-3071<br />
SKF. The industry’s first kits. The industry’s best coverage–over 96%!<br />
Just over 10 years ago, SKF introduced 2001<br />
the timing belt kit concept to the<br />
2000<br />
1999<br />
automotive world. By packaging belts,<br />
1998<br />
pulleys <strong>and</strong> tensioners in one box, 1997<br />
SKF offered garages an easy way to 1996<br />
1995<br />
save time <strong>and</strong> to ensure an accurate, 1994<br />
quality belt replacement every time. 1993<br />
1992<br />
1991<br />
Since then, the kit concept has won<br />
1990<br />
wide acceptance throughout Europe<br />
<strong>and</strong> Asia. As the sales chart here<br />
shows, more <strong>and</strong> more garages are now taking advantage of SKF’s broad<br />
product range to enhance the performance of their technicians—<strong>and</strong> the<br />
profitability of their business.<br />
SKF has continued to lead the way with the best new technologies <strong>and</strong><br />
the industry’s best coverage—over 96% of the European car parc including<br />
Asian models—virtually every vehicle your customers drive. By not<br />
having to turn away business, you can maximize profitability <strong>and</strong><br />
build your customer base.<br />
60<br />
50<br />
40<br />
30<br />
20<br />
10<br />
0<br />
ALFA AUDI BMW CIT FIAT FORD LADA LANC OPEL PEUG REN ROV SEAT SKOD VAG VOL<br />
European models<br />
SKF kit availability vs. other br<strong>and</strong>s*<br />
45<br />
40<br />
35<br />
30<br />
25<br />
20<br />
15<br />
10<br />
5<br />
0<br />
DAE DAIH HONDA HYUN ISUZU KIA MAZDA MTS NISSAN PROT SUBARU SUZ TOYOTA<br />
Asian models<br />
* SKF kits shown in blue.<br />
Market Insights<br />
• Over 40 million timing<br />
<strong>and</strong> multi-V belts are<br />
changed in Europe<br />
per year <strong>and</strong> the trend<br />
is toward the use of<br />
kits. (SKF kit sales are<br />
growing at over 30%<br />
per year.)<br />
• 75% of all cars on<br />
the road are fitted<br />
with air conditioning<br />
<strong>and</strong> power steering,<br />
The growing need<br />
for auxilliary (multi-V)<br />
belt kits is creating<br />
profit opportunities<br />
for garages.<br />
www.bergab.ru Берг АБ bergab@ya.ru Тел. (495)-228-06-21, факс (495) 223-3071
www.bergab.ru Берг АБ bergab@ya.ru Тел. (495)-228-06-21, факс (495) 223-3071<br />
What’s in the kits?<br />
Guide to symbols<br />
used on box labels<br />
<strong>Belt</strong> tensioner kit<br />
VKMA timing belt kits include:<br />
1 or 2 timing belts / 1 or 2 belt tensioner units / 0, 1 or 2 idler pulleys / mounting instructions<br />
VKMC timing belt kits with damper include:<br />
1 timing belt / 1 damper tensioner unit / 0 or 1 idler pulley / mounting instructions<br />
Idler pulley<br />
VKMA multi-V belt kits include:<br />
1 or 2 multi-V belts / 1 or 2 belt tensioner units / 0, 1 or 2 idler pulleys / mounting instructions<br />
VKMC timing belt kits with water pump include:<br />
1 timing belt / 1 water pump / 0 or 1 idler pulley / mounting instructions<br />
<strong>Multi</strong>-V belt<br />
tensioner pulley<br />
www.bergab.ru Берг АБ bergab@ya.ru Тел. (495)-228-06-21, факс (495) 223-3071
www.bergab.ru Берг АБ bergab@ya.ru Тел. (495)-228-06-21, факс (495) 223-3071<br />
Removal <strong>and</strong> Fitting Instructions<br />
Included with every SKF timing belt kit are detailed installation instructions to<br />
help you get the job done quickly <strong>and</strong> correctly.The instructions<br />
include helpful diagrams specific to the vehicle <strong>and</strong> type of<br />
kit required.<br />
The example shown<br />
here is provided to<br />
illustrate a typical timing<br />
belt tensioner procedure,<br />
as explained in every<br />
SKF timing belt kit.<br />
Figure C<br />
Figure D<br />
Because every engine<br />
has its own unique<br />
characteristics, always<br />
refer to the car<br />
manufacturer’s specific<br />
mounting procedures<br />
in full.<br />
Figure A<br />
Figure B<br />
Typical <strong>Timing</strong> <strong>Belt</strong> Fitting<br />
• Fit new idler pulley (3), <strong>and</strong>/or new tensioning pulley (2), in disengaged position,<br />
as necessary.<br />
• Fit new timing belt (1). Make sure arrows on belt point in correct direction <strong>and</strong><br />
that any timing marks align with those on sprockets.<br />
Typical <strong>Timing</strong> <strong>Belt</strong> Removal<br />
• Disconnect battery earth lead.<br />
• Remove belts <strong>and</strong> other items as required to gain access to timing belt.<br />
• Clamp flywheel, then remove crankshaft pulley<br />
• Remove timing cover(s).<br />
• Bring engine to timing position. Check alignment of all timing marks, timing holes<br />
(fit timing pins), <strong>and</strong> the like. In particular, check alignment of following timing<br />
marks with the appropriate fixed timing markers on engine housing: crankshaft<br />
sprocket (a), or flywheel; camshaft sprocket (b), or auxiliary shaft sprocket, where<br />
fitted); injection pump sprocket (d). Note:A diesel engine is shown in this illustration.<br />
• Remove timing belt – remove tensioning pulley <strong>and</strong>/or idler pulley, as necessary –<br />
refer to Fig. B, C or D.<br />
• Tension belt by rotating tensioning pulley (2) or water pump (e). Refer to Fig. D.<br />
Tighten, temporarily, tensioning pulley (2) or water pump (e).<br />
• Turn engine clockwise through two full turns (2 x 360º), bringing it back to<br />
timing position.<br />
• Check alignment of all timing marks, timing holes (fit timing pins) <strong>and</strong> the like.<br />
• Fit belt tension tester <strong>and</strong> check that tension matches recommended value,<br />
then tighten nut of tensioning pulley (2) or bolts of water pump (e) to<br />
recommended torque.<br />
• Refit timing cover.<br />
• Clamp flywheel, then refit crankshaft pulley <strong>and</strong> tighten bolt to<br />
recommended torque.<br />
• Refit <strong>and</strong> tension all belts previously removed.<br />
• Refit battery earth cable.<br />
www.bergab.ru Берг АБ bergab@ya.ru Тел. (495)-228-06-21, факс (495) 223-3071
www.bergab.ru Берг АБ bergab@ya.ru Тел. (495)-228-06-21, факс (495) 223-3071<br />
<strong>Timing</strong> <strong>and</strong> multi-V belts<br />
in the news<br />
Typical problems with timing<br />
<strong>and</strong> auxiliary belt systems<br />
Auto Moto magazine recently<br />
conducted a survey involving 58<br />
top models with a full range of<br />
engine types. The survey attempted<br />
to identify, among other things,<br />
weaknesses or problems that these<br />
vehicles experience in their lifetimes.<br />
The survey revealed that for a high<br />
percentage of the vehicles, there was<br />
a good possibility of problems related<br />
to the timing <strong>and</strong> auxiliary belt<br />
systems. A few are noted here.<br />
Automatic Tensioners—<br />
55 million vehicles <strong>and</strong> growing<br />
As reported in Parts Professional<br />
magazine, automatic belt tensioners<br />
have the potential to create a new<br />
source of income for your garage.<br />
Today there are about 55 million<br />
vehicles on the road equipped with<br />
belt tensioners. And that number is<br />
growing by 10 million vehicles yearly.<br />
Here are a few interesting facts:<br />
• More than 96% of installers polled<br />
by Parts Professional have replaced<br />
OE tensioners in the past year.<br />
One in five garages has installed<br />
more than 11.<br />
• Research indicates that tensioners<br />
can fail as early as 20,000 miles.<br />
The first sign of wear is “noise.”<br />
A tensioner that sounds bad usually is<br />
bad. While the engine is running, listen<br />
to the accessory drive for any noise<br />
coming from the tensioner. If there is:<br />
• Check for pulley bearing failure,<br />
which accounts for about half of all<br />
tensioner failures.<br />
• Another sign of tensioner wear<br />
is a belt that keeps coming off the<br />
tensioner<br />
• Misalignment can also cause the belt<br />
to wear unevenly <strong>and</strong> fail early.<br />
NOTE: A tensioner must be replaced<br />
as a complete assembly. Never try to<br />
pry part the halves of a spring casing<br />
to get to the spring. The spring is<br />
Profit-building tips<br />
• When performing any<br />
under-the-hood service,<br />
take an extra few<br />
minutes to check every<br />
vehicle’s belt <strong>and</strong><br />
tensioner system —<br />
especially if belt squeal<br />
is noticed.<br />
• Recommend a<br />
complete <strong>Multi</strong>-Vbelt<br />
system replacement<br />
to your customers—<br />
the best way to assure<br />
no trouble down<br />
the road.<br />
“alternator belt system<br />
<strong>and</strong> pulley become noisy”<br />
“oil contamination<br />
on belt<br />
causing failure”<br />
“risk of<br />
belt failure”<br />
• With an estimated failure rate of<br />
2%, approximately one in every<br />
50 cars you service might need<br />
a new tensioner.<br />
loaded a very high torque <strong>and</strong> can<br />
cause serious injury or even death.<br />
“check for<br />
bad mounting<br />
of tensioner”<br />
“timing system<br />
can be<br />
misaligned”<br />
Continuing innovation<br />
SKF continues to pioneer innovative automotive tensioner designs for<br />
use by automotive manufacturers <strong>and</strong> today holds many exclusive<br />
patents. SKF belt tensioners <strong>and</strong> pulleys can be found on a<br />
wide range of vehicles on today’s roads, which means that<br />
you can install quality <strong>and</strong> confidence for your valued<br />
customers, whether they have a small, basic engine<br />
or the latest hihg-power, mulit-valve powerplant.<br />
SKF designed <strong>and</strong> manufactures this popular V6<br />
engine belt tensioner unit, found in vehicles across<br />
Europe <strong>and</strong> North America.<br />
www.bergab.ru Берг АБ bergab@ya.ru Тел. (495)-228-06-21, факс (495) 223-3071
www.bergab.ru Берг АБ bergab@ya.ru Тел. (495)-228-06-21, факс (495) 223-3071<br />
Frequently asked questions<br />
Frequently asked questions<br />
Q: Tensioners <strong>and</strong> pulleys sometimes look<br />
the same. Can I interchange?<br />
A:You should only fit part numbers<br />
specifically shown for that application.<br />
Automotive engines each have<br />
their own particular performance<br />
characteristics, which means that<br />
tensioner <strong>and</strong> pulleys are designed<br />
<strong>and</strong> tested specifically for each new<br />
motor. The exterior appearance of<br />
the bearing unit may hide internal<br />
changes that have taken place to meet<br />
the change in engine specification,<br />
i.e., Grease performance, bearing<br />
clearance, tolerances, tensioner<br />
spring strength.<br />
Q: Can I refit an old timing belt?<br />
A: NO. Used belts should not be refitted<br />
<strong>and</strong> used. The original belt has already<br />
been in use at its optimized tension, so<br />
the properties of the belt have changed<br />
compared with a new belt.<br />
Q: The tensioner is showing external<br />
corrosion but is rotating freely. Is it okay?<br />
A: Change it. If the belt is being changed,<br />
then it is possible this unit will need<br />
to be functioning on the car for<br />
another 100K km. Don’t take the<br />
risk: internal condition <strong>and</strong> bearing life<br />
cannot be seen.<br />
Q: How often should a complete timing<br />
belt <strong>and</strong> tensioner change be carried out?<br />
A: Most car manufacturers including<br />
PSA, FORD, RENAULT, <strong>and</strong> OPEL<br />
specify complete repairs to their models<br />
during a specified service period.<br />
Outside this period the system should<br />
be checked for damage. Or if you<br />
are in doubt about the condition of<br />
components, you should recommend a<br />
complete change to your customer.<br />
Q: The waterpump needs to be changed.<br />
Am I able to offer my customer a<br />
complete kit?<br />
A: For certain applications, SKF kits include<br />
the waterpump, timing belt <strong>and</strong> tensioners.<br />
It is well known that the belt should be<br />
replaced after changing the pump.<br />
Q: <strong>Multi</strong>-V belt <strong>and</strong> tensioner systems are<br />
becoming more common. What advice<br />
should I give my customer?<br />
A:The multi-V system usually covers<br />
power steering, alternator, <strong>and</strong> air<br />
conditioning. If neglected, there is the<br />
potential that belt failure could cause<br />
problems such as charging sytem failure<br />
or sudden difficuly in steering. On<br />
some engines a snapped multi-V belt<br />
can enter the timing system <strong>and</strong> cause<br />
engine damage .<br />
Q: There are many br<strong>and</strong>s of timing belt<br />
kits available. Why should I use SKF?<br />
A: SKF was the first company to launch<br />
this concept ,<strong>and</strong> since then has<br />
continued to use its OE manufacturing<br />
experience to lead the market with<br />
OE approved components in SKF<br />
br<strong>and</strong>ed boxes.<br />
Q: What’s the main benefit to our garage<br />
for using timing belt kits?<br />
A:You will be more efficient, having the<br />
necessary components in one box. You<br />
will also have the ability to promote a<br />
professional image to your customers<br />
in terms of quality of work <strong>and</strong> service.<br />
The end result is higher customer<br />
satisfaction <strong>and</strong> a stronger business.<br />
Q: Can I buy the tensioner or pulleys on<br />
their own?<br />
A: Sometimes you will only be required<br />
by the customer to change the pulley<br />
or tensioner, so for flexility we offer an<br />
extensive range of these.<br />
Q: What is the difference between a timing<br />
belt kit <strong>and</strong> a multi-V belt kit?<br />
A:The timing belt kit is used on timing<br />
system in which the crankshaft drives<br />
the camshaft(s) <strong>and</strong> actuates the valves<br />
via a timing belt. The multi-V belt kit is<br />
used on auxiliary drives in which the<br />
crankshaft drives auxiliary components<br />
such as the alternator, air conditioning<br />
compressor, power steering pump etc.)<br />
via a multi-V belt.<br />
Q: What is a belt tensioner unit?<br />
A:The belt tensioner unit sets the right<br />
belt tension <strong>and</strong> provides guidance for<br />
the belt.<br />
Q: What is the difference between a BTU<br />
<strong>and</strong> an Automatic BTU?<br />
A:The adjustment of tension during<br />
mounting is achieved by means of an<br />
eccentric or by means of a spring acting<br />
against a near plate.<br />
Q: What is an idler pulley?<br />
A:The idler pulley is fixed <strong>and</strong> allows the<br />
belt to be correctly wound around the<br />
driven components.<br />
Q: How can I check the belt tensioner?<br />
A: Using the SKF TensiCheck, a belt tension<br />
testing device that ensures proper<br />
tension of the belt after mounting.<br />
Q: When should one repair <strong>and</strong>/or change<br />
a timing belt system <strong>and</strong> a multi-V belt<br />
system?<br />
A:The car manufacturers recommend to<br />
change belt <strong>and</strong> belt tension pulleys at:<br />
timing belt drive: 80 000- 120 000 km;<br />
multi-V belt drive: 50 000-80 000 km<br />
Q: What are the contents of the SKF<br />
timing belt <strong>and</strong> multi-V belt kits?<br />
A:VKMA: 1 belt plus 1 or more belt<br />
tension pulleys VKMC: 1 belt plus 1 or<br />
more belt tension pulleys plus 1 water<br />
pump VKM: 1 belt tension pulley with<br />
accessory components like screws or<br />
washers if needed for mounting.<br />
Q: What is the difference between a timing<br />
belt pulley <strong>and</strong> a multi-V belt pulley?<br />
A: Pulleys for multi-V belt can be BTU,<br />
Automatic BTU or Idler. Their profile<br />
is often characterized by one or<br />
more ribs.<br />
Q:What are the main causes of belt damage?<br />
A:Too high or too low tension, vibrations,<br />
high temperature <strong>and</strong> belt misalignment.<br />
Q: Why is it recommended to also change<br />
belt tensioner pulleys when the belt is<br />
repaired?<br />
A:The main source of the belt’s damage<br />
has most definitely affected the other<br />
rotating components of the timing <strong>and</strong><br />
auxiliary systems, like the BTU,<br />
Automatic BTU <strong>and</strong> idler pulley. To<br />
allow a complete <strong>and</strong> safe repair for the<br />
engine, SKF recommends changing the<br />
belt <strong>and</strong> the belt tensioner pulleys at the<br />
same time.<br />
www.bergab.ru Берг АБ bergab@ya.ru Тел. (495)-228-06-21, факс (495) 223-3071
www.bergab.ru Берг АБ bergab@ya.ru Тел. (495)-228-06-21, факс (495) 223-3071<br />
Change frequency<br />
<strong>and</strong> fitting times<br />
The following pages contain fitting times for timing belts <strong>and</strong> recommended<br />
replacement intervals for most popular models of the vehicles you service<br />
in your garage. The table also includes minimum <strong>and</strong> maximum belt tension<br />
values. Vehicle makes included are Alfa Romeo, BMW, Citroen Fiat, Ford,<br />
Pel/Vauxhall, Peugeot, Renault, Rover, Seat, Suzuki, Toyota,Volkswagen<br />
<strong>and</strong> Volvo.<br />
These times are only estimates, based on averages, but they can be helpful in<br />
scheduling <strong>and</strong> pricing belt replacements in your garage. Your actual fitting<br />
time may vary, depending on unexpected findings <strong>and</strong> the experience of the<br />
technician performing the service.<br />
Change frequency<br />
<strong>and</strong> fitting times<br />
SKF TYPICAL BELT MIN MAX<br />
MODEL ENGINE SIZE MOTOR YEAR COMMENT KIT** FITTING CHANGE TENSION TENSION<br />
TIME* FREQ VALUE(dan) VALUE(dan)<br />
CITROËN<br />
AX 954cc/1124 cc TU9/TU1 09/86-07/92 VKMA 03100 1.7 80k 11 15<br />
07/92-98 VKMA 03100 1.7 120k 11 15<br />
1360cc TU3 09/86-93 belt 108x17 VKMA 03110 1.7 80k 11 15<br />
93-96 belt 101x17 VKMA 03111 1.7 120k 11 15<br />
BX 1360cc TU3 87-93 belt 108x17 VKMA 03110 2.1 80k 11 15<br />
belt 101x17 VKMA 03111 2.1 120k 11 15<br />
1580cc XU5 87-01/92 VKMA 03200 3.2 120k 11 15<br />
02/92-93 VKMA 03201 3.2 120k 11 15<br />
SAXO 1124cc TU1 96 –> VKMA 03100 1.7 120k 11 15<br />
SKF TYPICAL BELT MIN MAX<br />
MODEL ENGINE SIZE MOTOR YEAR COMMENT KIT** FITTING CHANGE TENSION TENSION<br />
TIME* FREQ VALUE(dan) VALUE(dan)<br />
ALFA ROMEO<br />
33 1186/1351/1490 cc 83-94 hydraulic tappets VKMA 02500 2.7 80k 14 19<br />
mechanical tappets VKMA 02501 2.7 80k 14 19<br />
145/146 1351cc 94-96 VKMA 02501 3.1 120k 14 19<br />
155 1747cc 96-97 VKMA 02173 3.1 120k 16 22<br />
156 1747cc 97-01 VKMA 02173 3 120k 16 22<br />
AUDI<br />
80 1781cc 08/81-12/91 VKMA 01000 1.5 120k 15 20<br />
1984cc 3A 09/86-10/90 VKMA 01000 1.5 120k 15 20<br />
AAD 08/90-07/93 VKMA 01001 1.5 120k 15 20<br />
ABK/ABT/ADW 08/90-11/94 VKMA 01001 1.4 120k 15 20<br />
12/94-7/95 VKMA 01003 1.4 120k 15 20<br />
6A/ACE 03/93- 07/94 VKMA 01020 1.4 120k 17 23<br />
08/94-07/95 VKMA 01023 1.4 120k 17 23<br />
100 2309cc AAR 12/90-94 belt 147x19 VKMA 01050 2.3 120k 13 17<br />
A4 1595cc AHL/ANA/ARM 11/94-99 belt 138x23 VKMA 01113 2.5 120k 15 21<br />
1781cc ADR/AEB/AYA 11/94-01 belt 153x25 VKMC 01008 2.2 120k 17 23<br />
belt 152x25 VKMA 01004 2.2 120k 17 23<br />
1896cc AFF/1Z/AFN/AHU/AVG 11/94 -01 VKMA 01014 2.9 90k 21 28<br />
BMW<br />
318 1795cc M40 10/91-93 VKMA 08000/08001 2.2 45k 14 19<br />
320 1990cc M20 84-91 round belt profile VKMA 08110 1.9 60k 17 23<br />
1527cc Diesel TU5D 96 –> VKMA 03121 1.9 120k 17 23<br />
XANTIA 1761cc XU7 03/93 –> VKMA 03201 2.4 120k 11 15<br />
1905cc Diesel/TD XUD9/T 03/93-12/93 VKMA 03240 3 80k 17 23<br />
01/94 –> VKMA 03241 4.4 120k 17 23<br />
1997cc HDI DW10 99 –> VKMA 03246 4.6 160k 17 23<br />
XSARA 1905cc Diesel/TD XUD9 97 –> VKMA 03241 4.4 120k 17 23<br />
ZX 1360cc TU3 03/91-98 belt 108x17 VKMA 03110 1.7 120k 11 15<br />
belt 101x17 VKMA 03111 1.7 120k 11 15<br />
1905cc Diesel XUD9 91-12/93 VKMA 03240 2.6 80k 17 23<br />
01.94 –> VKMA 03241 2.6 120k 17 23<br />
FIAT<br />
CINQUECENTO 1108 cc 92-98 VKMA 02202 1.4 100k 12 16<br />
PANDA 769cc FIRE (750) 86-90 VKMA 02200 0.75 60k 12 16<br />
1108cc FIRE 86-90 VKMA 02200 0.75 60k 12 16<br />
PUNTO 1108cc (55) 93-2001 VKMA 02202 1.05 100k 12 16<br />
1242cc (60/75) 93-2001 VKMA 02201 1.05 100k 10 14<br />
1697cc Diesel 93-2001 VKMA 02152 1.45 105k 15 20<br />
TIPO 1372cc 88-90 VKMA 02410 1.5 60k 10 14<br />
91-96 VKMA 02410 1.5 100k 10 14<br />
UNO 994cc 146C7.000 89-90 VKMA 02021 1 60k 12 16<br />
91-95 VKMA 02021 1 100k 12 16<br />
999cc FIRE (146E5/EC/ED/EE) 89-90 VKMA 02200 1.05 60k 12 16<br />
91-95 VKMA 02200 1.05 100k 12 16<br />
1108cc FIRE (146EF/ET/EW) 89-90 VKMA 02200 1.05 60k 12 16<br />
91-95 VKMA 02200 1.05 100k 12 16<br />
1116cc CS (146A7) 89-90 VKMA 02216 1.25 60k 12 16<br />
www.bergab.ru Берг АБ bergab@ya.ru Тел. (495)-228-06-21, факс (495) 223-3071
www.bergab.ru Берг АБ bergab@ya.ru Тел. (495)-228-06-21, факс (495) 223-3071<br />
Change frequency<br />
<strong>and</strong> fitting times<br />
Change frequency<br />
<strong>and</strong> fitting times<br />
SKF TYPICAL BELT MIN MAX<br />
MODEL ENGINE SIZE MOTOR YEAR COMMENT KIT** FITTING CHANGE TENSION TENSION<br />
TIME* FREQ VALUE(dan) VALUE(dan)<br />
FORD<br />
ESCORT 1296cc HL13 (CVH) 76-87 VKMA 04200 0.8 90k 13 18<br />
1392cc/1597cc HL14 (CVH)/HL16 (CVH) 07/83-04/92 belt 97x19.75 VKMA 04201 0.8 60k 13 18<br />
05/92 –> belt 97x21.6 VKMA 04202 0.8 60k 15 20<br />
1596cc/1769cc ZH16/ZH18 (ZETEC E) 92-02/94 VKMA 04210 2.6 90k 17 23<br />
03/94-99 VKMA 04212 2.6 120k 17 23<br />
1753cc Diesel/Turbo Diesel 88-10/95 VKMA 04103 2.2 60k 13+15 18+21<br />
11/95-01/97 VKMA 04106 2.2 60k 15+15 20+20<br />
02/97 –> VKMA 04107 2.2 105k 15+15 20+20<br />
FIESTA 1242cc/1388cc ZHL12/ZHL14 (ZETEC S) 08/95-02/97 VKMA 04220 2.3 150k 15 20<br />
1392cc HL14 (CVH) 07/83-04/92 belt 97x19.75 VKMA 04201 0.8 60k 13 18<br />
05/92 –> belt 97x21.6 VKMA 04202 0.8 60k 15 20<br />
1753cc Diesel/Turbo Diesel 88-10/95 VKMA 04103 2 60k 13+15 18+21<br />
11/95-01/97 VKMA 04106 2 60k 15+15 20+20<br />
02/97 –> VKMA 04107 2 105k 15+15 20+20<br />
MONDEO 1596/1769/1998cc ZH16/ZH18ZH20 (ZETEC E) 93-02/94 VKMA 04212 2.9 90k 17 23<br />
03/94-05/98 VKMA 04212 2.9 120k 17 23<br />
1753cc Diesel/Turbo Diesel 93-10/95 VKMA 04103 3.2 60k 13+15 18+21<br />
11/95-09/96 VKMA 04106 3.2 60k 15+15 20+20<br />
10/96 –> VKMA 04107 3.2 105k 15+15 20+20<br />
HONDA<br />
CIVIC 1300cc/1500cc D13B/D15B 88-95 VKMA 93500 2.2 100k 16 22<br />
MAZDA<br />
323 1324cc B3 (SOHC) / (BF#) 04/87 –> VKMA 94101 1.7 100k 15 20<br />
B3 (SOHC) / (BA/G/J#) 10.96 –> VKMA 94102 1.7 100k 15 20<br />
1597cc B6 / (BF/W# ) 87 –> VKMA 94101 1.7 100k 15 20<br />
B6 (SOHC) / (BG# ) 06/89-12/95 VKMA 94102 1.7 100k 15 20<br />
626 1998cc FS / (GF/V# ) 08/91 –> VKMA 94010 1.7 100k 17 23<br />
FE (DOHC) / (GD#) 06/87-10/91 VKMA 94601 1.5 100k 17 23<br />
FE (SOHC) / (GD#) 06/87-10/91 VKMA 94230 1.5 100k 17 23<br />
NISSAN<br />
MICRA 1000cc MA10S / (K10) 12/82-12/88 VKMA 92400 1.9 60k 15 21<br />
12/88-11/92 VKMA 92401 1.9 60k 13 17<br />
OPEL/VAUXHALL<br />
ASCONA 1598cc 16N / Manual Gearbox 81-86 —>| 14054370 VKMC 05400 0.9 60k 13 18<br />
14054371 |—> VKMC 05401 1.2 60k 13 18<br />
ASTRA 1398cc C14NZ/SE./.14NV/SE./.X14NZ 92-97 belt 111x17 VKMA 05121 0.9 60k 11 15<br />
WITH W/ PUMP VKMC 05121 1.5 60k 11 15<br />
1398cc 16 v X14XE 94-97 belt 169x20 VKMA 05150 0.9 60k 13 18<br />
98 –> belt 162x20 VKMA 05152 1.5 120k 13 18<br />
1598cc 16 v X16XEL 94-97 belt 169x20 VKMA 05150 0.9 60k 13 18<br />
98 –> "—>I mot 20041690 VKMA 05152 1.1 60k 13 18<br />
98 –> "I—> mot 20041691 VKMA 05154 1.1 120k 13 18<br />
1699cc 17D 85-93 belt 146x24 VKMA 05201 2.4 60k 16 22<br />
17DR / X17DTL ECOTURBO 92-98 belt176x24 VKMA 05202 3 60k 16 22<br />
SKF TYPICAL BELT MIN MAX<br />
MODEL ENGINE SIZE MOTOR YEAR COMMENT KIT** FITTING CHANGE TENSION TENSION<br />
TIME* FREQ VALUE(dan) VALUE(dan)<br />
OPEL/VAUXHALL, continued<br />
CORSA 1195cc/1398cc C12NZ/C14NZ 83-93 belt 111x17 VKMA 05121 1 60k 11 15<br />
WITH W/ PUMP VKMC 05121 1.3 60k 11 15<br />
1398cc 16 v X14XE/X14SZ 94 –> VKMA 05150 1.1 60k 13 18<br />
1488cc X15TD 93-99 "—>I MOT 029082 VKMA 05208 1 120k 20 27<br />
"I—>MOT 029083 VKMA 05210 1 120k 20 27<br />
TIGRA 1398/1598 cc 16v X14XE/X16XEL 94 –> VKMA 05150 1.1 60k 13 18<br />
VECTRA 1598cc 16SV/E16NZ/C16NZ/X16SZ 89-95 VKMA 05121 1.3 60k 11 15<br />
"+ w/pump VKMC 05121 2 60k 11 15<br />
1598cc 16vv X16XEL 11/95 –> VKMA 05150 0.8 60k 13 18<br />
1699cc X17TD 96 –> "—>I MOT 029082 VKMA 05214 1.5 60k 20 27<br />
"I—>MOT 029083 VKMA 05215 1.5 120k 20 27<br />
1998cc C20NE 93-95 belt 146x20 VKMA 05402 1.8 60k 13 18<br />
1998cc 20XE/C20XE 89-92 belt 141x24 VKMA 05211 1.3 105k 16 22<br />
93-95 belt 176x24 VKMA 05220 1.1 60k 16 22<br />
1998cc C20SEL/X20XEV 95 –> belt 169x24 VKMA 05222 1 60k 16 22<br />
2500cc V6 C25XE/X25XE 93-99 "—>I CH W7154528 VKMA 05500 2.5 60k 20 27<br />
PEUGEOT<br />
106/206 954cc/1124cc TU9/TU1 92 –> VKMA 03100 1.8 120k 11 15<br />
1360cc TU3 92 –> belt 108x19 VKMA 03100 1.8 120k 11 15<br />
belt 101x17 VKMA 03110 1.8 120k 11 15<br />
106 1527cc Diesel TUD5 95 –> VKMA 03121 2.2 120k 17 23<br />
205 954cc/1124cc TU9/TU1 92 –> VKMA 03100 1.6 120k 11 15<br />
1769cc Diesel XUD7 83-12/93 VKMA 03240 3.8 120k 17 23<br />
01/94-97 VKMA 03241 3.8 120k 17 23<br />
306 1360cc TU3 93 –> VKMA 03110 1.9 120k 11 15<br />
1587cc TU5 93 –> VKMA 03111 1.8 120k 11 15<br />
1868cc Diesel DW8 98-99 VKMA 03244 3.8 120k 17 23<br />
1905ccT/D XUD9/T 93-12/93 VKMA 03240 5.3 120k 17 23<br />
01/94 –> VKMA 03241 4.8 120k 17 23<br />
405 1580cc/1905cc XU5/XU9 87-01/92 VKMA 03200 2.9 120k 11 15<br />
02/92-96 VKMA 03201 3.5 120k 11 15<br />
1905cc XU9J4 88-92 VKMA 03210 3.5 120k 17 23<br />
1769cc/1905cc Diesel XUD7 / XUD9/T 88-12/93 VKMA 03240 3.8 120k 17 23<br />
01/94-96 VKMA 03241 3.9 120k 17 23<br />
1998cc 16 vv XU10/J4 92-95 VKMA 03211 3.7 120k 21 28<br />
406 1761 cc XU7JP4 96-01 automatic tensioner VKMA 03214 3 120k 17 23<br />
1997cc HDI (90/110CV) DW10 99 –> VKMA 03246 4.5 160k 17 23<br />
2138cc T/D XUD11BT 96 –> VKMA 03251 4.2 120k 17 23<br />
X17TD 92-8/94 VKMA 05213 2.8 120k 20 27<br />
9/94-98 "—>I MOT 029078 VKMA 05214 2.8 60k 20 27<br />
9/94-99 "I—>MOT029079 VKMA 05215 2.8 120k 20 27<br />
www.bergab.ru Берг АБ bergab@ya.ru Тел. (495)-228-06-21, факс (495) 223-3071
www.bergab.ru Берг АБ bergab@ya.ru Тел. (495)-228-06-21, факс (495) 223-3071<br />
Change frequency<br />
<strong>and</strong> fitting times<br />
Change frequency<br />
<strong>and</strong> fitting times<br />
SKF TYPICAL BELT MIN MAX<br />
MODEL ENGINE SIZE MOTOR YEAR COMMENT KIT** FITTING CHANGE TENSION TENSION<br />
TIME* FREQ VALUE(dan) VALUE(dan)<br />
RENAULT<br />
CLIO 1149cc D7F 90-99 VKMA 06010 2.1 120k 11 15<br />
1171cc E5F/E7F 90-02/98 VKMA 06000 2.3 120k 11 15<br />
1390cc E6J/E7J 90-02/98 VKMA 06000 2.3 120k 11 15<br />
03/98-99 VKMA 06001 3 120k 11 15<br />
ESPACE 2068cc J8S 85-01/95 VKMA 06211 3 112k 17 23<br />
02/95-97 VKMA 06213 4 112k 17 23<br />
2188cc T/D G8T 96-99 VKMA 06501 4.4 120k 17 23<br />
LAGUNA 1794cc F3P 94-99 VKMA 06101 3.6 120k 13 17<br />
1998cc F3R 94-99 VKMA 06103 3.6 120k 13 17<br />
98-99 "+ pulley toothed VKMA 06123 3.6 120k 13 17<br />
2188cc T/D G8T 95-11/95 VKMA 06500 4.4 120k 17 23<br />
11/95-99 VKMA 06501 4.4 120k 17 23<br />
MEGANE/SCENIC 1390cc E7J 96-99 belt 95x17 VKMA 06000 2.1 120k 11 15<br />
98-99 belt 96x17 VKMA 06001 2.1 120k 11 15<br />
1598cc K7M 96-99 belt 95x17 VKMA 06000 2.1 120k 11 15<br />
96-99 belt 96x17 VKMA 06001 2.1 120k 11 15<br />
1870cc F8Q 10/96-99 VKMA 06124 4 120k 17 23<br />
1870cc Diesel F9Q 98-99 VKMA 06125 4 75k 17 24<br />
1998cc F3R 97-99 VKMA 06123 4 120k 13 17<br />
R 19 1390cc E6J/E7J 89-96 VKMA 06000 2.3 120k 11 15<br />
1721cc F2N/F3N 89-96 VKMA 06101 2.3 120k 13 17<br />
R 21 1995cc J7R 86-90 VKMA 06206 2.5 120k 13 17<br />
90-93 VKMA 06207 2.5 120k 13 17<br />
TWINGO 1149cc D7F 93-99 VKMA 06010 1.9 120k 11 15<br />
ROVER<br />
200 /400 series 1396cc 16vv 14K4 (DOHC) 10/89 –> belt 264x23 VKMA 07310 2.5 160k 15 21<br />
1590cc 16vv D16A(SOHC) 10/89-95 VKMA 93001 3.45 100k 16 22<br />
D16A(DOHC) 10/89-95 VKMA 93002 3.15 100k 16 22<br />
1769cc TD 8A8/D9B 83-12/93 VKMA 03240 4.05 120k 17 23<br />
01/94 –> VKMA 03241 4.05 120k 17 23<br />
SEAT<br />
CORDOBA 1781cc ABS 93 –> VKMA 01000 1.4 120k 15 20<br />
IBIZA 1193cc/1461cc 84-92 VKMA 02700 1.3 100k 13 17<br />
TOLEDO 1896cc TD AAZ 93-96 "—>I MOT 552764 VKMA 01011 1.8 120k 21 28<br />
93-06/96 I—>MOT 552765 VKMA 01013 1.8 120k 21 28<br />
07/96-08/97 VKMA 01013 1.8 120k 21 28<br />
SUZUKI<br />
CULTUS 1298cc G13B 92 –> VKMA 96200 1.9 100k 17 23<br />
SWIFT 1298cc G13 SOHC 8/84-96 VKMA 96202 1.9 100k 15 21<br />
VITARA 1598cc G16 88-04/96 VKMA 96204 2.4 100k 13 17<br />
91-04/96 VKMA 96002 2.4 100k 17 23<br />
SKF TYPICAL BELT MIN MAX<br />
MODEL ENGINE SIZE MOTOR YEAR COMMENT KIT** FITTING CHANGE TENSION TENSION<br />
TIME* FREQ VALUE(dan) VALUE(dan)<br />
TOYOTA<br />
CARINA II 1587cc 4A-F/FE 12/87-04/92 VKMA 91702 2 100k 15 21<br />
1974cc Diesel 1C/2C 04/82-02/95 VKMA 91100 1.8 100k 17 23<br />
CARINA E 1587cc 4A-FE 02/92-05/95 VKMA 91005 2.3 100k 14 19<br />
1974cc Diesel 2C 02/92-10/97 VKMA 91100 2.3 100k 17 23<br />
COROLLA 1295cc 2E-L 04/86-92 VKMA 91201 1.3 100k 16 22<br />
1332cc 4E-FE 05/95 –> VKMA 91400 2 100k 17 24<br />
1587cc 4A-FE 09/93 –> VKMA 91005 2 100k 14 19<br />
1839cc/1974cc Diesel 1C/2C 05/83-09/93 VKMA 91100 2.2 100k 17 23<br />
STARLET 999cc 1E/1E-L 04/86-03/95 VKMA 91205 1.7 100k 16 22<br />
1295cc 2E 12/89 –> VKMA 91201 1.9 100k 16 22<br />
VOLKSWAGEN<br />
BORA 1598cc AEH/AKL 99 –> VKMA 01113 2.6 100k 15 21<br />
GOLF 1272cc 79-89 with w/pump VKMC 01100 0.9 120k 15 21<br />
1390cc AHW/AKQ 10/97 –> "—>mot 242000 VKMA 01120 2 100k 13 18<br />
1702cc/1781cc 82-94 VKMA 01000 0.65 120k 15 20<br />
1896cc TD AAZ 92-05/94 "—>I MOT 552764 VKMA 01011 2 90k 21 28<br />
06/94-99 "I—> MOT 552765 VKMA 01013 2 90k 21 28<br />
1896cc TDI AGR/AHF/ALH 98-01 VKMA 01131 3 60k 21 28<br />
SHARAN 1896cc TDI 1Z/AFN/AHU 09/95 –> VKMA 01014 3 90k 21 28<br />
PASSAT 1595cc 05/73-93 belt 121x18 VKMA 01000 1.5 120k 15 20<br />
1781cc 82-96 belt 121x18 VKMA 01000 1.5 120k 15 20<br />
1781cc ADR/ANB/APT/APU/ARG 10/96-01 belt 152x25 VKMA 01004 2.5 180k 17 23<br />
with hyd/piston+belt 153x25 VKMC 01008 2.5 180k 17 23<br />
1896cc TDI AFN/AHU 10/96-08/98 VKMA 01014 3 90k 21 28<br />
2496cc TDI AFB/AKN 08/98-01 with hyd/piston VKMC 01150 3.3 120k 20+26 27+35<br />
POLO 1043cc 82-94 with w/pump+belt 108x19 VKMC 01100 1.9 120k 15 21<br />
91-94 with w/pump+belt 128x19 VKMC 01103 1.9 120k 13 17<br />
10/94-06/96 belt 132x19 VKMA 01105 1.3 120k 13 17<br />
1272cc 75-94 with w/pump+belt 108x19 VKMC 01100 1.9 120k 15 21<br />
91-94 with w/pump+belt 128x19 VKMC 01103 1.3 120k 13 17<br />
VENTO 1781cc ABS/ADZ 93-99 belt 121x18 VKMA 01000 1.6 120k 15 20<br />
VOLVO<br />
740/760 2316cc B23/B230 83-92 VKMA 06300 1.6 80k 15 21<br />
740/760 2383cc T/D D24/TIC 83-90 VKMA 01040 2.2 120k 20 27<br />
with w/pump VKMC 01040 2.4 120k 20 27<br />
940/960 2316cc B230 91-92 VKMA 06300 1.4 80k 15 21<br />
93-96 VKMA 06301 1.4 80k 13 17<br />
S40 1587/1731/1855cc 96-97 belt 148X23 VKMA 06602 3 120k 15 21<br />
S70 1984/2318/2435cc 97-98 "—>I mot 1266127 VKMA 06602 1.7 120k 15 21<br />
www.bergab.ru Берг АБ bergab@ya.ru Тел. (495)-228-06-21, факс (495) 223-3071
www.bergab.ru Берг АБ bergab@ya.ru Тел. (495)-228-06-21, факс (495) 223-3071<br />
Trouble shooting <strong>and</strong> failure analysis<br />
Symptom/Appearance Probable Cause Corrective Action<br />
The plastic idler pulley appears to be worn 1) Extreme environmental wear. Replace.<br />
on belt tracking area.<br />
(i.e., heat, water, stones).<br />
On plastic idlers, pulley has a chip in it. 1) Stone damage. Replace only if<br />
2) Faulty installation practices. chip is in belt<br />
tracking area.<br />
Tensioner bearing has been marred in belt 1) Stone damage. Replace only if<br />
tracking area. 2) Faulty installation practices. deformation is in<br />
belt tracking area.<br />
Tensioner bearing shows signs of corrosion. 1) Coating on pulley has worn off. Replace.<br />
2) NOTE: it is normal for coating<br />
to wear off belt tracking area.<br />
Bearing has excessive wobble (free rock) 1) Bearing failure. Replace.<br />
2) Excessive load on pulley.<br />
3) <strong>Belt</strong> is not tracking properly<br />
over pulley<br />
Bearing Appearance Probable Cause Corrective Action<br />
Grease appears to be leaking out 1) Seal degradation. Replace.<br />
of the bearing.<br />
2) Excessive radial internal clearance<br />
in bearing.<br />
Bearing seal is missing or damaged. 1) Worn pulley. Replace.<br />
2) Environmental damage<br />
(i.e., heat, water, stones).<br />
Bearing seal looks damaged. 1) Faulty installation practices. Replace.<br />
2) Environmental damage<br />
(i.e., heat, water, stones).<br />
Loose, Sticking or Seized Pulley Probable Cause Corrective Action<br />
Tensioner bearing is seized <strong>and</strong> will not 1) Bearing is damaged. Replace.<br />
rotate freely.<br />
Tensioner bearing does not rotate smoothly 1) Radial internal clearance in bearing Replace.<br />
or had a sticky feel to it when spun.<br />
is too low.<br />
2) Bearing fit in pulley is tight<br />
Pulley <strong>and</strong> bearing have relative motion. 1) This signifies that bearing is Replace.<br />
not being constrained.<br />
Normal load<br />
Normal loading direction during<br />
correct eccentric rotation<br />
(Above) The automatic tensioner has been<br />
set up incorrectly <strong>and</strong> so when the engine is<br />
running, the indicator arm has come into<br />
contact with the end stop, exceeding the<br />
correct tension of the belt.<br />
(Left) need an explanation of what this<br />
photo on the left is.<br />
Abnormal load<br />
Abnormal loading direction<br />
during wrong eccentric rotation<br />
Crack<br />
Noise Probable Cause Corrective Action<br />
Bearing makes a high pitched whine or 1) Worn bearing. Replace.<br />
hooting noise after the engine is started. 2) Bearing fit is incorrect.<br />
Noise lasts up to three minutes.<br />
Bearing makes a high pitched whine 1) Bearing is not functioning properly. Replace.<br />
or operation<br />
During normal<br />
operation, bearing<br />
is very quiet.<br />
Bearing assembly rattle when shaken. 1) Bearing cage is broken. Replace.<br />
2) Balls in bearing are loose.<br />
3) Bearing is void of lubricant.<br />
Tracking Probable Cause Corrective Action<br />
<strong>Belt</strong> does not track properly on idler belt 1) Bearing is not fixed to the correct Replace.<br />
tracking surface.<br />
depth in pulley.<br />
2) <strong>Belt</strong> tracking surface is not square to<br />
bearing mounting surface.<br />
3) Pulley tracking surface is tapered.<br />
(Crowning or bowing of belt tracking<br />
surface is sometimes intentional).<br />
Correct direction for the<br />
adjustment of the eccentric<br />
(direction of arrow)<br />
Direction of adjustment<br />
actually used<br />
(wrong direction)<br />
www.bergab.ru Берг АБ bergab@ya.ru Тел. (495)-228-06-21, факс (495) 223-3071
www.bergab.ru Берг АБ bergab@ya.ru Тел. (495)-228-06-21, факс (495) 223-3071<br />
Trouble shooting <strong>and</strong> failure analysis, continued<br />
Heavy damage on pulley flange.<br />
Heavy damage on the second face of<br />
idler <strong>and</strong> baring seal, probably caused<br />
by an external element coming in contact<br />
with the pulley during running.<br />
Lorem ipsum dolor sit amet, consecte<br />
tuer adipiscing elit, sed diam nonummy<br />
nibh euismod tincidunt ut laoreet dolore<br />
magna aliquam erat volutpat.<br />
Lorem ipsum dolor sit amet, consecte<br />
tuer adipiscing elit, sed diam nonummy<br />
nibh euismod tincidunt ut laoreet dolore<br />
magna aliquam erat volutpat.<br />
Pollution of belt fibers inside of pulleys–<br />
material from belt has overtime gone<br />
into workings of bearing unit <strong>and</strong> caused<br />
failure.<br />
Significant traces on the plastic pulleys<br />
of impact damages by foreign objects.<br />
Lorem ipsum dolor sit amet, consecte<br />
tuer adipiscing elit, sed diam nonummy<br />
nibh euismod tincidunt ut laoreet dolore<br />
magna aliquam erat volutpat.<br />
Lorem ipsum dolor sit amet, consectet<br />
uer adipiscing elit, sed diam nonummy<br />
nibh euismod tincidunt ut laoreet dolore<br />
magna aliquam erat volutpat.<br />
Significant traces on the plastic pulleys<br />
of impact damages by foreign objects.<br />
Lorem ipsum dolor sit amet, consect<br />
etuer adipiscing elit, sed diam nonummy<br />
nibh euismod tincidunt ut laoreet dolore<br />
magna aliquam erat volutpat.<br />
Impact damage on bearing due to<br />
wrong fitting onto block.<br />
Lorem ipsum dolor sit amet, consecte<br />
tuer adipiscing elit, sed diam nonummy<br />
nibh euismod tincidunt ut laoreet dolore<br />
magna aliquam erat volutpat.<br />
www.bergab.ru Берг АБ bergab@ya.ru Тел. (495)-228-06-21, факс (495) 223-3071
www.bergab.ru Берг АБ bergab@ya.ru Тел. (495)-228-06-21, факс (495) 223-3071<br />
Analyzing belt wear <strong>and</strong> damage<br />
A broken belt is frequently the result of a problem with the system of pulleys <strong>and</strong><br />
shafts which drive it. Therefore, it can be helpful to note the cause of belt breakage<br />
or wear <strong>and</strong> take steps to correct the problem. NOTE: If for any reason you need to<br />
replace a timing belt, DO NOT REINSTALL THE BELT; INSTALL A NEW ONE.<br />
1 2<br />
1<br />
Torn or broken belt with ragged, jagged cord<br />
Probable cause: Excessive fitting tension.<br />
2<br />
3<br />
<strong>Belt</strong> exhibits tooth shear<br />
Probable cause: Insufficient belt tension.<br />
Completely detached or worn teeth<br />
Probable cause: Either excessive or insufficient belt tension<br />
3 4<br />
4<br />
Hollowed teeth<br />
Probable cause: Insufficient belt tension<br />
5<br />
6<br />
Back of belt is cracked<br />
Probable cause: Incorrect temperature<br />
L<strong>and</strong> wear<br />
Probable cause: Excessive belt tension<br />
5 6<br />
7<br />
Oil contamination on belt<br />
Probable cause: Contamination from oil or other petroleum derivatives<br />
8<br />
Visible wear on edge of belt<br />
Probable cause: Misaligned pulleys <strong>and</strong>/or tensioner<br />
7<br />
8<br />
9<br />
Excessive noise<br />
Probable cause: Incorrect tension<br />
9<br />
www.bergab.ru Берг АБ bergab@ya.ru Тел. (495)-228-06-21, факс (495) 223-3071
www.bergab.ru Берг АБ bergab@ya.ru Тел. (495)-228-06-21, факс (495) 223-3071<br />
Good practices <strong>and</strong> helpful hints<br />
<strong>Belt</strong> life vs. correct tension<br />
Correct fitting<br />
Lorem ipsum dolor sit amet, consectetuer adip<br />
iscing elit, sed diam nonummy nibh euismod tin<br />
cidunt ut laoreet dolore magna aliquam erat<br />
Chord ripping<br />
Flank wear<br />
As this graph shows, the correct<br />
tension is critical to the life of the<br />
belt. Both excessive <strong>and</strong> insufficient<br />
tension can damage the belt <strong>and</strong><br />
cause premature failure.<br />
<strong>Belt</strong> tension<br />
Correct<br />
tension<br />
Normal wear<br />
Ripping of teeth<br />
Screw Ø 10<br />
Positioning screw<br />
Tooth jump<br />
Life of belt<br />
Incorrect fitting<br />
Lorem ipsum dolor sit amet, consectetuer adip<br />
iscing elit, sed diam nonummy nibh euismod tin<br />
cidunt ut laoreet dolore magna aliquam erat<br />
General Hints<br />
Do not use the teeth to block the engine when loosening or tightening<br />
the pulley bolts.<br />
Do no use solvents to clean the pulleys.<br />
Check that the auxiliary compnents controlled by the timing belt<br />
(water pump, oil pump <strong>and</strong> countershaft if appropriate) are functioning<br />
correctly <strong>and</strong> that the other pulleys such as the belt tightening pulley<br />
<strong>and</strong> driver rollers are free, without too much float.<br />
Lorem ipsum dolor sit amet,<br />
consectetuer adip iscing elit,<br />
sed diam nonummy nibh eui<br />
mod tin cidunt ut laoreet<br />
dolore magna aliquam erat<br />
Check for wear on the flanges. Rotate the driving shaft to the TDC of<br />
cylinder number 1; in the case of an engine with a double camshaft,<br />
assure that both are in the TDC position.<br />
www.bergab.ru Берг АБ bergab@ya.ru Тел. (495)-228-06-21, факс (495) 223-3071
www.bergab.ru Берг АБ bergab@ya.ru Тел. (495)-228-06-21, факс (495) 223-3071<br />
Setting up automatic tensioners:<br />
a typical example<br />
<strong>Timing</strong> <strong>Belt</strong> Tensioner Procedure<br />
Renault G8T 2.2L<br />
Diesel engine<br />
start to move CLOCKWISE. Continue<br />
pushing the tensioner until the Load<br />
Stop on the arm <strong>and</strong> the Pointer Tab on<br />
the front plate are separated by 1~2<br />
mm (See Figure 3a).<br />
9. Retract the screw-jack installation<br />
tool slowly until the Mean <strong>Belt</strong> Mark<br />
on the tensioner arm <strong>and</strong> aligns with<br />
the Position Indicator notch in the<br />
Pointer Tab (See Figure 4).<br />
10. Torque the Mounting Nut to 30 Nm<br />
using a torque wrench.<br />
1.Allow the engine <strong>and</strong> tensioner to<br />
stabilize to the same relative ambient<br />
temperature before installing a<br />
tensioner for proper belt tension<br />
adjustment. Do not attempt to install<br />
a cool tensioner onto a hot engine or<br />
vise versa.<br />
2. Rotate both the crankshaft <strong>and</strong><br />
camshaft CLOCKWISE to TDC<br />
(Top Dead Center) position (i.e. #1<br />
cylinder firing position) <strong>and</strong> remove<br />
the timing belt. This defined position<br />
is to be the position where there is<br />
no action (positive or negative) from<br />
the camshaft or other sprockets.<br />
One should find no sudden movement<br />
or abrupt action from either of<br />
4. Mount the tensioner while making<br />
sure that the Ø6 mm Dowel Pin is<br />
fully engaged (See Figure 1) Tensioner<br />
should be mounted flat on the bracket.<br />
5. H<strong>and</strong> tighten the M8 Mounting Nut.<br />
Pre-Installation of the TBT<br />
6. Install the timing belt around the<br />
crankshaft <strong>and</strong> camshaft sprockets<br />
<strong>and</strong> the tensioner as per drive layout<br />
(See Fig. 2a & 2b).<br />
Caution: Do not push the tensioner<br />
beyond this point. Continued travel of<br />
the tensioner arm may result in damage<br />
or deformation of tensioner’s pointer.<br />
Note: When the engine is started <strong>and</strong><br />
idling at room temperature (20°C), the<br />
mean belt position mark on the tensioner<br />
arm should oscillate evenly<br />
about the position indicator notch. The<br />
mean belt position mark oscillating +2°<br />
to -4° of the position indicator notch<br />
centerline is within the permissible tolerance<br />
range (See Figure 5).<br />
the sprockets. Generally cam &<br />
crankshaft sprockets have to line up<br />
with equivalent markings on the<br />
8. Rotate the crankshaft two (2)<br />
engine block to indicate TDC.<br />
complete revolutions manually for<br />
Initial Setup of the TBT<br />
(<strong>Timing</strong> <strong>Belt</strong> Tensioner)<br />
proper seating of the belt until the<br />
crankshaft is repositioned at the<br />
TDC position.<br />
3. Slide the pendulum mounting bracket<br />
farthest to the left before mounting<br />
the tensioner. This will ensure that<br />
the tensioner can be mounted easily<br />
when routing the belt.<br />
7. Push the tensioner into the belt with<br />
the screw-jack installation tool. The<br />
Tensioner assembly will move against<br />
the belt <strong>and</strong> the Arm will eventually<br />
This specific procedure is provided only<br />
as an example of a typical timing belt<br />
tensioner procedure. Always refer to the<br />
car manufacturer’s specific mounting<br />
procedures in full.<br />
www.bergab.ru Берг АБ bergab@ya.ru Тел. (495)-228-06-21, факс (495) 223-3071
www.bergab.ru Берг АБ bergab@ya.ru Тел. (495)-228-06-21, факс (495) 223-3071<br />
Setting up automatic tensioners:<br />
a typical example<br />
<strong>Timing</strong> <strong>Belt</strong> Tensioner<br />
(979272) for aftermarket<br />
VW 1.4/1.6L SOHC, I4 (EA 111)<br />
Revision date: 07/31/1998<br />
1.Allow the engine <strong>and</strong> tensioner to<br />
stabilize to the same relative ambient<br />
temperature before installing a<br />
tensioner for proper belt tension<br />
adjustment. Do not attempt to install<br />
a cool tensioner onto a hot engine or<br />
vise versa.<br />
2. Rotate both the crankshaft <strong>and</strong><br />
camshaft CLOCKWISE to TDC<br />
(Top Dead Center) position (i.e. #1<br />
cylinder firing position) <strong>and</strong> remove<br />
the timing belt. This defined position<br />
is to be the position where there<br />
is no action (positive or negative)<br />
from the camshaft or other<br />
sprockets. One should find no<br />
sudden movement or abrupt action<br />
from either of the sprockets.<br />
Generally cam & crankshaft<br />
sprockets have to line up with<br />
equivalent markings on the engine<br />
block to indicate TDC.<br />
Initial Setup of the TBT<br />
(<strong>Timing</strong> <strong>Belt</strong> Tensioner)<br />
3. Place a new tensioner onto the<br />
engine. Tensioner’s Anti-Rotation<br />
Fingers should fit over the Guiding<br />
Nut on the engine.<br />
4. Rotate the Installation Shaft Washer<br />
until the Hex Hole is pointing at<br />
the “5 O’clock position” then h<strong>and</strong><br />
tighten the M8 Mounting Bolt<br />
(See Figure 1).<br />
Fig. 1<br />
Installation of the TBT<br />
5. Install the timing belt being careful to<br />
engage the appropriate teeth of all<br />
the corresponding sprockets as per<br />
drive layout (See Figure 2).<br />
(Caution: Do not disturb the position of<br />
the crankshaft or camshaft sprockets<br />
during this procedure.)<br />
6. Rotate the Installation Shaft Washer<br />
CLOCKWISE with a Hex Key.<br />
Make sure to hold the mounting<br />
bolt with a Wrench in order to<br />
prevent it from turning when rotating<br />
the Installation Shaft Washer. The<br />
Tensioner assembly will move against<br />
the belt <strong>and</strong> the Arm will eventually<br />
start to move CLOCKWISE<br />
(See Figure 3).<br />
Fig. 3<br />
7. Continue rotating the Installation<br />
Shaft Washer until the Arm Pointer<br />
is positioned within the Nominal<br />
Position Window on the base plate,<br />
then lock the tensioner in this<br />
position by tightening the Mounting<br />
Nut with 19±3 Nm of torque<br />
(See Figure 4).<br />
Verification of the Nominal Position<br />
8. Remove both the Hex Key <strong>and</strong> the<br />
Wrench. Rotate the crankshaft two<br />
(2) complete revolutions manually<br />
for proper seating of the belt until<br />
the crankshaft is repositioned at the<br />
TDC position.<br />
Note: Repositioning the crankshaft to<br />
the TDC position must be done only<br />
during the clockwise rotation.<br />
9. Check the position of the Arm Pointer.<br />
– If the Arm Pointer still remains within<br />
the Nominal Position Window, the<br />
installation is complete.<br />
– If not, go to step #10. The installation<br />
needs to be repeated until the proper<br />
position is achieved.<br />
Readjustment<br />
10. Engage the Hex Key <strong>and</strong> retain<br />
it’s position while loosening the<br />
Mounting Bolt with the Wrench.<br />
The Mounting Bolt <strong>and</strong> the<br />
Tensioner do not need to be<br />
removed. Rotate the Installation<br />
Shaft Washer counterclockwise with<br />
the Hex Key until the Arm Pointer<br />
returns to the Free-Arm Position<br />
(See Figure 1). Follow step #5~9.<br />
Fig. 4<br />
Fig. 2<br />
www.bergab.ru Берг АБ bergab@ya.ru Тел. (495)-228-06-21, факс (495) 223-3071
www.bergab.ru Берг АБ bergab@ya.ru Тел. (495)-228-06-21, факс (495) 223-3071<br />
Now available from SKF:<br />
Detailed mounting instructions,<br />
listed by make <strong>and</strong> model<br />
Shown here are just a few examples taken from the Mounting<br />
Mulit-V <strong>and</strong> <strong>Timing</strong> <strong>Belt</strong>s, a highly detailed manual providing<br />
complete step by step instructions for the proper replacement of<br />
timing <strong>and</strong> multi-V belt systems. European <strong>and</strong> Asian vehicles<br />
are included. For more information, talk to your SKF dealer.<br />
www.bergab.ru Берг АБ bergab@ya.ru Тел. (495)-228-06-21, факс (495) 223-3071
www.bergab.ru Берг АБ bergab@ya.ru Тел. (495)-228-06-21, факс (495) 223-3071<br />
SKF <strong>Multi</strong>-V <strong>Belt</strong> <strong>Kits</strong><br />
SKF now offers kits for auxiliary belt replacement. These kits offer quality<br />
<strong>and</strong> convenience when replacing belts that drive alternators, air conditioner<br />
compressors, etc.<br />
<strong>Multi</strong>-V <strong>Belt</strong> <strong>Kits</strong> include 1 auxiliary belt, 1 idler pulley, <strong>and</strong> 1 belt<br />
tensioner unit plus mounting instructions.<br />
Examine the old belt<br />
Looking closely at the condition of the belt you have removed can provide<br />
important clues about the drive system, for example, worn pulleys, partially or<br />
completed seized components, oil leakage, etc.<br />
Regardless of the condition of the belt, SKF recommends installing a new belt<br />
to assure maximum efficiency of the engine, <strong>and</strong> trouble-free operation for<br />
your customers.<br />
Removing <strong>and</strong> checking<br />
multi-V belts <strong>and</strong> pulley fittings<br />
Following are general guidelines for the replacement of multi-V or “serpentine”<br />
belts. Because every engine is different, please consult your workshop manual<br />
for more specific instructions.<br />
Getting started<br />
• Disconnect the battery leads.<br />
• Put the h<strong>and</strong>brake on.<br />
Technical Tips<br />
Use every service as an opportunity to add value to your customer<br />
relationships by checking the condition of the engine’s multi-V belts.<br />
They’ll appreciate your concern for their safety.<br />
Deposits of material in the ribs of a belt typically will not cause the<br />
belt to break but instead cause excessive noise <strong>and</strong> vibration. This<br />
condition can be caused by excessive slippage due to insufficient<br />
tension, misaligned pulleys, or worn pulley profiles.<br />
A mis-aligned pulley will typically cause cord popout, in which a<br />
section of cord appears at the side of the belt. This problem can be<br />
serious when the cord becomes tangles in a fixed component.<br />
• Before removing the old belt, observe the path of the belt on the various<br />
pulleys. Mark on the old belt the direction in which it is fitted, so you can<br />
install the new belt correctly.<br />
• Before removing the belt, check the alignment of the pulleys. (You will want<br />
to recheck the alignment after installing the new belt.)<br />
Eliminating belt tension<br />
• If the drive has an automatic belt tensioner spring, use the appropriate wrench<br />
to rotate the belt tightening pulley in the opposite direction from which it is<br />
stretched. Release the tension <strong>and</strong> block the tensioner by inserting a clamp pin<br />
in its place.<br />
• If the drive has an automatic hydraulic tensioner, release the tension by rotating<br />
the pulley, as described above. Remove the hydraulic tensioner <strong>and</strong> compress<br />
the small piston with a clamp until its opening corresponds to the hole on the<br />
base of the tensioner. Block the small piston with an appropriate pin.<br />
• Unscrew the stop nut(s) of the belt tensioner <strong>and</strong> remove the belt. If necessary,<br />
also unscrew the lock nut(s) of the alternator or other accessories driven by<br />
the multi-V belt.<br />
www.bergab.ru Берг АБ bergab@ya.ru Тел. (495)-228-06-21, факс (495) 223-3071
www.bergab.ru Берг АБ bergab@ya.ru Тел. (495)-228-06-21, факс (495) 223-3071<br />
Setting correct belt tension<br />
with SKF TensiCheck<br />
The SKF TensiCheck <strong>Belt</strong> Tension Testing Device takes the guesswork – <strong>and</strong> the<br />
great potential for error – out of timing belt replacement.<br />
Developed by SKF research engineers, the SKF TensiCheck saves time<br />
during installation <strong>and</strong> minimizes the danger of improper belt tensioning<br />
<strong>and</strong> possible engine damage.<br />
With its compact carrying case <strong>and</strong> multi-lingual instructions, the<br />
SKF TensiCheck is h<strong>and</strong>y <strong>and</strong> easy to use by anyone on the shop<br />
floor. With the savings in time over trial <strong>and</strong> error methods, <strong>and</strong><br />
the elimination of call–backs <strong>and</strong> unhappy customers, SKF<br />
TensiCheck is a cost-effective investment for your garage.<br />
Key features include:<br />
• Superior accuracy over manual methods <strong>and</strong> other digital calibration techniques.<br />
• Microprocessor programmed for belts on most vehicles.<br />
• Simple design <strong>and</strong> universal graphics cross language barriers.<br />
• Works on both timing belts <strong>and</strong> multi-V belts specifically found in SKF kits.<br />
• Unlike competitive units, the SKF TensiCheck requires no calibration.<br />
• Mounts on the outside of the belt for easier installation — competitive types<br />
need to be mounted on the back side of the belt.<br />
• Sensors show “overload” or “underload” conditions as well as battery charge.<br />
• St<strong>and</strong>ard 9V battery powers the SKF TensiCheck for up to<br />
25 hours or longer depending on use.<br />
The SKF TensiCheck<br />
<strong>Belt</strong> Tension Testing Kit<br />
This kit includes a h<strong>and</strong>held electronic<br />
unit, a belt-mounted tensioning device,<br />
<strong>and</strong> multi-lingual instructions, all in an<br />
impact-resistant carrying case.<br />
The SKF TensiCheck is h<strong>and</strong>y <strong>and</strong> easy<br />
to use by anyone on the shop floor.<br />
It is also a cost-effective investement<br />
for your garage.<br />
www.bergab.ru Берг АБ bergab@ya.ru Тел. (495)-228-06-21, факс (495) 223-3071
4<br />
5<br />
www.bergab.ru Берг АБ bergab@ya.ru Тел. (495)-228-06-21, факс (495) 223-3071<br />
SKF TensiCheck measuring<br />
The SKF TensiCheck device made by SKF is an accurate, universal belt tension<br />
testing device which can be used on almost all car models.<br />
It can be used to check both the timing belts <strong>and</strong> auxiliary belts (3 to 8 ribs)<br />
contained in the SKF VKMA kits, along with many other automotive belt sizes.<br />
Because it calculates the correct tension to be applied to each belt <strong>and</strong> compares<br />
this tension with the tension of the installed belt, the user immediately knows if<br />
the belt is correctly loaded (green “OK” lamp lights up),<br />
insufficiently loaded (red “–” lamp<br />
lights up) or over-loaded (red “+”<br />
lamp lights up).<br />
Moreover the accurate tension,<br />
measured in daN, is displayed on the<br />
3<br />
right part of the screen.<br />
1<br />
2<br />
10<br />
6<br />
7 8 9<br />
11<br />
mm / U daN<br />
Having completed the correct belt <strong>and</strong> tensioner replacement procedure.<br />
1. Before starting mesurement of a belt’s tension, turn the crankshaft two<br />
revolutions <strong>and</strong> set it to the point where all the timing marks are aligned.<br />
2. Press the red button to switch the SKF TensiCheck on.<br />
www.bergab.ru Берг АБ bergab@ya.ru Тел. (495)-228-06-21, факс (495) 223-3071
www.bergab.ru Берг АБ bergab@ya.ru Тел. (495)-228-06-21, факс (495) 223-3071<br />
3. Select the belt characteristics using the following grey buttons.<br />
<strong>Timing</strong> belt (top grey button)<br />
4. <strong>Belt</strong> material HSN or XS / non HSN or non XS<br />
(second from the top grey button).<br />
5. Tooth profile curvilinear / trapezoidal (third from the top grey button).<br />
6. Width (mm) of the belt (up <strong>and</strong> down grey buttons at the bottom):<br />
The width will be displayed at the leftside of the screen.<br />
Note 1: the width <strong>and</strong> the material of timing belts are usually indicated<br />
on the back of the belt:<br />
41121x18 means 18 mm width <strong>and</strong> non HSN or XS material,<br />
58113x1’’ HSN means 25.4 mm width <strong>and</strong> HSN material.<br />
Note 2 : 1’’1/4 = 32 mm 1’’ = 25.4 mm 3/4’’ = 19 mm 1/2’’ = 12.7 mm.<br />
Auxiliary belt (top grey button).<br />
Number of V (up <strong>and</strong> down grey buttons at the bottom) :<br />
The number of V will be displayed at the left side of the screen.<br />
7,8. Install the mechanical grip on the belt.<br />
9.The mechanical grip must be placed at right angles to the belt with the<br />
two fingers on the back of the belt, the single finger on the opposite<br />
side of the belt must be placed in between two teeth (for timing belts)<br />
or at right angles to the ribs (for auxiliary belts). The belt must be<br />
placed in the middle of the single finger : the middle of the belt width<br />
must be in front of the arrows shown on the grip’s body. Turn the knob<br />
to clockwise until it locks (blocking point).<br />
www.bergab.ru Берг АБ bergab@ya.ru Тел. (495)-228-06-21, факс (495) 223-3071
www.bergab.ru Берг АБ bergab@ya.ru Тел. (495)-228-06-21, факс (495) 223-3071<br />
10. Press the green start button.<br />
11A. If, after pressing the green start button, three dots (...) are displayed on the<br />
right side of the screen instead of a load, check theparameters of the belt<br />
you have selected. This means that the belt type is not recognized by the<br />
SKF TensiCheck. Restart the opera-tion from step 3.<br />
11B. If the “-’’ red lamp lights up: the belt is insufficiently loaded.<br />
11C. If the “+’’ red lamp lights up: the belt is over-loaded.<br />
11D. If the “OK’’ green lamp lights up: the belt is correctly loaded.<br />
If necessary, when the “-’’ or “+’’ red lamps are lit up, remove the mechanical<br />
grip from the belt, adjust the belt load <strong>and</strong> restart the operation from step 1.<br />
CAUTION:<br />
• IMPORTANT: the belt tension must be set by progressively increasing the<br />
belt load. Thus it is important for the adjustment of the belt tension to slacken<br />
it completely <strong>and</strong> then restart to tension it.<br />
• If the SKF TensiCheck beeps : the load applied on the mechanical grip is too<br />
high. Stop turning the knob immediately. If you do not you may damage the<br />
load sensor mounted in the mechanical grip.<br />
• If the beep is continuous : the load sensor has been over-loaded <strong>and</strong> thus cannot<br />
perform correctly.<br />
• If the SKF TensiCheck is switched on <strong>and</strong> not used within 15 minutes it switches<br />
off automatically.<br />
• If the red power lamp (above of the red ON / OFF button) flashes, change the<br />
battery as soon as possible. The accuracy of the results could be affected if the<br />
battery does not have enough power.<br />
• The recommended battery to be used is an alkaline 9 V battery, type PP3/6LR61,<br />
or alternatively you can use the auxiliary power cable SKF VKNA 10 connected<br />
to the car battery.<br />
www.bergab.ru Берг АБ bergab@ya.ru Тел. (495)-228-06-21, факс (495) 223-3071
www.bergab.ru Берг АБ bergab@ya.ru Тел. (495)-228-06-21, факс (495) 223-3071<br />
Top car manufacturers across the globe choose SKF as their main wheel<br />
bearing supplier for quality <strong>and</strong> safety. With SKF wheel bearing kits we<br />
make sure it stays that way throughout the life of the car. The same SKF<br />
quality can be found in our full line of spare parts <strong>and</strong> tools. For more<br />
information, contact your SKF representative or visit www.vsm.skf.com<br />
COMING<br />
SOON!<br />
• SKF Aquamax <strong>and</strong> other<br />
water pumps<br />
• Suspension kits<br />
• Wheel bearing kits<br />
• Clutch release bearings<br />
• <strong>Multi</strong>-V belt kits<br />
• <strong>Timing</strong> belt kits<br />
• SKF TensiCheck<br />
(belt tension tester)<br />
• <strong>Belt</strong> tensioner pulleys<br />
• SKF IRIS (Integrated Repair<br />
Information System)<br />
SKF IRIS (Integrated Repair Information System) – Combines automotive<br />
diagnostics, repair information, just-in-time training <strong>and</strong> garage management<br />
modules in one easy-to-use PC-based system.<br />
Watch your mail for more information about this breakthrough tool.<br />
The high visibility of Formula One racing.<br />
For over 50 years, SKF products <strong>and</strong> expertise have helped make Ferrari a<br />
formidable force in Formula One racing. This year’s Ferrari car has more than<br />
150 SKF components!<br />
Grow your business with<br />
the industry’s most trusted br<strong>and</strong>.<br />
For more information about SKF timing belt or multi-V belt kits or any<br />
of our other products, contact your SKF representative or visit our website:<br />
www.bergab.ru Берг АБ bergab@ya.ru Тел. (495)-228-06-21, факс (495) 223-3071
www.bergab.ru Берг АБ bergab@ya.ru Тел. (495)-228-06-21, факс (495) 223-3071<br />
Save time, get answers,<br />
at www.vsm.skf.com<br />
The latest product news, trouble-shooting tips,<br />
<strong>and</strong> technical information are just a click away<br />
at the SKF automotive aftermarket website.<br />
Visit us soon — <strong>and</strong> often!<br />
PP2© Copyright SKF 2002<br />
Price - 10 Euro<br />
www.bergab.ru Берг АБ bergab@ya.ru Тел. (495)-228-06-21, факс (495) 223-3071