
Create successful ePaper yourself
Turn your PDF publications into a flip-book with our unique Google optimized e-Paper software.
www.bergab.ru Берг АБ bergab@ya.ru Тел. (495)-228-06-21, факс (495) 223-3071<br />
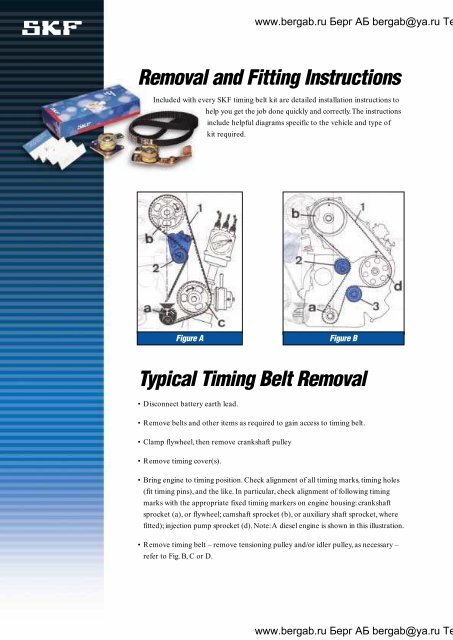
Removal <strong>and</strong> Fitting Instructions<br />
Included with every SKF timing belt kit are detailed installation instructions to<br />
help you get the job done quickly <strong>and</strong> correctly.The instructions<br />
include helpful diagrams specific to the vehicle <strong>and</strong> type of<br />
kit required.<br />
The example shown<br />
here is provided to<br />
illustrate a typical timing<br />
belt tensioner procedure,<br />
as explained in every<br />
SKF timing belt kit.<br />
Figure C<br />
Figure D<br />
Because every engine<br />
has its own unique<br />
characteristics, always<br />
refer to the car<br />
manufacturer’s specific<br />
mounting procedures<br />
in full.<br />
Figure A<br />
Figure B<br />
Typical <strong>Timing</strong> <strong>Belt</strong> Fitting<br />
• Fit new idler pulley (3), <strong>and</strong>/or new tensioning pulley (2), in disengaged position,<br />
as necessary.<br />
• Fit new timing belt (1). Make sure arrows on belt point in correct direction <strong>and</strong><br />
that any timing marks align with those on sprockets.<br />
Typical <strong>Timing</strong> <strong>Belt</strong> Removal<br />
• Disconnect battery earth lead.<br />
• Remove belts <strong>and</strong> other items as required to gain access to timing belt.<br />
• Clamp flywheel, then remove crankshaft pulley<br />
• Remove timing cover(s).<br />
• Bring engine to timing position. Check alignment of all timing marks, timing holes<br />
(fit timing pins), <strong>and</strong> the like. In particular, check alignment of following timing<br />
marks with the appropriate fixed timing markers on engine housing: crankshaft<br />
sprocket (a), or flywheel; camshaft sprocket (b), or auxiliary shaft sprocket, where<br />
fitted); injection pump sprocket (d). Note:A diesel engine is shown in this illustration.<br />
• Remove timing belt – remove tensioning pulley <strong>and</strong>/or idler pulley, as necessary –<br />
refer to Fig. B, C or D.<br />
• Tension belt by rotating tensioning pulley (2) or water pump (e). Refer to Fig. D.<br />
Tighten, temporarily, tensioning pulley (2) or water pump (e).<br />
• Turn engine clockwise through two full turns (2 x 360º), bringing it back to<br />
timing position.<br />
• Check alignment of all timing marks, timing holes (fit timing pins) <strong>and</strong> the like.<br />
• Fit belt tension tester <strong>and</strong> check that tension matches recommended value,<br />
then tighten nut of tensioning pulley (2) or bolts of water pump (e) to<br />
recommended torque.<br />
• Refit timing cover.<br />
• Clamp flywheel, then refit crankshaft pulley <strong>and</strong> tighten bolt to<br />
recommended torque.<br />
• Refit <strong>and</strong> tension all belts previously removed.<br />
• Refit battery earth cable.<br />
www.bergab.ru Берг АБ bergab@ya.ru Тел. (495)-228-06-21, факс (495) 223-3071