DIY FLASHLIGHT - Radio Shack
DIY FLASHLIGHT - Radio Shack
DIY FLASHLIGHT - Radio Shack

Create successful ePaper yourself
Turn your PDF publications into a flip-book with our unique Google optimized e-Paper software.
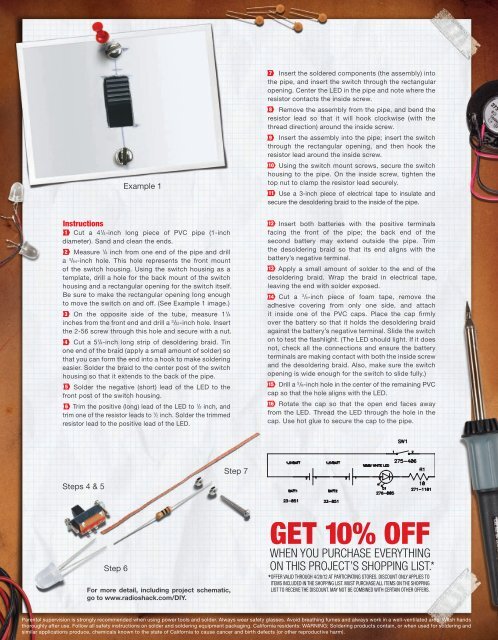
Example 1<br />
7 Insert the soldered components (the assembly) into<br />
the pipe, and insert the switch through the rectangular<br />
opening. Center the LED in the pipe and note where the<br />
resistor contacts the inside screw.<br />
8 Remove the assembly from the pipe, and bend the<br />
resistor lead so that it will hook clockwise (with the<br />
thread direction) around the inside screw.<br />
9 Insert the assembly into the pipe; insert the switch<br />
through the rectangular opening, and then hook the<br />
resistor lead around the inside screw.<br />
10 Using the switch mount screws, secure the switch<br />
housing to the pipe. On the inside screw, tighten the<br />
top nut to clamp the resistor lead securely.<br />
11 Use a 3-inch piece of electrical tape to insulate and<br />
secure the desoldering braid to the inside of the pipe.<br />
Instructions<br />
1 Cut a 4 1 /4-inch long piece of PVC pipe (1-inch<br />
diameter). Sand and clean the ends.<br />
2 Measure 1 /4 inch from one end of the pipe and drill<br />
a 5 /64-inch hole. This hole represents the front mount<br />
of the switch housing. Using the switch housing as a<br />
template, drill a hole for the back mount of the switch<br />
housing and a rectangular opening for the switch itself.<br />
Be sure to make the rectangular opening long enough<br />
to move the switch on and off. (See Example 1 image.)<br />
3 On the opposite side of the tube, measure 1 1 /4<br />
inches from the front end and drill a 3 /32-inch hole. Insert<br />
the 2-56 screw through this hole and secure with a nut.<br />
4 Cut a 5 1 /4-inch long strip of desoldering braid. Tin<br />
one end of the braid (apply a small amount of solder) so<br />
that you can form the end into a hook to make soldering<br />
easier. Solder the braid to the center post of the switch<br />
housing so that it extends to the back of the pipe.<br />
5 Solder the negative (short) lead of the LED to the<br />
front post of the switch housing.<br />
6 Trim the positive (long) lead of the LED to 1 /2 inch, and<br />
trim one of the resistor leads to 1 /2 inch. Solder the trimmed<br />
resistor lead to the positive lead of the LED.<br />
12 Insert both batteries with the positive terminals<br />
facing the front of the pipe; the back end of the<br />
second battery may extend outside the pipe. Trim<br />
the desoldering braid so that its end aligns with the<br />
battery’s negative terminal.<br />
13 Apply a small amount of solder to the end of the<br />
desoldering braid. Wrap the braid in electrical tape,<br />
leaving the end with solder exposed.<br />
14 Cut a 3 /4-inch piece of foam tape, remove the<br />
adhesive covering from only one side, and attach<br />
it inside one of the PVC caps. Place the cap firmly<br />
over the battery so that it holds the desoldering braid<br />
against the battery’s negative terminal. Slide the switch<br />
on to test the flashlight. (The LED should light. If it does<br />
not, check all the connections and ensure the battery<br />
terminals are making contact with both the inside screw<br />
and the desoldering braid. Also, make sure the switch<br />
opening is wide enough for the switch to slide fully.)<br />
15 Drill a 5 /8-inch hole in the center of the remaining PVC<br />
cap so that the hole aligns with the LED.<br />
16 Rotate the cap so that the open end faces away<br />
from the LED. Thread the LED through the hole in the<br />
cap. Use hot glue to secure the cap to the pipe.<br />
Step 7<br />
Steps 4 & 5<br />
Step 6<br />
For more detail, including project schematic,<br />
go to www.radioshack.com/<strong>DIY</strong>.<br />
get 10% off<br />
when you purchase everything<br />
on this project’s shopping list.*<br />
* Offer VAliD ThrOugh 4/28/12 AT PArTiciPATing STOreS. DiScOunT Only APPlieS TO<br />
iTemS incluDeD in The ShOPPing liST. muST PurchASe All iTemS On The ShOPPing<br />
liST TO receiVe The DiScOunT. mAy nOT Be cOmBineD wiTh cerTAin OTher OfferS.<br />
Parental supervision is strongly recommended when using power tools and solder. Always wear safety glasses. Avoid breathing fumes and always work in a well-ventilated area. Wash hands<br />
thoroughly after use. Follow all safety instructions on solder and soldering equipment packaging. California residents: WARNING: Soldering products contain, or when used for soldering and<br />
similar applications produce, chemicals known to the state of California to cause cancer and birth defects (or other reproductive harm).