9â Widescreen Portable DVD Player - Radio Shack
9â Widescreen Portable DVD Player - Radio Shack
9â Widescreen Portable DVD Player - Radio Shack

You also want an ePaper? Increase the reach of your titles
YUMPU automatically turns print PDFs into web optimized ePapers that Google loves.
16-680<br />
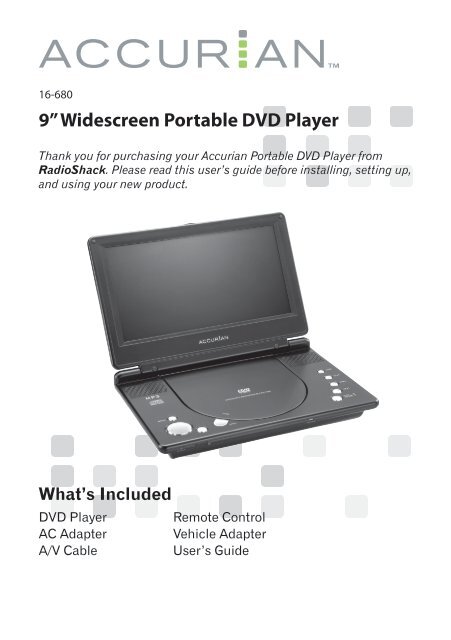
9” <strong>Widescreen</strong> <strong>Portable</strong> <strong>DVD</strong> <strong>Player</strong><br />
Thank you for purchasing your Accurian <strong>Portable</strong> <strong>DVD</strong> <strong>Player</strong> from<br />
<strong>Radio</strong><strong>Shack</strong>. Please read this user’s guide before installing, setting up,<br />
and using your new product.<br />
What’s Included<br />
<strong>DVD</strong> <strong>Player</strong><br />
Remote Control<br />
AC Adapter<br />
Vehicle Adapter<br />
A/V Cable<br />
User’s Guide
Contents<br />
Contents<br />
Quick Start.................................................................................................... 3<br />
<strong>DVD</strong> <strong>Player</strong> Features.................................................................................. 5<br />
Remote Control Features........................................................................... 7<br />
Replacing the Battery in Your Remote Control................................ 8<br />
Display Feature............................................................................................ 9<br />
<strong>DVD</strong> <strong>Player</strong> System Setup...................................................................... 10<br />
Access and Change System Settings.............................................. 10<br />
General Setup Page............................................................................ 10<br />
Video Quality Setup............................................................................ 11<br />
Password Setup Page........................................................................ 11<br />
Preference Page.................................................................................. 11<br />
Frequently Asked Questions (FAQ)...................................................... 12<br />
Why won’t my disc play?................................................................... 12<br />
What is region encoding?.................................................................. 12<br />
Can I play MP3 or picture discs?...................................................... 13<br />
What if Ÿ appears?............................................................................. 13<br />
Why won’t the player turn on? ......................................................... 13<br />
Why does the picture jump?.............................................................. 13<br />
Why is there no sound?...................................................................... 14<br />
How do I connect to additional hardware?..................................... 14<br />
Specifications............................................................................................ 14<br />
Lithium Battery Safety Instructions..................................................... 15<br />
Handling and Disposal...................................................................... 15<br />
Charging............................................................................................... 15<br />
RF Emissions Information....................................................................... 15<br />
Limited Warranty....................................................................................... 16<br />
Quick Start<br />
Follow these steps to quickly and easily set up your player. For a<br />
complete description of your player’s features, see Pages 5-11.<br />
Position the player for viewing, then open the display.<br />
Plug in the supplied AC adapter or vehicle adapter. If you<br />
plan to use the A/V function, connect the A/V cable.<br />
A/V Cable<br />
Vehicle Adapter<br />
AC Adapter<br />
Quick Start<br />
Note: You can use the player’s built-in Lithium polymer battery for<br />
power. To use battery power, charge the battery for about 5 hours<br />
or until the CHARGE indicator turns off. You must switch off the<br />
player to charge it. Charging the battery is only possible when<br />
you use the AC adapter and AC power supply.<br />
Push the OPEN button to access the <strong>DVD</strong> compartment.<br />
This product is a Class 1 Laser Product and complies<br />
with DHHS Rules 21 CFR Chapter 1, Subchapter J.<br />
OPEN Button
Quick Start<br />
Place a disc in the <strong>DVD</strong> compartment, graphic side facing<br />
up, and close the lid.<br />
<strong>DVD</strong> <strong>Player</strong> Features<br />
<strong>DVD</strong> <strong>Player</strong> Features<br />
CHARGE Indicator<br />
Lights when the<br />
battery is charging,<br />
and turns off when<br />
the battery is fully<br />
charged.<br />
Note: You can use MS, SD, and MMC cards on your <strong>DVD</strong> player. To use<br />
a card, insert it into the SD Slot on the side of the player, then<br />
press SD/<strong>DVD</strong> on the remote. To remove the card, just pull it<br />
out.<br />
Turn the power switch to ON (on the side of the player). The<br />
disc plays automatically.<br />
Your remote control comes with a battery installed. Pull the<br />
plastic tab out of the battery compartment before using the<br />
remote.<br />
POWER Indicator<br />
Lights when you turn<br />
on the <strong>DVD</strong> player.<br />
DC 9V<br />
Insert the AC adapter<br />
or the vehicle adapter.<br />
IR<br />
Infrared sensor to<br />
communicate with the remote.<br />
Volume<br />
Adjusts the<br />
volume.<br />
ON/OFF Switch<br />
A/V Jack<br />
Insert the A/V<br />
cable to play on an<br />
external screen.<br />
Headphone Jack<br />
Insert headphones (not<br />
supplied) for private listening.<br />
The speaker mutes.<br />
SD Slot<br />
To use an SD, MS, or MMC card<br />
(not supplied), insert the card into<br />
the SD Slot, then press SD/<strong>DVD</strong><br />
on the remote.<br />
To remove the card, pull it out.
<strong>DVD</strong> <strong>Player</strong> Features<br />
Remote Control Features<br />
Remote Control Features<br />
MENU<br />
Display menus.<br />
STOP<br />
Press to stop playback;<br />
press twice to clear the<br />
current stopping point.<br />
WIDE<br />
Switch between<br />
16:9 and 4:3 display<br />
ratio.<br />
DISPLAY<br />
Press to display disc<br />
information including time,<br />
chapter, and title information.<br />
SETUP<br />
Access the<br />
Setup Menu screen.<br />
ZOOM<br />
Enlarge an image to 2, 3, or<br />
4 times the original size.<br />
REPEAT (A-B and 1/All)<br />
Use A-B to repeat a specific portion<br />
from point A to point B.<br />
Press 1/All to repeat chapter, title,<br />
or all.<br />
OK<br />
Confirms<br />
a menu<br />
selection.<br />
Compass button<br />
Highlight selections<br />
on a menu screen.<br />
OPEN<br />
Push to open<br />
the <strong>DVD</strong><br />
compartment.<br />
PLAY/PAUSE<br />
Press to pause<br />
or resume during<br />
playback.<br />
PREV./NEXT<br />
Skip to the<br />
previous/next title,<br />
chapter, or track.<br />
PREV and<br />
NEXT <br />
Skip titles,<br />
chapters, or<br />
tracks.<br />
and<br />
ENTER<br />
Highlight<br />
and confirm<br />
selections on a<br />
menu screen.<br />
and <br />
are also fast<br />
backward and<br />
forward at 2X,<br />
4X, 8X, 16X,<br />
32X.<br />
SD/<strong>DVD</strong><br />
Switch between <strong>DVD</strong><br />
mode and SD mode.<br />
MENU<br />
<strong>DVD</strong> menus vary<br />
according to how each<br />
<strong>DVD</strong> disc is formatted<br />
and is separate from<br />
the player’s features.<br />
SUB<br />
Press repeatedly to<br />
select the desired<br />
subtitle language.<br />
AUDIO<br />
Select one of the<br />
language audio<br />
soundtracks<br />
programmed on a<br />
<strong>DVD</strong> or audio output<br />
mode on an audio CD.<br />
Note: The lamp in this product contains mercury. Dispose of properly.<br />
Do not put in trash.<br />
Number Keys (0–9)<br />
Use to enter<br />
levels, chapters,<br />
or passwords.<br />
Stop •<br />
Press to stop playback;<br />
press twice to clear the<br />
current stopping point.<br />
Play/Pause §<br />
Start or pause playing a disc.
Remote Control Features<br />
Replacing the Battery in Your Remote Control<br />
While pressing the tab on the battery compartment tray, pull to slide<br />
the tray out. Insert a new battery of the same type, positive (+) side<br />
facing the remote’s back. Then slide the tray back into the battery<br />
compartment until it clicks.<br />
Display Feature<br />
Display Feature<br />
The Display feature shows title, chapter, and time information when<br />
playing a disc.<br />
1. To display disc playback information during playback, press<br />
DISPLAY on the remote once to view the following.<br />
Title Elapsed<br />
Current title<br />
number<br />
Current chapter<br />
number<br />
Tab<br />
TT 01/12 CH 14/28 00:02:04<br />
Pull here while pressing the<br />
Tab to slide out the tray<br />
Total number<br />
of titles<br />
Total number<br />
of chapters<br />
Elapsed play<br />
time for the title<br />
Battery Notes:<br />
• Keep button-cell batteries away from children. Swallowing a buttoncell<br />
battery can be fatal.<br />
• Dispose of the old battery promptly and properly. Do not burn or<br />
bury it.<br />
• Use only a fresh battery of the required size and recommended type.<br />
2. Press DISPLAY repeatedly to cycle through and view the following<br />
disc time related information in sequence in the last column.<br />
Title Remaining<br />
TT 01/12 CH 14/28 02:01:59<br />
Chapter Elapsed<br />
TT 01/12 CH 14/28 00:01:34<br />
Chapter Remaining<br />
TT 01/12 CH 14/28 00:05:04
<strong>DVD</strong> <strong>Player</strong> System Setup<br />
<strong>DVD</strong> <strong>Player</strong> System Setup<br />
Complete the following steps to change your <strong>DVD</strong> player’s system<br />
settings, including default language, video, and password settings.<br />
Notes:<br />
• The following <strong>DVD</strong> player settings apply to <strong>DVD</strong> playback only and<br />
not all <strong>DVD</strong>s can use these features.<br />
• You must make system changes before loading the <strong>DVD</strong> in order for<br />
the changes to take effect.<br />
Accessing and Changing System Settings<br />
1. To access the <strong>DVD</strong> <strong>Player</strong> Setup menu, press the SETUP button<br />
on the remote.<br />
2. Use the arrow keys on the remote or the <strong>DVD</strong> player to select a<br />
system setting (see the following tables for descriptions) and press<br />
ENTER to confirm the selection.<br />
General Setup Page<br />
TV Display<br />
Angle Mark<br />
OSD Lang<br />
Screen Saver<br />
Last Memory<br />
• Normal/PS (Pan and scan) - When widescreen<br />
video material is played in this<br />
mode, the right and left side of the image<br />
is clipped. Few discs support PS mode.<br />
• Normal/LB (letter box) - When widescreen<br />
video material is played in this<br />
mode, black bands appear at the top and<br />
bottom of the screen.<br />
• Wide - (Default) Standard mode for<br />
playing wide-screen discs.<br />
On/Off: If enabled, the angle mark icon will<br />
display if different angles are available on a<br />
<strong>DVD</strong>. Select different angles by pressing the<br />
number keys on the remote.<br />
You can change the player’s menu language<br />
to English (player default), French, or<br />
Spanish.<br />
On/Off: When enabled, the player will go<br />
into Screen Saver mode three to five minutes<br />
after starting playback.<br />
On/Off: When enabled, the player will return<br />
to the last position of a disc when restarted.<br />
Video Quality Setup<br />
Brightness<br />
Contrast<br />
Hue<br />
Saturation<br />
Password Setup Page<br />
Password<br />
Select a setting using the right and left arrows.<br />
Default is 00.<br />
Select a setting using the right and left arrows.<br />
Default is 00.<br />
Select a setting using the right and left arrows.<br />
Default is 00.<br />
Select a setting using the right and left arrows.<br />
Default is 00.<br />
To change the password or rating, enter the<br />
default password: 3308. Enter a new password,<br />
then press ENTER. If you forget your password,<br />
use 3308.<br />
Preference Page (to access this feature , remove <strong>DVD</strong> or<br />
leave <strong>DVD</strong> compartment open)<br />
Audio<br />
Disc Menu<br />
Parental<br />
Default<br />
<strong>DVD</strong> <strong>Player</strong> System Setup<br />
Select a default audio playback language:<br />
English (default) French, Spanish, Chinese, or<br />
Japanese.<br />
Select a default playback disc menu language:<br />
English (default) French, Spanish, Chinese, or<br />
Japanese.<br />
Select a parental control setting: G, PG, PG-13,<br />
R, NC-17, or Disable (default).<br />
Select to Reset the <strong>DVD</strong> player to the factory<br />
default settings.<br />
3. When finished changing system settings, press Setup to exit the<br />
Setup menu.<br />
10 11
Frequently Asked Questions (FAQ)<br />
Frequently Asked Questions (FAQ)<br />
Why won’t my disc play?<br />
There are several possible causes:<br />
• Make sure there is a disc in the disc tray and it is inserted with the<br />
artwork facing up.<br />
• Clean the disc.<br />
• Makes sure the disc has the correct region encoding. See “What is<br />
region encoding?” below.<br />
• Condensation may have formed inside the unit due to a sudden<br />
change in temperature. Wait about an hour for it to clear and try<br />
again.<br />
• <strong>DVD</strong> players may not play all CD/<strong>DVD</strong>, CD/<strong>DVD</strong>+/-R, or<br />
CD/<strong>DVD</strong>+/-RW discs.<br />
Notes:<br />
• Do not use irregularly shaped discs such as heart or star-shaped<br />
discs, as they may cause the <strong>DVD</strong> player to malfunction.<br />
• Do not stick paper, tape or glue on the disc.<br />
• Do not expose the disc to direct sunlight or heat sources.<br />
• Do not touch the surface of a disc. Handle the disc by its edge.<br />
• Clean the disc by wiping out from the center out with a clean cloth.<br />
• Refer to any instructions supplied with the discs for additional<br />
features.<br />
• The subtitle function can only be used for discs on which subtitles<br />
have been recorded in multiple languages. The number of languages<br />
available also depends upon the disc, not the <strong>DVD</strong> player.<br />
• On some <strong>DVD</strong>s, subtitles are activated from the main menu of the<br />
<strong>DVD</strong>. Press MENU on the remote to activate the menu while a <strong>DVD</strong><br />
is in the player.<br />
What is region encoding?<br />
<strong>DVD</strong> players are designed to play movies coded by regions and will<br />
only play movies coded to their particular region. The list below shows<br />
the movie regions by number. This coding is used because a movie<br />
may be released on <strong>DVD</strong> before it is available in theaters in some<br />
countries.<br />
Region 1: Canada, United States, and Territories<br />
Region 2: Europe, Middle East, South Africa, Japan<br />
Region 3: Southeast Asia<br />
Region 4: Australia, New Zealand, Mexico, and Central and<br />
South America<br />
Region 5: Africa, Russia and rest of Asia<br />
Region 6: China<br />
Region Management Information: This <strong>DVD</strong> player is designed and<br />
manufactured to respond to the region management information that<br />
is recorded on a <strong>DVD</strong>. The region number of this <strong>DVD</strong> player is 1 (USA/<br />
CANADA). If the region (local) number of the disc that you attempt<br />
to play differs from the region number of the unit, “Wrong Region”<br />
appears on the screen, and the <strong>DVD</strong> player cannot play that disc.<br />
Can I play MP3 or picture discs?<br />
Yes, you can play <strong>DVD</strong>s, MP3 discs, and many picture discs.<br />
What if Ÿ Appears?<br />
The feature or action cannot be completed because:<br />
• The disc’s software restricts it.<br />
• The disc’s software does not support that feature (for example:<br />
angles or subtitles).<br />
• The feature is not available at the moment.<br />
• You have requested a title or chapter that is out of range.<br />
Why won’t the player turn on?<br />
• Check that the AC adapter or vehicle adapter is connected.<br />
• Make sure the built-in battery is fully charged before you use<br />
battery power.<br />
Notes:<br />
• You must use a Class 2 power adapter that provides 9V DC. Its center<br />
tip must be positive and its barrel plug must fit the <strong>DVD</strong> player’s DC<br />
9V jack. An adapter other than the one included may not meet this<br />
player’s specifications and could damage the player or adapter.<br />
• Do not leave the adapter plugged into the AC outlet or connected to<br />
the <strong>DVD</strong> player when you are not using the player.<br />
• To avoid injury, do not connect the AC adapter to a ceiling outlet.<br />
• The AC adapter might become warm after extended periods of use.<br />
Why does the picture jump?<br />
• Stop the <strong>DVD</strong> player and clean the disc.<br />
• Check the disc for scratches.<br />
Frequently Asked Questions (FAQ)<br />
12 13
Specifications<br />
Why is there no sound?<br />
There are several possible causes:<br />
• Make sure the player is not in pause mode. Press the PLAY/PAUSE<br />
button to return to normal play mode.<br />
• Make sure the volume is not low or off.<br />
• If you have headphones plugged into the headphone jack, the<br />
sound mutes. Unplug the headphones.<br />
How do I connect to additional hardware?<br />
To connect the <strong>DVD</strong> player to a TV (not included):<br />
1. Connect one end of the supplied A/V cable’s stereo plug into the<br />
<strong>DVD</strong> player’s A/V jack.<br />
2. Connect the other end to the AUDIO INPUT and VIDEO INPUT<br />
jacks on your TV (white = left channel, red = right channel,<br />
yellow = video) through an A/V cable with stereo phono plugs (not<br />
supplied).<br />
Specifications<br />
Compatible discs......................................................................<strong>DVD</strong>/CD/JPEG/MP3<br />
Compatible cards..................................................................................MS/SD/MMC<br />
Laser type..................................................................................Semiconductor laser<br />
Laser wavelength.............................................................................650 nm / 795 nm<br />
Signal system.....................................................................................................NTSC<br />
Video output level.............................................................................1 Vp-p (75 ohm)<br />
Audio output level...................................................................... 1.4 Vrms (10 kohm)<br />
S/N ratio.............................................................................................................. 60 dB<br />
Dynamic range................................................................................................... 85 dB<br />
Power supply.............................................................................. DC 9V (tip positive)<br />
Power consumption................................................................................................9W<br />
<strong>DVD</strong> <strong>Player</strong> Dimensions (W D H)........................................9.4 6.3 1.5 in<br />
(238 160 39 mm)<br />
Specifications are subject to change and improvement without notice. Actual<br />
product may vary from the images found in this document.<br />
Protect the environment by recycling used electronics. Go to<br />
www.ecyclingcentral.com to find a recycle location near you.<br />
Lithium Battery Safety Instructions<br />
Handling and Disposal<br />
• Do not burn or bury batteries. Do not puncture or crush. Do not disassemble.<br />
• Do not dispose of lithium batteries in the trash. Recycle at your local <strong>Radio</strong><strong>Shack</strong><br />
store.<br />
• Never allow loose cells to short circuit against battery tabs or other conductive<br />
items. Keep loose cells and battery packs out of reach of children.<br />
• If the electrolyte in the cells should get on your skin, thoroughly wash with soap<br />
and water. If in the eyes, rinse thoroughly with cool water. Immediately seek<br />
medical attention.<br />
Charging<br />
• Use only chargers rated for lithium cells. Be sure the charger’s voltage and<br />
current settings are correct for the battery pack being charged.<br />
• Charge batteries on a fireproof surface away from flammable items or liquids.<br />
• Do not charge inside an automobile, especially while driving.<br />
• Batteries should NEVER be left unattended while charging. Only adults should<br />
charge the batteries.<br />
• Follow the manufacturer’s instructions for charging the product and do not charge<br />
longer than recommended. Unplug the charger when the battery is charged.<br />
RF Emissions Information<br />
Lithium Battery Safety Instructions<br />
This equipment has been tested and found to comply with the limits for a Class B digital<br />
device, pursuant to Part 15 of the FCC Rules. These limits are designed to provide reasonable<br />
protection against harmful interference in a residential installation. This equipment generates,<br />
uses, and can radiate radio frequency energy and, if not installed and used in accordance with<br />
the instructions, may cause harmful interference to radio communications. However, there<br />
is no guarantee that interference will not occur in a particular installation. If this equipment<br />
does cause harmful interference to radio or television reception, which can be determined by<br />
turning the equipment off and on, the user is encouraged to try to correct the interference by<br />
one or more of the following measures:<br />
• Reorient or relocate the receiving antenna.<br />
• Increase the separation between the equipment.<br />
• Connect the equipment to an outlet on a circuit different from the device.<br />
• Consult your local <strong>Radio</strong><strong>Shack</strong> or an experienced radio/TV technician for help.<br />
If you cannot eliminate the interference, the FCC requires that you stop using your device.<br />
Changes or modifications not expressly approved by <strong>Radio</strong><strong>Shack</strong> may cause interference and<br />
void the user’s authority to operate the equipment.<br />
This device complies with Part 15 of the FCC Rules. Operation is subject to the following two<br />
conditions: (1) This device may not cause harmful interference, and (2) This device must accept<br />
any interference received, including interference that may cause undesired operation.<br />
14 15
Limited Warranty<br />
America Action Inc. warrants this <strong>DVD</strong> <strong>Player</strong> and accessories against defects in<br />
material or workmanship as follows:<br />
LABOR: If this product is determined to be defective within Three (3) Months from<br />
the date of purchase, Action will repair or replace it at no charge. Action reserves the<br />
option to repair or replace the product. After the warranty period expires, customer will<br />
be responsible for all labor charges.<br />
PARTS: Action will supply new or rebuilt replacement parts in exchange for defective<br />
parts for a period of One (1) Year from the date of purchase. Customer will be<br />
responsible for the cost of parts after the warranty period expires.<br />
This warranty does not cover customer’s instruction, installation or setup adjustments.<br />
This warranty does not cover cosmetic damage due to acts of God, accident, misuse,<br />
abuse, negligence, commercial use or modification of any part of the product.<br />
This warranty does not cover damage due to improper operation or maintenance,<br />
connection to improper voltage supply or attempted repair by anyone other than<br />
facilities authorized by Action. This warranty does not cover products sold AS IS or<br />
WITH ALL FAULTS. This warranty is valid only in the United States.<br />
Proof of purchase in forms of a bill of sale, sales receipt, or dated invoice that proves<br />
the product is within the warranty period must be presented to obtain warranty service.<br />
This warranty is invalid in the event that the factory-applied serial number has been<br />
altered or removed from the product.<br />
Repair or replacement as provided under this warranty is the exclusive remedy of<br />
the consumer. Action shall not be liable for any incidental or consequential damages<br />
for breach of any expressed or implied warranty of merchantability or fitness for a<br />
particular purpose on this product is limited in duration to the extent of this warranty.<br />
Some states do not allow the exclusion or limitation of incidental or consequential<br />
damages, or allow limitations on how long an implied warranty lasts, so the above<br />
limitations or exclusions may not apply to you. This warranty gives you specific legal<br />
rights, and you may have other rights that vary from state to state.<br />
Warranties and specifications are subject to change without prior notice. For the latest<br />
information regarding your product warranty issues, please contact the service center<br />
at the toll free number provided below, go to our website at www.axiontv.com, or write<br />
to us at:<br />
Service Center<br />
America Action, Inc.<br />
100 Exchange Place<br />
Pomona, CA 91768<br />
USA<br />
1-866-571-9143<br />
©2008. <strong>Radio</strong><strong>Shack</strong>, Corporation. All rights reserved.<br />
Accurian is a trademark used by <strong>Radio</strong><strong>Shack</strong> Corporation.<br />
16-680<br />
07A08<br />
Printed in China