RY23040-N - RIVA Racing
RY23040-N - RIVA Racing
RY23040-N - RIVA Racing

Create successful ePaper yourself
Turn your PDF publications into a flip-book with our unique Google optimized e-Paper software.
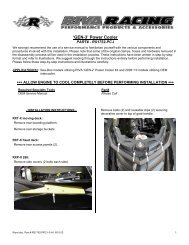
Pro-Series Reduction Nozzle<br />
PART# - <strong>RY23040</strong>-N<br />
APPLICATION(S): All Yamaha FZR, FZS, FX, GPR & XLT models<br />
- INSTALLATION INSTRUCTIONS -<br />
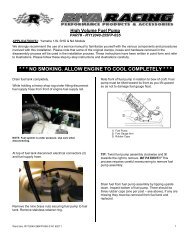
1. Disconnect battery cables. NOTE: Negative (black) first. Positive (red) second.<br />
2. Disconnect steering, reverse and Q.S.T.S. cables from steering nozzle. (see illustration #1)<br />
3. Remove visibility spout hose from top of stock reduction nozzle. NOTE: Visibility spout is disabled on <strong>RIVA</strong> Pro-<br />
Series Reduction Nozzle to comply with competition safety rules. To retain use of visibility spout the socket<br />
head cap screw must be removed from fitting on <strong>RIVA</strong> Pro-Series Reduction Nozzle.<br />
4. Disconnect the stock siphon hose from left side of stock reduction nozzle. (see illustration #1)<br />
5. Remove the four M10 bolts securing stock reduction nozzle to pump. (see illustration #1)<br />
6. Remove stock reduction nozzle assembly.<br />
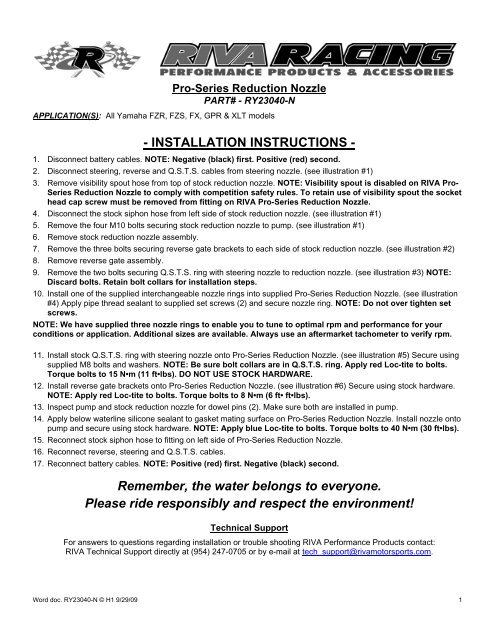
7. Remove the three bolts securing reverse gate brackets to each side of stock reduction nozzle. (see illustration #2)<br />
8. Remove reverse gate assembly.<br />
9. Remove the two bolts securing Q.S.T.S. ring with steering nozzle to reduction nozzle. (see illustration #3) NOTE:<br />
Discard bolts. Retain bolt collars for installation steps.<br />
10. Install one of the supplied interchangeable nozzle rings into supplied Pro-Series Reduction Nozzle. (see illustration<br />
#4) Apply pipe thread sealant to supplied set screws (2) and secure nozzle ring. NOTE: Do not over tighten set<br />
screws.<br />
NOTE: We have supplied three nozzle rings to enable you to tune to optimal rpm and performance for your<br />
conditions or application. Additional sizes are available. Always use an aftermarket tachometer to verify rpm.<br />
11. Install stock Q.S.T.S. ring with steering nozzle onto Pro-Series Reduction Nozzle. (see illustration #5) Secure using<br />
supplied M8 bolts and washers. NOTE: Be sure bolt collars are in Q.S.T.S. ring. Apply red Loc-tite to bolts.<br />
Torque bolts to 15 N•m (11 ft•lbs). DO NOT USE STOCK HARDWARE.<br />
12. Install reverse gate brackets onto Pro-Series Reduction Nozzle. (see illustration #6) Secure using stock hardware.<br />
NOTE: Apply red Loc-tite to bolts. Torque bolts to 8 N•m (6 ft• ft•lbs).<br />
13. Inspect pump and stock reduction nozzle for dowel pins (2). Make sure both are installed in pump.<br />
14. Apply below waterline silicone sealant to gasket mating surface on Pro-Series Reduction Nozzle. Install nozzle onto<br />
pump and secure using stock hardware. NOTE: Apply blue Loc-tite to bolts. Torque bolts to 40 N•m (30 ft•lbs).<br />
15. Reconnect stock siphon hose to fitting on left side of Pro-Series Reduction Nozzle.<br />
16. Reconnect reverse, steering and Q.S.T.S. cables.<br />
17. Reconnect battery cables. NOTE: Positive (red) first. Negative (black) second.<br />
Remember, the water belongs to everyone.<br />
Please ride responsibly and respect the environment!<br />
Technical Support<br />
For answers to questions regarding installation or trouble shooting <strong>RIVA</strong> Performance Products contact:<br />
<strong>RIVA</strong> Technical Support directly at (954) 247-0705 or by e-mail at tech_support@rivamotorsports.com.<br />
Word doc. <strong>RY23040</strong>-N © H1 9/29/09 1
Limited Warranty<br />
<strong>RIVA</strong> Pro-Series Reduction Nozzles carry a 90-day limited warranty to the original purchaser. They are warranted to be free of defects in materials and workmanship under<br />
normal use and service. Customer modified components will be void of warranty. This warranty is limited to defects in the primary components only. Finish and/or wear<br />
marks in or on primary components are not covered under this warranty.<br />
<strong>RIVA</strong> <strong>Racing</strong>’s liability is expressly limited to the repair or replacement of the components contained within or associated with this kit. <strong>RIVA</strong> <strong>Racing</strong> agrees to repair or at<br />
<strong>RIVA</strong>’s option, replace any defective unit without charge, if product is returned to <strong>RIVA</strong> <strong>Racing</strong> freight prepaid within the warranty period. Any equipment returned which, in<br />
<strong>RIVA</strong>’s opinion, has been subjected to misuse, abuse, overheating or accident shall not be covered by this warranty.<br />
<strong>RIVA</strong> <strong>Racing</strong> shall have no liability for special, incidental or consequential damages or injury to persons or property from any cause arising from the sale, installation or use<br />
of this product.<br />
No other warranty, express or implied, including, but not limited to the implied warranties of merchantability and fitness for a particular purpose, applies. Various states do<br />
not allow for the limitation of incidental or consequential damages and therefore the above exclusion or limitation may not apply to you.<br />
Warranty does not include the expenses related to freight or transportation of parts or compensation for any inconvenience or loss of use while being repaired. A copy of<br />
the original invoice and a Return Authorization Number (RA#) must accompany all warranty claims.<br />
Warranted replacement parts will be returned freight collect.<br />
- INSTALLATION IMAGES -<br />
M10 Bolts<br />
(4)<br />
Q.S.T.S.<br />
Cable<br />
Reverse gate<br />
bracket bolts.<br />
(3 per side)<br />
Steering<br />
Cable<br />
Siphon<br />
Tube<br />
Reverse<br />
Cable<br />
Illustration #1 Illustration #2<br />
Word doc. <strong>RY23040</strong>-N © H1 9/29/09 2
Q.S.T.S. ring<br />
bolts. Be sure to<br />
retain bolt collars!<br />
Nozzle ring set screws.<br />
(1 top/1 bottom)<br />
Illustration #3 Illustration #4<br />
Use supplied hardware<br />
only. Make sure bolt<br />
collars are in place.<br />
Illustration #5 Illustration #6<br />
Word doc. <strong>RY23040</strong>-N © H1 9/29/09 3