'GEN-3' Power Cooler - RIVA Racing
'GEN-3' Power Cooler - RIVA Racing
'GEN-3' Power Cooler - RIVA Racing

You also want an ePaper? Increase the reach of your titles
YUMPU automatically turns print PDFs into web optimized ePapers that Google loves.
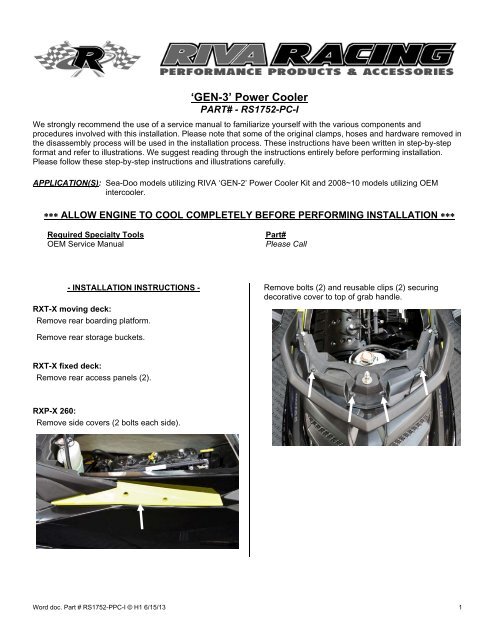
‘GEN-3’ <strong>Power</strong> <strong>Cooler</strong><br />
PART# - RS1752-PC-I<br />
We strongly recommend the use of a service manual to familiarize yourself with the various components and<br />
procedures involved with this installation. Please note that some of the original clamps, hoses and hardware removed in<br />
the disassembly process will be used in the installation process. These instructions have been written in step-by-step<br />
format and refer to illustrations. We suggest reading through the instructions entirely before performing installation.<br />
Please follow these step-by-step instructions and illustrations carefully.<br />
APPLICATION(S): Sea-Doo models utilizing <strong>RIVA</strong> ‘GEN-2’ <strong>Power</strong> <strong>Cooler</strong> Kit and 2008~10 models utilizing OEM<br />
intercooler.<br />
ALLOW ENGINE TO COOL COMPLETELY BEFORE PERFORMING INSTALLATION <br />
Required Specialty Tools<br />
OEM Service Manual<br />
Part#<br />
Please Call<br />
- INSTALLATION INSTRUCTIONS -<br />
RXT-X moving deck:<br />
Remove rear boarding platform.<br />
Remove bolts (2) and reusable clips (2) securing<br />
decorative cover to top of grab handle.<br />
Remove rear storage buckets.<br />
RXT-X fixed deck:<br />
Remove rear access panels (2).<br />
RXP-X 260:<br />
Remove side covers (2 bolts each side).<br />
Word doc. Part # RS1752-PPC-I © H1 6/15/13 1
RXP-X 260 (continued):<br />
Remove bolts (1 at rear) and reusable clips (4 at front)<br />
securing decorative cover to outside of grab handle.<br />
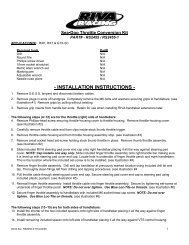
Remove and save clamps:<br />
1- Exhaust connection between water box (muffler)<br />
and exhaust outlet.<br />
2- Supercharger to intercooler hose (discard).<br />
3- Intercooler to throttle body hose (discard).<br />
1<br />
2<br />
3<br />
All models:<br />
Disconnect intercooler air inlet and outlet hoses from<br />
intercooler.<br />
Remove coolant overflow reservoir. Remove grab<br />
handle (6 bolts).<br />
Disconnect straps (2) securing intercooler to hull.<br />
2013 & Newer Models: Disconnect Intercooler Vent<br />
Hose.<br />
Word doc. Part # RS1752-PPC-I © H1 6/15/13 2
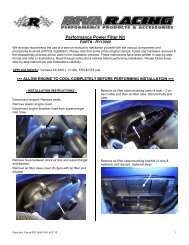
Disconnect water inlet and outlet hoses from intercooler.<br />
NOTE: Mark each hose before disconnecting.<br />
WATER OUT<br />
WATER IN<br />
Secure bilge siphon hoses (2) to <strong>Power</strong> <strong>Cooler</strong> using<br />
supplied zip tie.<br />
Connect intercooler air inlet and outlet hoses to <strong>Power</strong><br />
<strong>Cooler</strong>. NOTE: Do not over tighten clamps.<br />
2013 & Newer Craft:<br />
Install supplied ‘T’ fitting into <strong>Power</strong> <strong>Cooler</strong> flush hose<br />
and secure with supplied 17.0 Oetikers. Connect stock<br />
1/4” vent hose and secure with stock clamp. NOTE: Do<br />
not over tighten clamp.<br />
Remove intercooler. For RXT-X S3 hull models<br />
intercooler can be removed through openings at rear of<br />
craft by carefully rotating as you guide it out either side.<br />
Place supplied ‘GEN-3’ <strong>Power</strong> <strong>Cooler</strong> in hull. For RXT-X<br />
S3 hull models intercooler can be installed through<br />
openings at rear of craft by carefully rotating as you<br />
guide it in either side.<br />
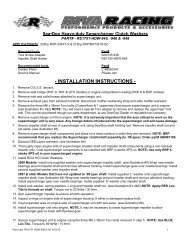
Secure water inlet and outlet hoses to ‘GEN-3’ <strong>Power</strong><br />
<strong>Cooler</strong>.<br />
WATER OUT<br />
2008~2010 craft equipped with OEM intercooler:<br />
Follow intercooler ‘vent hose’ down to thru-hull fitting.<br />
Remove and install supplied block-off onto thru-hull<br />
fitting. Secure with stock clamp. NOTE: Do not over<br />
tighten clamp.<br />
Craft equipped with <strong>RIVA</strong> ‘GEN-2’ <strong>Power</strong> <strong>Cooler</strong>:<br />
Follow intercooler ‘vent hose’ down to ‘T’ fitting in<br />
exhaust cooling line. Replace ‘T’ fitting with supplied<br />
brass 3/8” barbed hose splicer. NOTE: Do not over<br />
tighten clamps.<br />
WATER IN<br />
Vent Hose<br />
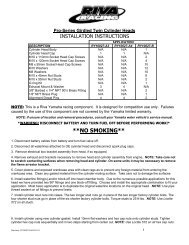
Ensure stock rubber pad is in place under <strong>Power</strong><br />
<strong>Cooler</strong>. Secure <strong>Power</strong> <strong>Cooler</strong> in place using stock<br />
straps (2).<br />
RXT-X moving deck:<br />
Replace rear storage buckets and rear boarding<br />
platform.<br />
RXT-X fixed deck:<br />
Replace rear access panels (2).<br />
RXP-X 260:<br />
Replace rear grab handle.<br />
Check bilge for tools, rags, etc. Run craft on a flush kit<br />
to check for proper operation.<br />
Word doc. Part # RS1752-PPC-I © H1 6/15/13 3
FLUSHING INSTRUCTIONS:<br />
<strong>RIVA</strong> <strong>Power</strong> <strong>Cooler</strong> must be flushed independently of motor using supplied flush kit fitting.<br />
This can be done before or after flushing motor using stock Sea•Doo flush point.<br />
Engine must be running when flushing <strong>RIVA</strong> <strong>Power</strong> <strong>Cooler</strong>.<br />
Do not over-rev engine when flushing or blowing out motor afterwards.<br />
IMPORTANT MAINTENANCE TIP: To assure optimal performance extra care must be used with<br />
flushing the cooling system after riding. After flushing craft using stock Sea-Doo flush kit you must<br />
flush the <strong>RIVA</strong> <strong>Power</strong> <strong>Cooler</strong> using the supplied flush kit. When doing so we strongly recommend the<br />
use of a salt /deposit remover such as Salt-Away® which can be purchased through <strong>RIVA</strong> <strong>Racing</strong>’s<br />
parts department. When flushing with a salt/deposit remover do not flush with fresh water afterwards.<br />
Allow salt/deposit remover to remain in cooling system. This will prevent build up of salt and/or<br />
mineral deposits from water left in cooling system that could clog intercooler core.<br />
Your <strong>Power</strong> <strong>Cooler</strong> is equipped with a sacrificial anode. This should be inspected at the beginning<br />
and end of each riding season. Replace as needed by contacting <strong>RIVA</strong> <strong>Racing</strong>’s parts department.<br />
NOTE: Apply pipe thread sealant when replacing. Do not over tighten.<br />
Remember, the water belongs to everyone.<br />
Please ride responsibly and respect the environment!<br />
Technical Support<br />
For answers to questions regarding installation or trouble shooting <strong>RIVA</strong> Performance Products contact:<br />
<strong>RIVA</strong> Technical Support directly at (954) 247-0705 or by e-mail at tech_support@rivamotorsports.com.<br />
Limited Warranty<br />
<strong>RIVA</strong> ‘GEN-3’ <strong>Power</strong> <strong>Cooler</strong>s carry a 90-day limited warranty to the original purchaser. They are warranted to be free of defects in materials and workmanship under normal<br />
use and service. Customer modified components will be void of warranty. This warranty is limited to defects in the primary components only. Finish and/or wear marks in or<br />
on primary components are not covered under this warranty.<br />
<strong>RIVA</strong> <strong>Racing</strong>’s liability is expressly limited to the repair or replacement of the components contained within or associated with this kit. <strong>RIVA</strong> <strong>Racing</strong> agrees to repair or at<br />
<strong>RIVA</strong>’s option, replace any defective unit without charge, if product is returned to <strong>RIVA</strong> <strong>Racing</strong> freight prepaid within the warranty period. Any equipment returned which, in<br />
<strong>RIVA</strong>’s opinion, has been subjected to misuse, abuse, overheating or accident shall not be covered by this warranty.<br />
<strong>RIVA</strong> <strong>Racing</strong> shall have no liability for special, incidental or consequential damages or injury to persons or property from any cause arising from the sale, installation or use<br />
of this product.<br />
No other warranty, express or implied, including, but not limited to the implied warranties of merchantability and fitness for a particular purpose, applies. Various states do<br />
not allow for the limitation of incidental or consequential damages and therefore the above exclusion or limitation may not apply to you.<br />
Warranty does not include the expenses related to freight or transportation of parts or compensation for any inconvenience or loss of use while being repaired. A copy of<br />
the original invoice and a Return Authorization Number (RA#) must accompany all warranty claims.<br />
Warranted replacement parts will be returned freight collect.<br />
Word doc. Part # RS1752-PPC-I © H1 6/15/13 4