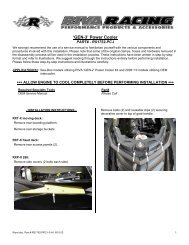
Performance Power Filter Kit - RIVA Racing
Performance Power Filter Kit - RIVA Racing
Performance Power Filter Kit - RIVA Racing

Create successful ePaper yourself
Turn your PDF publications into a flip-book with our unique Google optimized e-Paper software.
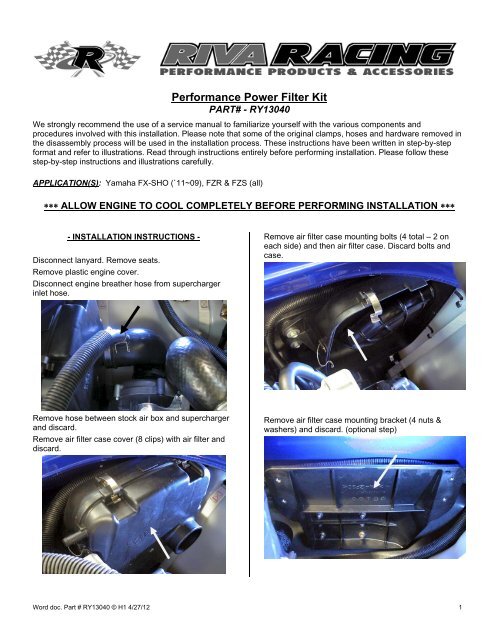
<strong>Performance</strong> <strong>Power</strong> <strong>Filter</strong> <strong>Kit</strong><br />
PART# - RY13040<br />
We strongly recommend the use of a service manual to familiarize yourself with the various components and<br />
procedures involved with this installation. Please note that some of the original clamps, hoses and hardware removed in<br />
the disassembly process will be used in the installation process. These instructions have been written in step-by-step<br />
format and refer to illustrations. Read through instructions entirely before performing installation. Please follow these<br />
step-by-step instructions and illustrations carefully.<br />
APPLICATION(S): Yamaha FX-SHO (`11~09), FZR & FZS (all)<br />
ALLOW ENGINE TO COOL COMPLETELY BEFORE PERFORMING INSTALLATION <br />
- INSTALLATION INSTRUCTIONS -<br />
Disconnect lanyard. Remove seats.<br />
Remove plastic engine cover.<br />
Disconnect engine breather hose from supercharger<br />
inlet hose.<br />
Remove air filter case mounting bolts (4 total – 2 on<br />
each side) and then air filter case. Discard bolts and<br />
case.<br />
Remove hose between stock air box and supercharger<br />
and discard.<br />
Remove air filter case cover (8 clips) with air filter and<br />
discard.<br />
Remove air filter case mounting bracket (4 nuts &<br />
washers) and discard. (optional step)<br />
Word doc. Part # RY13040 © H1 4/27/12 1
Locate chrome accent piece on left side of craft directly<br />
below steering.<br />
Install supplied billet adapter flange onto supercharger<br />
inlet completely. Secure using supplied allen wrench.<br />
Remove the two socket head cap screws at the leading<br />
edge and discard.<br />
At same location, but inside hull, loosely install supplied<br />
aluminum mounting bracket using supplied M6 socket<br />
head cap screws (2), M6 flat washers (2), M6 fender<br />
washers (2) and M6 nylock nuts (2). NOTE: Do not<br />
tighten bolts just yet!<br />
NOTE: The side with the small shoulder must face<br />
the supercharger housing. DO NOT USE LOCTITE.<br />
Bolts come equipped with thread locking agent. Do<br />
not over tighten bolts.<br />
Carefully screw (right-handed threads) supplied tapered<br />
plastic flange onto billet adapter flange.<br />
NOTE: Do not over tighten. Flange only needs to be<br />
snug.<br />
Thoroughly clean outside of supercharger inlet using a<br />
non-residual cleaner.<br />
Word doc. Part # RY13040 © H1 4/27/12 2
Silicone<br />
coupler<br />
secured with<br />
supplied<br />
hose clamp.<br />
Lord mount.<br />
<strong>Power</strong> <strong>Filter</strong><br />
with Pre-<strong>Filter</strong><br />
installed.<br />
Install by rotating <strong>Power</strong> <strong>Filter</strong> tube assembly while<br />
pulling towards engine. NOTE: Tapered plastic flange<br />
installs into <strong>Power</strong> <strong>Filter</strong> tube.<br />
Ensure <strong>Power</strong> <strong>Filter</strong> tube is installed onto adapter flange<br />
completely. Snug hose clamp, but do not tighten<br />
completely.<br />
Locate lord mount on <strong>Power</strong> <strong>Filter</strong> tube. Rotate <strong>Power</strong><br />
<strong>Filter</strong> tube towards mounting bracket until aligned.<br />
Secure lord mount to bracket using supplied M8 bolt,<br />
M8 lock washer and M8 fender washer. NOTE: Apply<br />
blue Loctite to bolt. Do not over tighten bolt.<br />
Tighten clamp for coupler at supercharger inlet. NOTE:<br />
Do not over tighten clamp.<br />
Tighten bolts securing chrome accent piece and<br />
mounting bracket to hull. NOTE: Do not over tighten<br />
bolts.<br />
Thoroughly clean both ends of supplied <strong>Power</strong> <strong>Filter</strong><br />
tube and inside of supplied <strong>Power</strong> <strong>Filter</strong> with a nonresidual<br />
cleaner. Install supplied <strong>Power</strong> <strong>Filter</strong> onto end<br />
of tube with threaded brass insert and secure.<br />
NOTE: Do not over tighten clamp. Install supplied<br />
Pre-<strong>Filter</strong> onto <strong>Power</strong> <strong>Filter</strong>. NOTE: Failure to install<br />
supplied pre-filter can result in severe engine<br />
damage!<br />
Thoroughly clean inside of supplied silicone coupler.<br />
Install onto opposite end of <strong>Power</strong> <strong>Filter</strong> tube. Secure<br />
using one supplied hose clamp. NOTE: Do not over<br />
tighten clamp.<br />
Place second supplied clamp over adapters on<br />
supercharger inlet.<br />
Install supplied lord mount into threaded brass insert in<br />
<strong>Power</strong> <strong>Filter</strong> tube. NOTE: Apply blue Loctite to stud.<br />
Do not over tighten.<br />
At front of engine insert <strong>Power</strong> <strong>Filter</strong> tube assembly into<br />
engine compartment over fuel tank (<strong>Power</strong> <strong>Filter</strong> end<br />
first).<br />
Lower coupler end of <strong>Power</strong> <strong>Filter</strong> tube assembly into<br />
place by rotating towards supercharger. Place coupler<br />
at an angle over left side of adapter on supercharger<br />
inlet.<br />
Install engine breather hose onto fitting at center of<br />
<strong>Power</strong> <strong>Filter</strong> tube.<br />
Secure using stock spring clamp.<br />
2012 & Newer Models: Use supplied adapter hose.<br />
Replace plastic engine cover. NOTE: Apply blue<br />
Loctite to bolts. Do not over tighten bolts.<br />
Check bilge for tools, rags, etc. Run craft on a flush kit<br />
to check for proper operation.<br />
Word doc. Part # RY13040 © H1 4/27/12 3
Remember, the water belongs to everyone.<br />
Please ride responsibly and respect the environment!<br />
Technical Support<br />
For answers to questions regarding installation or trouble shooting <strong>RIVA</strong> <strong>Performance</strong> Products contact:<br />
<strong>RIVA</strong> Technical Support directly at (954) 247-0705 or by e-mail at tech_support@rivamotorsports.com.<br />
Limited Warranty<br />
<strong>RIVA</strong> <strong>Performance</strong> <strong>Power</strong> <strong>Filter</strong> <strong>Kit</strong>s carry a 1-year limited warranty to the original purchaser. They are warranted to be free of defects in materials and workmanship under<br />
normal use and service. Customer modified components will be void of warranty. This warranty is limited to defects in the primary components only. Finish and/or wear<br />
marks in or on primary components are not covered under this warranty.<br />
<strong>RIVA</strong> <strong>Racing</strong>’s liability is expressly limited to the repair or replacement of the components contained within or associated with this kit. <strong>RIVA</strong> <strong>Racing</strong> agrees to repair or at<br />
<strong>RIVA</strong>’s option, replace any defective unit without charge, if product is returned to <strong>RIVA</strong> <strong>Racing</strong> freight prepaid within the warranty period. Any equipment returned which, in<br />
<strong>RIVA</strong>’s opinion, has been subjected to misuse, abuse, overheating or accident shall not be covered by this warranty.<br />
<strong>RIVA</strong> <strong>Racing</strong> shall have no liability for special, incidental or consequential damages or injury to persons or property from any cause arising from the sale, installation or use<br />
of this product.<br />
No other warranty, express or implied, including, but not limited to the implied warranties of merchantability and fitness for a particular purpose, applies. Various states do<br />
not allow for the limitation of incidental or consequential damages and therefore the above exclusion or limitation may not apply to you.<br />
Warranty does not include the expenses related to freight or transportation of parts or compensation for any inconvenience or loss of use while being repaired. A copy of<br />
the original invoice and a Return Authorization Number (RA#) must accompany all warranty claims.<br />
Warranted replacement parts will be returned freight collect.<br />
Word doc. Part # RY13040 © H1 4/27/12 4