Installing RM Tutor 3 powered by NetSupport - RM.com
Installing RM Tutor 3 powered by NetSupport - RM.com
Installing RM Tutor 3 powered by NetSupport - RM.com

You also want an ePaper? Increase the reach of your titles
YUMPU automatically turns print PDFs into web optimized ePapers that Google loves.
<strong>Installing</strong> <strong>RM</strong> <strong>Tutor</strong> 3<br />
7. To start the installation, click the Next button.<br />
8. At the Installation Complete window, click the Finish button.<br />
9. Use Windows ® Explorer to browse to the CD drive and open the<br />
<strong>RM</strong> SchoolShare Firewall Configurator folder, then:<br />
• Double-click the file <strong>RM</strong> SchoolShare Firewall Configurator.<br />
• Click the Install button, then click OK.<br />
10. Use Windows ® Explorer to browse to the CD drive. From the CD drive,<br />
select the following three files: setup, client32, nsm.lic. From the Edit menu<br />
choose Copy.<br />
11. From the Start menu, choose Run, type \\ssmaster and click OK.<br />
12. Double-click the SchoolShare folder to open it. From the Edit menu, choose<br />
Paste (this will paste the files into the SchoolShare folder).<br />
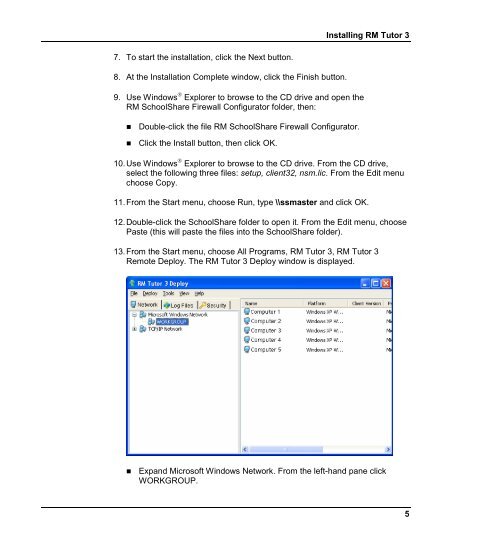
13. From the Start menu, choose All Programs, <strong>RM</strong> <strong>Tutor</strong> 3, <strong>RM</strong> <strong>Tutor</strong> 3<br />
Remote Deploy. The <strong>RM</strong> <strong>Tutor</strong> 3 Deploy window is displayed.<br />
• Expand Microsoft Windows Network. From the left-hand pane click<br />
WORKGROUP.<br />
5