Textease Quick Guide - RM.com
Textease Quick Guide - RM.com
Textease Quick Guide - RM.com

You also want an ePaper? Increase the reach of your titles
YUMPU automatically turns print PDFs into web optimized ePapers that Google loves.
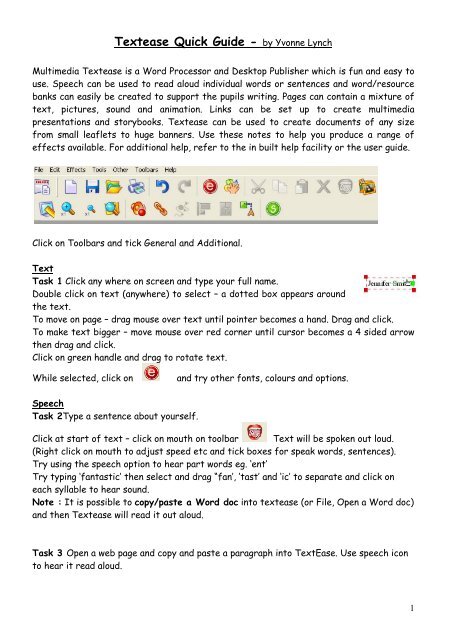
<strong>Textease</strong> <strong>Quick</strong> <strong>Guide</strong> - by Yvonne Lynch<br />
Multimedia <strong>Textease</strong> is a Word Processor and Desktop Publisher which is fun and easy to<br />
use. Speech can be used to read aloud individual words or sentences and word/resource<br />
banks can easily be created to support the pupils writing. Pages can contain a mixture of<br />
text, pictures, sound and animation. Links can be set up to create multimedia<br />
presentations and storybooks. <strong>Textease</strong> can be used to create documents of any size<br />
from small leaflets to huge banners. Use these notes to help you produce a range of<br />
effects available. For additional help, refer to the in built help facility or the user guide.<br />
Click on Toolbars and tick General and Additional.<br />
Text<br />
Task 1 Click any where on screen and type your full name.<br />
Double click on text (anywhere) to select – a dotted box appears around<br />
the text.<br />
To move on page – drag mouse over text until pointer be<strong>com</strong>es a hand. Drag and click.<br />
To make text bigger – move mouse over red corner until cursor be<strong>com</strong>es a 4 sided arrow<br />
then drag and click.<br />
Click on green handle and drag to rotate text.<br />
While selected, click on<br />
and try other fonts, colours and options.<br />
Speech<br />
Task 2Type a sentence about yourself.<br />
Click at start of text – click on mouth on toolbar Text will be spoken out loud.<br />
(Right click on mouth to adjust speed etc and tick boxes for speak words, sentences).<br />
Try using the speech option to hear part words eg. ‘ent’<br />
Try typing ‘fantastic’ then select and drag “fan’, ‘tast’ and ‘ic’ to separate and click on<br />
each syllable to hear sound.<br />
Note : It is possible to copy/paste a Word doc into textease (or File, Open a Word doc)<br />
and then <strong>Textease</strong> will read it out aloud.<br />
Task 3 Open a web page and copy and paste a paragraph into TextEase. Use speech icon<br />
to hear it read aloud.<br />
1
Spelling<br />
Any spelling to be checked is highlighted automatically. Right click on highlighted<br />
misspelt word. (You can also select a piece of text by dragging over it, or simply click<br />
anywhere in the sentence) and then click spelling icon which is visible if Text toolbar has<br />
been ticked.<br />
If you wish the word to be added to dictionary, click add. Tick dictionary to get more<br />
words to choose from.<br />
Task 4 Type ‘tooday’ and right click on it – choose correct spelling. Tick dictionary box<br />
and see dictionary collection of words.<br />
Text frames<br />
TextEase does not act like a normal word processor but can be made to do so if a text<br />
frame (F7) is added to a page. If the whole page is in a text frame then it will perform<br />
like a standard word processor.<br />
Graphics<br />
Click on . Clip art is opened. Drag your picture on to page. Click to select so that you<br />
can move, enlarge, rotate etc (as for text).<br />
Home icon takes you to C:\Program Files\Softease\<strong>Textease</strong> Resources\Curriculum<br />
Resources. Green arrow takes you to further resources.<br />
It is also possible to add your own pictures (and also videos) which are already stored in<br />
the drives associated with your <strong>com</strong>puter by clicking on My Resources tab after clicking<br />
on picture icon.<br />
(C:\Documents and Settings\Toshiba User\My Documents\My Pictures)<br />
You can also<br />
●Crop picture files (not clipart) by using the<br />
●Flip by holding control and click and drag <strong>com</strong>er.<br />
●Duplicate by hold control and drag to side<br />
Task 5<br />
Find a suitable picture and insert in the TextEase window.<br />
Try duplicating it by holding control, clicking and dragging.<br />
Try holding control then grabbing a corner and dragging it to flip picture.<br />
Also try to put a frame around one of the duplicate pictures (select and effects, frame).<br />
2
Labelling Diagrams<br />
It is very easy to choose a clipart graphic and then add labels. Click on screen at the<br />
point where you need to type a text label. Use the drawing tool line to point to the<br />
appropriate spot.<br />
You can make lines into arrows by selecting<br />
line and using Effects, Arrows tab.<br />
You can group objects by holding control<br />
while you select each one, (or click on Select<br />
all icon) then click on<br />
Task 6 – Find a picture and add some labels. Group them to make it all one object.<br />
Word Banks<br />
You can easily make up your own word banks associated with a particular topic.<br />
Task 7<br />
Click on Other, Create Word Bank. Type a glossary list of words (eg one, two, three,<br />
four) Note: all the functions of textease are able to be used in this window also. Save<br />
this file with an appropriate name. Now click on TextEase page then Other, Select<br />
word bank, so as to use it when working on an assignment relating to that topic.<br />
Sound linking<br />
It is very easy to link sound with any object. You can link a text, sound or your own<br />
creation.<br />
Task 8<br />
a. Select object eg a picture then click on link icon .<br />
Click on the Speech tab. In the window next to Say, type a few words eg “testing sound”.<br />
Tick Say box and close window.<br />
When mouse moves over picture a sound icon will appear which when clicked speak text.<br />
b. If you attach a microphone to your <strong>com</strong>puter then you can select an object or picture,<br />
then use Tools, Record a sound. A sound icon appears when mouse moves over object –<br />
click to hear recorded sound.<br />
Polygon Tool<br />
Right click on the polygon icon – a shapes window opens and a shape can be dragged on to<br />
page.<br />
Select and use Effects<br />
to fill it with colour etc.<br />
3
Animation<br />
To create an animation there has to be on object (text or graphic) and a path for it to<br />
follow and for them to be linked together.<br />
Task 9<br />
Insert a graphic on a page.<br />
Use one of the drawing tools and draw the path to be followed.<br />
Select the graphic then select the path (double click left button on graphic then click<br />
the right button on the path so they are both selected).<br />
Click on the links button then on the animate tab on the links window.<br />
Check to ‘Follow over’ box.<br />
The graphic should move over the path.<br />
If you select path and make the line colour “None” then you will see object move without<br />
the path being visible.<br />
Note If one graphic needs to sit on top of another, select it then choose Tools, Higher.<br />
Talking Books: Task 10<br />
Insert more pages by clicking on Edit, Pages, Insert pages.<br />
Type some text on the second page (eg. page2). Select, click on<br />
links, Bookmark. Type in a bookmark name one word eg two) and<br />
click bookmark name box.<br />
Click on link graphic on page 1 (eg.the shark picture).<br />
Find two in Jump to bookmark window.<br />
Now test your link by clicking on the shark.<br />
This idea can be used to create multiple pages of your book – a<br />
young child can now have your book read out aloud to them and<br />
they are able to move to the next page at their own rate.<br />
Don’t forget to add some multimedia effects.<br />
You can add page numbers and graphic to every page if wish.<br />
Click where you want the page number to appear, then click on<br />
Tools, Insert Page Numbers, and first option. Then select the<br />
“1”, click Other, Header and Footer, All Pages. Repeat for a<br />
graphic which you want on every page.<br />
Copy/Paste<br />
You can select any text or object and then click on copy icon.<br />
Click where you want this to be pasted and click on paste icon.<br />
4
Other features. Look at File, Examples – Paint, Database, Spreadsheet and Presenter<br />
folders contain examples demonstrating ways to integrate features into the curriculum.<br />
Paint<br />
Note: Can open either Graphics toolbar or Paint toolbar but not both at the same time.<br />
Eg<br />
Database<br />
Eg<br />
Using the Database wizard, it is very easy to create a collection of fields to contain text<br />
information or a picture. (Students first need to plan what fields will be appropriate).<br />
The student then has to research the details of the relevant creatures (or whatever) and<br />
create a record for each.<br />
It is possible to then use the database to look up organisms, do a query on a particular<br />
feature or generate a table based on those records. (Note that the toolbar icons now<br />
relate to the use of the database).<br />
5
Spreadsheet<br />
Simply click Spreadsheet, ‘Create Spreadsheet”, then click and drag to produce the size<br />
you want. Create the relevant columns headings and row labels.<br />
You can insert/delete columns and rows, add formulae and use auto sum and sort.<br />
It is very easy to draw a chart of selected<br />
region.<br />
It is also possible to<br />
a. select spreadsheet data, copy and<br />
paste into Excel.<br />
b. Select chart/graph and paste into<br />
another document.<br />
Presenter – operates in much the same way as PowerPoint. When running presentation,<br />
you can use right click to find controls.<br />
Help menu brings up excellent manuals for each tool.<br />
Don’t forget to use the Highlighting tools as a wonderful tool to assist finding the main<br />
points in a piece of writing.<br />
These training notes were written by Yvonne Lynch. March 2009<br />
ylynch@hotkey.net.au<br />
6