IPSEC Site-to-Site VPNs on a PIX/ASA Firewall - Router Alley
IPSEC Site-to-Site VPNs on a PIX/ASA Firewall - Router Alley
IPSEC Site-to-Site VPNs on a PIX/ASA Firewall - Router Alley

Create successful ePaper yourself
Turn your PDF publications into a flip-book with our unique Google optimized e-Paper software.
<str<strong>on</strong>g>IPSEC</str<strong>on</strong>g> <str<strong>on</strong>g>Site</str<strong>on</strong>g>-<str<strong>on</strong>g>to</str<strong>on</strong>g>-<str<strong>on</strong>g>Site</str<strong>on</strong>g> <str<strong>on</strong>g>VPNs</str<strong>on</strong>g> <strong>on</strong> a <strong>PIX</strong>/<strong>ASA</strong> v1.21 – Aar<strong>on</strong> Balchunas<br />
1<br />
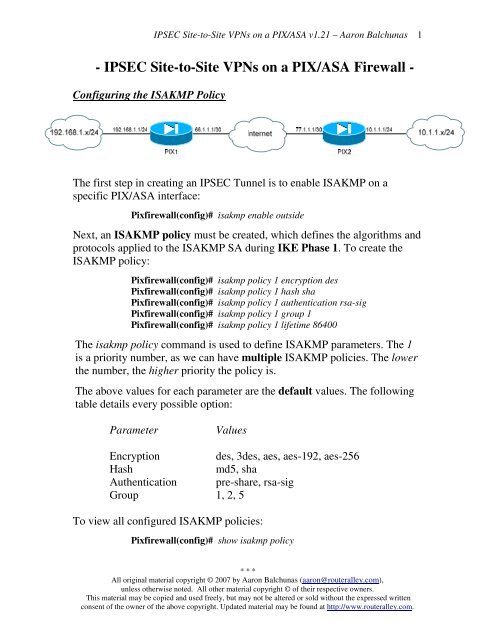
- <str<strong>on</strong>g>IPSEC</str<strong>on</strong>g> <str<strong>on</strong>g>Site</str<strong>on</strong>g>-<str<strong>on</strong>g>to</str<strong>on</strong>g>-<str<strong>on</strong>g>Site</str<strong>on</strong>g> <str<strong>on</strong>g>VPNs</str<strong>on</strong>g> <strong>on</strong> a <strong>PIX</strong>/<strong>ASA</strong> <strong>Firewall</strong> -<br />
C<strong>on</strong>figuring the ISAKMP Policy<br />
The first step in creating an <str<strong>on</strong>g>IPSEC</str<strong>on</strong>g> Tunnel is <str<strong>on</strong>g>to</str<strong>on</strong>g> enable ISAKMP <strong>on</strong> a<br />
specific <strong>PIX</strong>/<strong>ASA</strong> interface:<br />
Pixfirewall(c<strong>on</strong>fig)# isakmp enable outside<br />
Next, an ISAKMP policy must be created, which defines the algorithms and<br />
pro<str<strong>on</strong>g>to</str<strong>on</strong>g>cols applied <str<strong>on</strong>g>to</str<strong>on</strong>g> the ISAKMP SA during IKE Phase 1. To create the<br />
ISAKMP policy:<br />
Pixfirewall(c<strong>on</strong>fig)# isakmp policy 1 encrypti<strong>on</strong> des<br />
Pixfirewall(c<strong>on</strong>fig)# isakmp policy 1 hash sha<br />
Pixfirewall(c<strong>on</strong>fig)# isakmp policy 1 authenticati<strong>on</strong> rsa-sig<br />
Pixfirewall(c<strong>on</strong>fig)# isakmp policy 1 group 1<br />
Pixfirewall(c<strong>on</strong>fig)# isakmp policy 1 lifetime 86400<br />
The isakmp policy command is used <str<strong>on</strong>g>to</str<strong>on</strong>g> define ISAKMP parameters. The 1<br />
is a priority number, as we can have multiple ISAKMP policies. The lower<br />
the number, the higher priority the policy is.<br />
The above values for each parameter are the default values. The following<br />
table details every possible opti<strong>on</strong>:<br />
Parameter<br />
Values<br />
Encrypti<strong>on</strong> des, 3des, aes, aes-192, aes-256<br />
Hash<br />
md5, sha<br />
Authenticati<strong>on</strong> pre-share, rsa-sig<br />
Group 1, 2, 5<br />
To view all c<strong>on</strong>figured ISAKMP policies:<br />
Pixfirewall(c<strong>on</strong>fig)# show isakmp policy<br />
* * *<br />
All original material copyright © 2007 by Aar<strong>on</strong> Balchunas (aar<strong>on</strong>@routeralley.com),<br />
unless otherwise noted. All other material copyright © of their respective owners.<br />
This material may be copied and used freely, but may not be altered or sold without the expressed written<br />
c<strong>on</strong>sent of the owner of the above copyright. Updated material may be found at http://www.routeralley.com.
<str<strong>on</strong>g>IPSEC</str<strong>on</strong>g> <str<strong>on</strong>g>Site</str<strong>on</strong>g>-<str<strong>on</strong>g>to</str<strong>on</strong>g>-<str<strong>on</strong>g>Site</str<strong>on</strong>g> <str<strong>on</strong>g>VPNs</str<strong>on</strong>g> <strong>on</strong> a <strong>PIX</strong>/<strong>ASA</strong> v1.21 – Aar<strong>on</strong> Balchunas<br />
2<br />
C<strong>on</strong>figuring Authenticati<strong>on</strong> (Pre-Shared Keys)<br />
If using a pre-shared key for authenticati<strong>on</strong>, a key string must be specified,<br />
pointing <str<strong>on</strong>g>to</str<strong>on</strong>g> the remote host’s IP address. To c<strong>on</strong>figure the pre-shared key <strong>on</strong><br />
a <strong>PIX</strong> OS 6.0 device:<br />
Pixfirewall(c<strong>on</strong>fig)# isakmp policy 1 authenticati<strong>on</strong> pre-share<br />
Pixfirewall(c<strong>on</strong>fig)# isakmp key MYKEY address 77.1.1.1<br />
To c<strong>on</strong>figure the pre-shared key <strong>on</strong> a <strong>PIX</strong> OS 7.0 device:<br />
asafirewall(c<strong>on</strong>fig)# tunnel-group 77.1.1.1 type ipsec-l2l<br />
asafirewall(c<strong>on</strong>fig)# tunnel-group 77.1.1.1 ipsec-attributes<br />
asafirewall(c<strong>on</strong>fig-tunnel-ipsec)# pre-shared-key MYKEY<br />
Remember, both the shared key, and the ISAKMP policy must match <strong>on</strong><br />
both peers for a sessi<strong>on</strong> <str<strong>on</strong>g>to</str<strong>on</strong>g> be established. To view c<strong>on</strong>figured ISAKMP<br />
policies:<br />
Pixfirewall(c<strong>on</strong>fig)# show isakmp policy<br />
C<strong>on</strong>figuring Authenticati<strong>on</strong> (Digital Signatures)<br />
Pre-shared keys are the simplest method of authenticati<strong>on</strong>. Much more<br />
c<strong>on</strong>figurati<strong>on</strong> is required if we want <str<strong>on</strong>g>to</str<strong>on</strong>g> use RSA Digital Signatures. The<br />
hostname and domain-name for the <strong>PIX</strong>/<strong>ASA</strong> <strong>Firewall</strong> must be specified, as<br />
this informati<strong>on</strong> is included in the blank certificate sent <str<strong>on</strong>g>to</str<strong>on</strong>g> the CA:<br />
Pixfirewall(c<strong>on</strong>fig)# isakmp policy 1 authenticati<strong>on</strong> rsa-sig<br />
Pixfirewall(c<strong>on</strong>fig)# hostname Pixfirewall<br />
Pixfirewall(c<strong>on</strong>fig)# domain-name MYDOMAIN.COM<br />
Next, the RSA key must be generated:<br />
Pixfirewall(c<strong>on</strong>fig)# ca generate rsa key 2048<br />
Next, the Certificate Authority must be identified:<br />
Pixfirewall(c<strong>on</strong>fig)# ca identity MYCA 192.168.1.5<br />
Pixfirewall(c<strong>on</strong>fig)# ca c<strong>on</strong>figure MYCA ca 1 100<br />
Next, the CA must be authenticated, <str<strong>on</strong>g>to</str<strong>on</strong>g> ensure its validity:<br />
Pixfirewall(c<strong>on</strong>fig)# ca authenticate MYCA<br />
* * *<br />
All original material copyright © 2007 by Aar<strong>on</strong> Balchunas (aar<strong>on</strong>@routeralley.com),<br />
unless otherwise noted. All other material copyright © of their respective owners.<br />
This material may be copied and used freely, but may not be altered or sold without the expressed written<br />
c<strong>on</strong>sent of the owner of the above copyright. Updated material may be found at http://www.routeralley.com.
<str<strong>on</strong>g>IPSEC</str<strong>on</strong>g> <str<strong>on</strong>g>Site</str<strong>on</strong>g>-<str<strong>on</strong>g>to</str<strong>on</strong>g>-<str<strong>on</strong>g>Site</str<strong>on</strong>g> <str<strong>on</strong>g>VPNs</str<strong>on</strong>g> <strong>on</strong> a <strong>PIX</strong>/<strong>ASA</strong> v1.21 – Aar<strong>on</strong> Balchunas<br />
3<br />
C<strong>on</strong>figuring Authenticati<strong>on</strong> (Digital Signatures) (c<strong>on</strong>tinued)<br />
Next, a certificate must actually be requested. In other words, the certificate<br />
must be digitally signed.<br />
Pixfirewall(c<strong>on</strong>fig)# ca enroll MYCA CAPASSWORD<br />
Finally, the certificate must be saved:<br />
Pixfirewall(c<strong>on</strong>fig)# ca save all<br />
Pixfirewall(c<strong>on</strong>fig)# write memory<br />
C<strong>on</strong>figuring the <str<strong>on</strong>g>IPSEC</str<strong>on</strong>g> Transform Set<br />
After IKE Phase 1 c<strong>on</strong>figurati<strong>on</strong> is complete, a transform-set policy must<br />
be created. The transform-set defines the security policy <str<strong>on</strong>g>to</str<strong>on</strong>g> apply <str<strong>on</strong>g>to</str<strong>on</strong>g> traffic<br />
during IKE Phase 2:<br />
Pixfirewall(c<strong>on</strong>fig)# cryp<str<strong>on</strong>g>to</str<strong>on</strong>g> ipsec transform-set MYSET ah-sha-hmac esp-des<br />
ESP and AH can be used c<strong>on</strong>currently. The following table details every<br />
possible opti<strong>on</strong>:<br />
AH Transforms<br />
ah-md5-hmac<br />
ah-sha-hmac<br />
ESP Encrypti<strong>on</strong><br />
Transforms<br />
esp-des<br />
esp-3des<br />
esp-aes<br />
esp-aes-192<br />
esp-aes-256<br />
esp-null<br />
ESP Authenticati<strong>on</strong><br />
Tranforms<br />
esp-md5-hmac<br />
esp-sha-hmac<br />
Thus, if the desired c<strong>on</strong>figurati<strong>on</strong> is ESP with 3DES for encrypti<strong>on</strong> and<br />
MD5 for authenticati<strong>on</strong>:<br />
Pixfirewall(c<strong>on</strong>fig)# cryp<str<strong>on</strong>g>to</str<strong>on</strong>g> ipsec transform-set MYSET esp-3des esp-md5-hmac<br />
* * *<br />
All original material copyright © 2007 by Aar<strong>on</strong> Balchunas (aar<strong>on</strong>@routeralley.com),<br />
unless otherwise noted. All other material copyright © of their respective owners.<br />
This material may be copied and used freely, but may not be altered or sold without the expressed written<br />
c<strong>on</strong>sent of the owner of the above copyright. Updated material may be found at http://www.routeralley.com.
<str<strong>on</strong>g>IPSEC</str<strong>on</strong>g> <str<strong>on</strong>g>Site</str<strong>on</strong>g>-<str<strong>on</strong>g>to</str<strong>on</strong>g>-<str<strong>on</strong>g>Site</str<strong>on</strong>g> <str<strong>on</strong>g>VPNs</str<strong>on</strong>g> <strong>on</strong> a <strong>PIX</strong>/<strong>ASA</strong> v1.21 – Aar<strong>on</strong> Balchunas<br />
4<br />
Specifying Interesting Traffic<br />
The next step is <str<strong>on</strong>g>to</str<strong>on</strong>g> specify what traffic is interesting. In other words, which<br />
traffic can initiate the <str<strong>on</strong>g>IPSEC</str<strong>on</strong>g> tunnel, and can be sent across the tunnel. An<br />
access-list is used <str<strong>on</strong>g>to</str<strong>on</strong>g> identify interesting traffic:<br />
Pixfirewall(c<strong>on</strong>fig)# access-list MYLIST permit ip 192.168.1.0 255.255.255.0<br />
10.1.1.0 255.255.255.0<br />
The above access-list specifies that traffic from the 192.168.1.x network,<br />
destined <str<strong>on</strong>g>to</str<strong>on</strong>g> the 10.1.1.x network can both initiate and utilize the <str<strong>on</strong>g>IPSEC</str<strong>on</strong>g><br />
tunnel. This access-list will be referenced later in our c<strong>on</strong>figurati<strong>on</strong>.<br />
Next, the <strong>PIX</strong>/<strong>ASA</strong> firewall must be instructed <str<strong>on</strong>g>to</str<strong>on</strong>g> not NAT this VPN traffic.<br />
The nat 0 command coupled with an access-list will accomplish this:<br />
Pixfirewall(c<strong>on</strong>fig)# access-list NONAT permit ip 192.168.1.0 255.255.255.0<br />
10.1.1.0 255.255.255.0<br />
Pixfirewall(c<strong>on</strong>fig)# nat (inside) 0 access-list NONAT<br />
Opti<strong>on</strong>al Commands<br />
Two additi<strong>on</strong>al commands may be necessary:<br />
Pixfirewall(c<strong>on</strong>fig)# sysopt c<strong>on</strong>necti<strong>on</strong> permit-ipsec<br />
Pixfirewall(c<strong>on</strong>fig)# route outside 10.1.1.0 255.255.255.0 77.1.1.1<br />
The sysopt c<strong>on</strong>necti<strong>on</strong> permit-ipsec command instructs the <strong>PIX</strong> <str<strong>on</strong>g>to</str<strong>on</strong>g> bypass<br />
any access-lists applied <str<strong>on</strong>g>to</str<strong>on</strong>g> interfaces, for traffic being sent across the <str<strong>on</strong>g>IPSEC</str<strong>on</strong>g><br />
tunnel. Otherwise, if <strong>PIX</strong>FIREWALL had an access-list applied for<br />
incoming traffic <strong>on</strong> its outside interface, any traffic from 10.1.1.x/24 would<br />
be dropped unless explicitly permitted.<br />
The route command adjusts the <strong>PIX</strong>’s routing table, so that any traffic<br />
destined <str<strong>on</strong>g>to</str<strong>on</strong>g> 10.1.1.x/24 is sent across the <str<strong>on</strong>g>IPSEC</str<strong>on</strong>g> tunnel <str<strong>on</strong>g>to</str<strong>on</strong>g> the 77.1.1.1 peer.<br />
* * *<br />
All original material copyright © 2007 by Aar<strong>on</strong> Balchunas (aar<strong>on</strong>@routeralley.com),<br />
unless otherwise noted. All other material copyright © of their respective owners.<br />
This material may be copied and used freely, but may not be altered or sold without the expressed written<br />
c<strong>on</strong>sent of the owner of the above copyright. Updated material may be found at http://www.routeralley.com.
<str<strong>on</strong>g>IPSEC</str<strong>on</strong>g> <str<strong>on</strong>g>Site</str<strong>on</strong>g>-<str<strong>on</strong>g>to</str<strong>on</strong>g>-<str<strong>on</strong>g>Site</str<strong>on</strong>g> <str<strong>on</strong>g>VPNs</str<strong>on</strong>g> <strong>on</strong> a <strong>PIX</strong>/<strong>ASA</strong> v1.21 – Aar<strong>on</strong> Balchunas<br />
5<br />
C<strong>on</strong>figuring the <str<strong>on</strong>g>IPSEC</str<strong>on</strong>g> Cryp<str<strong>on</strong>g>to</str<strong>on</strong>g> Map<br />
The final step is <str<strong>on</strong>g>to</str<strong>on</strong>g> create a cryp<str<strong>on</strong>g>to</str<strong>on</strong>g> map, which references all previously<br />
c<strong>on</strong>figured <str<strong>on</strong>g>IPSEC</str<strong>on</strong>g> SA parameters (including the access-list for interesting<br />
traffic, the SA peer, and the IKE transform-set).<br />
Pixfirewall(c<strong>on</strong>fig)# cryp<str<strong>on</strong>g>to</str<strong>on</strong>g> map MYMAP 1 ipsec-isakmp<br />
Pixfirewall(c<strong>on</strong>fig)# cryp<str<strong>on</strong>g>to</str<strong>on</strong>g> map MYMAP 1 match address MYLIST<br />
Pixfirewall(c<strong>on</strong>fig)# cryp<str<strong>on</strong>g>to</str<strong>on</strong>g> map MYMAP 1 set peer 77.1.1.1<br />
Pixfirewall(c<strong>on</strong>fig)# cryp<str<strong>on</strong>g>to</str<strong>on</strong>g> map MYMAP 1 set transform-set MYSET<br />
Pixfirewall(c<strong>on</strong>fig)# cryp<str<strong>on</strong>g>to</str<strong>on</strong>g> map MYMAP 1 set security-associati<strong>on</strong> lifetime sec<strong>on</strong>ds<br />
8000<br />
The cryp<str<strong>on</strong>g>to</str<strong>on</strong>g> map must be applied <str<strong>on</strong>g>to</str<strong>on</strong>g> an interface, which will allow the <str<strong>on</strong>g>IPSEC</str<strong>on</strong>g><br />
communicati<strong>on</strong> process <str<strong>on</strong>g>to</str<strong>on</strong>g> begin:<br />
Pixfirewall(c<strong>on</strong>fig)# cryp<str<strong>on</strong>g>to</str<strong>on</strong>g> map MYMAP interface outside<br />
Only <strong>on</strong>e cryp<str<strong>on</strong>g>to</str<strong>on</strong>g> map is allowed per interface. If multiple VPN tunnels will<br />
be terminating <strong>on</strong> a single interface, they can be separated using the<br />
sequence number within a single cryp<str<strong>on</strong>g>to</str<strong>on</strong>g> map:<br />
Pixfirewall(c<strong>on</strong>fig)# cryp<str<strong>on</strong>g>to</str<strong>on</strong>g> map MYMAP 1 match address MYLIST<br />
Pixfirewall(c<strong>on</strong>fig)# cryp<str<strong>on</strong>g>to</str<strong>on</strong>g> map MYMAP 1 set peer 77.1.1.1<br />
Pixfirewall(c<strong>on</strong>fig)# cryp<str<strong>on</strong>g>to</str<strong>on</strong>g> map MYMAP 1 set transform-set MYSET<br />
Pixfirewall(c<strong>on</strong>fig)# cryp<str<strong>on</strong>g>to</str<strong>on</strong>g> map MYMAP 5 match address ANOTHERLIST<br />
Pixfirewall(c<strong>on</strong>fig)# cryp<str<strong>on</strong>g>to</str<strong>on</strong>g> map MYMAP 5 set peer 88.1.1.1<br />
Pixfirewall(c<strong>on</strong>fig)# cryp<str<strong>on</strong>g>to</str<strong>on</strong>g> map MYMAP 5 set transform-set ANOTHERSET<br />
To view a c<strong>on</strong>figured cryp<str<strong>on</strong>g>to</str<strong>on</strong>g> map:<br />
Pixfirewall(c<strong>on</strong>fig)# show cryp<str<strong>on</strong>g>to</str<strong>on</strong>g> map<br />
* * *<br />
All original material copyright © 2007 by Aar<strong>on</strong> Balchunas (aar<strong>on</strong>@routeralley.com),<br />
unless otherwise noted. All other material copyright © of their respective owners.<br />
This material may be copied and used freely, but may not be altered or sold without the expressed written<br />
c<strong>on</strong>sent of the owner of the above copyright. Updated material may be found at http://www.routeralley.com.
<str<strong>on</strong>g>IPSEC</str<strong>on</strong>g> <str<strong>on</strong>g>Site</str<strong>on</strong>g>-<str<strong>on</strong>g>to</str<strong>on</strong>g>-<str<strong>on</strong>g>Site</str<strong>on</strong>g> <str<strong>on</strong>g>VPNs</str<strong>on</strong>g> <strong>on</strong> a <strong>PIX</strong>/<strong>ASA</strong> v1.21 – Aar<strong>on</strong> Balchunas<br />
6<br />
Troubleshooting <str<strong>on</strong>g>IPSEC</str<strong>on</strong>g> Tunnels<br />
Various commands can be used <str<strong>on</strong>g>to</str<strong>on</strong>g> troubleshoot both <str<strong>on</strong>g>IPSEC</str<strong>on</strong>g> and ISAKMP:<br />
Pixfirewall# show isakmp<br />
Pixfirewall# show isakmp policy<br />
Pixfirewall# show cryp<str<strong>on</strong>g>to</str<strong>on</strong>g> ipsec transform-set<br />
Pixfirewall# show cryp<str<strong>on</strong>g>to</str<strong>on</strong>g> map<br />
Pixfirewall# show cryp<str<strong>on</strong>g>to</str<strong>on</strong>g> ipsec sa<br />
Pixfirewall# debug cryp<str<strong>on</strong>g>to</str<strong>on</strong>g> isakmp<br />
Pixfirewall# debug cryp<str<strong>on</strong>g>to</str<strong>on</strong>g> ipsec<br />
To manually tear down an ISAKMP or <str<strong>on</strong>g>IPSEC</str<strong>on</strong>g> SA:<br />
Pixfirewall# clear cryp<str<strong>on</strong>g>to</str<strong>on</strong>g> isakmp sa<br />
Pixfirewall# clear cryp<str<strong>on</strong>g>to</str<strong>on</strong>g> ipsec sa<br />
The following is an example of ISAKMP/<str<strong>on</strong>g>IPSEC</str<strong>on</strong>g> debug output:<br />
7w4d: ISAKMP (0:2): beginning Quick Mode exchange, M-ID of 2023464223<br />
7w4d: ISAKMP (0:2): sending packet <str<strong>on</strong>g>to</str<strong>on</strong>g> 77.1.1.1 (I) QM_IDLE<br />
7w4d: ISAKMP (0:2): Node 2023464223, Input = IKE_MESG_INTERNAL, IKE_INIT_QM<br />
Old State = IKE_QM_READY New State = IKE_QM_I_QM1<br />
7w4d: ISAKMP (0:2): Input = IKE_MESG_INTERNAL, IKE_PHASE1_COMPLETE<br />
Old State = IKE_P1_COMPLETE New State = IKE_P1_COMPLETE<br />
7w4d: ISAKMP (0:2): received packet from 77.1.1.1 (I) QM_IDLE<br />
7w4d: ISAKMP (0:2): processing HASH payload. message ID = -1688543668<br />
7w4d: ISAKMP (0:2): processing NOTIFY PROPOSAL_NOT_CHOSEN pro<str<strong>on</strong>g>to</str<strong>on</strong>g>col 0<br />
spi 0, message ID = -1683843668, sa = 827636AFC<br />
7w4d: ISAKMP (0:2): deleting node -1688543668 error FALSE reas<strong>on</strong><br />
"informati<strong>on</strong>al (in) state 1"<br />
7w4d: ISAKMP (0:2): Input = IKE_MESG_FROM_PEER, IKE_INFO_NOTIFY<br />
Old State = IKE_P1_COMPLETE New State = IKE_P1_COMPLETE<br />
The above debug output is indicating that IKE Phase 1 is completing, but<br />
Phase 2 is failing due <str<strong>on</strong>g>to</str<strong>on</strong>g> an ESP Hash mismatch between the SA peers.<br />
* * *<br />
All original material copyright © 2007 by Aar<strong>on</strong> Balchunas (aar<strong>on</strong>@routeralley.com),<br />
unless otherwise noted. All other material copyright © of their respective owners.<br />
This material may be copied and used freely, but may not be altered or sold without the expressed written<br />
c<strong>on</strong>sent of the owner of the above copyright. Updated material may be found at http://www.routeralley.com.