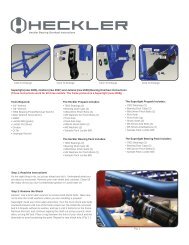
Superlight 06 Tech Guide - Santa Cruz Bikes
Superlight 06 Tech Guide - Santa Cruz Bikes
Superlight 06 Tech Guide - Santa Cruz Bikes

You also want an ePaper? Increase the reach of your titles
YUMPU automatically turns print PDFs into web optimized ePapers that Google loves.
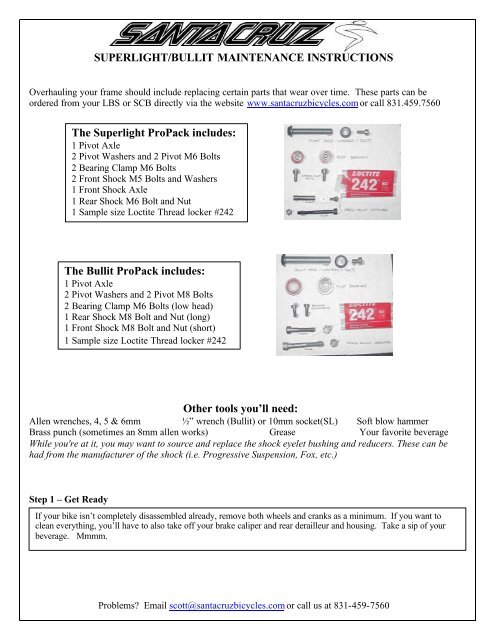
SUPERLIGHT/BULLIT MAINTENANCE INSTRUCTIONS<br />
Overhauling your frame should include replacing certain parts that wear over time. These parts can be<br />
ordered from your LBS or SCB directly via the website www.santacruzbicycles.com or call 831.459.7560<br />
The <strong>Superlight</strong> ProPack includes:<br />
1 Pivot Axle<br />
2 Pivot Washers and 2 Pivot M6 Bolts<br />
2 Bearing Clamp M6 Bolts<br />
2 Front Shock M5 Bolts and Washers<br />
1 Front Shock Axle<br />
1 Rear Shock M6 Bolt and Nut<br />
1 Sample size Loctite Thread locker #242<br />
The Bullit ProPack includes:<br />
1 Pivot Axle<br />
2 Pivot Washers and 2 Pivot M8 Bolts<br />
2 Bearing Clamp M6 Bolts (low head)<br />
1 Rear Shock M8 Bolt and Nut (long)<br />
1 1 Front Shock M8 Bolt and Nut (short)<br />
1 Sample size Loctite Thread locker #242<br />
Other tools you’ll need:<br />
Allen wrenches, 4, 5 & 6mm ½” wrench (Bullit) or 10mm socket(SL) Soft blow hammer<br />
Brass punch (sometimes an 8mm allen works) Grease Your favorite beverage<br />
While you're at it, you may want to source and replace the shock eyelet bushing and reducers. These can be<br />
had from the manufacturer of the shock (i.e. Progressive Suspension, Fox, etc.)<br />
Step 1 – Get Ready<br />
If your bike isn’t completely disassembled already, remove both wheels and cranks as a minimum. If you want to<br />
clean everything, you’ll have to also take off your brake caliper and rear derailleur and housing. Take a sip of your<br />
beverage. Mmmm.<br />
Problems? Email scott@santacruzbicycles.com or call us at 831-459-7560
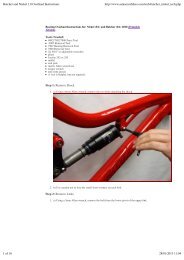
Step 2 – Remove Shock<br />
Removing the shock hardware from the front of the shock is slightly different on the Bullit and <strong>Superlight</strong>; follow<br />
the appropriate directions. Remember, if you scre w up your frame (or somebody else’s), it’s your fault, so it’s<br />
better to make sure you take the time to do it right now. If something seems wrong, it probably is, so put<br />
down the sledgehammer and relax for a minute.<br />
<strong>Superlight</strong>: Using two 4mm allen wrenches, turn the bolts on the front of the shock in opposing directions. Remove<br />
one bolt. Using a punch (or 8mm allen wrench if necessary) tap the shock axle out. This should happen without<br />
major hammering. If it seems really seized up, don’t bash it or you risk damaging the frame. If it really won’t<br />
move, try removing the opposite bolt and tapping the other direction, or you can always give us a call or email Scott<br />
for more suggestions – the contact info is at the bottom of the page.<br />
Bullit: Use your ½” wrench and 6mm allen to remove the front shock bolt. Tap it out gently. Remove the shock<br />
from the frame. Be careful that the shock doesn’t fall and hit your down-tube; it could chip the paint.<br />
Now remove the rear shock bolt and nut. You should be now be able to remove the shock from the frame.<br />
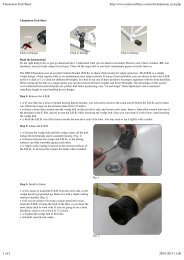
Step 3 – Remove Pivot Axle<br />
If you’ve got a <strong>Superlight</strong> and want to remove<br />
the swingarm, you first need to take off the<br />
seatstay bridge by removing the four bolts on the<br />
seat stays before continuing. Bullit owners:<br />
fuggetaboutit.<br />
Loosen the bearing clamp pinch bolt (the ones<br />
circled in the picture) before attempting to<br />
extract the pivot axle. Once the bearing clamp<br />
bolts are loose, use two allen wrenches to turn<br />
the pivot bolts in opposing directions. Remove<br />
one bolt and washer and tap the axle out of the<br />
frame using a punch. If it seems stuck, thread<br />
your old rear shock bolt into the axle and tap on that<br />
so you don’t mushroom the axle itself.<br />
Once the axle is out, remove the swingarm from the<br />
frame, this might require wiggling it a bit to move the<br />
bearings away from the down-tube. So far, so good,<br />
have a drink.<br />
Step 4 – Change the Bearings<br />
You should be able to press the bearings out of the swingarm with your fingers. If this is difficult,<br />
carefully pry open the slot with a screwdriver while pushing out on the bearing. Be careful not to<br />
damage the swingarm or pry open the slot too far. Once the old bearings are out, reverse the process<br />
with your new bearings. Remove the old pinch bolts and replace them with new ones, making sure<br />
that you use Loctite #242 on the bearing pinch bolt threads. DON’T TIGHTEN THE PINCH<br />
BOLTS YET! Just put them in by hand, and continue to the next step.<br />
Problems? Email scott@santacruzbicycles.com or call us at 831-459-7560
Step 5 – Re-install Swingarm<br />
Position the swingarm on the frame again, with the bearing holes lined up with the pivot hole. Take your<br />
new pivot axle and slide it through the bearing, into the frame and into the bearing on the other side. Apply<br />
Loctite #242 to the bolts, and using one washer per side, tighten the bolts down to the recommended torque<br />
(in the table at the bottom of the page).<br />
Now it is OK to tighten the bearing pinch bolts. Perfect.<br />
Step 6 – Re-install Shock<br />
If you’re replacing the reducers and/or DU bushings on your shock, do that now. Beware that you get no<br />
grease on the DU bushings, but you should put a dab of grease in the hole of the reducers (steel shaft on<br />
Progressive, aluminum on Fox) before putting the frame hardware back in. Greasing the reducers will help<br />
you get the bolt and axle out of your frame when you do this again. Position the rear of the shock between<br />
the uprights, then place the front of the shock between the tabs or shock shuttle up front.<br />
<strong>Superlight</strong>: Slide your new shock axle through the frame tab, the shock and into the other side. This<br />
should be easy to do. Thread the M5 bolts and washers (grease the threads!) into the axle and snug them<br />
down.<br />
Bullit: Slide the short M8 bolt through the shock shuttle/shock and out the other side. Tighten the nut.<br />
Repeat for the rear with your new bolt and nut. Be sure the shock adjustment dials are all in the right<br />
orientation.<br />
Step 7 – Dial That Action In<br />
You’re probably feeling pretty good about yourself now, and you have every right to be, but don’t get too<br />
cocky yet. Torque is now the key. Don’t have a torque wrench? Why not buy one, if you’re into working<br />
on your bike it’s an invaluable tool and will help ensure that you are doing it correctly. Either way, make<br />
sure everything is tight now, using the torque spec chart below.<br />
Model Fastener Description Torque (in-lbs)<br />
Bullit Pivot Axle Bolts (M8 X 1.25 X 12 low head allen cap screws) 120<br />
Bullit/SL Bearing Clamp (M6 X 1.0 X 16 low head allen cap screws) 60<br />
Bullit Front and rear shock bolt (M8 X 1.25 allen cap screw with nylok nut) 120<br />
SL Front shock axle retaining bolts (M5 X 0.8 X 8 allen head cap screws) 40<br />
SL Pivot Axle Bolts (M6 X 1.0 X 12 allen head cap screw) 60<br />
Congratulations – your <strong>Santa</strong> <strong>Cruz</strong> is now overhauled and ready for riding!<br />
(After you put the rest back together)<br />
Problems? Email scott@santacruzbicycles.com or call us at 831-459-7560