Butcher and Nickel 1.0 Overhaul Instructions - Santa Cruz Bikes
Butcher and Nickel 1.0 Overhaul Instructions - Santa Cruz Bikes
Butcher and Nickel 1.0 Overhaul Instructions - Santa Cruz Bikes

Create successful ePaper yourself
Turn your PDF publications into a flip-book with our unique Google optimized e-Paper software.
<strong>Butcher</strong> <strong>and</strong> <strong>Nickel</strong> <strong>1.0</strong> <strong>Overhaul</strong> <strong>Instructions</strong><br />
http://www.santacruzbikes.com/tech/butcher_nickel_tech.php<br />
Bearing <strong>Overhaul</strong> <strong>Instructions</strong> for: <strong>Nickel</strong> (0.1) <strong>and</strong> <strong>Butcher</strong> (0.1) 2010 (Printable<br />
Version)<br />
Tools Needed:<br />
6902/7902/7900 Press Tool<br />
6902 Removal Tool<br />
7902 Bearing Removal Tool<br />
7900 Removal Tool<br />
(2) ll/16" or adjustable wrenches<br />
pliers<br />
Loctite 242 or 243<br />
mallet<br />
seal pick<br />
metric Allen wrench set<br />
torque wrench<br />
<strong>and</strong> some grease<br />
A vice is helpful, but not required.<br />
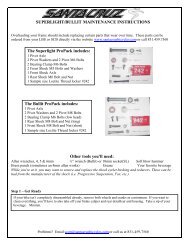
Step 1: Remove Shock<br />
1.<br />
a) Using a 6mm Allen wrench, remove the two bolts attaching the shock.<br />
2.<br />
b) Use caution not to lose the small shim washers on each bolt.<br />
Step 2: Remove Links<br />
1.<br />
a) Using a 5mm Allen wrench, remove the bolt from the lower pivot of the upper link.<br />
1 of 16 28/01/2013 11:04
<strong>Butcher</strong> <strong>and</strong> <strong>Nickel</strong> <strong>1.0</strong> <strong>Overhaul</strong> <strong>Instructions</strong><br />
http://www.santacruzbikes.com/tech/butcher_nickel_tech.php<br />
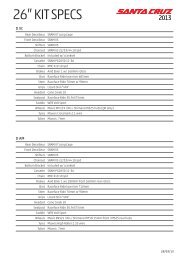
2. b) Use the same Allen wrench to remove the tapered washer from the pivot axle. Wedge the Allen<br />
wrench into the bolt hole <strong>and</strong> side load it to pop the tapered washer out.<br />
3. c) Using an 8mm Allen wrench, loosen <strong>and</strong> remove the pivot axle. Squeeze the APP links together as<br />
you loosen the axle.<br />
4.<br />
d) Use a 6mm allen wrench to remove the APP link fixing bolts from the swingarm.<br />
2 of 16 28/01/2013 11:04
<strong>Butcher</strong> <strong>and</strong> <strong>Nickel</strong> <strong>1.0</strong> <strong>Overhaul</strong> <strong>Instructions</strong><br />
http://www.santacruzbikes.com/tech/butcher_nickel_tech.php<br />
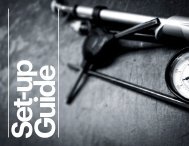
Step 3: Remove Upper Link<br />
1.<br />
a) Using a 4mm Allen wrench, remove the bolt from the upper pivot of the upper link.<br />
2. b) Use the same Allen wrench to remove the tapered washer from the pivot axle. Wedge the Allen<br />
wrench into the bolt hole <strong>and</strong> side load it to pop the tapered washer out.<br />
3. c) Using a 5mm Allen wrench, loosen <strong>and</strong> remove the pivot axle. The link will come off- take care not<br />
to lose any of the pivot caps.<br />
3 of 16 28/01/2013 11:04
<strong>Butcher</strong> <strong>and</strong> <strong>Nickel</strong> <strong>1.0</strong> <strong>Overhaul</strong> <strong>Instructions</strong><br />
http://www.santacruzbikes.com/tech/butcher_nickel_tech.php<br />
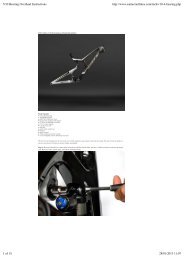
Step 4: Remove Main Pivot Axle <strong>and</strong> Swingarm<br />
1. a) Using a 5mm Allen wrench, remove the bolt from the lower pivot of the upper link.<br />
2. b) Use the same Allen wrench to remove the tapered washer from the pivot axle. Wedge the Allen<br />
wrench into the bolt hole <strong>and</strong> side load it to pop the tapered washer out.<br />
4 of 16 28/01/2013 11:04
<strong>Butcher</strong> <strong>and</strong> <strong>Nickel</strong> <strong>1.0</strong> <strong>Overhaul</strong> <strong>Instructions</strong><br />
http://www.santacruzbikes.com/tech/butcher_nickel_tech.php<br />
3.<br />
c) Using an 8mm Allen wrench, loosen <strong>and</strong> remove the pivot axle. The swingarm will come off at this<br />
point- although it is not necessary to completely remove it. If convenient, feel free to leave it on the<br />
bike- just keep it clear of the main pivot.<br />
5 of 16 28/01/2013 11:04
<strong>Butcher</strong> <strong>and</strong> <strong>Nickel</strong> <strong>1.0</strong> <strong>Overhaul</strong> <strong>Instructions</strong><br />
http://www.santacruzbikes.com/tech/butcher_nickel_tech.php<br />
4. d) Remove Pivot caps for safe keeping.<br />
Step 5: Remove Main Pivot Bearings<br />
1.<br />
a) Assemble “7902 Bearing Removal Tool" as shown on the main pivot bearings.<br />
6 of 16 28/01/2013 11:04
<strong>Butcher</strong> <strong>and</strong> <strong>Nickel</strong> <strong>1.0</strong> <strong>Overhaul</strong> <strong>Instructions</strong><br />
http://www.santacruzbikes.com/tech/butcher_nickel_tech.php<br />
2. b) Once the tool is properly seated on the bearing, tap it out with a hammer.<br />
3.<br />
4.<br />
c) Repeat for opposite side.<br />
d) Clean bearing bores of dirt/grease etc.<br />
Step 6: Change Upper Link Bearings<br />
1.<br />
2.<br />
a) If you have a vise available, clamp the upper pivot of the upper link in as shown. Keep the bearing<br />
caps on this pivot so the vice does not damage the link. If you don't have a vice, hang the link off a<br />
table or work bench. Pad the link with a rag, <strong>and</strong> hold onto it firmly while tapping the bearings out.<br />
b) Remove the two larger bearings using the same technique as the main pivot (step 5)<br />
7 of 16 28/01/2013 11:04
<strong>Butcher</strong> <strong>and</strong> <strong>Nickel</strong> <strong>1.0</strong> <strong>Overhaul</strong> <strong>Instructions</strong><br />
http://www.santacruzbikes.com/tech/butcher_nickel_tech.php<br />
3.<br />
c) Get the bearing press tool out, <strong>and</strong> assemble as shown with one of the new 7902 bearings. Make<br />
sure the black seal of the bearing faces out!!!!!!<br />
4.<br />
d) Tighten the tool with your 11/16" or adjustable wrenches until the bearing bottoms out.<br />
8 of 16 28/01/2013 11:04
<strong>Butcher</strong> <strong>and</strong> <strong>Nickel</strong> <strong>1.0</strong> <strong>Overhaul</strong> <strong>Instructions</strong><br />
http://www.santacruzbikes.com/tech/butcher_nickel_tech.php<br />
5. e) Assemble another bearing onto the other side of the link- again, making sure the black seal faces out.<br />
Tighten this one <strong>and</strong> bottom it in the bore.<br />
6. f) Place the bearing caps back on the link, <strong>and</strong> flip the link so the pivot you just finished working on is<br />
clamped in the vice.<br />
7. g) Repeat the bearing removal process on the smaller bearings, using the 7900 bearing removal tool.<br />
8.<br />
h) Press new 7900 bearings in (black seals out!) using the press tool as shown. For the first bearing- use<br />
one press adaptor on the side of the link opposite the bearing you are pressing first. This will keep the<br />
nut from sinking too deep into the link.<br />
9 of 16 28/01/2013 11:04
<strong>Butcher</strong> <strong>and</strong> <strong>Nickel</strong> <strong>1.0</strong> <strong>Overhaul</strong> <strong>Instructions</strong><br />
http://www.santacruzbikes.com/tech/butcher_nickel_tech.php<br />
9. i) Press the first bearing in, with the nut sitting directly on the bearing.<br />
10.<br />
j) Once the first bearing is seated- remove the press adaptor from the opposite side, <strong>and</strong> press the<br />
second bearing in as you did the first.<br />
Step 7: Install new Main Pivot Bearings<br />
1.<br />
a) Repeat Steps 6b through 6e to press in new main pivot bearings<br />
10 of 16 28/01/2013 11:04
<strong>Butcher</strong> <strong>and</strong> <strong>Nickel</strong> <strong>1.0</strong> <strong>Overhaul</strong> <strong>Instructions</strong><br />
http://www.santacruzbikes.com/tech/butcher_nickel_tech.php<br />
Step 8: Remove APP link bearings<br />
1.<br />
a) Assemble the 6902 Removal Tool as shown. Tighten using an 8mm allen wrench <strong>and</strong> 11/16" or<br />
adjustable wrench until the bearing pops out.<br />
2.<br />
b) Repeat for the other APP link.<br />
11 of 16 28/01/2013 11:04
<strong>Butcher</strong> <strong>and</strong> <strong>Nickel</strong> <strong>1.0</strong> <strong>Overhaul</strong> <strong>Instructions</strong><br />
http://www.santacruzbikes.com/tech/butcher_nickel_tech.php<br />
Step 9: Install new APP link bearings<br />
1.<br />
a) Assemble the 6902 bearing <strong>and</strong> installation tool as shown- with the press adaptor on the backside of<br />
the link is backwards (with the flat side facing the link).<br />
2.<br />
b) Tighten the nuts together until the bearing bottoms in the link.<br />
12 of 16 28/01/2013 11:04
<strong>Butcher</strong> <strong>and</strong> <strong>Nickel</strong> <strong>1.0</strong> <strong>Overhaul</strong> <strong>Instructions</strong><br />
http://www.santacruzbikes.com/tech/butcher_nickel_tech.php<br />
3. c) Repeat for other APP link<br />
Step 10: Install Swingarm<br />
1.<br />
a) Put a dab of grease on each of the bearing caps for the main pivot, <strong>and</strong> place them onto the bearings<br />
(with the lip facing in).<br />
2. b) Clean the pivot axle off, <strong>and</strong> then apply loctite 242 to the threads. Coat all of the non-threaded<br />
surfaces with grease.<br />
3. c) Hold the swingarm in place, <strong>and</strong> use an 8mm allen wrench to thread the axle through the link <strong>and</strong><br />
into the frame. The axle should be only snug- not tight. Think of it like adjusting a headset- you want it<br />
as loose as possible while still removing any lateral play. It will vary slightly, but tightening it to 35-40<br />
in/lbs is a pretty safe bet. This is not very tight<br />
13 of 16 28/01/2013 11:04
<strong>Butcher</strong> <strong>and</strong> <strong>Nickel</strong> <strong>1.0</strong> <strong>Overhaul</strong> <strong>Instructions</strong><br />
http://www.santacruzbikes.com/tech/butcher_nickel_tech.php<br />
4.<br />
d) Apply grease to the external surface of one of the tapered washers, <strong>and</strong> install one of the M6 bolts<br />
through it. Apply Loctite 242 to the threads, <strong>and</strong> tighten to 110 in/lbs.<br />
Step 11: Install APP Links<br />
1.<br />
a) Install bearing caps on the APP links- on the same side as the laser etching.<br />
14 of 16 28/01/2013 11:04
<strong>Butcher</strong> <strong>and</strong> <strong>Nickel</strong> <strong>1.0</strong> <strong>Overhaul</strong> <strong>Instructions</strong><br />
http://www.santacruzbikes.com/tech/butcher_nickel_tech.php<br />
2. b) Apply loctite 242 to the bolt threads, <strong>and</strong> insert the bolt into the link through the backside.<br />
3. c) Using a 6mm allen wrench, tighten the links onto the frame until you reach 190 in/lbs.<br />
Step 12: Install Upper Link<br />
1. a) Clean pivot axles, bolts, <strong>and</strong> tapered washers of grease <strong>and</strong> loctite. Apply loctite to the threads, <strong>and</strong><br />
coat all external non-threaded surfaces of the axle with grease.<br />
2. b) Use a 5mm allen wrench to thread the smaller axle through the link <strong>and</strong> into the frame. The axle<br />
should be only snug- not tight. Think of it like adjusting a headset- you want it as loose as possible<br />
while still removing any lateral play. It will vary slightly, but tightening it to 35-40 in/lbs is a pretty<br />
safe bet. This is not very tight<br />
3.<br />
4.<br />
5.<br />
c) Apply grease to the external surface of the small tapered washer, <strong>and</strong> install the M5 bolt through it.<br />
Apply loctite 242 to the threads, <strong>and</strong> tighten to 100 in/lbs.<br />
d) Repeat steps a-c for the lower pivot, <strong>and</strong> torque the M6 bolt to 110 in/lbs.<br />
e) Apply Loctite 242 to both shock bolts <strong>and</strong> install the shock onto the upper link <strong>and</strong> frame.<br />
15 of 16 28/01/2013 11:04
<strong>Butcher</strong> <strong>and</strong> <strong>Nickel</strong> <strong>1.0</strong> <strong>Overhaul</strong> <strong>Instructions</strong><br />
http://www.santacruzbikes.com/tech/butcher_nickel_tech.php<br />
6. f) Torque to 140 in/lbs.<br />
Derailleur Hanger Change<br />
1.<br />
Use a 4mm allen wrench to remove both bolts. Apply loctite 242 to bolts <strong>and</strong> install new dropout. Hold<br />
hanger straight while you torque the bolts to 80 in/lbs.<br />
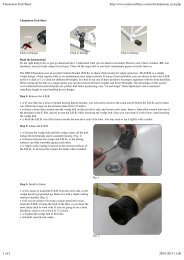
One of the bearings exploded when I tried to remove it- what do I do now?<br />
1.<br />
Unfortunately angular contact bearings are not very strong when you side load them in the opposite<br />
direction they were designed to be loaded in. So, sometimes when removing them, they will come<br />
apart. On the lower link there is a small channel where a punch can be placed on the backside of the<br />
bearing. Just clamp the link in a vise <strong>and</strong> give the punch a good smack with a mallet. They will come<br />
out easily.<br />
The upper link is a little more difficult, but the removal tools will work. Remove all of the seals <strong>and</strong><br />
balls from the broken bearing, <strong>and</strong> clean out the grease so you can see what is going on. Use the<br />
removal tool as usual, but reverse the orientation of the removal jaws. The larger jaws will grab the<br />
bearing race. Make sure the large flat face in the center of the removal jaws is flush on the bearing race.<br />
Once you have the removal driver installed, <strong>and</strong> all seems flush <strong>and</strong> flat, give the driver a couple of taps<br />
with a hammer. The race will come right out.<br />
16 of 16 28/01/2013 11:04