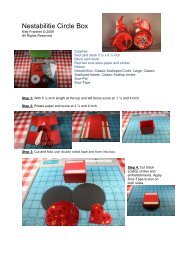
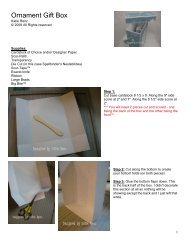
Flip Flop Book - Scor-Pal!
Flip Flop Book - Scor-Pal!
Flip Flop Book - Scor-Pal!

You also want an ePaper? Increase the reach of your titles
YUMPU automatically turns print PDFs into web optimized ePapers that Google loves.
<strong>Flip</strong> <strong>Flop</strong> <strong>Book</strong><br />
Eleonor McGarry © Copyright 2007<br />
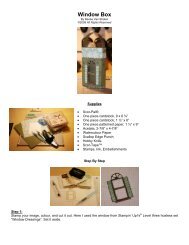
Supplies:<br />
<strong>Scor</strong>-<strong>Pal</strong>®<br />
Decorator Paper - two 7 1/4" x 71/4" (outside Cover)<br />
Light chipboard - two 6 1/4" x 6 1/4" (inside Cover)<br />
Co-coordinating cardstock - two 6" x 6" (inside lining of cover) or you can use decorator paper<br />
Two 12" x 12" cardstock (inside pages and tags)<br />
Four pieces of contrasting cardstock for spine attachments 6" x 1 1/2"<br />
Top Tags - three 3 1/4" x 5 1/2" (cut from second sheet of 12" x12" cardstock)<br />
Bottom Tags - three 2 1/8" x 5 1/2" (cut from second sheet of 12" x12" cardstock)<br />
According to how you decorate your tags you may want to matt your pictures with additional cardstock.<br />
Ribbon for closure<br />
“<strong>Scor</strong>-Tape”<br />
or double sided adhesive<br />
Embellishments for your cover such as prima flowers<br />
Step 1: Prepare your front and back cover covering the chipboard with the decorator paper as<br />
illustrated. Glue paper to chipboard. Clip the corners; fold in the edges and glue. Put aside for future<br />
use.
Step 2: Cut the 12" x 12" cardstock in half. <strong>Scor</strong>e each piece at 3", 6", and 9". Accordion fold as<br />
illustrated with mountain fold in the middle.<br />
Step 3: <strong>Scor</strong>e and fold the four 1 1/2" x 6" pieces. Attach the two accordions together by gluing one of<br />
the strips on top of the joint where the two accordions meet. The center of the accordion should be a<br />
mountain fold as shown in the Front picture. Place a strip folded in the other direction on the back<br />
where the two accordions meet to add strength. Glue the other strips onto the mountain folds for a<br />
consistent decorative treatment.<br />
Step 4: Attach the end flaps to the insides of your cover. Align the length of the fold to just inside the<br />
edge of the cover. I like to align the bottom of the accordion fold with the bottom of the cover so my<br />
book will stand up evenly when it is pulled out and not tip forward.<br />
Step 5: Embellish the tags.<br />
Top Tags - three 3 1/4" x 5 1/2" (cut from second sheet of 12" x12" cardstock)<br />
Bottom Tags - three 2 1/8" x 5 1/2" (cut from second sheet of 12" x12" cardstock)<br />
Note how they are going to be positioned. Use Terrific Tape and glue into place as illustrated. The top<br />
tags are wider so you have more room for pictures.
This is the inside of the project. Rub on transfers were used for the words but this could be easily done<br />
on the computer. No pictures yet. For the ribbon I ran a length of “<strong>Scor</strong>-Tape” across the middle of<br />
the back cover and glued down a portion of the ribbon. I used twill tape that had printed words<br />
“Treasured Moments”.<br />
Text and photos are the property of Eleonor McGarry and <strong>Scor</strong>-<strong>Pal</strong> Products © Copyright 2007