Disconnect the battery negative terminal. Please note to - Halfords
Disconnect the battery negative terminal. Please note to - Halfords
Disconnect the battery negative terminal. Please note to - Halfords

You also want an ePaper? Increase the reach of your titles
YUMPU automatically turns print PDFs into web optimized ePapers that Google loves.
• <strong>Disconnect</strong> <strong>the</strong> <strong>battery</strong> <strong>negative</strong> <strong>terminal</strong>. <strong>Please</strong> <strong>note</strong> <strong>to</strong> check with vehicle manufacturer <strong>to</strong><br />
advise if this is safe, also please make sure you have any radio codes necessary<br />
• Ensure that wherever you drill <strong>the</strong>re are no cables or brake/fuel lines behind <strong>the</strong> panel.<br />
Firstly you should determine <strong>the</strong> most suitable position in <strong>the</strong> boot of <strong>the</strong> vehicle <strong>to</strong> mount your<br />
enclosure and amplifier. We would recommend that you point <strong>the</strong> subwoofer <strong>to</strong>wards <strong>the</strong> rear<br />
of <strong>the</strong> vehicle although you may want <strong>to</strong> experiment with different positions after installation<br />
is complete <strong>to</strong> see which gives <strong>the</strong> best results. Once <strong>the</strong> mounting position has been decided<br />
you can start <strong>to</strong> install <strong>the</strong> wiring.<br />
The included power cable should run from <strong>the</strong> vehicle <strong>battery</strong> through a rubber grommet in<br />
<strong>the</strong> vehicle bulkhead in<strong>to</strong> <strong>the</strong> passenger compartment and <strong>the</strong>n under <strong>the</strong> vehicle trim panels<br />
<strong>to</strong> <strong>the</strong> amplifiers location where it will connect <strong>to</strong> <strong>the</strong> positive <strong>terminal</strong> on <strong>the</strong> amplifier. Be<br />
sure <strong>to</strong> secure <strong>the</strong> fuse holder near <strong>to</strong> <strong>the</strong> <strong>battery</strong> where it can be easily accessed and do not<br />
connect this cable <strong>to</strong> <strong>the</strong> <strong>battery</strong> until <strong>the</strong> rest of <strong>the</strong> wiring is complete (or remove <strong>the</strong> fuse).<br />
The Black cable will run from <strong>the</strong> amplifiers’ <strong>negative</strong> <strong>terminal</strong> <strong>to</strong> a good earth point in <strong>the</strong><br />
vehicle as close <strong>to</strong> <strong>the</strong> amplifier as possible. If drilling a new earth point make sure <strong>the</strong> paint<br />
is removed and <strong>the</strong> surface is clean of dirt and debris, a wire brush can be used for this.<br />
The Blue remote wire runs down <strong>the</strong> same side as <strong>the</strong> power cable and will connect <strong>to</strong> <strong>the</strong><br />
remote output wire from your head unit. You may also use <strong>the</strong> electric aerial output wire but<br />
please ensure that this remains on when ano<strong>the</strong>r source is used i.e: CD Player.<br />
The Signal cables (RCA) will run from your head unit down <strong>the</strong> opposite side of <strong>the</strong> vehicle<br />
from <strong>the</strong> power cable and connect <strong>to</strong> <strong>the</strong> line input jacks on <strong>the</strong> amplifier.<br />
Run one pair of speaker cables from <strong>the</strong> amplifier speaker output <strong>terminal</strong>s and connect <strong>to</strong><br />
<strong>the</strong> input <strong>terminal</strong>s on <strong>the</strong> enclosure observing polarity (red positive, black <strong>negative</strong> on <strong>the</strong><br />
enclosure).<br />
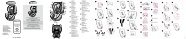
Chassis<br />
Ground<br />
Power Cable +12V<br />
Fuse Holder<br />
Head Unit<br />
Vehicle Battery<br />
Speaker Cable<br />
Remote Turn-On Cable<br />
Signal Cable (RCA)
When turning on your MTSBP12 for <strong>the</strong> first time, turn <strong>the</strong> gain control on <strong>the</strong> amplifier <strong>to</strong><br />
minimum and also turn <strong>the</strong> crossover <strong>to</strong> minimum and <strong>the</strong> bass boost <strong>to</strong> off.<br />
Turn on your head unit and increase <strong>the</strong> volume <strong>to</strong> approximately 3/4’s maximum volume.<br />
Slowly increase <strong>the</strong> gain on <strong>the</strong> amplifier until <strong>the</strong> bass level matches <strong>the</strong> rest of <strong>the</strong> music.<br />
Increase <strong>the</strong> crossover <strong>to</strong> around 80Hz.<br />
If <strong>the</strong> subwoofer dis<strong>to</strong>rts, reduce <strong>the</strong> crossover point/gain until <strong>the</strong> dis<strong>to</strong>rtion disappears.<br />
Peak Power<br />
700 Watts<br />
Max Power<br />
350 Watts<br />
RMS Power<br />
175 Watts<br />
Enclosure Size (ft 3 ) 1.27<br />
Input Sensitivity<br />
90 dB<br />
Voice Coil Size 2”<br />
Magnet Size<br />
45 oz<br />
<strong>Please</strong> register your product online at www.mutant.uk.com/registration <strong>to</strong> be<br />
entered in<strong>to</strong> our free quarterly prize draw. For prize details please visit www.mutant.uk.com.<br />
You will also have <strong>the</strong> opportunity <strong>to</strong> be first <strong>to</strong> hear of any new Mutant Products.
• No Sound from Subwoofer:<br />
Check connections on subwoofer are good and connections at amplifier are good.<br />
• Sound is Dis<strong>to</strong>rted:<br />
Check that gain levels are correct at all amplifiers and processors. Also check that<br />
crossover points are correct.<br />
• Amplifier Does Not Turn On:<br />
Check all power connections at <strong>the</strong> amplifier, also make sure <strong>the</strong> main fuse has not blown<br />
and that <strong>the</strong> earth point is good.<br />
• Amplifier Turns On But No Sound:<br />
Check all speaker and signal wires connections. Also check that <strong>the</strong> Gain and Crossover<br />
points is set correctly.<br />
If <strong>the</strong> above trouble shooting advice does not solve <strong>the</strong> problem, please contact <strong>the</strong> Mutant<br />
Technical Support team or return <strong>to</strong> your dealer with <strong>the</strong> original bill of sale<br />
Dealer:<br />
(Enter your dealer telephone number here for future reference)<br />
Mutant Tech Support: 0900 1020 119*<br />
*Calls cost 60p per minute. Opening hours 9:00am – 5:30pm Mon-Thurs, 9:00 – 1:30pm Fri. Call cost correct at time of print<br />
Technical @armourau<strong>to</strong>.com<br />
For more information about<br />
car audio visit our website at<br />
is a brand name of Armour Au<strong>to</strong>motive Ltd.<br />
Woolmer Way, Bordon, Hampshire, GU35 9QE<br />
T: +44 (0)1420 476767 F: +44 (0)1420 477137<br />
www.armourau<strong>to</strong>.com