

DU-L77 - Service.pioneer-eur.com - Pioneer
DU-L77 - Service.pioneer-eur.com - Pioneer
DU-L77 - Service.pioneer-eur.com - Pioneer

You also want an ePaper? Increase the reach of your titles
YUMPU automatically turns print PDFs into web optimized ePapers that Google loves.
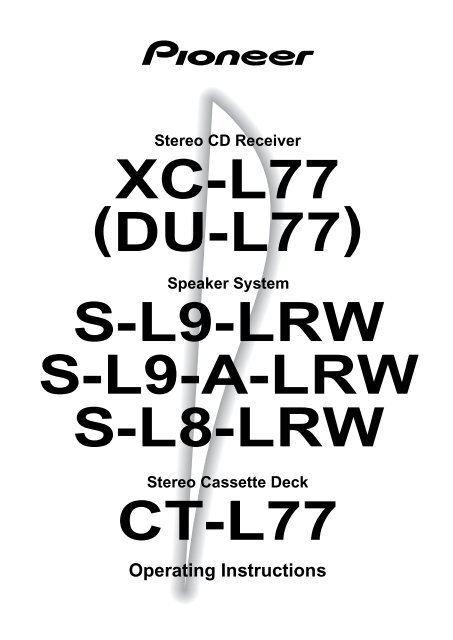
Stereo CD Receiver<br />
XC-<strong>L77</strong><br />
(<strong>DU</strong>-<strong>L77</strong>)<br />
Speaker System<br />
S-L9-LRW<br />
S-L9-A-LRW<br />
S-L8-LRW<br />
Stereo Cassette Deck<br />
CT-<strong>L77</strong><br />
Operating Instructions
Thank you for buying this <strong>Pioneer</strong> product.<br />
Please read through these operating instructions<br />
so you will know how to operate your model<br />
properly. After you have finished reading the<br />
instructions, put them away in a safe place for<br />
future reference.<br />
In some countries or regions, the shape of the<br />
power plug and power outlet may sometimes<br />
differ from that shown in the explanatory<br />
drawings. However, the method of connecting<br />
and operating the unit is the same.<br />
WARNING: TO PREVENT FIRE OR SHOCK<br />
HAZARD, DO NOT EXPOSE THIS APPLIANCE TO<br />
RAIN OR MOISTURE.<br />
THE POWER SWITCH IS SECONDARY CONNECTED<br />
AND THEREFORE DOES NOT SEPARATE THE UNIT<br />
FROM MAINS POWER IN THE STANDBY POSITION.<br />
This product <strong>com</strong>plies with the Low Voltage<br />
Directive (73/23/EEC), EMC Directives (89/336/EEC,<br />
92/31/EEC) and CE Marking Directive (93/68/EEC).<br />
IMPORTANT 1<br />
The lightning flash with arrowhead symbol, within an<br />
equilateral triangle, is intended to alert the user to the<br />
presence of uninsulated "dangerous voltage" within the<br />
product's enclosure that may be of sufficient magnitude<br />
to constitute a risk of electric shock to persons.<br />
CAUTION<br />
RISK OF ELECTRIC SHOCK<br />
DO NOT OPEN<br />
CAUTION:<br />
TO PREVENT THE RISK OF ELECTRIC SHOCK, DO<br />
NOT REMOVE COVER (OR BACK). NO USER-<br />
SERVICEABLE PARTS INSIDE. REFER SERVICING TO<br />
QUALIFIED SERVICE PERSONNEL.<br />
The exclamation point within an equilateral triangle is<br />
intended to alert the user to the presence of important<br />
operating and maintenance (servicing) instructions in<br />
the literature ac<strong>com</strong>panying the appliance.<br />
IMPORTANT<br />
FOR USE IN THE UNITED<br />
KINGDOM<br />
The wires in this mains lead are<br />
coloured in accordance with the<br />
following code:<br />
Blue : Neutral<br />
Brown : Live<br />
If the plug provided is unsuitable for<br />
your socket outlets, the plug must be<br />
cut off and a suitable plug fitted.<br />
The cutoff plug should be disposed of<br />
and must not be inserted into any 13<br />
amp socket as this can result in<br />
electric shock. The plug or adaptor of<br />
the distribution panel should be<br />
provided with a 5 amp fuse. As the<br />
colours of the wires in the mains lead<br />
of this appliance may not correspond<br />
with coloured markings identifying<br />
the terminals in your plug, proceed as<br />
follows:<br />
The wire which is coloured blue must<br />
be connected to the terminal which is<br />
marked with the letter N or coloured<br />
black.<br />
The wire which is coloured brown<br />
must be connected to the terminal<br />
which is marked with the letter L or<br />
coloured red.<br />
Do not connect either wire to the earth<br />
terminal of a three-pin plug.<br />
NOTE<br />
After replacing or changing a fuse, the<br />
fuse cover in the plug must be replaced<br />
with a fuse cover which corresponds to<br />
the colour of the insert in the base of<br />
the plug or the word that is embossed<br />
on the base of the plug, and the<br />
appliance must not be used without a<br />
fuse cover. If lost, replacement fuse<br />
covers can be obtained from your dealer.<br />
Only 5 A fuses approved by B.S.I. or<br />
A.S.T.A. to B.S. 1362 should be used.<br />
CAUTION<br />
RISK OF ELECTRIC SHOCK<br />
DO NOT OPEN<br />
ATTENTION<br />
DANGER D'ELECTROCUTION<br />
NE PAS OUVRIR<br />
These labels can be found on<br />
the unit’s bottom panel.<br />
[For Stereo CD Receiver XC-<strong>L77</strong>]<br />
CAUTION<br />
This product contains a laser diode of higher<br />
class than 1. To ensure continued safety, do not<br />
remove any covers or attempt to gain access to<br />
the inside of the product.<br />
Refer all servicing to qualified personnel.<br />
The following caution label appears on your unit.<br />
US and foreign patents licensed from Dolby<br />
Laboratories Licensing Corporation<br />
These Operating Instructions describe the operating<br />
procedures of not only the XC-<strong>L77</strong> Stereo CD Receiver<br />
but the CT-<strong>L77</strong> Stereo Cassette Deck as well. However,<br />
the CT-<strong>L77</strong> is sold separately.<br />
Location: Bottom of the unit.<br />
CLASS 1<br />
LASER PRO<strong>DU</strong>CT<br />
INFRINGEMENT OF COPYRIGHT<br />
Recording and playback of copyrighted material<br />
may require consent. See the Copyright Design<br />
and Patent Act 1988.
Contents<br />
3 What’s What<br />
1 Before You Start<br />
Before you Start ................................................................................................. 5<br />
2 Installing and Connecting up<br />
Finding a Suitable Location ............................................................................. 7<br />
Connecting Up the System ................................................................................ 8<br />
Front Panel ...................................................................................................... 13<br />
Remote Control ............................................................................................... 14<br />
Display ............................................................................................................. 15<br />
4 Switching On<br />
Switching On and Setting the Clock ............................................................... 16<br />
Playing a Compact Disc .................................................................................. 17<br />
Adjusting the Sound ........................................................................................ 18<br />
Listening to the Radio ..................................................................................... 19<br />
Playing a Cassette Tape ................................................................................... 20<br />
5 Using the CD player<br />
Using the Menu System ................................................................................... 23<br />
Programming the Track Order ....................................................................... 24<br />
Playing Things Again ...................................................................................... 25<br />
Playing Tracks at Random ............................................................................. 26<br />
Changing the Display ...................................................................................... 26<br />
6 Using the Tuner<br />
The Tuner Menu .............................................................................................. 27<br />
Memorizing Stations for Quick Recall ........................................................... 27<br />
Listening to Memorized Stations .................................................................... 28<br />
Giving a Station Memory a Name .................................................................. 28<br />
An Introduction to RDS ................................................................................... 29<br />
Displaying RDS Information .......................................................................... 30<br />
Searching for a Programme Type ................................................................... 31<br />
Changing the Display ...................................................................................... 32<br />
7 Using the Tape Deck<br />
Setting the Reverse Mode ................................................................................ 33<br />
Making Tape Recordings ................................................................................ 33<br />
Automatically Recording a CD ....................................................................... 34<br />
Automatically Recording an MD .................................................................... 35<br />
Recording Other Sources ................................................................................ 36<br />
Resetting the Tape Counter ............................................................................. 37<br />
Changing the Display ...................................................................................... 37<br />
8 Using the Timer<br />
The Timer Menu ............................................................................................. 38<br />
Setting the Wake Up Timer ............................................................................. 38<br />
Cancelling the Wake Up Timer ....................................................................... 39<br />
Setting the Sleep Timer ................................................................................... 40<br />
Setting Up a Future Recording ....................................................................... 40<br />
Cancelling the Record Timer .......................................................................... 42<br />
Setting Multiple Timers ................................................................................... 42<br />
9 Additional Information<br />
Setting the Display Brightness ........................................................................ 43<br />
Switching Off the Demo Mode ........................................................................ 43<br />
Troubleshooting .............................................................................................. 44<br />
Maintenance .................................................................................................... 46<br />
Specifications .................................................................................................. 47
1 Before You Start<br />
Features<br />
Elegant design<br />
The X–LP77 looks as good it sounds. With a front panel almost <strong>com</strong>pletely free<br />
from the usual array of buttons and flashing lights, the X–LP77 has been<br />
designed to blend in elegantly with its surroundings rather than draw attention<br />
to itself. And since the CD receiver and optional tape deck and MD recorder are<br />
separate <strong>com</strong>ponents, you can choose to place them side-by-side for a sleek,<br />
horizontal look, or on top of each other for a more conventional vertical<br />
arrangement. The <strong>com</strong>pact, slim-line speakers also can be used vertically or<br />
horizontally to <strong>com</strong>plement the layout of the system.<br />
Display with detachable remote control<br />
All the <strong>com</strong>ponents in the X–LP77 share a single large fluorescent display and<br />
control panel. This control panel can easily be detached from the display,<br />
turning it into the system’s infrared remote controller.<br />
Direct play function<br />
From standby mode to playing a CD or listening to a tape or the radio in a<br />
single button press: the direct play function intelligently switches on the system,<br />
changes to the desired function and starts playback.<br />
Energy Saving Design<br />
The X–LP77 has been designed to minimize power consumption when in<br />
standby mode (plugged in to the power supply, but with the unit switched off).<br />
Standby power consumption is just 1W, even when both the optional tape deck<br />
and MD recorder are connected.<br />
4
CAUTION<br />
1<br />
2<br />
3<br />
Danger of explosion if battery is incorrectly<br />
replaced.<br />
Replace only with the same or<br />
equivalent type re<strong>com</strong>mended by the<br />
manufacturer. Discard used batteries<br />
according to the manufacturer’s<br />
instructions.<br />
7 meters<br />
30 o 30 o<br />
Operating range of the remote<br />
control unit<br />
1 Before You Start<br />
Checking What’s in the Box<br />
Thank you for buying this <strong>Pioneer</strong> product. Before starting to set up your new stereo<br />
system, please check that you received the following supplied accessories in the<br />
XC–<strong>L77</strong> Stereo CD Receiver box:<br />
• AM loop antenna<br />
• FM wire antenna<br />
• Power cable<br />
• Display unit connecting cable<br />
• Lithium battery CR2025 (for remote control)<br />
• Warranty card<br />
• This instruction manual<br />
In the box that the speakers came in you should find the following accessories:<br />
• Subwoofer connecting cable • Speaker cables (x2)<br />
• Speaker stands (x2)<br />
• Screws (x4) (to attach speaker stands)<br />
• Non skid pads (for satellite speakers (x8), for subwoofer (x4))<br />
Using this manual<br />
This manual is for the XC–<strong>L77</strong> Stereo CD Receiver, CT–<strong>L77</strong> Stereo Cassette Deck and<br />
S–L8/S–L9/S–L9-A speaker system. It is split into two broad sections; the first covers<br />
setting up, and the second, using the system. Set up, which starts here, shows you how<br />
to install and connect up the system.<br />
In the second section of the manual, starting on page 13, you’ll learn how to use every<br />
feature of the CD receiver/cassette deck system. The final part of the manual provides a<br />
troubleshooting section and technical specifications.<br />
Putting the battery in the remote<br />
1 Turn over the remote control. Push a ball-point pen into the hole to release<br />
the battery cover and slide it off.<br />
2 Put in the supplied battery, taking care to match the plus and minus sides<br />
with the markings inside the <strong>com</strong>partment.<br />
3 Slide the cover back on, and your remote is ready for use.<br />
CAUTION:<br />
• Remove the battery if the remote is not going to be used for a month or more.<br />
• Remove dead batteries promptly— they can leak and damage the unit.<br />
• If the remote is connected to the display, no battery is necessary for it to work.<br />
The battery is not recharged by connecting the remote to the display, however.<br />
Using the remote control<br />
Keep in mind the following when using the remote control unit:<br />
• Make sure that there are no obstacles in between the remote and the remote<br />
sensor on the unit.<br />
• Use within the operating range and angle, as shown in the diagram left.<br />
• Remote operation may be<strong>com</strong>e unreliable if strong sunlight or fluorescent<br />
light is shining on the unit’s remote sensor.<br />
• Remote controllers for different devices can interfere with each other. Avoid<br />
using remotes for other equipment located nearby this unit.<br />
• Replace the battery when you notice the operating range of the remote fall.<br />
• On the rear of the remote there is a gold-coloured connector that links the<br />
remote with the display unit. Avoid touching this when using the remote<br />
separately.<br />
5
1 Before You Start<br />
Handling discs<br />
When holding CDs of any type, take care not to leave fingerprints,<br />
dirt or scratches on the disc surface. Hold the disc by its<br />
edge or by the center hole and edge. Damaged or dirty discs can<br />
affect playback and/or recording performance. Take care also<br />
not to scratch the label side of the disc. Although not as fragile<br />
as the recording side, scratches can still result in a disc<br />
be<strong>com</strong>ing unusable.<br />
Should a disc be<strong>com</strong>e marked with fingerprints, dust, etc., clean<br />
using a soft, dry cloth, wiping the disc lightly from the center to<br />
the outside edge as shown in the diagram below. If necessary,<br />
use a cloth soaked in alcohol, or a <strong>com</strong>mercially available CD<br />
cleaning kit to clean a disc more thoroughly. Never use benzine,<br />
thinner or other cleaning agents, including products designed<br />
for cleaning vinyl records.<br />
Wipe lightly from the<br />
center of the disc<br />
using straight strokes<br />
Don’t wipe the disc<br />
surface using circular<br />
strokes<br />
Storing discs<br />
Although CDs are more durable than vinyl records, you should<br />
still take care to handle and store discs correctly. When you're<br />
not using a disc, return it to its case and store upright. Avoid<br />
leaving discs in excessively cold, humid, or hot environments<br />
(including under direct sunlight).<br />
For more detailed care information see the instructions that<br />
<strong>com</strong>e with discs.<br />
Discs to avoid<br />
CDs spin at high speed inside the player during playback and<br />
recording. If you can see that a disc is cracked, chipped, warped,<br />
or otherwise damaged, don't risk using it in your CD player—<br />
you could end up damaging the unit.<br />
This unit is designed for use with conventional, fully circular<br />
CDs only. Use of shaped CDs is not re<strong>com</strong>mended for this<br />
product. <strong>Pioneer</strong> disclaims all liability arising in connection<br />
with the use of shaped CDs.<br />
Using cassette tapes<br />
The tape of a cassette is quite easily damaged and loose tape can<br />
jam in the tape deck mechanism. If the tape has be<strong>com</strong>e<br />
unwound, use a pen or pencil<br />
to wind it back on to the spool.<br />
When not using cassettes,<br />
always store in the case. Store<br />
cassettes away from magnetic<br />
fields, excessive heat, humidity,<br />
dust or oil.<br />
Before recording on a tape,<br />
wind the tape on past the leader tape (about the first 3 or 4<br />
seconds of each side).<br />
Avoid using tapes longer than 90 minutes.<br />
Since tapes longer than 90 minutes are so thin, they are more<br />
susceptible to jamming in the tape deck mechanism and other<br />
trouble such as irregular winding.<br />
Erase protection<br />
You can protect an important recording against accidental<br />
erasure by breaking the erase-protect tab(s) with a small<br />
screwdriver.<br />
For side B<br />
For side A<br />
If you want to re-record on an erase-protected cassette, cover the<br />
space left by the broken tab with self-adhesive tape.<br />
Note: If you're using Type II (High/CrO 2) tapes, make sure<br />
you don't also cover the tape-type detection holes.<br />
Tape-type detection hole<br />
6
STANDBY/ON<br />
MINIDISC<br />
PHONES<br />
10cm<br />
2 Installing and Connecting Up<br />
Finding a Suitable Location<br />
We want you to enjoy using your new stereo system for years to <strong>com</strong>e, so please bear in<br />
25cm<br />
^ )<br />
^ )<br />
@# )<br />
!<br />
10cm<br />
Be sure to leave enough space for<br />
proper ventilation above, either<br />
side and at the rear of the unit.<br />
mind the following points when choosing a suitable location for the system <strong>com</strong>ponents<br />
and speakers:<br />
Do...<br />
✔ Use in a well-ventilated room.<br />
✔ Place on a solid, flat, level surface, such as a table, shelf or stereo rack.<br />
✔ Leave at least 10cm either side of the unit, 15cm at the back, and 25cm<br />
overhead for proper ventilation.<br />
✗<br />
✗<br />
✗<br />
✗<br />
✗<br />
✗<br />
✗<br />
✗<br />
✗<br />
Don’t...<br />
Use in a place exposed to high temperatures or humidity, including near<br />
radiators and other heat-generating appliances.<br />
Place on a window sill or other place where any of the <strong>com</strong>ponents or<br />
speakers will be exposed to direct sunlight.<br />
Use in an excessively dusty or damp environment.<br />
Place directly on top of any appliance which be<strong>com</strong>es hot in use.<br />
Use near a television or monitor as you may experience interference—<br />
especially if the television uses an indoor antenna.<br />
Use in a kitchen or other room where the unit may be exposed to smoke or<br />
steam.<br />
Place on an unstable surface, or one that is not large enough to support all<br />
four of the unit’s feet, or the whole footprint of each speaker.<br />
Block the cooling fan on the rear of the unit. Don’t cover the unit with cloth,<br />
or use on thick carpet, etc.<br />
Place the display unit on or very near a television, monitor or analog clock.<br />
Avoiding condensation problems<br />
Condensation may form inside the unit if it is brought into a warm room from<br />
outside, or if the temperature of the room rises quickly. Although the condensation<br />
won’t damage the unit, it may temporarily impair its performance. For this reason<br />
you should leave it to adjust to the warmer temperature for about an hour before<br />
switching on and using.<br />
CAUTION! Handling power cords<br />
Always handle the power cord by the plug - don’t pull out the plug<br />
from the wall socket by the wire. Avoid touching the plug or cord with<br />
wet hands. Do not place this unit, furniture, etc. on top of the power<br />
cord, and route it in such a way that it is unlikely to be stepped on or<br />
tripped over. Never tie the power cord together with other cords, or<br />
knot it in any way.<br />
A damaged power cord can cause fire or give you an electric shock.<br />
Check the power cord occasionally—if it’s damaged ask a <strong>Pioneer</strong><br />
authorized service centre or your dealer for a replacement.<br />
7
2 Installing and Connecting Up<br />
Connecting Up the System<br />
Important: Before making or changing any rear<br />
panel connections, make sure that all the <strong>com</strong>ponents<br />
are switched off and unplugged from the power<br />
Display cable<br />
Ribbon cable<br />
System connections<br />
Ribbon cables<br />
IMPORTANT: Never connect or<br />
disconnect the system ribbon cables<br />
while the power plug is connected to<br />
the wall outlet. Doing so may damage<br />
the unit.<br />
Display unit<br />
CD receiver<br />
Tape deck<br />
supply.<br />
The CD receiver is the central <strong>com</strong>ponent of the<br />
system: everything else connects to it. The diagram<br />
left shows the tape deck connected to the CD receiver,<br />
without the optional MD recorder or CD recorder. (If<br />
you bought either/both of these, see their respective<br />
instruction manuals for details of connecting them<br />
to the rest of the system.)<br />
1 Connect the display cable between the CD<br />
receiver and display unit, taking care to connect<br />
the L-shaped connector to the display unit.<br />
2 If you also have the tape deck:<br />
Connect it up to the CD receiver using the ribbon<br />
cable attached to the rear of the tape deck. (See<br />
Ribbon cables, left, for important information<br />
on connecting/disconnecting these.)<br />
It is possible to wall-mount the display unit using<br />
two screws (not supplied) securely fastened to a wall.<br />
Line the screws up with the holes on the rear side of<br />
the unit and hang the unit on the wall.<br />
To insert, hold the connector and push<br />
firmly into the socket until you hear it<br />
click home.<br />
To remove, hold the connector<br />
securely on either side with thumb and<br />
forefinger and pull out from the socket.<br />
Screw holes for<br />
wall-mounting<br />
Note: <strong>Pioneer</strong> bears no responsibility for<br />
accidents resulting from faulty assembly or<br />
installation, insufficient mounting strength of<br />
walls or other building fixtures, misuse or<br />
natural disasters.<br />
To use the remote and display as a single unit,<br />
connect the two as shown below. When correctly<br />
connected the four larger buttons light up blue.<br />
1 2 3<br />
8
2 Installing and Connecting Up<br />
Sub-woofer<br />
Right speaker<br />
Left speaker<br />
Sub-woofer cable<br />
CAUTION!<br />
The speaker system is not<br />
magnetically shielded. This<br />
means that if the speakers are<br />
placed very near a television<br />
set or monitor, you may see<br />
colour distortion in the picture.<br />
Move the speaker(s)<br />
further away from the television<br />
to solve the problem.<br />
Do not connect any other<br />
amplifier to this system. In<br />
rare cases this may result in<br />
smoke or fire.<br />
Do not block the port opening<br />
on the front of the<br />
subwoofer.<br />
If you wish to connect speakers<br />
other than the ones supplied,<br />
use only speakers with<br />
a nominal impedance of between<br />
6Ω and 16Ω (the subwoofer<br />
should be 4Ω). Refer<br />
to the instructions that came<br />
with your speakers if you are<br />
unsure of their impedance<br />
before connecting them and<br />
switching on.<br />
Speaker cable<br />
Connecting the speakers<br />
The S–L8/S–L9/S–L9-A speaker system consists of two <strong>com</strong>pact satellite speakers that<br />
deliver the middle and treble frequencies, and a subwoofer that provides powerful bass.<br />
When connecting or disconnecting speakers, make sure that the power is switched off<br />
and the unit unplugged from the wall outlet.<br />
To get the best sound from the system, it’s important that the red (+) and black (–)<br />
speaker terminals on the CD receiver are connected to the corresponding terminals on<br />
each speaker. To help you match up the terminals correctly, the supplied speaker cable<br />
is colour coded: connect the white half of the cable to the black (–) terminals, and the<br />
grey striped half to the red (+) terminals.<br />
Speaker terminal connectors<br />
Note: Make sure that the bare speaker wires cannot touch each other, or <strong>com</strong>e<br />
into contact with other metal parts once the unit is switched on.<br />
Twist the exposed wire<br />
strands together.<br />
Pull open the tab and<br />
insert the twisted wire fully<br />
into the terminal.<br />
Snap the tab shut again<br />
to secure the speaker<br />
cable.<br />
9
2 Installing and Connecting Up<br />
Non-slip pads<br />
Screw holes for<br />
wall mounting<br />
Stand attached for<br />
horizontal placement<br />
For S-L8 speakers: for correct<br />
balance, make sure that the<br />
speaker stands are fixed to the<br />
upper two screw holes when placing<br />
horizontally.<br />
Placing the satellite speakers<br />
The speakers <strong>com</strong>e with stands that can be used if you plan to put the speakers on a<br />
shelf or table. It’s possible to attach the stands so that the speakers stand upright (as<br />
shown in the illustration on the facing page, for example), or on their side — as<br />
shown in the diagram left. Attach a stand to each speaker using the supplied screws<br />
(two per stand). Next, fix two of the supplied non-slip pads to the underside of each<br />
speaker (it makes no difference which way up the speakers are when they are placed<br />
horizontally).<br />
As an alternative to placing your speakers on a shelf or table, you may want to wallmount<br />
them. The rear panel of each speaker has two screw holes for this purpose —<br />
use the single top one for vertical mounting, or both for horizontal mounting. Hang<br />
the speakers from screws in the wall as you would a picture. Screws and other<br />
mounting fixtures are not supplied. If you decide to wall-mount the speakers, make<br />
sure that the wall is capable of supporting the weight of the speakers.<br />
Choosing a listening position<br />
Ideally, the satellite speakers should be at about ear-level when you’re listening to<br />
them. Putting the speakers on the floor, or mounting them very high on a wall is not<br />
re<strong>com</strong>mended. For the best stereo effect, place the speakers 2–3 meters apart, and<br />
choose as your listening position a point within the shaded triangle below.<br />
2–3 meters<br />
10<br />
Note<br />
Screws for wall mounting are<br />
not supplied. Use screws<br />
suitable for the type of material<br />
and strength of the wall<br />
or surface.<br />
Mount the speakers only on<br />
a vertical wall or surface.<br />
<strong>Pioneer</strong> bears no responsibility<br />
for accidents resulting<br />
from faulty assembly or installation,<br />
insufficient<br />
mounting strength of walls<br />
or other building fixtures,<br />
misuse, or natural disasters.<br />
Listening<br />
area<br />
Placing the subwoofer<br />
Placement of the subwoofer is not as critical as the satellite speakers because bass<br />
sounds are much less directional than middle and treble sounds. However, bear the<br />
following points in mind when choosing a suitable location:<br />
❖ The subwoofer’s speakers are at the rear of the unit. Place the subwoofer at<br />
least 5cm away from a wall for best results.<br />
❖ As with other audio <strong>com</strong>ponents, don’t place the subwoofer near heaters,<br />
radiators or other appliances that generate heat.<br />
❖ Although you have some freedom in placement, experiment with different<br />
subwoofer locations—some will sound better than others from your usual<br />
listening position.<br />
Note: Before placing the subwoofer, attach the four supplied non-slip pads to the<br />
underside of the unit. Avoid touching the actual speaker cones of the subwoofer unit<br />
when installing or moving it.
2 Installing and Connecting Up<br />
AM loop antenna<br />
FM wire antenna<br />
Power cable<br />
1<br />
2<br />
3<br />
Connecting the antennas<br />
Connecting the supplied antennas will allow you to listen to both AM and FM radio<br />
broadcasts. If you find that reception quality is poor, an outdoor antenna should give<br />
you better sound quality — see the Connecting external antennas box on the<br />
following page for more on how to do this.<br />
Before making or changing antenna connections, make sure that the power is<br />
switched off and the unit disconnected from the AC wall outlet.<br />
1 Pull off the protective shields of both AM antenna wires.<br />
2 Pull open both tabs and insert one wire fully into each terminal.<br />
3 Snap the tabs shut to secure the AM antenna wires.<br />
Place the AM antenna on a flat surface and point in the direction giving the best<br />
reception. If necessary, stabilize with a pen or pencil through the hole near the base.<br />
Avoid placing near <strong>com</strong>puters, television sets or other electrical appliances (including<br />
the display unit of this system), and do not let it <strong>com</strong>e into contact with metal objects.<br />
It’s also possible to fix the AM antenna to a wall using two small screws or pins<br />
through the two holes at the top of the loop. Before fixing, make sure that the<br />
reception is satisfactory.<br />
11
STANDBY/ON<br />
PHONES<br />
2 Installing and Connecting Up<br />
4 4 Plug the supplied FM antenna into the FM antenna terminal.<br />
For best results, extend the FM antenna fully and fix to a wall or door frame. Don’t<br />
drape loosely or leave it coiled up. The supplied FM antenna is a simple means of<br />
receiving FM stations; using a dedicated, outdoor FM antenna will usually give you<br />
better reception and sound quality. See below for connection details.<br />
Note: The signal earth (H) is designed to reduce noise that occurs when an<br />
antenna is connected. It is not an electrical safety earth.<br />
Connecting external antennas<br />
Outdoor type<br />
Indoor type<br />
External AM antenna<br />
Use 5–6 meters of vinyl-insulated wire<br />
and set up either indoors or outdoors.<br />
Leave the AM loop antenna connected.<br />
External FM antenna<br />
Use 75Ω coaxial cable with a PAL-type<br />
plug connector to hook up an external<br />
FM antenna.<br />
12<br />
Standard stereo audio<br />
lead (not supplied)<br />
AUX/CD-R IN<br />
^ )<br />
DIGITAL<br />
OUT<br />
(OPT.)<br />
L<br />
R<br />
Optical digital audio<br />
lead (not supplied)<br />
L<br />
R<br />
Connecting other <strong>com</strong>ponents<br />
The CD receiver has analog audio inputs and an optical digital output for connecting<br />
up other <strong>com</strong>ponents. Possible uses for the analog inputs include sound from a VCR<br />
or satellite receiver, a file-type (‘jukebox’)<br />
Playback<br />
Recording<br />
L<br />
R<br />
OUT (PLAY)<br />
DIGITAL<br />
IN<br />
(OPT.)<br />
L<br />
R<br />
CD player, or turntable (with suitable<br />
phono amplifier). Use a standard stereo<br />
audio cable (with RCA/phono plugs on<br />
either end) to connect the AUX/CD-R IN<br />
(auxiliary input) on the CD receiver to the<br />
AUDIO OUT sockets on the other<br />
<strong>com</strong>ponent. Be sure to match the colourcoded<br />
plugs and sockets at both ends for<br />
best results.<br />
If you have a digital recorder equipped with<br />
an optical digital input, such as a DAT deck, CD-R or MD recorder, you can connect it<br />
to the CD receiver’s optical digital out for digital recording of CDs. If you didn’t get an<br />
optical cable with your digital recorder, you can buy one from any good audio dealer.<br />
Just above and to the left of the auxiliary inputs there is a socket labelled<br />
FROM MODEL PDR-<strong>L77</strong>. This is for use with the optional CD-recorder only —<br />
see the CD-R manual for more information on this.<br />
Plugging in to the mains<br />
After making sure that the system <strong>com</strong>ponents and speakers are all connected<br />
properly, plug in the power cable to the back of the CD receiver, and the other end to a<br />
mains power outlet.<br />
If you have the optional MD recorder, this has a separate mains lead which must also<br />
be connected. In order to use the MD recorder, you must have both units plugged in.
Front Panel<br />
1 2<br />
3 What’s What<br />
^ )<br />
3 4<br />
5<br />
6<br />
STANDBY/ON<br />
PHONES<br />
7<br />
8<br />
10<br />
@# )<br />
!<br />
9<br />
11 12<br />
CD Receiver<br />
1 CD tray<br />
2 Power light – Lights when the unit is switched on.<br />
3 ^ button – Press to play a disc, or pause a disc that’s already playing<br />
(press again to restart playback).<br />
4 ) button – Press to open or close the CD tray.<br />
5 Play light – Lights when a CD is playing<br />
6 Standby/On button – Press to switch the unit between standby and on<br />
modes. Indicator lights in standby mode. Note: this unit consumes a small<br />
amount of electricity in standby mode (1W).<br />
7 Phones socket – Connect a pair of headphones for private listening.<br />
When plugged in, the speakers are automatically switched off.<br />
Tape deck<br />
8 @# button – Press to play a tape in the current direction, or reverse the<br />
direction of a tape that’s already playing.<br />
9 ) button – Press to open or close the cassette tape tray.<br />
10 Play light – Lights when a tape is playing<br />
11 Cassette tape tray<br />
12 Power light – Lights when the unit is switched on.<br />
13
3 What’s What<br />
Remote Control<br />
18<br />
REMOTE LOCATOR<br />
ON<br />
OFF<br />
1 2 3 4 5 6 7 8 9 10 11 12<br />
17<br />
STANDBY/ ON<br />
<br />
AUX/CD-R SOUND DISPLAY SET MD<br />
TAPE<br />
REC<br />
TIMER/ &<br />
CHARACTER CANCEL<br />
$<br />
! —<br />
›<br />
+ ⁄<br />
VOL<br />
16<br />
15 14 13<br />
14<br />
Remote Locator<br />
This remote control has a<br />
feature that will allow you<br />
to locate it if you’ve mislaid<br />
it in the room. When remote<br />
locator is switched on,<br />
clapping at least three times<br />
within the space of about a<br />
second will cause the<br />
remote control to beep.<br />
This should help you to<br />
locate it.<br />
Although a useful function,<br />
leaving the remote locator<br />
on all the time reduces the<br />
battery life of the remote.<br />
For this reason, an on/off<br />
slider switch is provided on<br />
the rear.<br />
When switched on, the<br />
remote will sometimes beep<br />
if knocked or dropped—<br />
this is not a malfunction.<br />
1 MENU – Press to access various features, including station memory<br />
naming, changing the tape reverse mode, and so on.<br />
2 Tape deck mode – Press to switch the sound to tape deck and start the<br />
tape playing (if there’s one loaded).<br />
3 SOUND – Press to put the $ and › buttons into tone, subwoofer<br />
level and balance control mode.<br />
4 DISPLAY – Press to change the kind of information that the display shows.<br />
The choices available depend on the current function (CD, tape, etc.).<br />
5 SET – Press to finish operations such as setting the clock, setting the reverse<br />
mode, and so on.<br />
6 MD REC – Press to put MD recorder into record-pause mode.<br />
7 TAPE REC – Press to put tape deck into record-pause mode.<br />
8 TIMER/CHARACTER – Press to start setting the timer. Also use to select<br />
characters when naming tuner station memories, etc.<br />
9 & CANCEL – Press to stop playback (or recording) of the CD/MD/tape.<br />
Also use to cancel operations, such as setting the clock, before the SET<br />
button has been pressed (see 5 above).<br />
10 $ › buttons – Press to fast-reverse / fast-forward the CD/MD/tape.<br />
11 CD mode – Press to switch the sound to CD and start the disc playing (if<br />
there’s one loaded).<br />
12 Up – Use to raise the volume.<br />
13 Down – Use to lower the volume.<br />
14 Tuner mode – Press to switch the sound to tuner, switch between AM and<br />
FM, and switch between preset station memories.<br />
15 MD mode – Press to switch the sound to MD and start the disc playing (if<br />
there’s one loaded).<br />
16 Power – Press to switch the unit between standby and on modes.<br />
Note: this unit consumes about 1W of electricity in standby mode.<br />
17 AUX/CD-R mode – Press to switch the sound to the <strong>com</strong>ponent<br />
connected to the AUX/CD-R inputs.<br />
18 REMOTE LOCATOR – Use to switch on/off remote locator (see box,<br />
left).
Display<br />
3 What’s What<br />
1 2<br />
3<br />
4<br />
5 6 7 8 9 10 11 12 13 14 15<br />
16 17 18 19<br />
*<br />
• Dolby noise reduction<br />
manufactured under<br />
license from Dolby<br />
Laboratories Licensing<br />
Corporation.<br />
• “DOLBY”, and the<br />
double-D symbol are<br />
trademarks of Dolby<br />
Laboratories Licensing<br />
Corporation.<br />
1 Tape function – Highlights when in tape deck mode<br />
2 CD function – Highlights when in CD player mode<br />
3 MD function – Highlights when in MD recorder mode<br />
4 Tuner function – Highlights when in tuner mode<br />
5 Aux/CD-R function – Lights when in aux/CD-R mode<br />
6 Record timer – Lights when setting the timer; flashes once set.<br />
7 Wake up timer – Lights when the wake up timer is set; flashes during<br />
wake up timer playback.<br />
8 Sleep timer – Lights when the sleep timer is set.<br />
9 Tuned – Lights when the tuner is tuned to a broadcast.<br />
10 Stereo – Lights when the tuner is receiving an FM stereo broadcast.<br />
11 Mono – Lights when the tuner is set to the mono mode (applies only to FM<br />
broadcasts).<br />
12 RDS – Lights when the tuner is in an RDS mode.<br />
13 MD recording – Lights when MD is in record or record-pause mode.<br />
14 SYNCHRO – Lights during automatic (synchro) recording.<br />
15 Tape recording – Lights when tape deck is in record or record-pause mode.<br />
16 Play direction – Indicates the current direction (side) of the tape.<br />
17 Reverse mode – Indicates the current tape reverse mode.<br />
18 Dolby NR* – Lights when Dolby NR is switched on.<br />
19 Character display<br />
15
4 Switching On<br />
Switching On and Setting the Clock<br />
If you've followed the manual to here, you should now have your system installed with<br />
everything connected up and plugged in. This chapter takes you through using the<br />
basic features: playing CDs and tapes, listening to radio stations, and adjusting the<br />
volume, tone and balance to get the sound you want.<br />
First of all, we'll set the clock. This is mainly used for timer functions, such as the<br />
sleep timer, though you can also use the display as a clock. Unless you unplug the<br />
unit, or there's a power failure, you only need to set the clock once.<br />
SET<br />
TIMER<br />
AUX/CD-R SOUND DISPLAY SET MD TAPE TIMER/ &<br />
STANDBY/ ON<br />
REC<br />
CHARACTER CANCEL<br />
$<br />
! —<br />
›<br />
+ ⁄<br />
VOL<br />
STANDBY/ON<br />
4 ¢<br />
Display shows the CD player as<br />
the current function (no disc<br />
loaded)<br />
1 Switch on.<br />
You can use the STANDBY/ON button on either the remote control or the<br />
CD receiver unit to do this.<br />
The display lights and briefly indicates the current volume level before<br />
showing the current function (e.g. CD).<br />
day / month / year<br />
hour : minute<br />
2 Press TIMER.<br />
3 Press SET.<br />
The display changes to show a date and time, with the day part of the date<br />
flashing to indicate that you can set it.<br />
After setting the day, set the<br />
month<br />
Correct time and date after<br />
setting<br />
Tip<br />
Press DISPLAY in standby<br />
mode to show the day<br />
and time. The display<br />
remains until you hit the<br />
STANDBY/ON button.<br />
4 Use the $ and › buttons to set the<br />
correct day of the month, then press SET.<br />
Once you’ve pressed SET, the month will start flashing.<br />
5 In the same way, set the rest of the date<br />
and time.<br />
Each time you press SET, the next part of the date/time will start flashing.<br />
Adjust using the $ and › buttons.<br />
Pressing SET after setting the minute <strong>com</strong>pletes the clock setup.<br />
Note: The time is in 24-hour clock format (i.e., 13:00 is 1pm).<br />
Remember: If power is interrupted, the clock display will flash until you reset it to<br />
the correct time. To use the timer features, always set the clock to the correct time.<br />
16
Playing a Compact Disc<br />
4 Switching On<br />
Here, we’ll run through the basics you need to play discs in the CD player/receiver.<br />
Other features of the CD player, such as programming the track order, are covered<br />
later —see pages 23 to 26 for <strong>com</strong>plete instructions on all the CD player’s features.<br />
7 CD<br />
UP<br />
Printed/<br />
label side<br />
8cm disc guide<br />
12cm disc guide<br />
)<br />
AUX/CD-R SOUND DISPLAY SET MD TAPE TIMER/ & $ › VOL<br />
STANDBY/ ON<br />
REC<br />
CHARACTER CANCEL ! — + ⁄<br />
4 ¢<br />
DOWN<br />
1 With the system switched on, press ) on<br />
the front panel of the CD receiver.<br />
The disc tray ejects. Place a CD, with the label face up, on to the disc tray,<br />
making sure that it is seated properly in the disc guide.<br />
Note: Do not use an adapter when playing 8cm CD-singles. The disc tray<br />
has guides for both 12cm and 8cm discs.<br />
CD playing with the track<br />
number and track time elapsed<br />
shown in the display.<br />
Tip<br />
In step 2 above, pressing<br />
the CD button closed the<br />
disc tray and set the disc<br />
playing. In fact, pressing<br />
this button is always the<br />
quickest way to play a<br />
disc. If there's already a<br />
disc in the player, then<br />
pressing the CD button—<br />
even when the system is<br />
in standby mode—will<br />
switch the system on,<br />
switch to CD sound, and<br />
start the disc playing.<br />
2 On the remote, press the CD button.<br />
The disc tray closes and the disc starts playing from track 1.<br />
You can also use the CD receiver’s front panel controls:<br />
^ closes the disc tray and starts the disc playing from the first track.<br />
) closes the disc tray without starting playback.<br />
3 Use the UP and DOWN buttons to adjust<br />
the volume.<br />
Press and hold for continuous adjustment. The display indicates the current<br />
volume level as you adjust it.<br />
4 To pause playback, press the CD button.<br />
To resume playback, press again.<br />
You can also use the CD receiver’s front panel controls:<br />
Press ^ once to pause playback; press again to resume.<br />
5 To fast-reverse or fast-forward, press and<br />
hold $ or ›.<br />
You should hear snippets of sound to give you some idea of where you are in<br />
the track. Release the button to resume normal playback.<br />
Continues<br />
17
4 Switching On<br />
Adjusting the Sound<br />
Tip<br />
In step 3, if more than<br />
5 seconds goes by<br />
without you pressing a<br />
button, the system assumes<br />
you're happy<br />
with the new level and<br />
sets it for you, without<br />
you having to press<br />
SET (step 4).<br />
6 To skip back or forward to another track,<br />
press (but don't hold) $ or ›.<br />
Pressing › once skips to the start of the next track on the disc. Further<br />
presses take you to subsequent tracks.<br />
Pressing $ once takes you to the beginning of the current track. Further<br />
presses skip to the start of previous tracks.<br />
You can use the track skip buttons while the disc is paused, too. The track<br />
number changes while the disc remains paused.<br />
7 To stop playback, press &.<br />
If the disc was paused, then the pause mode is cancelled.<br />
On the previous page, you may have adjusted the volume while the CD was playing.<br />
Volume is adjustable from zero (silence) to 36 (maximum volume) using the volume<br />
UP and DOWN buttons on the remote.<br />
So that you can adjust the sound to your liking, you can also adjust the bass, treble,<br />
balance and subwoofer level. Start a disc playing before working through the steps<br />
below so that you can hear the effect of changes as you make them.<br />
SOUND<br />
STANDBY/ ON<br />
AUX/CD-R SOUND DISPLAY SET MD TAPE TIMER/ &<br />
REC<br />
CHARACTER CANCEL<br />
SET<br />
$<br />
! —<br />
›<br />
+ ⁄<br />
VOL<br />
4 ¢<br />
Choose BASS to control the low<br />
frequency sounds<br />
Display shows the current level<br />
New level after adjusting<br />
1 Press SOUND.<br />
Press repeatedly to switch between:<br />
BASS - TREBLE - BALANCE - WOOFER LEVEL<br />
Stop on the one you want to adjust.<br />
2 Press SET.<br />
The display shows the current level.<br />
3 Use the $ and › buttons to adjust the<br />
level.<br />
The display indicates the level as you change it. (The subwoofer has just three<br />
settings: LOW, MEDIUM and HIGH.)<br />
4 When you're happy with the level, press<br />
SET again.<br />
18
4 Switching On<br />
Listening to the Radio<br />
The tuner can receive both FM and AM broadcasts, and lets you memorize your<br />
favourite stations so you don't have to manually tune in every time you want to listen.<br />
Here we run through the basic tuner controls, including switching between AM and<br />
FM, and tuning to a station. Full instructions for all the tuner's other features can be<br />
found on pages 27 to 32.<br />
¢<br />
AUX/CD-R SOUND DISPLAY SET MD TAPE TIMER/ &<br />
STANDBY/ ON<br />
REC<br />
CHARACTER CANCEL<br />
$<br />
! —<br />
›<br />
+ ⁄<br />
VOL<br />
4<br />
TUNER<br />
1 Press TUNER to switch to tuner mode.<br />
Press repeatedly to switch between:<br />
FM - AM - STATION<br />
For now, choose either FM or AM— the STATION option is covered on page<br />
27.<br />
Receiving a stereo station on FM<br />
87.50. The ‘tuned’ and ‘stereo’<br />
indicators are lit.<br />
2 Tune to a station.<br />
There are three tuning modes—step, auto, and high-speed:<br />
Step tuning: Press the $ or › button repeatedly to step through<br />
the frequency band in either direction<br />
Auto tuning: Press and hold the $ or › button until the frequency<br />
display starts to move, then release. The tuner will stop on the next station it<br />
finds. Repeat to search for other stations.<br />
High-speed tuning: Press and hold the $ or › button until the<br />
frequency display starts to move rapidly. Keep the button held down until you<br />
reach the frequency you want. If necessary, fine tune the frequency using the<br />
step tuning method.<br />
When you're tuned into a station, the tuned indicator lights in the display.<br />
If the station is FM stereo, the stereo indicator lights.<br />
Improving poor FM reception<br />
If you're listening to an FM station in stereo but the reception is weak, you can<br />
improve the sound quality by switching to mono:<br />
MENU<br />
SET<br />
AUX/CD-R SOUND DISPLAY SET MD TAPE TIMER/ &<br />
STANDBY/ ON<br />
REC<br />
CHARACTER CANCEL<br />
$<br />
! —<br />
›<br />
+ ⁄<br />
VOL<br />
4 ¢<br />
19
4 Switching On<br />
1 Press MENU.<br />
You’re now in the tuner menu.<br />
2 Press the $ or › button repeatedly to<br />
select FM AUTO/MONO, then press SET.<br />
3 Press the $ or › button to select the<br />
FM MONO option.<br />
(Press again to switch back to FM AUTO mode.)<br />
The ‘mono’ indicator lights next<br />
to the ‘tuned’ symbol.<br />
4 Press SET again to exit the menu.<br />
The mono indicator lights in the display.<br />
Note: The FM MONO mode remains set until you change it back to FM<br />
AUTO mode.<br />
Playing a Cassette Tape<br />
The optional CT–<strong>L77</strong> tape deck features auto-reverse, Dolby B NR (noise reduction)<br />
and auto tape select. The auto-reverse feature lets you play or record both sides of the<br />
tape without physically taking it out and turning it over. Dolby B NR reduces tape hiss<br />
on tapes recorded using Dolby NR (which includes almost all <strong>com</strong>mercially recorded<br />
tapes). Auto tape select means that the deck automatically detects the type of tape<br />
you're playing—normal (type I) or high-position (type II)—so there's no need to<br />
check the tape type and switch manually. Here, we'll run through the basic tape deck<br />
controls; instructions for other features, such as recording, start on page 33.<br />
TAPE<br />
SET<br />
7<br />
AUX/CD-R SOUND DISPLAY SET MD TAPE TIMER/ &<br />
STANDBY/ ON<br />
REC<br />
CHARACTER CANCEL<br />
$<br />
! —<br />
›<br />
+ ⁄<br />
VOL<br />
Cassette<br />
tape<br />
Cassette tray<br />
)<br />
4<br />
¢<br />
Note<br />
Take care to place the<br />
cassette in the cassette<br />
tray the right way<br />
round—the exposed<br />
tape should face toward<br />
the deck as you put it in.<br />
1 Press TAPE to switch to tape mode.<br />
2 Press ) on the front panel to open the<br />
cassette tray.<br />
20
4 Switching On<br />
Tape playing with tape counter<br />
shown in the display. Direction<br />
is ‘forward’<br />
The direction indicator changes<br />
when the tape is reversed<br />
Tape deck searching for the<br />
start of the track after next<br />
Tip<br />
In step 3 above, pressing<br />
TAPE closed the cassette<br />
tray and set the tape<br />
playing. In fact, pressing<br />
this button is always the<br />
quickest way to play a<br />
tape. If there's already a<br />
tape in the player, then<br />
pressing the TAPE button—even<br />
when the system<br />
is in standby<br />
mode—will switch the<br />
system on, switch to<br />
TAPE sound, and start<br />
the tape playing.<br />
3 Load a cassette tape then press TAPE to<br />
close the cassette tray and start playback.<br />
Use a tape that's already recorded on so you can hear something in the<br />
following steps!<br />
The side of the tape you'll hear is whichever is face-up in the tray when you<br />
load it. This is the 'forward' ( 3 ) direction, while the other side is 'reverse'<br />
( 2 ). The forward indicator is shown in the display.<br />
Pressing ) on the front panel also closes the cassette tray, but does not start<br />
playback.<br />
4 To play the other side of the tape, press<br />
TAPE.<br />
Each time you press TAPE during playback, the other side of the tape starts<br />
playing. Pressing TAPE when the tape is stopped starts playback on the side it<br />
was playing previously.<br />
The current tape direction is indicated in the display.<br />
5 To skip back or forward a track on the<br />
tape, press $ or › while the tape is<br />
playing.<br />
› searches for the next blank space between tracks on the side currently<br />
playing (in other words, to the start of the next track), then resumes playback.<br />
$ searches for the previous blank space between tracks on the side<br />
currently playing (in other words, to the start of the current track), then<br />
resumes playback.<br />
By pressing $ or › more than once, the player will skip several tracks<br />
at once. For example, press › twice to skip forward two tracks.<br />
Note: Track search is unlikely to work reliably in the following cases:<br />
❖<br />
❖<br />
❖<br />
❖<br />
if the space between tracks is less than about 4 seconds<br />
if the recording is particularly noisy so the spaces are not recognized<br />
if the recording contains frequent silences, such as a language study tape.<br />
if the recording contains sections of very quiet material, such as some<br />
classical music recordings<br />
6 To stop the tape, press &.<br />
7 To rewind or fast forward the tape, press<br />
$ or › while the tape is stopped.<br />
To stop the tape, press &. Alternatively, press TAPE to start playback directly.<br />
21
4 Switching On<br />
Using Dolby NR.<br />
For best sound quality, tapes that are recorded with Dolby NR should be played with<br />
Dolby NR switched on. This includes virtually all <strong>com</strong>mercially produced tapes—look<br />
for the double –D symbol (2) on the inlay card, or on the cassette tape itself. To<br />
switch Dolby NR on and off:<br />
MENU<br />
SET<br />
AUX/CD-R SOUND DISPLAY SET MD TAPE TIMER/ &<br />
STANDBY/ ON<br />
REC<br />
CHARACTER CANCEL<br />
$<br />
! —<br />
›<br />
+ ⁄<br />
VOL<br />
4 ¢<br />
1 Press MENU.<br />
The tape menu options are:<br />
$ REVERSE MODE ›<br />
DOLBY NR – COUNTER RESET<br />
2 Use $ or › to select DOLBY NR, then<br />
press SET.<br />
3 Press $ or › to switch between Dolby<br />
NR on and off.<br />
The Dolby NR indicator lights<br />
when Dolby NR is switched on<br />
4 Press SET again to exit the menu.<br />
The Dolby NR indicator (2NR) lights in the display when Dolby NR is on.<br />
• Dolby noise reduction manufactured under license from Dolby<br />
Laboratories Licensing Corporation.<br />
• “DOLBY”, and the double-D symbol are trademarks of Dolby<br />
Laboratories Licensing Corporation.<br />
22
5 Using the CD Player<br />
Using the Menu System<br />
Access to many of the less <strong>com</strong>monly used functions of the system is via a menu<br />
system. Each <strong>com</strong>ponent (CD player, tuner, tape deck, auxiliary, and MD recorder) has<br />
it's own set of menu options, but access to all of them is from the MENU button. If<br />
you worked through the last section, you'll have already used the menu system when<br />
you switched between mono and auto FM reception, or switched Dolby NR on/off.<br />
MENU SET<br />
AUX/CD-R SOUND DISPLAY SET MD TAPE TIMER/ &<br />
STANDBY/ ON<br />
REC<br />
CHARACTER CANCEL<br />
$<br />
! —<br />
›<br />
+ ⁄<br />
VOL<br />
Pressing MENU displays the first menu option for the <strong>com</strong>ponent you're currently<br />
using. You can display the next option by pressing ›, or the previous one by<br />
pressing $. The menus 'wrap around', so once you get to the end of the list,<br />
pressing › again takes you back to the first item.<br />
To select the menu option currently displayed, press the SET button. This will take you<br />
to a further 'sub-menu', which may simply consist of two settings (like FM mono and<br />
auto, or Dolby NR on and off), or may have more choices. Either way, choose between<br />
different options with the $ and › buttons, and select them by pressing SET.<br />
If you make a mistake while in the menu system, simply press & to cancel and exit.<br />
The CD menu<br />
The CD menu gives you access to the following functions:<br />
CD PROGRAM - Specify the track order on a disc (page 24)<br />
CD REPEAT MODE - Set the current track or disc to repeat play (page 25)<br />
CD RANDOM PLAY - The player plays tracks in a random order (page 26)<br />
The tuner menu<br />
The tuner menu gives you access to the following functions:<br />
STATION MEMORY - Memorize station frequencies for quick recall (page 27)<br />
STATION NAME - Give station memories meaningful names (page 28) (You'll only<br />
see this option if you're in Station mode - see page 27.)<br />
FM AUTO/MONO - Specify the FM reception mode (page 19) (You'll only see this<br />
option if you're in FM reception mode.)<br />
The tape menu<br />
The tape menu gives you access to the following functions:<br />
4 ¢<br />
REVERSE MODE - Play a single side, or both sides of a tape automatically (page 33)<br />
COUNTER RESET - Set the tape counter to zero (page 37)<br />
DOLBY NR - Switch the Dolby Noise Reduction on or off (page 21)<br />
23
5 Using the CD Player<br />
Programming the Track Order<br />
This mode lets you program a sequence (a playlist) of up to 24 tracks to play. The<br />
order can be anything you choose. Tracks can appear more than once in the playlist,<br />
or can be left out entirely. The playlist applies only to the disc in the player at the time.<br />
Once you eject the disc (or switch the power into standby), the playlist is lost.<br />
MENU<br />
SET<br />
CANCEL<br />
CD<br />
AUX/CD-R SOUND DISPLAY SET MD TAPE TIMER/ &<br />
STANDBY/ ON<br />
REC<br />
CHARACTER CANCEL<br />
$<br />
! —<br />
›<br />
+ ⁄<br />
VOL<br />
4 ¢<br />
1 Press MENU and select CD PROGRAM.<br />
Remember: switch between menu options using the $ and ›<br />
buttons; select the option by pressing SET.<br />
Track 3 has been selected as<br />
the first track in the playlist.<br />
The track length is also shown.<br />
After pressing SET, the step is<br />
memorized.<br />
After pressing MENU, the display<br />
shows the number of tracks in<br />
the playlist, and the total<br />
running time of the playlist.<br />
2 Select a track to add to the playlist using<br />
the $ and › buttons.<br />
For example, to add track 3, press › three times. Or, to add the last but one<br />
track, press $ twice.<br />
3 Press SET to add the track to the playlist.<br />
4 Repeat steps 2 and 3 to continue adding<br />
tracks to the playlist.<br />
If you make a mistake, press CANCEL to delete the last (most recent) track<br />
programmed. (Delete multiple tracks by pressing CANCEL repeatedly.)<br />
5 When you're happy with the playlist, press<br />
MENU.<br />
The playlist can be up to 24 tracks long.<br />
6 Press CD button to start playback.<br />
24<br />
Checking the playlist order<br />
You can only check the playlist order when the disc is stopped. Once stopped, you can<br />
step through the playlist using the $ and › buttons. Each track number on the<br />
playlist is displayed together with the track length.<br />
If you then press CANCEL, the total playing time of the playlist is displayed.<br />
Deleting the playlist<br />
If you want to delete the playlist without ejecting the disc, simply press CANCEL when<br />
the disc is stopped.
5 Using the CD Player<br />
Playing Things Again<br />
You can set the CD player to repeat either a single track over and over, or the whole disc.<br />
MENU<br />
SET<br />
CD<br />
AUX/CD-R SOUND DISPLAY SET MD TAPE TIMER/ &<br />
STANDBY/ ON<br />
REC<br />
CHARACTER CANCEL<br />
$<br />
! —<br />
›<br />
+ ⁄<br />
VOL<br />
4 ¢<br />
1 Press MENU and select CD REPEAT MODE.<br />
Remember: switch between menu options using the $ and ›<br />
buttons; select the option by pressing SET.<br />
One-track repeat mode<br />
All-track repeat mode<br />
The repeat mode indicator<br />
stays lit during playback, too.<br />
Tip<br />
You can use either of the repeat<br />
modes together with the program<br />
play mode.<br />
Setting the repeat mode to<br />
REPEAT ALL plays the tracks in the<br />
playlist over and over. In repeat<br />
track mode, just the current track<br />
in the playlist repeats.<br />
2 Select a repeat mode.<br />
Three options are available:<br />
Remember: switch between menu options using the $ and ›<br />
buttons; select the option by pressing SET.<br />
3 Start playback.<br />
In one track repeat mode, any track you choose will repeat. If you jump to<br />
another track (using track skip or manual search), then the new track will<br />
start repeating.<br />
In all track repeat mode, whenever the end of the disc is reached, the player<br />
will jump back to the first track and continue playback. You’re still free to<br />
skip tracks and use manual search.<br />
Note: The repeat mode you set stays active until you:<br />
❖<br />
❖<br />
❖<br />
$ REPEAT TRK? ›<br />
REPEAT OFF? REPEAT ALL?<br />
select another repeat mode, or switch repeat mode off using the menu.<br />
eject the disc.<br />
switch to standby mode.<br />
25
5 Using the CD Player<br />
Tip<br />
Playing Tracks at Random<br />
To have the CD player play the tracks on a disc in a different order each time you play<br />
You can use either of the repeat<br />
modes together with the random<br />
play mode.<br />
Setting the repeat mode to<br />
REPEAT ALL endlessly plays all the<br />
tracks on the disc at random. In<br />
REPEAT TRACK mode, just the<br />
current randomly selected track<br />
repeats.<br />
the disc, use the random play function. Each track will play just once, but the order<br />
will be random. When all tracks have been played, the disc stops.<br />
MENU<br />
STANDBY/ ON<br />
SET<br />
AUX/CD-R SOUND DISPLAY SET MD TAPE TIMER/ &<br />
REC<br />
CHARACTER CANCEL<br />
$<br />
! —<br />
›<br />
+ ⁄<br />
VOL<br />
4 ¢<br />
1 Press MENU and select CD RANDOM PLAY.<br />
Remember: switch between menu options using the $ and ›<br />
buttons; select the option by pressing SET.<br />
The random indicator lights<br />
during playback<br />
2 Playback begins automatically.<br />
Pressing & during random play stops playback, and random play mode is<br />
cancelled.<br />
You can use random and repeat play together to endlessly repeat all tracks on<br />
a disc in a random order.<br />
Changing the Display<br />
CD disc total display<br />
Clock display<br />
Calendar display<br />
CD elapsed track time display<br />
CD track remain display<br />
CD disc remain display<br />
You can choose to display various kinds of information during playback and stop<br />
modes. Switch between them by pressing the DISPLAY button.<br />
When the disc is stopped<br />
CD DISC TOTAL - displays the number of tracks and the total playing time of the disc<br />
CLOCK - displays the current time and date<br />
CALENDAR - displays the current date<br />
DIMMER SELECT - adjusts the display brightness (see page 43)<br />
When the disc is playing<br />
CD ELAPSED TRACK TIME - displays the track number and the time elapsed<br />
CD TRACK REMAIN - displays the track number and track time still remaining<br />
CD ALL REMAIN - displays the disc time still remaining<br />
CLOCK - displays the current time and date<br />
CALENDAR - displays the current date<br />
DIMMER SELECT - adjusts the display brightness (see page 43)<br />
* In random play mode, CD DISC REMAIN is not available.<br />
26
The Tuner Menu<br />
The tuner menu gives you access to the following functions:<br />
6 Using the Tuner<br />
STATION MEMORY - Memorize station frequencies for quick recall (p.27)<br />
STATION NAME - Give station memories meaningful names (p.28) (You'll only see<br />
this option if you're in Station mode - see page 28.)<br />
FM AUTO/MONO - Specify the FM reception mode (p.19) (You'll only see this<br />
option if you're in FM reception mode.)<br />
Memorizing Stations for Quick Recall<br />
You can store up to 24 station presets (memories) so that you always have easy access<br />
to your favourite stations without having to tune in manually each time. After you've<br />
set a station memory you can give it a name so you can remember which is which.<br />
Note: The following instructions assume that you are already familiar with tuning<br />
into radio stations—turn back to page 19 for detailed tuning instructions.<br />
MENU<br />
SET<br />
AUX/CD-R SOUND DISPLAY SET MD TAPE TIMER/ &<br />
STANDBY/ ON<br />
REC<br />
CHARACTER CANCEL<br />
$<br />
! —<br />
›<br />
+ ⁄<br />
VOL<br />
4 ¢<br />
The tuner tuned to a station on<br />
FM 87.50MHz.<br />
1 Tune into a radio station on either the AM<br />
or FM band.<br />
See page 19 for detailed instructions on how to do this.<br />
2 Press MENU and select STATION MEMORY.<br />
Remember: switch between menu options using the $ and ›<br />
buttons; select the option by pressing SET.<br />
The station memory number—<br />
1 in the display—flashes as<br />
you change it<br />
After pressing SET, the display<br />
reverts to the AM or FM<br />
frequency display<br />
3 Choose a station memory in which to store<br />
the station's frequency.<br />
There are 24 memory locations; each can store one station. Use the $ and<br />
› buttons to step through the locations available.<br />
4 Press SET to store the station.<br />
The display flashes to indicate that it's stored.<br />
Note: Station presets remain memorized for several days if the system is disconnected<br />
from the mains power outlet. After this time, station presets are lost and you’ll<br />
have to re-program them.<br />
27
6 Using the Tuner<br />
Listening to a Memorized Station<br />
When using the tuner button to switch between FM and AM, you've probably noticed a<br />
third option. This is the station memory mode, in which you can listen to the stations<br />
you’ve previously memorized.<br />
4 ¢<br />
AUX/CD-R SOUND DISPLAY SET MD TAPE TIMER/ &<br />
STANDBY/ ON<br />
REC<br />
CHARACTER CANCEL<br />
$<br />
! —<br />
›<br />
+ ⁄<br />
VOL<br />
In station memory mode the<br />
display shows the station<br />
memory number and the<br />
frequency<br />
TUNER<br />
1 Press TUNER repeatedly until the display<br />
looks something like the display left.<br />
Remember: the TUNER button gives you access to FM and AM bands, as<br />
well as the station memories.<br />
2 Use the $ and › buttons to step<br />
through the station memories.<br />
The tuner will jump immediately to the frequency in the station memory.<br />
Unless you've given the station memory a name (see below for how to do<br />
this), the display shows the station memory number and the frequency.<br />
Giving a Station Memory a Name<br />
If you've set up more than a couple of station memories, you'll probably want to give<br />
them names that are a little more memorable than "FM 98.70." Normally, of course,<br />
the name will be that of the radio station.<br />
MENU SET 4 ¢<br />
AUX/CD-R SOUND DISPLAY SET MD TAPE TIMER/ &<br />
STANDBY/ ON<br />
REC<br />
CHARACTER CANCEL<br />
$<br />
! —<br />
›<br />
+ ⁄<br />
VOL<br />
CHARACTER<br />
TUNER<br />
1 Recall the station memory you want to<br />
name.<br />
See Listening to Memorized Stations above for detailed instructions on this.<br />
2 Press MENU and select STATION NAME.<br />
Remember: switch between menu options using the $ and ›<br />
buttons; select the option by pressing SET.<br />
28
6 Using the Tuner<br />
The display shows the station<br />
memory number and a flashing<br />
cursor<br />
Display after inputting the first<br />
character<br />
Tip<br />
If you make a mistake, you can go<br />
back and correct the last<br />
character by pressing DISPLAY. To<br />
abort <strong>com</strong>pletely and start again,<br />
press CANCEL.<br />
Display showing the <strong>com</strong>pleted<br />
name<br />
3 Enter a name for the current station<br />
memory.<br />
Names can be up to 9 characters long and can contain letters (upper and<br />
lower case), numbers, spaces and other symbols.<br />
To select a character:<br />
Use the CHARACTER button to switch between character lists:<br />
Alphabet (uppercase) - Alphabet (lowercase) -<br />
numbers (0-9) & punctuation/symbols<br />
Use the $ and › buttons to select a character from the current list:<br />
ABCDEFGHIJKLMNOPQRSTUVWXYZ . , ' / <br />
abcdefghijklmnopqrstuvwxyz . , ' / <br />
0123456789<br />
! " # $ % & ' ( ) * + , - . / : ; < = > ? @ _ ` <br />
Press SET to enter the character.<br />
The cursor moves to the next character position ready for you to input<br />
another character.<br />
4 When you're happy with the station name,<br />
press MENU to exit.<br />
An Introduction to RDS<br />
Radio Data System, or RDS as it's usually known, is a system used by FM radio<br />
stations to provide listeners with various kinds of information—the name of the<br />
station and the kind of show they're broadcasting, for example. This information<br />
shows up as text on the display, and you can switch between the kind of information<br />
shown. Although you don't get RDS information from all FM radio stations, you do<br />
with most.<br />
Probably the best feature of RDS is that you can search automatically by type of<br />
programme. So, if you felt like listening to jazz, you could search for a station that's<br />
broadcasting a show with the programme type, "JAZZ." There are around 30 such<br />
programme types, including various genres of music, news, sport, talk shows, financial<br />
information, and so on.<br />
The XC–<strong>L77</strong> receiver let's you display three different kinds of RDS information: Radio<br />
Text, Programme <strong>Service</strong> Name, and Programme Type.<br />
Radio Text (RT) is messages sent by the radio station. These can be anything the<br />
broadcaster chooses—a talk radio station might give out its telephone number as RT,<br />
for example.<br />
Programme <strong>Service</strong> Name (PS) is the name of the radio station.<br />
Programme Type (PTY) indicates the kind of programme currently being broadcast.<br />
29
6 Using the Tuner<br />
The XC–<strong>L77</strong> can search for and display the following programme types:<br />
Pop M<br />
Rock M<br />
M.O.R. M<br />
Light M<br />
Classics<br />
Jazz<br />
Country<br />
Nation M<br />
Oldies<br />
Folk M<br />
Other M<br />
News<br />
Affairs<br />
Info<br />
Pop music<br />
Sport<br />
Rock music Educate<br />
“Middle of the road” Drama<br />
music<br />
Culture<br />
‘Light’ classical music Science<br />
‘Serious’ classical music Varied<br />
Country music<br />
Popular music in a<br />
language other than<br />
English<br />
Popular music from the<br />
’50s<br />
Folk music<br />
Other music not fitting<br />
any of the above<br />
categories<br />
Current affairs<br />
General information<br />
Weather<br />
Finance<br />
Children<br />
Social A<br />
Religion<br />
Phone in<br />
Travel<br />
Leisure<br />
Document<br />
Educational material<br />
Science and technology<br />
Usually talk-based<br />
material, such as quiz<br />
shows or interviews.<br />
Children’s entertainment<br />
Social affairs<br />
Holiday-type travel rather<br />
than traffic announcements,<br />
etc.<br />
Leisure interests and<br />
hobbies<br />
Documentaries<br />
In addition, there is a programme type, ALARM!, used for exceptional emergency<br />
announcements. You can't search for this, but the tuner will switch automatically to<br />
any station that’s broadcasting this RDS signal.<br />
Displaying RDS Information<br />
You have access to three kinds of RDS information, and can freely switch between<br />
them.<br />
SET<br />
4 ¢<br />
AUX/CD-R SOUND DISPLAY SET MD TAPE TIMER/ &<br />
STANDBY/ ON<br />
REC<br />
CHARACTER CANCEL<br />
$<br />
! —<br />
›<br />
+ ⁄<br />
VOL<br />
DISPLAY<br />
TUNER<br />
1 Tune into an FM radio station.<br />
Only FM stations broadcast RDS data, so you must be listening to a station in<br />
the FM band to display any RDS information.<br />
For more detailed instructions on tuning to stations, see page 19.<br />
30
6 Using the Tuner<br />
Programme type is selected<br />
The RDS indicator lights and<br />
the broadcast RDS information<br />
is displayed<br />
2 Press DISPLAY.<br />
Press repeatedly and choose between:<br />
RT - Radio Text<br />
PS - Programme <strong>Service</strong> Name<br />
PTY - Programme Type<br />
Stop on the one you want, then press SET.<br />
The display will show the RDS information, if there is any. If the station<br />
you're listening to is not transmitting any RDS information, you'll see the<br />
message NO DATA in the display.<br />
If you selected PTY and the display shows NO TYPE, the display will revert<br />
automatically to the programme service name after about 5 seconds.<br />
Searching for a Programme Type<br />
One of the most useful features of RDS is the ability to search for a particular kind of<br />
radio programme. You can search for any of the programme types listed on page 30—<br />
this covers all kinds of music, as well as news, weather forecasts, sports programmes,<br />
and a variety of others.<br />
SET<br />
4 ¢<br />
AUX/CD-R SOUND DISPLAY SET MD TAPE TIMER/ &<br />
STANDBY/ ON<br />
REC<br />
CHARACTER CANCEL<br />
$<br />
! —<br />
›<br />
+ ⁄<br />
VOL<br />
DISPLAY<br />
TUNER<br />
Select programme type search<br />
Programme type “Jazz” selected<br />
The tuner stops on any station<br />
that is broadcasting that<br />
programme type<br />
1 Press DISPLAY and select PTY SEARCH.<br />
Press DISPLAY repeatedly to switch between the options, then press SET.<br />
2 Select the programme type.<br />
Use the $ and › buttons to change the programme type; select one by<br />
pressing SET.<br />
The <strong>com</strong>plete list is on the previous page.<br />
3 The tuner starts searching for a matching<br />
station.<br />
The tuner searches through the FM stations stored in the station memories.<br />
If the tuner finds a matching programme type, the tuner plays 5 seconds of<br />
the station. To listen to that station, press SET. (The tuner stops searching.)<br />
If you don't press SET during the 5 seconds, the tuner resumes the search.<br />
Cancel the search by pressing &.<br />
31
6 Using the Tuner<br />
Changing the display<br />
You can choose to display various kinds of information when listening to the tuner.<br />
Frequency display<br />
RT display<br />
PS display<br />
PTY display<br />
Switch between them by pressing the DISPLAY button:<br />
FREQUENCY - displays the current radio frequency<br />
RT - displays RDS radio text information<br />
PS - displays RDS programme service name information<br />
PTY - displays RDS programme type information<br />
PTY SEARCH - search for a particular programme type<br />
CLOCK - displays the current time and date<br />
CALENDAR - displays the current date<br />
DIMMER SELECT - adjusts the display brightness (see page 43)<br />
PTY SEARCH display<br />
Clock display<br />
Calendar display<br />
32
7 Using the Tape Deck<br />
Setting the Reverse Mode<br />
The tape deck can play both sides of a tape without you having to take the cassette out<br />
and turning it over by hand. This feature is called auto-reverse (because to play the<br />
other side of the tape, the tape travels in the opposite direction).<br />
You can switch sides any time while playing a tape by pressing the TAPE button (see<br />
page 20 for how to use all the basic playback controls). The reverse mode, however,<br />
tells the deck what to do when it reaches the end of the tape on the side it's playing.<br />
There are three modes:<br />
• ENDLESS – Play the tape round and round continuously: ”<br />
• ONE-WAY – Play one side, then stop: O<br />
• REVERSE – Play both sides then stop: [<br />
MENU<br />
SET<br />
AUX/CD-R SOUND DISPLAY SET MD TAPE TIMER/ &<br />
STANDBY/ ON<br />
REC<br />
CHARACTER CANCEL<br />
$<br />
! —<br />
›<br />
+ ⁄<br />
VOL<br />
4 ¢<br />
Current reverse mode is<br />
‘endless’<br />
Tape playing in ‘reverse’ mode<br />
1 Press MENU and select REVERSE MODE.<br />
Remember: switch between menu options using the $ and ›<br />
buttons; select the option by pressing SET.<br />
2 Select a reverse mode.<br />
Three options are available:<br />
$ ENDLESS? ›<br />
REVERSE? - ONE-WAY?<br />
Remember: switch between menu options using the $ and ›<br />
buttons; select the option by pressing SET.<br />
Note: In endless mode, the deck only plays the tape through 16 times before it stops<br />
automatically. If you start playback in the reverse direction in reverse mode, the tape will<br />
stop after it reaches the end of that side (i.e, it won’t play in the forward direction.)<br />
Making Tape Recordings<br />
You can make tape recordings from any other <strong>com</strong>ponent in the system, and also from<br />
an external <strong>com</strong>ponent connected to the AUX/CD-R inputs. If you're recording from<br />
CD or the optional MD recorder, it's usually most convenient to use the synchrorecording<br />
mode. This makes the process largely automatic with the system starting<br />
and stopping the recording for you. Detailed instructions for this are below. If you're<br />
recording from the tuner or from a <strong>com</strong>ponent connected to the AUX/CD-R inputs, use<br />
the manual recording mode explained on page 36.<br />
Once recording has started, you can't switch to another <strong>com</strong>ponent until either the<br />
recording has stopped, or you pause the recording. So, for example, you can't switch<br />
over to the tuner while you're recording a CD.<br />
33
7 Using the Tape Deck<br />
Unlike some tape decks, there's no need to set recording levels —the deck sets the<br />
right level automatically. Also, when recording, the volume, tone and balance controls<br />
have no effect on the recording. This means that you can record something with the<br />
volume turned right down, if you want.<br />
Before recording, check that the cassette erase tabs have not been broken, and that the<br />
tape is either a type I (normal position) or type II (high position/CrO 2 ) — you can't<br />
record on type IV (metal) tapes using this deck.<br />
If you're recording from the start of a tape, it's a good idea to wind the tape on a little<br />
so that you don't accidently start recording over the leader tape. You can either do this<br />
by hand, or load the tape into the deck and play the tape for 5–6 seconds.<br />
Automatically Recording a CD<br />
Tip<br />
It’s possible to synchro-record<br />
a CD onto<br />
both tape and MD simultaneously.<br />
Set up<br />
both the tape deck and<br />
the MD recorder ready<br />
for recording (steps 1–<br />
4), then press both<br />
REC buttons in step 8.<br />
See the MJ–<strong>L77</strong><br />
manual for more on<br />
MD recording.<br />
This feature makes recording a CD as simple as possible by automatically starting and<br />
stopping the CD and tape together. There are two modes: 1 track synchro records just a<br />
single track, then stops; all tracks synchro records the whole disc.<br />
TAPE<br />
STANDBY/ ON<br />
TAPE REC<br />
AUX/CD-R SOUND DISPLAY SET MD TAPE TIMER/ &<br />
REC<br />
CHARACTER CANCEL<br />
CD<br />
1 Load a cassette into the tape deck.<br />
In order to follow these instructions more easily, place the cassette in the tray<br />
with side A face up.<br />
$<br />
! —<br />
›<br />
+ ⁄<br />
VOL<br />
4 ¢<br />
The recording direction is set<br />
to ‘forward’<br />
The reverse mode is set to<br />
‘reverse’<br />
Dolby NR switched on<br />
2 Check the recording direction.<br />
If the tape direction indicator shows 3 , then recording will start from side A.<br />
If it shows 2 , then recording will start from side B.<br />
If you need to change the direction, press TAPE twice, then &.<br />
3 Set the auto-reverse mode.<br />
If you set this to O, then recording will stop after reaching the end of the<br />
current side. If it's set to p or π, then recording will continue onto the<br />
other side of the tape. However, if you start recording in the reverse direction,<br />
(2) only that side of the tape will be recorded, whatever the reverse mode.<br />
For detailed instructions on setting the reverse mode, see page 33.<br />
4 Turn Dolby NR on or off as required.<br />
Using Dolby NR improves the sound quality of tape recordings that are going<br />
to be played on Dolby NR equipped players. If the tape is not going to be<br />
played on a Dolby NR equipped player (or if you're not sure), you should<br />
leave Dolby NR off.<br />
See page 22 for detailed instructions on switching Dolby NR on/off.<br />
34
7 Using the Tape Deck<br />
5 Press CD to switch to the CD player.<br />
With the CD stopped, the<br />
display shows the number of<br />
tracks and the playing time<br />
The synchro indicator lights<br />
and the recording indicator<br />
flashes<br />
After starting CD playback, the<br />
recording indicator lights<br />
steadily<br />
6 Load the CD you want to record.<br />
See page 17 for detailed instructions on loading discs.<br />
If the disc has started playing, press & .<br />
7 If you want to record just one track, select<br />
the track using the $ and › buttons.<br />
8 Press TAPE REC.<br />
The tape deck goes into record-pause mode, waiting for you to start the CD<br />
player.<br />
9 Press CD to start the CD playing.<br />
Recording starts automatically with the CD.<br />
Once the track or disc has finished, the tape deck goes back into record-pause<br />
mode—press & to fully stop recording.<br />
Should you want to stop recording before the track/disc has finished playing,<br />
simply press & any time during the recording.<br />
Note: If the recorder has to switch the side of the tape half way through a track,<br />
recording will start again on the other side from the beginning of the same track. This<br />
means you don't get a single track spread over two sides of a tape.<br />
Automatically Recording an MD<br />
If you have the optional MD recorder, you can make synchro-recordings from MDs in<br />
the same way as from CDs. Setting up the tape deck to record (setting the record<br />
direction, reverse mode and Dolby NR) is exactly the same. The only difference <strong>com</strong>es<br />
in selecting the source to record.<br />
TAPE REC<br />
AUX/CD-R SOUND DISPLAY SET MD TAPE TIMER/ &<br />
STANDBY/ ON<br />
REC<br />
CHARACTER CANCEL<br />
$<br />
! —<br />
›<br />
+ ⁄<br />
VOL<br />
MD<br />
4 ¢<br />
Cassette loaded and direction,<br />
reverse mode and Dolby NR all<br />
set up<br />
1 Follow steps 1–4 of Automatically<br />
Recording a CD above.<br />
❖ Load a cassette<br />
❖<br />
❖<br />
❖<br />
Set the record direction<br />
Set the reverse mode<br />
Switch Dolby NR on/off.<br />
Continues<br />
35
7 Using the Tape Deck<br />
2 Press MD to switch to the MD recorder.<br />
With the MD stopped, the<br />
display shows the number of<br />
tracks and the playing time<br />
The synchro indicator lights<br />
and the recording indicator<br />
flashes<br />
After starting MD playback, the<br />
recording indicator lights<br />
steadily<br />
3 Load the MD you want to record.<br />
See page 11 of the MD manual for detailed instructions on loading discs.<br />
If the disc has started playing, press &.<br />
4 If you want to record just one track, select<br />
the track using the $ and › buttons.<br />
5 Press TAPE REC.<br />
The tape deck goes into record-pause mode, waiting for you to start the MD<br />
recorder.<br />
6 Press MD to start the MD playing.<br />
Recording starts automatically with the MD.<br />
Once the track or disc has finished, the tape deck goes back into record-pause<br />
mode—press & to fully stop recording.<br />
Should you want to stop recording before the track/disc has finished playing,<br />
simply press & any time during the recording.<br />
Note: If the recorder has to switch the side of the tape half way through a track,<br />
recording will start again on the other side from the beginning of the same track. This<br />
means you don't get a single track spread over two sides of a tape.<br />
Recording Other Sources<br />
Usually, when recording a CD or MD, the synchro-recording feature is the easiest way<br />
to do it. However, if you want to record from the tuner or from a <strong>com</strong>ponent connected<br />
to the AUX/CD-R inputs, you'll need to start and stop the recording manually.<br />
TAPE<br />
TAPE REC<br />
AUX/CD-R SOUND DISPLAY SET MD TAPE TIMER/ &<br />
STANDBY/ ON<br />
REC<br />
CHARACTER CANCEL<br />
$<br />
! —<br />
›<br />
+ ⁄<br />
VOL<br />
AUX/CD-R<br />
7<br />
TUNER<br />
Cassette loaded and direction,<br />
reverse mode and Dolby NR all<br />
set up<br />
1 Follow steps 1–4 of Automatically<br />
Recording a CD on page 34.<br />
❖ Load a cassette<br />
❖<br />
❖<br />
❖<br />
Set the record direction<br />
Set the reverse mode<br />
Switch Dolby NR on/off.<br />
36
7 Using the Tape Deck<br />
The display shows the tuner<br />
tuned to station memory 12<br />
The recording indicator flashes<br />
Once recording starts, the<br />
recording indicator stops<br />
flashing and lights steadily<br />
2 Select the source you want to record.<br />
For example, if you want to record from the tuner, press TUNER, and tune<br />
into a station.<br />
If you are recording from another <strong>com</strong>ponent, set it up ready for playback.<br />
3 Press TAPE REC.<br />
The recorder goes into record-pause mode.<br />
4 Press TAPE to begin recording.<br />
If you’re recording from a <strong>com</strong>ponent that requires you to start playback (a<br />
turntable or another cassette deck, for example), start playback here.<br />
To pause recording, press TAPE REC. To resume, press again.<br />
The recording indicator<br />
disappears<br />
5 When you want to finish the recording,<br />
press &.<br />
Resetting the Tape Counter<br />
The tape deck has a digital tape counter which resets to zero each time you load a<br />
cassette or switch the power off. You can reset the counter to zero at any other time<br />
from the menu.<br />
MENU<br />
SET<br />
AUX/CD-R SOUND DISPLAY SET MD TAPE TIMER/ &<br />
STANDBY/ ON<br />
REC<br />
CHARACTER CANCEL<br />
$<br />
! —<br />
›<br />
+ ⁄<br />
VOL<br />
After pressing SET, the tape<br />
counter returns to zero<br />
Changing the Display<br />
Tape counter display<br />
Clock display<br />
4 ¢<br />
1 Press MENU and select COUNTER RESET.<br />
Remember: switch between menu options using the $ and › buttons;<br />
select the option by pressing SET.<br />
You can choose to display various kinds of when using the tape deck. Switch between<br />
them by pressing the DISPLAY button.<br />
TAPE COUNTER - displays the tape counter<br />
CLOCK - displays the current time and date<br />
CALENDAR - displays the current date<br />
DIMMER SELECT - adjusts the display brightness (see page 43)<br />
Calendar display<br />
37
8 Using the Timer<br />
The Timer Menu<br />
Using the timer features you can automatically record a programme from the tuner at<br />
a certain time, wake up to a CD playing, or fall asleep at night to<br />
the radio. Access to these functions is from the TIMER menu, which is accessed by<br />
pressing the TIMER button. The menu has four options:<br />
WAKE UP - Set the system to switch on and start playing at a certain time (for<br />
example, at the same time as your alarm clock goes in the morning).<br />
TIMER REC - Set the tape deck or optional MD player to record a radio programme at<br />
a certain time.<br />
SLEEP TIMER - Set the system to switch off at a certain time (for example, half an<br />
hour after you go to bed).<br />
CLOCK ADJUST - Set the clock to the correct time (see page 16). Remember, the<br />
timer functions won't work properly unless you've set the clock!<br />
Setting the Wake Up Timer<br />
Once set, the wake-up timer will remain active (i.e., it will switch on the system every<br />
day) until you cancel it (see Cancelling the Wake Up Timer below). You can wake up<br />
to the sound of any <strong>com</strong>ponent in the system, but not a <strong>com</strong>ponent connected to the<br />
AUX/CD-R inputs. To set the wake up timer, you'll need to tell it which <strong>com</strong>ponent to<br />
start playing, what time to start, and also what time to stop.<br />
SET<br />
TIMER<br />
AUX/CD-R SOUND DISPLAY SET MD TAPE TIMER/ &<br />
STANDBY/ ON<br />
REC<br />
CHARACTER CANCEL<br />
$<br />
! —<br />
›<br />
+ ⁄<br />
VOL<br />
4 ¢<br />
1 Select the <strong>com</strong>ponent you want the timer<br />
to start playing.<br />
For example, press the CD button and load a CD into the player (no need to<br />
start it playing). If you're using the tuner, tune in to a radio station.<br />
Remember to set the volume at a suitable level (things sound louder first<br />
thing in the morning...)<br />
2 Select WAKE-UP from the timer menu.<br />
Remember: switch between timer menu options using the $ and ›<br />
buttons; select the option by pressing SET.<br />
38
8 Using the Timer<br />
The ‘on’ time is whatever was<br />
last set for the wake-up timer<br />
Adjust it to what you want.<br />
Remember: the time is<br />
displayed as a 24-hour clock<br />
The ‘off’ time is automatically<br />
set to an hour later than the<br />
‘on’ time<br />
Adjust it to what you want<br />
3 Set the time to switch on.<br />
First, set the hour:<br />
Use the $ and › buttons to change the flashing hour display, then<br />
press SET.<br />
Next, set the minute:<br />
Use the $ and › buttons to change the flashing minute display,<br />
then press SET.<br />
4 Set the switch off time.<br />
Set the hour:<br />
Use the $ and › buttons to change the flashing hour display, then<br />
press SET.<br />
Next, set the minute:<br />
Use the $ and › buttons to change the flashing minute display,<br />
then press SET.<br />
After pressing SET, the display shows you the settings you’ve just made,<br />
including the switch on and off times, the <strong>com</strong>ponent, and the volume level.<br />
The clock and sunrise symbols in the display indicate that the wake up timer<br />
is active.<br />
Note: for the wake-up timer to work, the system must be in standby mode,<br />
so remember to switch the system off before going to sleep. (In standby mode<br />
you can check the timer settings by pressing TIMER.)<br />
Cancelling the Wake Up Timer<br />
Tip<br />
Although you can’t directly<br />
edit the wake-up<br />
settings once they’re<br />
made, if you cancel the<br />
wake-up timer then set<br />
it again, the previous<br />
settings will show up in<br />
the display.<br />
The wake-up timer doesn't automatically cancel, since you may well want to have the<br />
system switch on every morning at the same time, for example.<br />
STANDBY/ ON<br />
SET<br />
TIMER<br />
AUX/CD-R SOUND DISPLAY SET MD TAPE TIMER/ &<br />
REC<br />
CHARACTER CANCEL<br />
$<br />
! —<br />
›<br />
+ ⁄<br />
VOL<br />
4 ¢<br />
If the clock and sunrise<br />
indicators are lit, then when<br />
you press SET...<br />
1 Select WAKE-UP from the timer menu.<br />
Remember: switch between timer menu options using the $ and ›<br />
buttons; select the option by pressing SET.<br />
After pressing SET, the timer indicator in the display goes out.<br />
...the wake-up timer is<br />
cancelled<br />
39
8 Using the Timer<br />
Setting the Sleep Timer<br />
When setting the sleep timer, you only have to tell the system when to switch off.<br />
SET<br />
TIMER<br />
AUX/CD-R SOUND DISPLAY SET MD TAPE TIMER/ &<br />
STANDBY/ ON<br />
REC<br />
CHARACTER CANCEL<br />
$<br />
! —<br />
›<br />
+ ⁄<br />
VOL<br />
4 ¢<br />
1 Select SLEEP TIMER from the timer menu.<br />
Remember: switch between timer menu options using the $ and ›<br />
buttons; select the option by pressing SET.<br />
2 Select a time option:<br />
Use the $ and › buttons to switch between options, then press SET.<br />
After choosing one of the sleep<br />
options, the display dims $ SLEEP AUTO ›<br />
SLEEP 90 - SLEEP 60 - SLEEP 30 - SLEEP OFF<br />
Tip<br />
AUTO plays the current CD, tape or MD out, then switches off the system.<br />
AUTO will not be available if a CD<br />
or MD is playing in repeat mode<br />
(see p.25), or if a tape is playing<br />
in endless mode (see p.33). If you<br />
select AUTO, then subsequently<br />
start playing something in repeat<br />
or endless mode, the sleep timer<br />
will change automatically to the 90<br />
minute setting.<br />
Setting Up a Future Recording<br />
90, 60 and 30 options switch off the system after 90, 60 and 30 minutes,<br />
respectively; OFF cancels the sleep timer if it was previously set.<br />
The little moon indicator lights in the display to show the sleep timer is set and the<br />
display dims. To check how much time is left on the sleep timer, select SLEEP TIMER<br />
from the timer menu, then press SET. The display shows the remaining time.<br />
You can set the timer to record something from either the tuner or a <strong>com</strong>ponent<br />
connected to the AUX/CD-R inputs. For example, you might want to record a<br />
programme on the radio that is broadcast while you're at work. If you're recording<br />
from an auxiliary <strong>com</strong>ponent it must also be able to switch on at the time the<br />
recording starts —this system can't control it —or you have to leave it switched on<br />
until the recording has finished.<br />
Timer recording works with either the tape deck or the optional MD recorder. During<br />
the actual recording, the volume is automatically set to minimum.<br />
SET<br />
TIMER<br />
AUX/CD-R SOUND DISPLAY SET MD TAPE TIMER/ &<br />
STANDBY/ ON<br />
REC<br />
CHARACTER CANCEL<br />
$<br />
! —<br />
›<br />
+ ⁄<br />
VOL<br />
4 ¢<br />
40
8 Using the Timer<br />
The tape deck is set up ready<br />
to record<br />
The tuner is set up ready to be<br />
recorded<br />
1 Set up the tape deck/MD recorder.<br />
If you're recording to tape:<br />
Load a cassette tape, set the recording direction and reverse mode, and<br />
switch on/off Dolby NR as required.<br />
If you're recording to disc:<br />
Load an MD into the recorder.<br />
2 Set up the tuner/auxiliary <strong>com</strong>ponent.<br />
If you're recording from the tuner:<br />
Switch to the tuner, and tune into the station (see page 19 for more<br />
detailed instructions on this).<br />
If you're recording from the auxiliary <strong>com</strong>ponent:<br />
Switch to that <strong>com</strong>ponent and set it up for playback.<br />
3 Select TIMER REC from the timer menu.<br />
Remember: switch between timer menu options using the $ and ›<br />
buttons; select the option by pressing SET.<br />
The on time is whatever was<br />
last set for timer recording<br />
Adjust it to what you want.<br />
Remember: the time is<br />
displayed as a 24-hour clock<br />
The ‘off’ time is automatically<br />
set to an hour later than the<br />
‘on’ time<br />
Adjust it to what you want<br />
Confirm that you’re recording<br />
to tape<br />
4 Set the recording start time:<br />
First, set the hour:<br />
Use the $ and › buttons to change the flashing hour display, then<br />
press SET.<br />
Next, set the minute:<br />
Use the $ and › buttons to change the flashing minute display,<br />
then press SET.<br />
5 Set the recording end time:<br />
First, set the hour:<br />
Use the $ and › buttons to change the flashing hour display, then<br />
press SET.<br />
Next, set the minute:<br />
Use the $ and › buttons to change the flashing minute display,<br />
then press SET.<br />
6 Select either tape or MD recording:<br />
Use the $ or › button to switch between options, then press SET.<br />
TAPE REC - MD REC (only available if an MD recorder is connected)<br />
After pressing SET, the display shows you the settings you’ve just made,<br />
including the switch on and off times, and the <strong>com</strong>ponents you’re recording<br />
to and from. The clock and record symbols in the display indicate that the<br />
record timer is set.<br />
Be sure to switch the system into standby mode before timer recording starts. (In standby<br />
mode you can check the timer settings by pressing TIMER.)<br />
After the recording has finished, the timer recording mode is automatically cancelled.<br />
41
8 Using the Timer<br />
Cancelling the Record Timer<br />
Once the timer recording has finished, the timer is automatically cancelled. However,<br />
if you need to cancel it before the recording has started, (either because you made a<br />
mistake setting it, or simply because you no longer want to make the recording),<br />
here’s how you do it.<br />
SET<br />
TIMER<br />
AUX/CD-R SOUND DISPLAY SET MD TAPE TIMER/ &<br />
STANDBY/ ON<br />
REC<br />
CHARACTER CANCEL<br />
$<br />
! —<br />
›<br />
+ ⁄<br />
VOL<br />
4 ¢<br />
If the clock and record<br />
indicators are lit, then when<br />
you press SET...<br />
1 Select TIMER REC from the timer menu.<br />
Switch between timer menu options using the $ and › buttons; select<br />
the option by pressing SET.<br />
After pressing SET, the timer indicator in the display goes out.<br />
...the record timer is cancelled<br />
Setting Multiple Timers<br />
You can set more than one of the timers —to record a radio programme with the<br />
record timer, then later start playing a CD at the time set by the wake-up timer, for<br />
example. Be careful, however, to leave at least a minute between the end time for one<br />
timer and the start time of another. If the start and end times overlap or are the same,<br />
the later timer will not operate correctly.<br />
✘<br />
✔Timer recording<br />
Timer recording<br />
Wake-up timer<br />
Wake-up timer<br />
End time Start time<br />
At least 1 minute<br />
42
9 Additional Information<br />
Setting the Display Brightness<br />
You can adjust the brightness of the display to suit the lighting conditions of the room.<br />
For example, in a brightly lit room you'd probably want the display brighter than in a<br />
room with low lighting.<br />
SET<br />
@ #<br />
AUX/CD-R SOUND DISPLAY SET MD TAPE<br />
STANDBY/ ON<br />
‡/*<br />
TIMER/ &<br />
CHARACTER CANCEL<br />
$<br />
! —<br />
›<br />
+ ⁄<br />
VOL<br />
DISPLAY<br />
4 ¢<br />
1 Choose DIMMER SELECT from the display<br />
menu.<br />
Remember: Switch between the display menu options using the DISPLAY<br />
button; select the option by pressing SET.<br />
2 Adjust the brightness using the $ and<br />
› buttons.<br />
There are five levels of brightness.<br />
43
9 Additional Information<br />
Troubleshooting<br />
Incorrect operation can be mistaken for trouble or malfunction. If you think that there is something wrong with this <strong>com</strong>ponent,<br />
check the points below. Sometimes the trouble may lie in another <strong>com</strong>ponent. Investigate the other <strong>com</strong>ponents and electrical<br />
appliances being used. If the trouble cannot be rectified even after exercising the checks below, ask your nearest <strong>Pioneer</strong> authorized<br />
service station to carry out repair work.<br />
Symptom<br />
Power turns off<br />
abruptly during<br />
operation.<br />
No sound<br />
Can’t switch between<br />
functions.<br />
Play doesn’t start when<br />
the play/pause button<br />
is pressed.<br />
Can’t listen to<br />
broadcasts, or sound is<br />
distorted.<br />
Broadcast is in stereo,<br />
but sound from<br />
speakers is monaural.<br />
Can’t record<br />
Likely Cause<br />
Remedy<br />
• Cooling fan vent is blocked.<br />
• The CD receiver has been set on top of soft cloth<br />
or deep-pile rug, thus blocking the cooling vents.<br />
• Power plug is disconnected.<br />
• Not all connection cables are connected properly.<br />
• Unit is in demo mode.<br />
• Cassette deck or MD recorder is currently<br />
recording.<br />
• Disc has been inserted upside down.<br />
• Disc is dirty.<br />
• Disc has scratches.<br />
• Antenna isn’t connected.<br />
• Antenna direction or position is poor.<br />
• An electrical appliance (fluorescent lamp, hair<br />
dryer, etc.), including the fluorescent display of<br />
this system, is being used in the near vicinity.<br />
• The frequency interval is incorrectly set.<br />
• Monaural indicator is lit in the display.<br />
• Erasure-prevention tabs are broken out from the<br />
tape cassette.<br />
Sound is muddy or • Heads are dirty.<br />
distorted. When recording<br />
over a previous<br />
• A type IV (Metal) tape is being used.<br />
recording, the old<br />
recording can still be<br />
heard underneath.<br />
• Install so that the fan is not blocked.<br />
• Do not install the CD receiver on top of any<br />
surface that may block the vents.<br />
• Connect the power plug correctly.<br />
• Refer to the section on connections and make<br />
sure all connections are correct and secure.<br />
• To cancel the demo mode, press the power<br />
switch on either of the CD receiver, display<br />
unit, or remote control unit while the demo<br />
mode is operating.<br />
• You cannot change the function during<br />
recording.<br />
• Load discs with label side (printed surface)<br />
upwards.<br />
• Clean the disc.<br />
• Use another disc.<br />
• Connect antennas properly.<br />
• Orient antenna to the proper direction and<br />
position.<br />
• Discontinue use of the appliance producing the<br />
noise, or move it farther away from the<br />
antenna.<br />
• Adjust the tuning frequency interval correctly<br />
(p.45).<br />
• Use the MENU button to select “FM AUTO”<br />
(p.19).<br />
• Either replace the tape, or place cellophane<br />
tape over the erasure-prevention tabs (p.6).<br />
• Clean the heads (p.46).<br />
• Use either a type I (Normal), or Type II (Cr02)<br />
tape.<br />
44
9 Additional Information<br />
Symptom<br />
Playback sound is<br />
muddy or distorted;<br />
high frequency sounds<br />
are excessively<br />
emphasized.<br />
Timer doesn’t operate.<br />
Remote control unit<br />
doesn’t work.<br />
Likely cause<br />
• The Dolby NR setting is not the same as that<br />
used during recording.<br />
• Clock isn’t set to the correct current time.<br />
• Power interruption has caused the clock to be set<br />
to the incorrect time (when the clock display is<br />
flashing).<br />
• Batteries are exhausted.<br />
• A fluorescent lamp is located close to the remote<br />
control unit.<br />
• The remote control unit is not pointed at the<br />
signal receiver on the display unit.<br />
Remedy<br />
• Set the Dolby NR system to the same setting as<br />
that used during recording (see p.22).<br />
• Reset the clock to the correct current time<br />
(see p.16).<br />
• Reset the clock to the correct current time<br />
(see p.16).<br />
• Load new batteries.<br />
• Remove the fluorescent lamp from the area of<br />
the remote control unit.<br />
• Point the remote control unit at the remote<br />
sensor (located on the right side of the display<br />
unit) when operating.<br />
Power won’t turn on to<br />
the deck or CD receiver.<br />
• System cable connection is incorrect.<br />
• Connect the system cable correctly.<br />
Remote Locator<br />
function doesn’t work<br />
• The microphone in the remote control is covered<br />
• The remote control is too far away.<br />
• The battery in the remote control is dead.<br />
• The slide switch is in the OFF position.<br />
• The interval between claps is too long or too<br />
short.<br />
• This is not a malfunction.<br />
• Move to a different location and try again.<br />
• Replace the battery.<br />
• Slide the Remote Locator switch to the ON<br />
position<br />
• The interval should be about a second.<br />
• When the system is installed near a television set, magnetic influence from the speakers may cause the television’s picture to be<br />
distorted. This symptom frequently occurs when using an indoor antenna; in this event, install an outdoor antenna, or separate<br />
the system farther from the television.<br />
• Static electricity and other outside electrical influences may cause the system to operate incorrectly. In such cases, unplugging<br />
and reconnecting the power cord may help correct the problem.<br />
• More than one of the same kind of <strong>com</strong>ponent (CD receiver, MD recorder, or cassette deck) cannot be connected at the same<br />
time.<br />
NOTE<br />
Setting the tuner’s frequency interval:<br />
FM broadcasts are normally tuned at 50kHz intervals and AM broadcasts at 9kHz intervals, but this setting can be changed to<br />
100kHz (FM) and 10kHz (AM) if desired in the following way:<br />
1. Switch the unit into standby mode.<br />
2. Press MENU and choose TUNER F. STEP using the $ or › button. Press SET to select it.<br />
3. Switch between AM 9K (FM 50K) and AM 10K (FM 100K) using the $ and › buttons. Press SET to select.<br />
45
9 Additional Information<br />
Maintenance<br />
Cleaning external surfaces<br />
To clean the <strong>com</strong>pact disc recorder, wipe with a soft, dry cloth. For stubborn dirt, wet a<br />
soft cloth with a mild detergent solution made by diluting one part detergent to 5 or 6<br />
parts water, wring well, then wipe off the dirt. Use a dry cloth to wipe the surface dry.<br />
Do not use volatile liquids such as benzene and thinner which may damage the<br />
surfaces.<br />
Moving the unit<br />
If you need to move the unit, first switch it off and unplug from the wall outlet. Never<br />
lift or move the unit during playback or recording—CDs rotate at a high speed and<br />
may be damaged.<br />
CD lens cleaner<br />
The <strong>com</strong>pact disc player's pickup lens should not be<strong>com</strong>e dirty in normal use, but if<br />
for some reason it should malfunction due to dirt or dust, consult your nearest<br />
<strong>Pioneer</strong> authorized service center. Although lens cleaners for <strong>com</strong>pact disc recorders<br />
are <strong>com</strong>mercially available, we do not re<strong>com</strong>mend using them since some may<br />
damage the lens.<br />
Tape head cleaner<br />
To maintain the recording/playback quality of the tape deck, use a <strong>com</strong>mercially<br />
available wet-type cassette head cleaner. Avoid using dry-type cassette head cleaners.<br />
Be careful: Some cassette head cleaners are not designed to work with auto-reverse<br />
decks and may be<strong>com</strong>e jammed in the mechanism — ask your <strong>Pioneer</strong> authorized<br />
service centre for details.<br />
After using the head cleaner, leave the unit for 2–3 minutes before playing a tape. This<br />
will give any excess cleaning fluid a chance to dry.<br />
Demagnetizing the tape head<br />
The recording/playback head in the tape deck gradually be<strong>com</strong>es magnetized after<br />
long periods of use. Playback and recording quality will suffer as a result, with a lack<br />
of treble and increased noise. To avoid the problem, we re<strong>com</strong>mend using a head<br />
demagnetizer at regular intervals. These are available from any good audio dealer.<br />
When using a head demagnetizer, be sure to turn the volume right down and unplug<br />
any headphones to avoid damaging the unit or the speakers. For further details, refer<br />
to the instructions that came with the head demagnetizer.<br />
46
Specifications<br />
Stereo CD Receiver: XC-<strong>L77</strong><br />
Amplifier Section<br />
Continuous Power Satellite (RMS) ....................... 30 W + 30 W<br />
(1 kHz, THD 10%, 8 Ω)<br />
Continuous Power Subwoofer (RMS) ................................ 50 W<br />
(100 Hz, THD 10%, 4 Ω)<br />
Continuous Power Satellite (DIN) ......................... 22 W + 22 W<br />
(1 kHz, THD 1%, 8 Ω)<br />
Continuous Power Subwoofer (DIN) .................................. 40 W<br />
(100 Hz, THD 1%, 4 Ω)<br />
Music Power Satellite (DIN) .................................. 40 W + 40 W<br />
(1 kHz, THD 1%, 8 Ω)<br />
Music Power Subwoofer (DIN) ........................................... 70 W<br />
(100 Hz, THD 1%, 4 Ω)<br />
FM Tuner Section<br />
Frequency Range ................................................. 87.5 - 108MHz<br />
Antenna ......................................................... 75 Ω, unbalanced<br />
AM Tuner Section<br />
Frequency Range ........................................ 531 kHz - 1,602 kHz<br />
(9 kHz step);<br />
530 kHz - 1,700 kHz (10 kHz step)<br />
Antenna ................................................................ Loop antenna<br />
Compact Disc Player Section<br />
Type ...................................... Compact disc digital audio system<br />
Usable discs .......................................................... Compact discs<br />
Channels ..................................................................... 2 (stereo)<br />
Frequency Response ............................................... 4 Hz–20 kHz<br />
Signal-to-Noise Ratio ........................................... 110 dB (EIAJ)<br />
Wow and Flutter ..................................... Limit of measurement<br />
(0.001%) or less (EIAJ)<br />
Power Requirements .................................... AC 230 V, 50/60 Hz<br />
Power Consumption (ON mode) ........................................ 98 W<br />
Power Consumption (Standby mode) ............................... 0.9 W<br />
Dimensions ............................. 220 (W) x 75 (H) x 318 (D) mm<br />
Weight ................................................................................ 4.0 kg<br />
Accessories<br />
Operating instructions .............................................................. 1<br />
Warranty card ............................................................................ 1<br />
FM wire antenna ...................................................................... 1<br />
AM loop antenna ....................................................................... 1<br />
Lithium battery (CR2025) ........................................................ 1<br />
AC power cable .......................................................................... 1<br />
Display unit connecting cable .................................................. 1<br />
9 Additional Information<br />
Stereo Cassette Deck: CT-<strong>L77</strong><br />
System ................................................ 4-track, 2-channel stereo<br />
Heads ........................................... Recording/playback head x 1<br />
Erase head x 1<br />
Motor ........................................................... DC Servo motor x 1<br />
Frequency Response (–20dB recording)<br />
Type I (Normal) tape ....................... 20 Hz–16,000 Hz ± 6 dB<br />
Type II (High/CrO2) tape ................. 20 Hz–16,000 Hz ± 6 dB<br />
Signal-to-Noise Ratio ........................................................ 56 dB<br />
(EIAJ, peak recording level, audio <strong>com</strong>pensation)<br />
Noise Reduction Effect<br />
Dolby B-type NR ON ..................... More than 10 dB (at 5 kHz)<br />
Wow and Flutter .................................................... 0.08% WRMS<br />
±0.14% (DIN)<br />
Dimensions .............................220 (W) x 75 (H) x 310 (D) mm<br />
Weight ................................................................................ 2.2 kg<br />
Accessories<br />
Supplementary Operating instructions ..................................... 1<br />
Warranty card ............................................................................ 1<br />
Satellite Speaker System: S-L8-LR / S-L9-LR / S-<br />
L9-A-LR<br />
Type ...................................................... Enclosed bookshelf type<br />
Speaker Elements ........................................ 70mm (cone type)<br />
Nominal impedance ........................................................... 8 Ω<br />
Frequency response ...................................... 125 Hz–20,000 Hz<br />
Maximum input (Music Power DIN) ................................. 30W<br />
External dimensions (S-L8) ...... 123 (W) x 240 (H) x 70 (D) mm<br />
External dimensions (S-L9) .... 126(W) x 250(H) x68.5 (D) mm<br />
Weight (S-L9 LR / S-L9-A-LR) ......................................... 0.8 kg<br />
Weight (S-L8-LR) .............................................................. 0.6 kg<br />
Subwoofer Speaker System: S-L8-W / S-L9-W / S-<br />
L9-A-W<br />
Type ................... Phase-inversion (bass-reflex), bookshelf type<br />
Speaker Elements ..................................... 10cm (cone type) x2<br />
Nominal impedance ........................................................... 4 Ω<br />
Frequency response .......................................... 22 Hz–3,000 Hz<br />
Maximum input (Music Power DIN) ................................ 50 W<br />
External dimensions ........ 150 (W) x 340 (H) x 304.5 (D) mm<br />
Weight .............................................................................. 4.7 kg<br />
Accessories<br />
Speaker cables ........................................................................... 2<br />
Subwoofer connecting cable ..................................................... 1<br />
Speaker stands ........................................................................... 2<br />
Screws (for speaker stands) ...................................................... 4<br />
Non skid pads (S-L8-LR) ........................................................... 8<br />
Non skid pads (S-L9-LR / S-L9-A-LR) ....................................... 4<br />
NOTE: Specifications and design subject to possible<br />
modification without notice, due to improvements.<br />
47
Switching Off the Demo Mode<br />
The CD receiver has a demonstration display mode which operates when the system is<br />
plugged in. This mode is meant primarily for store displays, and you'll probably want<br />
to turn it off. If you unplug the unit, or there's a power cut, the demo mode will be set<br />
to on again once power is restored.<br />
MENU<br />
SET<br />
@ #<br />
STANDBY/ ON<br />
AUX SOUND DISPLAY SET MD TAPE<br />
‡/*<br />
TIMER/ &<br />
CHARACTER CANCEL<br />
$<br />
! —<br />
›<br />
+ ⁄<br />
VOL<br />
4 ¢<br />
1 In standby mode, press MENU and select<br />
DEMO MODE.<br />
Remember: Switch between menu options using the $ and ›<br />
buttons; select the option by pressing SET.<br />
2 Press either $ or › to select DEMO<br />
OFF.<br />
3 Press SET.<br />
Published by <strong>Pioneer</strong> Electronic Corporation.<br />
Copyright © 1999 <strong>Pioneer</strong> Electronic Corporation.<br />
All rights reserved.<br />
PIONEER ELECTRONIC CORPORATION 4-1, Meguro 1-Chome, Meguro-ku, Tokyo 153-8654, Japan<br />
PIONEER ELECTRONICS [USA] INC. P.O. BOX 1540, Long Beach, California 90801-1540<br />
PIONEER ELECTRONICS OF CANADA, INC. 300 Allstate Parkway, Markham, Ontario L3R OP2, Canada<br />
PIONEER ELECTRONIC [EUROPE] N.V. Haven 1087, Keetberglaan 1, 9120 Melsele, Belgium TEL: 03/570.05.11<br />
PIONEER ELECTRONICS AUSTRALIA PTY. LTD. 178-184 Boundary Road, Braeside, Victoria 3195, Australia, TEL: 03-9586-6300<br />
PIONEER ELECTRONICS DE MEXICO S.A. DE C.V. San Lorenzo Num 1009 3er piso Desp. 302 Col. Del Valle, Mexico D.F. C.P. 03100 TEL: 5-688-52-90<br />
Printed in the U.K.


