
Create successful ePaper yourself
Turn your PDF publications into a flip-book with our unique Google optimized e-Paper software.
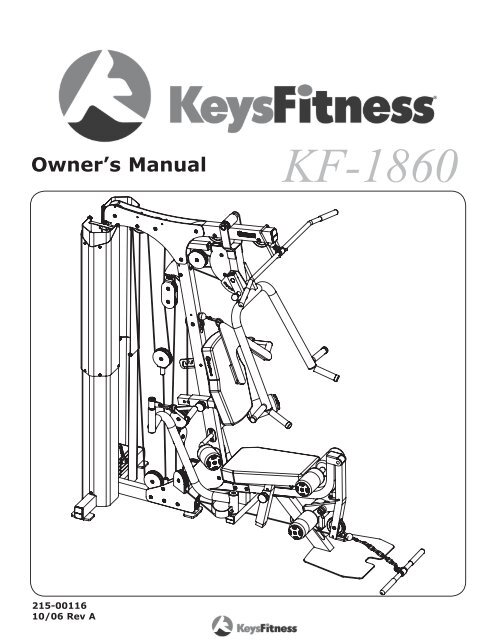
Owner’s Manual<br />
<strong>KF</strong>-<strong>1860</strong><br />
215-00116<br />
10/06 Rev A
Table of Contents<br />
Before You Start 3<br />
Important Safety Information 4<br />
Assembly 5-26<br />
Weight Ratios 27<br />
Weight Stack Sticker Placement 28<br />
Cable View 29<br />
Top View 30<br />
Exploded View 31<br />
Parts List 32<br />
Warranty Information 33
Before You Start<br />
THANK YOU for making this unit a part of your exercise program.<br />
<strong>Keys</strong> <strong>Fitness</strong> assures the very best in value, appearance, durability<br />
and biomechanics.<br />
This manual will guide you through the assembly process. If at any<br />
time you are having trouble with the assembly or use of this product, then<br />
please contact us at our <strong>Keys</strong> <strong>Fitness</strong> Helpline. We have trained service technicians<br />
on site to take care of you, our valued customer.<br />
REGISTRATION CARD<br />
To avoid unnecessary delays in warranty parts and to insure that a permanent<br />
record of your purchase is on file with our company, be sure to send in the warranty<br />
registration card or register on-line at www.keysfitness.com within 10 days<br />
of purchase.<br />
KEYS FITNESS Series<br />
Q U E S T I O N S ?<br />
CALL<br />
1-888-380-0482<br />
Monday-Friday<br />
8:30-5:30 Central Time<br />
When calling please have the following product information available:<br />
Model Name :<br />
Serial #:<br />
Manufactured Date :<br />
PO # :<br />
Model Name Decal Location
Important Safety Information<br />
Prior to assembly, remove components from the box and verify that all the listed parts were<br />
supplied.<br />
NOTE: Hand tighten bolts and nylon nuts until machine is fully assembled.<br />
Read all precautions and instructions in this manual before using this equipment.<br />
WARNING!<br />
Before using this unit or starting any exercise program, consult your<br />
physician. This is especially important for persons over the age of<br />
35 and/or persons with pre-existing health problems. <strong>Keys</strong> <strong>Fitness</strong><br />
Products LP assumes no responsibility for personal injury or property<br />
damage sustained by or through the use of this product.<br />
It is the owner’s responsibility to ensure that all users of this unit<br />
have read the Owner’s Manual and are familiar with safety information<br />
and precautions.<br />
SAFETY PRECAUTIONS<br />
• This unit should only be used on a level surface and is intended for<br />
indoor use only. <strong>Keys</strong> <strong>Fitness</strong> recommends an equipment mat be<br />
placed under the unit to protect the floor or carpet and for easier<br />
cleaning.<br />
• Wear comfortable, good-quality walking or running shoes and<br />
appropriate clothing. Do not use this unit with bare feet, sandals,<br />
socks or stockings!<br />
• Always examine your unit before using to ensure all parts are in<br />
working order.<br />
• Do not leave children unsupervised near or on the unit.<br />
• Service to your unit should only be performed by an authorized<br />
service representative, unless authorized and/or instructed by a<br />
<strong>Keys</strong> <strong>Fitness</strong> technician. Failure to follow these instructions will void<br />
the warranty.
Assembly<br />
Box 1
Assembly<br />
Box 2
Assembly<br />
Box 3<br />
Box 4<br />
Box 5 Box 6
Assembly<br />
12.2 * 91.5 1 pc<br />
12.2 * 69 1 pc
Assembly
Assembly<br />
STEP 1<br />
Insert the two Guide Rods (24) into Rear Base (1) and secure them in place using two<br />
Washers (102), two Spring Washers (103), and two Allen Bolts (97).<br />
Figure 1<br />
10
Assembly<br />
STEP 2<br />
Attach the Seat Pad Support Receptacle (2) to Rear Base (1) and secure in place using three<br />
Nylon Locknuts (104), six Washers (102), and three Bolts (94).<br />
Connect the Front Upright (86) to Seat Pad Support Receptacle (2) and secure together using<br />
two Nylon Locknuts (104), four Washers (102), and two Bolts (95).<br />
Insert the Pec Dec Mount (7) onto Seat Pad Support Receptacle (2) using two Nylon Locknuts<br />
(104), four Washers (102), and two Bolts (94) on the side. Next, insert one Washer (107),<br />
one Spring Washer (103), and one Bolt (93) through the top of the Seat Pad Receptacle (2).<br />
Figure 2<br />
11
Assembly<br />
Step 3<br />
Install the Main Upright (3) onto Seat Pad Support Receptacle (2). Secure it in place using<br />
three Nylon Locknuts (104), six Washers (102), and three Bolts (94) on the side. Two Bolts<br />
(98), one Spring Washer (117), three Washers (101), one Nylon Locknut (105) will secure it at<br />
the bottom.<br />
Figure 3<br />
12
Assembly<br />
Step 4<br />
Slide one Weight Stack Bumper (30) down each Guide Rod (24). Next, slide the weight<br />
plates down the Guide Rods (24) in this order - five 15lb Plates (36), nine 10lb Plates (37), five<br />
5lb Plates (38), and the Top Plate (27).<br />
Insert the Main Top Beam (4) onto the two Guide Rods (24) and the Main Upright (3).<br />
Secure Main Top Beam (4) to Main Upright (3) using two Nylon Locknuts (104), four Washers<br />
(101), two Bolts (98). Last, use four Spring Washers (103) and two Allen Bolts (97) to secure<br />
the Main Top Beam (4) to the two Guide Rods (24). Attach Weight Pin (31) to Weight Stack.<br />
Figure 4<br />
13
Assembly<br />
Step 5<br />
Attach Press Arm Support (5) to Main Upright (3) by aligning the holes and sliding the Shaft<br />
(74) through the holes of the Press Arm Support (5).<br />
Secure the Shaft (74) to the Press Arm Support (5) using two Set Screws (84).<br />
Install Press Arm (6) to Press Arm Support (5) by aligning the holes and sliding the Shaft<br />
(73) through the holes of the Press Arm (6).<br />
Secure the Shaft (73) to the Press Arm (6) using two Set Screws (84).<br />
Figure 5<br />
14
Assembly<br />
Step 6<br />
Slide the Right Pec Dec Arm (8) on to the shaft of the Pec Dec Mount (7). Secure the arm in<br />
place using one Big Washer (76), one Washer (102), one Spring Washer (103), and one Allen<br />
Bolt (97).<br />
Slide Pec Dec Handle Bar (19) onto the top of the Right Pec Dec Arm (8) and secure using<br />
one Chrome Washer (106), one Washer (102), one Spring Washer (103), and one Allen Bolt<br />
(97).<br />
Repeat this step to complete the Left Pec Dec assembly.<br />
Figure 6<br />
15
Assembly<br />
Step 7<br />
Install the Right and Left Hold Leg Frames (17 & 18) to Main Upright (3) and secure using<br />
two Nylon Locknuts (104), four Washers (102), and two Bolts (95).<br />
Make sure both Hold Leg Frames are angled upwards.<br />
Figure 7<br />
16
Assembly<br />
Step 8<br />
Slide the Shaft (72) into the Leg Extension Lever (10). Attach Leg Extension Lever (10)<br />
to Seat Pad Support Receptacle (2) and secure using one Washer (119), one Spring Washer<br />
(115), and one Allen Bolt (118).<br />
Slide Foam Frame w/ Shaft (11) through the Leg Extension Lever (10) and attach the Foam<br />
Frame w/o Shaft (12) to the other side. Insert the Slip Tension Pin (80) through the hole<br />
where the two foam frames meet. Note: You may need to use a rubber mallet to install Slip<br />
Tension Pin (80).<br />
Figure 8<br />
17
Assembly<br />
Step 9<br />
Attach the Seat Pad (26) to the Seat Pad Support (13) using two Washers (102) and two Allen<br />
Bolts (96). Slide the Seat Support assembly (13) into the Seat Pad Support Receptacle (2) and<br />
secure by tightening attached Locking Knob.<br />
Install the Telescope (14) to the bottom of the Back Pad Support (16) and secure in place<br />
using one Nylon Locknut (104) and one Bolt (99).<br />
Install the Tilting (15) to the top of the Back Pad Support (16) and secure in place using one<br />
Nylon Locknut (104) and one Bolt (88).<br />
Attach the Back Pad (25) to Back Pad Support (16) using two Washers (102) and two Bolts<br />
(89).<br />
Last, slide the Back Pad Support assembly into the receptacle on the Main Upright (3) and<br />
secure by tightening the Locking Pop Pin (52).<br />
Figure 9<br />
18
Assembly<br />
Step 10<br />
Slide two Upholstered Roller Pads (42) onto Foam Frames (11 & 12) and secure using two Big<br />
Plugs (65).<br />
Slide the Long Foam Tube (77) through the hole in Seat Pad Support (13). Slide two Plastic<br />
Washers (87) onto each end of Long Foam Tube (77). Next, slide two Upholstered Roller Pads<br />
(42) onto each side of Long Foam Tube (77) and secure using two Big Plugs (65).<br />
Slide two Upholstered Roller Pads (42) onto the Leg Hold Frames (17 & 18) and secure using<br />
two Big Plugs (65).<br />
Figure 10<br />
19
Assembly<br />
Step 11<br />
Note: Stretch all cables out completely and make sure all twisting is removed before installing.<br />
Install Chest Press Cable (45) as detailed in Figure 11. Follow dotted lines to identify exact<br />
location of pulleys. See Page 29 “Cable View” for more detail.<br />
Start by threading cable end into Top Plate (27).<br />
You will need the following for installation:<br />
Pulley (44) - Qty. 8<br />
Cable (45) - Qty. 1<br />
Nylon Locknut (104) - Qty. 9<br />
Long Pulley Spacer (53) - Qty. 6<br />
Longer Pulley Spacer (55) - Qty. 4<br />
Adjustable Stopper (75) - Qty. 1<br />
Bolt (90) - Qty. 2<br />
Bolt (91) - Qty. 2<br />
Bolt (93) - Qty 3<br />
Bolt (95) - Qty. 2<br />
Washer (102) - Qty. 18<br />
Hex Nut (100) - Qty. 1<br />
Small Pulley (120) - Qty. 1<br />
Figure 11<br />
20
Assembly<br />
Step 12<br />
Note: Stretch all cables out completely and make sure all twisting is removed before installing.<br />
Install Mid Pulley Cable (46) as detailed in Figure 12. Follow dotted lines to identify exact<br />
location of pulleys. See Page 29 “Cable View” for more detail.<br />
Start by installing cable under the pulley at Leg Extension location.<br />
You will need the following for installation:<br />
Pulley (44) - Qty. 8<br />
Cable (46) - Qty. 1<br />
Nylon Locknut (104) - Qty. 8<br />
Long Pulley Spacer (53) - Qty. 6<br />
Longer Pulley Spacer (55) - Qty. 4<br />
Short Pulley Spacer (54) - Qty. 2<br />
Washer (102) - Qty. 18<br />
Bolt (91) - Qty. 3<br />
Bolt (92) - Qty. 1<br />
Bolt (93) - Qty 1<br />
Bolt (94) - Qty. 1<br />
Bolt (95) - Qty. 1<br />
Pulley Bracket w/ Shaft (21) - Qty. 1<br />
Pulley Bracket Block (22) - Qty. 1<br />
Pulley Bracket (23) - Qty. 1<br />
Figure 12<br />
21
Assembly<br />
Step 13<br />
Note: This step is only used if you do not have the Leg Press 2 attachment. Use the Cable<br />
Adapter (113) in place of the pulley.<br />
Note: Stretch all cables out completely and make sure all twisting is removed before installing.<br />
Install Leg Press Cable Substitute (47) as detailed in Figure 13. Follow dotted lines to identify<br />
exact location of pulleys.<br />
You will need the following for installation:<br />
Cable Adapter (113) - Qty. 1<br />
Longer Pulley Spacer (55) - Qty. 2<br />
Cable (47) - Qty. 1<br />
Bolt (95) - Qty. 1<br />
Washers (102) - Qty. 2<br />
Nylon Locknut (104) - Qty. 1<br />
Figure 13<br />
22
Assembly<br />
Step 14<br />
Note: Stretch all cables out completely and make sure all twisting is removed before installing.<br />
Install Pec Dec Cable (49) as detailed in Figure 14. Follow dotted lines to identify exact<br />
location of pulleys. See Page 29 “Cable View” for more detail.<br />
You will need the following for installation:<br />
Cable (49) - Qty. 1<br />
Pulley (44) - Qty. 3<br />
Pulley Bracket Block (22) - Qty. 1<br />
Bolt (91) - Qty. 3<br />
Washers (102) - Qty. 6<br />
Nylon Locknut (104) - Qty. 3<br />
Phillips Screw (85) - Qty. 2<br />
Figure 14<br />
23
Assembly<br />
Step 15<br />
Connect Long Lat Bar (70) to the Chest Press Cable (45) using two Gear Hooks (33) and<br />
Short Chain (35).<br />
Connect Ab Strap (40) or Lat Strap (34) to Mid Pulley Cable (46) using one Gear Hook (33).<br />
Connect Short Lat Bar (71) to Mid Pulley Cable (46) using two Gear Hooks (33) and Long<br />
Chain (32).<br />
Figure 15<br />
32<br />
71<br />
24
Assembly<br />
Step 16<br />
Install Weight Shrouds (20) to each side of the Main Top Beam (4) using two Washers (102),<br />
two Spring Washers (103), and Allen Bolts (97 & 118).<br />
Secure the bottom portion of the Weight Shrouds (20) to the Rear Frame (1) using two<br />
Washers (119) and two Allen Bolts (118).<br />
Figure 16<br />
Note: Tighten all hardware securely.<br />
25
Assembly<br />
Congratulations!<br />
You have completed the assembly of your new <strong>KF</strong>-<strong>1860</strong>.<br />
26
Weight Ratios<br />
Based On 200 LB Weight Stack<br />
27
Weight Stack Sticker Placement<br />
Your new unit can be purchased with either a 200 LB or 250 LB weight stack.<br />
Depending on which weight stack you have purchased will determine which weight<br />
stack sticker numbers will be used.<br />
The weight stack images below show which weight stack sticker numbers are to be<br />
used on your weight stack. Please note that these stickers should not be put on<br />
until the entire unit has been assembled and all bolts and nuts have been tightened.<br />
200 LB Stack 250 LB Stack<br />
10 10<br />
15<br />
20<br />
25<br />
30<br />
35<br />
45<br />
55<br />
65<br />
75<br />
85<br />
95<br />
105<br />
115<br />
125<br />
140<br />
155<br />
170<br />
185<br />
200<br />
20<br />
30<br />
40<br />
50<br />
60<br />
70<br />
80<br />
90<br />
100<br />
115<br />
130<br />
145<br />
160<br />
175<br />
190<br />
205<br />
220<br />
235<br />
250<br />
28
Cable View<br />
29
Top View<br />
30
Exploded View<br />
31
Parts List<br />
<strong>KF</strong>-<strong>1860</strong> Parts List Rev A<br />
Ref # Part # Description Qty Ref # Part # Description Qty<br />
1 223-00949 FRAME, REAR <strong>KF</strong>-<strong>1860</strong> 1 67 206-00143 PEC DEC STOP BUMPER KPS-2050 1<br />
2 223-00950 RECEPTACLE, SEAT PAD SUPPORT <strong>KF</strong>-<strong>1860</strong> 1 68 206-00061 BASE PAD KPS 3<br />
3 223-00951 UPRIGHT, MAIN <strong>KF</strong>-<strong>1860</strong> 1 69 206-00099 END CAP BUMPER - KPS 1<br />
4 223-00952 BEAM, MAIN TOP <strong>KF</strong>-<strong>1860</strong> 1 70 223-00092 LAT BAR KPS-GYM, 223-00574 1<br />
5 223-00034 PRESS ARM SUPPORT KPS-1550/<strong>KF</strong>-<strong>1860</strong> 1 71 219-00136 SHORT BAR KPS-2000 1<br />
6 223-00953 PRESS ARM, <strong>KF</strong>-<strong>1860</strong> 1 72 230-00017 SHAFT LEG EXT. KPS-1850/1550 1<br />
7 223-00241 PEC DEC MOUNT 1 73 230-00018 SHAFT FOR CHEST PRESS ADJ. KPS-1850 1<br />
8 223-00954 PEC DEC ARM, RIGHT <strong>KF</strong>-<strong>1860</strong> 1 74 230-00019 SHAFT CHEST PRESS KPS-1850 1<br />
9 223-00955 PEC DEC ARM, LEFT <strong>KF</strong>-<strong>1860</strong> 1 75 210-00097 ADJUSTABLE STOPPER, KPS 1<br />
10 223-00244 LEG EXTENSION LEVER KPS-1850 1 76 202-00145 BIG WASHER, 56.5*10.5*5 2<br />
11 219-00265 FOAM FRAME W/SHAFT KPS-1850/1550 1 77 230-00008 LONG FOAM TUBE 1<br />
12 219-00266 FOAM FRAME W/O SHAFT KPS-1850/1550 1 78 219-00281 CABLE RETAINER KPS-1850/2050 1<br />
13 223-00245 SEAT PAD SUPPORT KPS-1850 1 79 206-00390 PLUG, ROLLER PAD TUBE CAP, <strong>KF</strong> SERIES 2<br />
14 219-00267 TELESCOPE FOR BACK PAD KPS-1850 1 80 202-00146 SLIP TENSION PIN 1<br />
15 219-00268 TILTING FOR BACK PAD KPS-1850 1 81 202-00147 U PIN 1<br />
16 219-00269 BACK PAD SUPPORT KPS-1850 1 82 202-00144 SMALL SPRING 1<br />
17 219-00270 RIGHT LEG HOLD LEG FRAME KPS-1850/2050 1 83 202-00142 NUT, M6 17<br />
18 219-00271 LEFT LEG HOLD LEG FRAME KPS-1850/2050 1 84 202-00143 SCREW, M8*6 5<br />
19 219-00272 PEC DEC HANDLE BAR KPS-1850/1550 2 85 202-00122 PHILLIP SCREW, M4*20 2<br />
20 223-00957 WEIGHT SHROUD,TOP <strong>KF</strong>-<strong>1860</strong> 2 86 223-00956 UPRIGHT, FRONT <strong>KF</strong>-<strong>1860</strong> 1<br />
21 219-00273 PULLEY BRACKET W/SHAFT KPS-1850 1 87 206-00134 PLASTIC WASHER KPS-2050/1850 2<br />
22 219-00274 PULLEY BRACKET BLOCK KPS-1850 1 88 202-00325 SHORT SHOULDER BOLT, 12.2X69 1<br />
23 219-00275 PULLEY BRACKET KPS-1850 1 89 202-00635 SCREW, M10X30 BUTTON HEAD SOCKET CAP 2<br />
24 223-00247 GUIDE ROD KPS-1850 2 90 202-00664 SCREW, BUTTON HEAD SOCKET CAP M10X50 4<br />
25 228-00218 BACK PAD, <strong>KF</strong>-<strong>1860</strong> 1 91 202-00658 SCREW, BUTTON HEAD SOCKET CAP M10X45 9<br />
26 228-00219 SEAT PAD, <strong>KF</strong>-<strong>1860</strong> 1 92 202-00665 SCREW, BUTTON HEAD SOCKET CAP M10X65 1<br />
27 223-00031 TOP PLATE KPS-GYM 1 93 202-00637 SCREW, M10X70 BUTTON HEAD SOCKET CAP 5<br />
28 202-00121 SCREW, M12*35 1 94 202-00655 SCREW, BUTTON HEAD SOCKET CAP M12X75 9<br />
29 219-00276 SELECTOR ROD KPS-GYMS 1 95 202-00634 SCREW, M10X80 BUTTON HEAD SOCKET CAP 9<br />
30 206-00026 WEIGHT BUMPER KPS 2 97 202-00636 SCREW, M8X25 BUTTON HEAD SOCKET CAP 8<br />
31 210-00004 WEIGHT PIN 1 98 202-00640 SCREW, M12X80 BUTTON HEAD SOCKET CAP 4<br />
32 229-00038 LONG CHAIN 12 1 99 202-00326 LONG SHOULDER BOLT, 12.2X91.5 1<br />
33 210-00008 GEAR HOOK, KPS 7 100 202-00129 REGULAR HEX NUT 10 1<br />
34 210-00061 HAND STRAP KPS GYM 2 101 202-00127 WASHER, 13*24*1.5 7<br />
35 229-00037 SHORT CHAIN 1 102 202-00128 WASHER, 11*20*2 78<br />
39 214-00001 WEIGHT STACK STICKERS INRAY 1 103 202-00100 SPRING WASHER, M10 10<br />
40 210-00060 ABDOMINAL STRAP KPS GYM 1 104 202-00091 NYLON NUT, M10 35<br />
41 210-00059 ANKLE STRAP KPS GYM 1 105 202-00092 NYLON NUT, M12 3<br />
42 206-00395 FOAM PADDING, 100X22X180 <strong>KF</strong> SERIES 6 106 202-00678 WASHER, CHROME 38X11X2 2<br />
43 206-00103 LAT BAR GRIP - KPS 4 107 202-00130 WASHER, BIG 11*38*2 2<br />
44 223-00228 BIG PULLEY 4.5" 18 108 202-00131 PHILLIP SCREW, M6*15 2<br />
45 229-00047 CHEST PRESS CABLE KPS-1850 P45 1 109 202-00132 HEX KEY 6 1<br />
46 229-00048 MID PULLEY CABLE KPS-1850 P46 1 110 202-00133 HEX KEY 4 1<br />
47 229-00049 LEG PRESS CABLE SUBSTITUTE KPS-2050/1850 1 111 206-00135 GRIP 4<br />
48 202-00324 BIG WASHER, 7X38X3 1 112 206-00136 RUBBER STOPPER 3<br />
49 229-00050 PEC DEC CABLE KPS-2050/1850 1 113 210-00093 CABLE ADAPTOR 1<br />
50 210-00095 POP PIN, KPS 1 114 206-00137 NYLON COVER 1<br />
51 202-00139 SPRING WASHER, 6 1 115 202-00134 SPRING WASHER 8 1<br />
52 210-00096 POP PIN (LOCKING) 2 116 210-00091 LUBRICANT 1<br />
53 202-00071 LONG PULLEY SPACER - KPS GYMS 10 117 202-00135 SPRING WASHER, 12 1<br />
54 202-00025 SHORT PULLEY SPACER - KPS 2 118 202-00136 ALLEN BOLT M8*15 5<br />
55 202-00140 LONG PULLEY SPACER 8 119 202-00158 WASHER, 9*22*2 3<br />
56 202-00016 BRONZE ID 25.4 8 120 223-00231 SMALL PULLEY, KPS-CC/CG/LATA/SCC 2<br />
57 202-00023 BRONZE BUSHING, ID 12.2 4 121 223-00958 WEIGHT SHROUD, MIDDLE <strong>KF</strong>-<strong>1860</strong> 2<br />
58 202-00024 BEARING ID 25 6 122 223-00959 WEIGHT SHROUD, BOTTOM <strong>KF</strong>-<strong>1860</strong> 2<br />
59 202-00141 BRONZE BUSHING, ID16 2 123 202-00677 SMALL SPACER, <strong>KF</strong>-<strong>1860</strong> 16<br />
60 206-00139 SQUARE PLUG 50*25 3 124 202-00676 SCREW, BUTTON HD SOC CAP M6X18 16<br />
61 206-00020 PLUG 44.5 2 125 202-00227 WASHER, 6.6X12X1.6 32<br />
62 206-00140 SQUARE PLUG 50.8 2 126 202-00675 CAP, ALUMINUM 32 4<br />
63 206-00180 PLUG, 76.2*50.8 4 127 202-00674 SCREW, 10-32X3.2 8<br />
64 206-00102 PLUG 32 - KPS 4 131 206-00139 SQUARE PLUG 50*25 2<br />
65 206-00141 BIG PLUG 25.4 KPS-2050/1850/1550 6 # 202-00679 BOLT PACK, <strong>KF</strong>-<strong>1860</strong> (1) 1<br />
66 206-00142 NYLON STOPPER 1 # 202-00680 BOLT PACK, <strong>KF</strong>-<strong>1860</strong> (2) 1<br />
32
Warranty Information<br />
KEYS FITNESS PRODUCTS, L.P.<br />
LIFETIME WARRANTY<br />
This Warranty applies in the United States and Canada to products manufactured or distributed by<br />
<strong>Keys</strong> <strong>Fitness</strong> Products, LP (“<strong>Keys</strong>”) under the KEYS brand name. The warranty is non-transferable<br />
and valid only to the original purchaser.<br />
<strong>Keys</strong> warrants that the Product you have purchased for non-commercial, personal, family, or<br />
household use from <strong>Keys</strong> or from an authorized <strong>Keys</strong> reseller is free from defects in materials or<br />
workmanship under normal use during the warranty period. Your sales receipt, showing the date of<br />
purchase of the Product, is your proof of purchase. This warranty only extends to you, the original<br />
purchaser. It is not transferable to anyone who subsequently purchases or acquires the Product<br />
from you. This Warranty becomes VALID ONLY if the product is purchased through a <strong>Keys</strong> <strong>Fitness</strong><br />
authorized dealer unless otherwise authorized by <strong>Keys</strong> <strong>Fitness</strong> in writing and must be assembled / installed according to<br />
the instructions included with the Product.<br />
In a light institutional setting, <strong>Keys</strong> will extend a one year limited warranty to the original purchaser.<br />
During the warranty period <strong>Keys</strong> will repair or replace (at <strong>Keys</strong>' option) the product if it becomes defective, malfunctions, or<br />
otherwise fails to conform with this Warranty under normal use. In repairing the Product, <strong>Keys</strong> may replace defective parts<br />
with new or, at the option of <strong>Keys</strong>, serviceable used parts that are equivalent to new parts in performance. All exchanged<br />
parts and Products replaced under this warranty will become the property of <strong>Keys</strong>. <strong>Keys</strong> reserves the right to change manufacturers<br />
of any part to cover any existing warranty.<br />
This warranty DOES NOT COVER shipping charges, export taxes, custom duties and taxes, or any other charges associated<br />
with transportation of the parts or Product. To obtain warranty service, you must contact a <strong>Keys</strong> authorized retailer,<br />
service technician or <strong>Keys</strong> <strong>Fitness</strong> at our phone number located in this manual. Any parts determined to be defective must<br />
be returned to <strong>Keys</strong> to obtain warranty service. You must prepay any shipping charges, export taxes, custom duties and<br />
taxes, or any other charges associated with transportation of the parts or Product. In addition, you are responsible for<br />
insuring any parts or Product shipped or returned. You assume the risk of loss during shipment. You must present <strong>Keys</strong><br />
with proof-of-purchase documents (including the date of purchase). Any evidence of alteration, erasure or forgery of proofof-purchase<br />
documents will be cause to void this Warranty.<br />
This Warranty does not extend to any product not purchased from <strong>Keys</strong> or from an authorized <strong>Keys</strong> reseller. This Limited<br />
Warranty does not extend to any Product that has been damaged or rendered defective; (a) as a result of accident, misuse,<br />
or abuse; (b) by the use of parts not manufactured or sold by <strong>Keys</strong>; (c) by modification of the Product : (d) operation<br />
on incorrect power supplies; or (e) as a result of service by anyone other than <strong>Keys</strong>, or an authorized <strong>Keys</strong> warranty service<br />
provider. Product on which the serial number has been defaced or removed is not eligible for warranty service. Should<br />
any Product submitted for warranty service be found ineligible, an estimate of repair cost will be furnished and the repair<br />
will be made if requested by you upon <strong>Keys</strong>' receipt of payment or acceptable arrangements for payment.<br />
EXCEPT AS EXPRESSLY SET FORTH IN THIS WARRANTY, KEYS MAKES NO OTHER WARRANTIES, EXPRESSED<br />
OR IMPLIED, INCLUDING ANY IMPLIED WARRANTIES OF MERCHANTABILITY AND FITNESS FOR A PARTICULAR<br />
PURPOSE. KEYS EXPRESSLY DISCLAIMS ALL WARRANTIES NOT STATED IN THIS LIMITED WARRANTY.<br />
ANY IMPLIED WARRANTIES THAT MAY BE IMPOSED BY LAW ARE LIMITED TO THE TERMS OF THIS LIMITED<br />
WARRANTY. NEITHER KEYS NOR ANY OF ITS AFFILIATES SHALL BE RESPONSIBLE FOR INCIDENTAL OR<br />
CONSEQUENTIAL DAMAGES. SOME STATES DO NOT ALLOW LIMITATIONS ON HOW LONG AN IMPLIED<br />
WARRANTY LASTS OR THE EXCLUSION OR LIMITATION OF INCIDENTAL OR CONSEQUENTIAL DAMAGES, SO<br />
THE ABOVE LIMITATIONS OR EXCLUSION MAY NOT APPLY TO YOU. This Limited Warranty gives you specific legal<br />
rights and you may also have other rights that may vary from state to state. This is the only express warranty applicable to<br />
<strong>Keys</strong>-branded products. <strong>Keys</strong> neither assumes nor authorizes anyone to assume for it any other express warranty.<br />
PLEASE SEND IN THE INCLUDED WARRANTY CARD OR REGISTER ON-LINE AT www.keysfitness.com WITHIN<br />
TEN (10) DAYS OF PURCHASE TO REGISTER YOUR UNIT WITH KEYS FITNESS PRODUCTS, LP. MAIL<br />
WARRANTY CARD TO: KEYS FITNESS PRODUCTS, PO BOX 551239, DALLAS, TX 75355<br />
33
<strong>Keys</strong> <strong>Fitness</strong> Products, L.P.<br />
4009 Distribution Drive, Suite 250<br />
Garland, Texas 75041<br />
Customer Service: 1-888-380-0482