R-26ST Operation-Manual GB - Sharp Central & Eastern Europe
R-26ST Operation-Manual GB - Sharp Central & Eastern Europe
R-26ST Operation-Manual GB - Sharp Central & Eastern Europe

You also want an ePaper? Increase the reach of your titles
YUMPU automatically turns print PDFs into web optimized ePapers that Google loves.
1. R-<strong>26ST</strong> introduction 12.01 1/12/06 8:22 PM Page A<br />
Achtung<br />
Avertissement<br />
Waarschuwing<br />
Avvertenza<br />
Advertencia<br />
Attention<br />
DEUTSCH<br />
R-<strong>26ST</strong><br />
MIKROWELLENGERÄT - BEDIENUNGSANLEITUNG MIT KOCHBUCH<br />
FOUR A MICRO-ONDES - MODE D’EMPLOI AVEC LIVRE DE RECETTES<br />
MAGNETRONOVEN - GEBRUIKSAANWIJZING MET KOOKBOEK<br />
FORNO A MICROONDE - MANUALE D’ISTRUZIONI E LIBRO DI RICETTE<br />
HORNO DE MICROONDAS - MANUAL DE INSTRUCCIONES Y RECETARIO<br />
MICROWAVE OVEN - OPERATION MANUAL WITH COOKBOOK<br />
D<br />
Diese Bedienungsanleitung enthält wichtige Informationen, welche Sie vor Inbetriebnahme des Gerätes unbedingt sorgfältig durchlesen sollten.<br />
Achtung: Die Nichtbeachtung der Gebrauchs- und Serviceanweisungen sowie jeglicher Eingriff, der das Betreiben des Gerätes in<br />
geöffnetem Zustand (z.B. geöffnetes Gehäuse) erlaubt, führt zu erheblichen Gesundheitsschäden.<br />
F<br />
Ce mode d’emploi du four contient des informations importantes, que vous devez lire avant d’utiliser votre four à micro–ondes.<br />
Avertissement: Des risques sérieux pour la santé peuvent être encourus si ces instructions d’utilisation et d’entretien ne sont pas<br />
respectées ou si le four est modifié de sorte qu’il soit possible de le faire fonctionner lorsque la porte est ouverte.<br />
NL<br />
Deze gebruiksaanwijzing bevat belangrijke informatie die u dient te lezen alvorens u de oven in gebruik neemt.<br />
Waarschuwing: Het niet naleven van de gebruiks- en onder- houdsvoorschriften evenals elke ingreep die het mogelijk maakt<br />
dat het toestel in niet-gesloten toestand in werking kan gesteld worden, kan leiden tot ernstige gezondheidsletsels.<br />
I<br />
Questo manuale contiene informazioni importanti, che dovete leggere prima di usare il forno.<br />
Avvertenza: La mancata osservanza di queste istruzioni sull’uso e sulla manutenzione del forno, o l’alterazione del forno<br />
che ne permetta l’uso a sportello aperto, possono costituire un grave pericolo per la vostra salute.<br />
E<br />
Este manual contiene información muy importante que debe leer antes de utilizar el horno.<br />
Advertencia: Pueden presentarse serios riesgos para su salud si no respeta estas instrucciones de uso y mantenimiento, o si<br />
el horno se modifica de forma que pueda ponerse en funcionamiento con la puerta abierta.<br />
<strong>GB</strong><br />
This operation manual contains important information which you should read carefully before using your microwave oven.<br />
Important: There may be a serious risk to health if this operation manual is not followed or if the oven is modified so that it operates with<br />
the door open.<br />
ESPAÑOL ITALIANO NEDERLANDS FRANÇAIS<br />
ENGLISH<br />
800 W (IEC 60705)
1. R-<strong>26ST</strong> introduction 12.01 1/12/06 8:22 PM Page B<br />
D<br />
Sehr geehrter Kunde,<br />
Wir gratulieren Ihnen zu Ihrem neuen Mikrowellengerät, das Ihnen ab jetzt die Arbeit im Haushalt wesentlich<br />
erleichtern wird.<br />
Sie werden angenehm überrascht sein, was man mit der Mikrowelle alles machen kann. Sie können nicht nur<br />
schnell Speisen auftauen und erhitzen, sondern auch ganze Menüs zubereiten.<br />
In unserer Versuchsküche hat das Mikrowellen-Team eine Auswahl der köstlichsten internationalen Rezepte<br />
zusammengestellt, die Sie schnell und einfach nachkochen können.<br />
Lassen Sie sich von den beigefügten Rezepten inspirieren und bereiten Sie Ihre Lieblingsgerichte in der Mikrowelle zu.<br />
Sicher werden Sie von den zahlreichen Vorteilen eines Mikrowellengerätes begeistert sein:<br />
● Speisen können direkt in den Portionstellern zubereitet werden, dadurch entsteht weniger Abwasch.<br />
● Durch kürzere Garzeiten und die Verwendung von wenig Wasser und Fett bleiben viele Vitamine,<br />
Mineralien und Aromen erhalten.<br />
Wir empfehlen Ihnen, die Bedienungsanleitung und den Ratgeber genau durchzulesen.<br />
So wird Ihnen die Bedienung Ihres Gerätes leicht von der Hand gehen.<br />
Viel Spaß beim Umgang mit Ihrem neuen Mikrowellengerät und beim Ausprobieren der köstlichen Rezepte.<br />
F<br />
Chère cliente, cher client,<br />
Félicitations! Vous venez de faire l’acquisition d’un nouveau four à micro-ondes, qui va vous simplifier<br />
considérablement la vie en cuisine.<br />
Vous serez agréablement surpris de voir tout ce qu’il est possible de faire avec un four à micro-ondes. Vous pouvez<br />
non seulement décongeler et réchauffer rapidement des aliments, mais également préparer des repas entiers.<br />
Dans notre cuisine test, notre équipe spécialisée dans les fours à micro-ondes a sélectionné les meilleures<br />
recettes du monde entier, rapides et faciles à préparer.<br />
Inspirez-vous des recettes que nous avons choisies et préparez vos plats préférés au four à micro-ondes.<br />
Il y a de nombreux avantages à posséder un four à micro-ondes, et vous ne pourrez que vous en réjouir:<br />
● Les aliments peuvent être préparés directement dans les plats de service, ce qui réduira la vaisselle.<br />
● Grâce aux temps de cuisson plus courts et à la faible quantité d’eau et de graisse utilisée, nombre de<br />
vitamines, minéraux et saveurs originales sont préservés.<br />
Nous vous conseillons de lire avec attention le guide des recettes et les instructions d’utilisation.<br />
Vous comprendrez dès lors plus aisément comment utiliser votre four.<br />
Nous vous souhaitons beaucoup de plaisir dans l’utilisation de votre four à micro-ondes et l’élaboration de<br />
délicieuses recettes.<br />
NL<br />
Geachte klant,<br />
Wij feliciteren u met de aankoop van uw nieuwe magnetronoven, die het werk in de keuken voortaan<br />
aanzienlijk zal vergemakkelijken.<br />
U zult aangenaam verrast zijn over wat u allemaal met de magnetron kunt doen. U kunt er niet alleen snel<br />
mee ontdooien en opwarmen, maar u kunt er ook volledige maaltijden mee bereiden.<br />
Ons magnetronteam heeft in onze testkeuken een selectie gemaakt uit de lekkerste internationale recepten die<br />
snel en gemakkelijk kunnen worden klaargemaakt.<br />
Laat u inspireren door onze recepten en maak uw favoriete gerechten klaar in uw magnetronoven.<br />
Een magnetronoven heeft zo veel voordelen en we zijn er zeker van dat u ze snel zult ontdekken:<br />
● U kunt eten meteen klaarmaken in de borden waarin het wordt geserveerd, waardoor u minder moet<br />
afwassen.<br />
● Door de kortere kooktijden en omdat er weinig water en vetstoffen worden gebruikt, blijven vitaminen,<br />
mineralen en typische smaken beter bewaard.<br />
Wij adviseren u de gebruiksaanwijzing en het bijgeleverde kookboek zorgvuldig door te lezen.<br />
Op die manier zal het bedienen van uw oven voor u geen enkel probleem opleveren.<br />
Veel plezier met uw magnetronoven en met het uitproberen van de heerlijke recepten.<br />
1
1. R-<strong>26ST</strong> introduction 12.01 1/12/06 8:22 PM Page C<br />
I<br />
Gentile Cliente,<br />
Congratulazioni per l’acquisto del Vostro nuovo forno a microonde, con il quale potrete preparare molto più<br />
agevolmente i Vostri piatti preferiti.<br />
Potrete ben presto apprezzare quante cose si possono fare con un forno a microonde. Oltre a scongelare<br />
rapidamente cibi surgelati o riscaldare vivande precotte, potrete infatti preparare anche interi pranzi.<br />
Nella nostra cucina di prova, il nostro team di esperti in microonde ha preparato una raccolta delle più<br />
prelibate ricette internazionali, facili e semplici da preparare.<br />
Ispirati da tali ricette abbiamo preparato e allegato le ricette per cucinare i Vostri piatti preferiti nel forno a microonde.<br />
Un forno a microonde offre numerosi vantaggi che siamo certi che apprezzerete:<br />
● Possibilità di cucinare i cibi direttamente nei piatti di portata, riducendo il numero di stoviglie da lavare.<br />
● Tempi di cottura più brevi e uso di quantità limitate di acqua e grassi che consentono di conservare<br />
molte vitamine, minerali e sapori caratteristici.<br />
Vi consigliamo di leggere attentamente il manuale di istruzioni insieme al ricettario.<br />
Potrete così apprendere come utilizzare al meglio il vostro forno.<br />
Divertitevi a cucinare con questo forno sperimentando le deliziose ricette proposte.<br />
E<br />
Estimado cliente:<br />
Le felicitamos por haber adquirido este nuevo horno microondas que le facilitará notablemente sus quehaceres<br />
culinarios.<br />
Le sorprenderá la cantidad de cosas que se pueden hacer con un microondas. No sólo podrá descongelar<br />
rápidamente o calentar la comida, sino que también podrá preparar menús completos.<br />
Nuestro equipo ha recopilado en nuestra cocina una selección de las más deliciosas recetas internacionales<br />
fáciles y rápidas de preparar.<br />
Las recetas que hemos incluido le permitirán inspirarse y preparar sus platos favoritos con ayuda del horno microondas.<br />
Son tantas las ventajas de tener un horno microondas que estamos seguros de que le sorprenderán:<br />
● La comida se puede preparar directamente en las bandejas, por lo que tendrá menos utensilios a la<br />
hora de lavar los platos.<br />
● Gracias a unos tiempos de cocción reducidos así como a la utilización de pequeñas cantidades de<br />
agua y grasa, se conservan muchas de las vitaminas, minerales y sabores característicos de los alimentos.<br />
Le aconsejamos que lea detenidamente el libro de recetas y el manual de instrucciones.<br />
De este modo podrá entender rápidamente como utilizar su horno microondas.<br />
Esperamos que disfrute de su horno de microondas y de las deliciosas recetas que le proponemos.<br />
<strong>GB</strong><br />
Dear Customer,<br />
Congratulations on acquiring your new microwave oven, which from now on will make your kitchen chores<br />
considerably easier.<br />
You will be pleasantly surprised by the kinds of things you can do with a microwave. Not only can you use it<br />
for rapid defrosting or heating up of food, you can also prepare whole meals.<br />
In our test kitchen our microwave team has gathered together a selection of the most delicious international<br />
recipes which are quick and simple to prepare.<br />
Be inspired by the recipes we have included and prepare your own favourite dishes in your microwave oven.<br />
There are so many advantages to having a microwave oven which we are sure you will find exciting:<br />
● Food can be prepared directly in the serving dishes, leaving less to wash up.<br />
● Shorter cooking times and the use of little water and fat ensure that many vitamins, minerals and<br />
characteristic flavours are preserved.<br />
We advise you to read the cookery book guide and operating instructions carefully.<br />
You will then easily understand how to use your oven.<br />
Enjoy using your microwave oven and trying out the delicious recipes.<br />
2
1. R-<strong>26ST</strong> introduction 12.01 1/12/06 8:22 PM Page D<br />
D<br />
Achtung:<br />
Ihr Produkt trägt<br />
dieses Symbol.<br />
Es besagt, dass<br />
Elektro- und<br />
Elektronikgeräte<br />
nicht mit dem<br />
Haushaltsmüll<br />
entsorgt, sondern<br />
einem getrennten<br />
Rücknahmesystem<br />
zugeführt werden<br />
sollten.<br />
A. Entsorgungsinformationen für Benutzer aus<br />
Privathaushalten<br />
1. In der Europäischen Union<br />
Achtung: Werfen Sie dieses Gerät zur Entsorgung bitte nicht in den<br />
normalen Hausmüll !<br />
Gemäß einer neuen EU-Richtlinie, die die ordnungsgemäße Rücknahme,<br />
Behandlung und Verwertung von gebrauchten Elektro- und Elektronikgeräten<br />
vorschreibt, müssen elektrische und elektronische Altgeräte getrennt entsorgt<br />
werden.<br />
Nach der Einführung der Richtlinie in den EU-Mitgliedstaaten können<br />
Privathaushalte ihre gebrauchten Elektro- und Elektronikgeräte nun kostenlos<br />
an ausgewiesenen Rücknahmestellen abgeben*.<br />
In einigen Ländern* können Sie Altgeräte u.U. auch kostenlos bei Ihrem<br />
Fachhändler abgeben, wenn Sie ein vergleichbares neues Gerät kaufen.<br />
*) Weitere Einzelheiten erhalten Sie von Ihrer Gemeindeverwaltung.<br />
Wenn Ihre gebrauchten Elektro- und Elektronikgeräte Batterien oder Akkus<br />
enthalten, sollten diese vorher entnommen und gemäß örtlich geltenden<br />
Regelungen getrennt entsorgt werden.<br />
Durch die ordnungsgemäße Entsorgung tragen Sie dazu bei, dass<br />
Altgeräte angemessen gesammelt, behandelt und verwendet werden. Dies<br />
verhindert mögliche schädliche Auswirkungen auf Umwelt und Gesundheit<br />
durch eine unsachgemäße Entsorgung.<br />
2. In anderen Ländern außerhalb der EU<br />
Bitte erkundigen Sie sich bei Ihrer Gemeindeverwaltung nach dem<br />
ordnungsgemäßen Verfahren zur Entsorgung dieses Geräts.<br />
Für die Schweiz: Gebrauchte Elektro- und Elektronikgeräte können kostenlos<br />
beim Händler abgegeben werden, auch wenn Sie kein neues Produkt<br />
kaufen. Weitere Rücknahmesysteme finden Sie auf der Homepage von<br />
www.swico.ch oder www.sens.ch.<br />
B. Entsorgungsinformationen für gewerbliche<br />
Nutzer<br />
1. In der Europäischen Union<br />
Wenn Sie dieses Produkt für gewerbliche Zwecke genutzt haben und nun<br />
entsorgen möchten:<br />
Bitte wenden Sie sich an Ihren SHARP Fachhändler, der Sie über die<br />
Rücknahme des Produkts informieren kann. Möglicherweise müssen Sie die<br />
Kosten für die Rücknahme und Verwertung tragen. Kleine Produkte (und<br />
kleine Mengen) können möglicherweise bei Ihrer örtlichen Rücknahmestelle<br />
abgegeben werden.<br />
Für Spanien: Bitte wenden Sie sich an das vorhandene Rücknahmesystem<br />
oder Ihre Gemeindeverwaltung, wenn Sie Fragen zur Rücknahme Ihrer<br />
Altgeräte haben.<br />
2. In anderen Ländern außerhalb der EU<br />
Bitte erkundigen Sie sich bei Ihrer Gemeindeverwaltung nach dem<br />
ordnungsgemäßen Verfahren zur Entsorgung dieses Geräts.<br />
3
1. R-<strong>26ST</strong> introduction 12.01 1/12/06 8:22 PM Page E<br />
F<br />
Attention :<br />
votre produit<br />
comporte ce<br />
symbole.<br />
Il signifie que les<br />
produits électriques<br />
et électroniques<br />
usagés ne doivent<br />
pas être mélangés<br />
avec les déchets<br />
ménagers généraux.<br />
Un système de<br />
collecte séparé est<br />
prévu pour ces<br />
produits.<br />
A. Informations sur la mise au rebut à l'intention<br />
des utilisateurs privés (ménages)<br />
1. Au sein de l’Union européenne<br />
Attention : si vous souhaitez mettre cet appareil au rebut, ne le jetez pas<br />
dans une poubelle ordinaire !<br />
Les appareils électriques et électroniques usagés doivent être traités<br />
séparément et conformément aux lois en vigueur en matière de traitement,<br />
de récupération et de recyclage adéquats de ces appareils.<br />
Suite à la mise en oeuvre de ces dispositions dans les Etats membres, les<br />
ménages résidant au sein de l’Union européenne peuvent désormais<br />
ramener gratuitement* leurs appareils électriques et électroniques usagés<br />
sur des sites de collecte désignés.<br />
Dans certains pays*, votre détaillant reprendra également gratuitement<br />
votre ancien produit si vous achetez un produit neuf similaire.<br />
*) Veuillez contacter votre administration locale pour plus de<br />
renseignements.<br />
Si votre appareil électrique ou électronique usagé comporte des piles ou<br />
des accumulateurs, veuillez les mettre séparément et préalablement au rebut<br />
conformément à la législation locale en vigueur.<br />
En veillant à la mise au rebut correcte de ce produit, vous contribuerez à<br />
assurer le traitement, la récupération et le recyclage nécessaires de ces<br />
déchets, et préviendrez ainsi les effets néfastes potentiels de leur mauvaise<br />
gestion sur l’environnement et la santé humaine.<br />
2. Pays hors de l’Union européenne<br />
Si vous souhaitez mettre ce produit au rebut, veuillez contacter votre<br />
administration locale qui vous renseignera sur la méthode d’élimination<br />
correcte de cet appareil.<br />
Suisse : les équipements électriques ou électroniques usagés peuvent être<br />
ramenés gratuitement au détaillant, même si vous n’achetez pas un nouvel<br />
appareil. Pour obtenir la liste des autres sites de collecte, veuillez vous<br />
reporter à la page d’accueil du site www.swico.ch ou www.sens.ch.<br />
B. Informations sur la mise au rebut à l’intention<br />
des entreprises<br />
1. Au sein de l’Union européenne<br />
Si ce produit est utilisé dans le cadre des activités de votre entreprise et que<br />
vous souhaitiez le mettre au rebut :<br />
Veuillez contacter votre revendeur SHARP qui vous informera des conditions<br />
de reprise du produit. Les frais de reprise et de recyclage pourront vous être<br />
facturés. Les produits de petite taille (et en petites quantités) pourront être<br />
repris par vos organisations de collecte locales.<br />
Espagne : veuillez contacter l’organisation de collecte existante ou votre<br />
administration locale pour les modalités de reprise de vos produits usagés.<br />
2. Pays hors de l’Union européenne<br />
Si vous souhaitez mettre ce produit au rebut, veuillez contacter votre<br />
administration locale qui vous renseignera sur la méthode d’élimination<br />
correcte de cet appareil.<br />
4
1. R-<strong>26ST</strong> introduction 12.01 1/12/06 8:22 PM Page F<br />
NL<br />
Let op:<br />
Uw product is van<br />
dit merkteken<br />
voorzien.<br />
Dit betekent dat<br />
afgedankte<br />
elektrische en<br />
elektronische<br />
apparatuur niet<br />
samen met het<br />
normale huisafval<br />
mogen worden<br />
weggegooid.<br />
Er bestaat een<br />
afzonderlijk<br />
inzamelingssysteem<br />
voor deze<br />
producten.<br />
A. Informatie over afvalverwijdering voor<br />
gebruikers (particuliere huishoudens)<br />
1. In de <strong>Europe</strong>se Unie<br />
Let op: Deze apparatuur niet samen met het normale huisafval weggooien!<br />
Afgedankte elektrische en elektronische apparatuur moet gescheiden<br />
worden ingezameld conform de wetgeving inzake de verantwoorde<br />
verwerking, terugwinning en recycling van afgedankte elektrische en<br />
elektronische apparatuur.<br />
Na de invoering van de wet door de lidstaten mogen particuliere<br />
huishoudens in de lidstaten van de <strong>Europe</strong>se Unie hun afgedankte<br />
elektrische en elektronische apparatuur kosteloos* naar hiertoe<br />
aangewezen inzamelingsinrichtingen brengen*.<br />
In sommige landen* kunt u bij de aanschaf van een nieuw apparaat het<br />
oude product kosteloos bij uw lokale distributeur inleveren.<br />
*) Neem contact op met de plaatselijke autoriteiten voor verdere informatie.<br />
Als uw elektrische of elektronische apparatuur batterijen of accumulatoren<br />
bevat dan moet u deze afzonderlijk conform de plaatselijke voorschriften<br />
weggooien.<br />
Door dit product op een verantwoorde manier weg te gooien, zorgt u<br />
ervoor dat het afval de juiste verwerking, terugwinning en recycling<br />
ondergaat en potentiële negatieve effecten op het milieu en de menselijke<br />
gezondheid worden voorkomen die anders zouden ontstaan door het<br />
verkeerd verwerken van het afval.<br />
2. In andere landen buiten de <strong>Europe</strong>se Unie<br />
Als u dit product wilt weggooien, neem dan contact op met de plaatselijke<br />
autoriteiten voor informatie omtrent de juiste verwijderingsprocedure.<br />
Voor Zwitserland: U kunt afgedankte elektrische en elektronische apparatuur<br />
kosteloos bij de distributeur inleveren, zelfs als u geen nieuw product koopt.<br />
Aanvullende inzamelingsinrichtingen zijn vermeld op de startpagina van<br />
www.swico.ch or www.sens.ch.<br />
B. Informatie over afvalverwijdering voor<br />
bedrijven<br />
1. In de <strong>Europe</strong>se Unie<br />
Als u het product voor zakelijke doeleinden heeft gebruikt en als u dit wilt<br />
weggooien:<br />
Neem contact op met uw SHARP distributeur die u inlichtingen verschaft<br />
over de terugname van het product. Het kan zijn dat u een<br />
afvalverwijderingsbijdrage voor de terugname en recycling moet betalen.<br />
Kleine producten (en kleine hoeveelheden) kunnen door de lokale<br />
inzamelingsinrichtingen worden verwerkt.<br />
Voor Spanje: Neem contact op met de inzamelingsinrichting of de lokale<br />
autoriteiten voor de terugname van uw afgedankte producten.<br />
2. In andere landen buiten de <strong>Europe</strong>se Unie<br />
Als u dit product wilt weggooien, neem dan contact op met de plaatselijke<br />
autoriteiten voor informatie omtrent de juiste verwijderingsprocedure.<br />
5
1. R-<strong>26ST</strong> introduction 12.01 1/12/06 8:22 PM Page G<br />
I<br />
Attenzione:<br />
Il dispositivo è<br />
contrassegnato da<br />
questo simbolo, che<br />
segnala di non<br />
smaltire le<br />
apparecchiature<br />
elettriche ed<br />
elettroniche insieme<br />
ai normali rifiuti<br />
domestici.<br />
Per tali prodotti è<br />
previsto un sistema<br />
di raccolta a parte.<br />
A. Informazioni sullo smaltimento per gli utenti<br />
(privati)<br />
1. Nell’Unione europea<br />
Attenzione: Per smaltire il presente dispositivo, non utilizzare il normale<br />
bidone della spazzatura!<br />
Le apparecchiature elettriche ed elettroniche usate devono essere gestite a<br />
parte e in conformità alla legislazione che richiede il trattamento, il<br />
recupero e il riciclaggio adeguato dei suddetti prodotti.<br />
In seguito alle disposizioni attuate dagli Stati membri, i privati residenti<br />
nella UE possono conferire gratuitamente le apparecchiature elettriche ed<br />
elettroniche usate a centri di raccolta designati*.<br />
In alcuni paesi*, anche il rivenditore locale può ritirare gratuitamente il<br />
vecchio prodotto se l’utente acquista un altro nuovo di tipologia simile.<br />
*) Per maggiori informazioni si prega di contattare l’autorità locale<br />
competente.<br />
Se le apparecchiature elettriche o elettroniche usate hanno batterie o<br />
accumulatori, l’utente dovrà smaltirli a parte preventivamente in conformità<br />
alle disposizioni locali.<br />
Lo smaltimento corretto del presente prodotto contribuirà a garantire che i<br />
rifiuti siano sottoposti al trattamento, al recupero e al riciclaggio necessari<br />
prevenendone il potenziale impatto negativo sull’ambiente e sulla salute<br />
umana, che potrebbe derivare da un’inadeguata gestione dei rifiuti.<br />
2. In paesi che non fanno parte dell’UE<br />
Se si desidera eliminare il presente prodotto, contattare le autorità locali e<br />
informarsi sul metodo di smaltimento corretto.<br />
Per la Svizzera: Le apparecchiature elettriche o elettroniche usate possono<br />
essere restituite gratuitamente al rivenditore, anche se non si acquista un<br />
prodotto nuovo. Altri centri di raccolta sono elencati sulle homepage di<br />
www.swico.ch o di www.sens.ch.<br />
B. Informazioni sullo smaltimento per gli utenti<br />
commerciali<br />
1. Nell’Unione europea<br />
Se il prodotto è impiegato a scopi commerciali, procedere come segue per<br />
eliminarlo.<br />
Contattare il proprio rivenditore SHARP che fornirà informazioni circa il<br />
ritiro del prodotto. Potrebbero essere addebitate le spese di ritiro e<br />
riciclaggio. Prodotti piccoli (e quantitativi ridotti) potranno essere ritirati<br />
anche dai centri di raccolta locali.<br />
Per la Spagna: Contattare il sistema di raccolta ufficiale o l’ente locale<br />
preposto al ritiro dei prodotti usati.<br />
2. In paesi che non fanno parte dell’UE<br />
Se si desidera eliminare il presente prodotto, contattare le autorità locali e<br />
informarsi sul metodo di smaltimento corretto.<br />
6
1. R-<strong>26ST</strong> introduction 12.01 1/12/06 8:22 PM Page H<br />
E<br />
Atención:<br />
su producto está<br />
marcado con este<br />
símbolo.<br />
Significa que los<br />
productos eléctricos<br />
y electrónicos<br />
usados no deberían<br />
mezclarse con los<br />
residuos domésticos<br />
generales.<br />
Existe un sistema de<br />
recogida<br />
independiente para<br />
estos productos.<br />
A. Información sobre eliminación para usuarios<br />
particulares<br />
1. En la Unión <strong>Europe</strong>a<br />
Atención: si quiere desechar este equipo, ¡por favor no utilice el cubo de la<br />
basura habitual!<br />
Los equipos eléctricos y electrónicos usados deberían tratarse por separado<br />
de acuerdo con la legislación que requiere un tratamiento, una<br />
recuperación y un reciclaje adecuados de los equipos eléctricos y<br />
electrónicos usados.<br />
Tras la puesta en práctica por parte de los estados miembros, los hogares<br />
de particulares dentro de los estados de la Unión <strong>Europe</strong>a pueden devolver<br />
sus equipos eléctricos y electrónicos a los centros de recogida designados<br />
sin coste alguno *.<br />
En algunos países* es posible que también su vendedor local se lleve su<br />
viejo producto sin coste alguno si Ud. compra uno nuevo similar.<br />
*) Por favor, póngase en contacto con su autoridad local para obtener más<br />
detalles.<br />
Si sus equipos eléctricos o electrónicos usados tienen pilas o<br />
acumuladores, por favor deséchelos por separado con antelación según<br />
los requisitos locales.<br />
Al desechar este producto correctamente, ayudará a asegurar que los<br />
residuos reciban el tratamiento, la recuperación y el reciclaje necesarios,<br />
previniendo de esta forma posibles efectos negativos en el medio ambiente<br />
y la salud humana que de otra forma podrían producirse debido a una<br />
manipulación de residuos inapropiada.<br />
2. En otros países fuera de la Unión <strong>Europe</strong>a<br />
Si desea desechar este producto, por favor póngase en contacto con las<br />
autoridades locales y pregunte por el método de eliminación correcto.<br />
Para Suiza: Los equipos eléctricos o electrónicos pueden devolverse al<br />
vendedor sin coste alguno, incluso si no compra ningún nuevo producto.<br />
Se puede encontrar una lista de otros centros de recogida en la página<br />
principal de www.swico.ch o www.sens.ch.<br />
B. Información sobre Eliminación para empresas<br />
usuarias<br />
1. En la Unión <strong>Europe</strong>a<br />
Si el producto se utiliza en una empresa y quiere desecharlo:<br />
Por favor póngase en contacto con su distribuidor SHARP, quien le<br />
informará sobre la recogida del producto. Puede ser que le cobren los<br />
costes de recogida y reciclaje. Puede ser que los productos de tamaño<br />
pequeño (y las cantidades pequeñas) sean recogidos por sus centros de<br />
recogida locales.<br />
Para España: por favor, póngase en contacto con el sistema de recogida<br />
establecido o con las autoridades locales para la recogida de los<br />
productos usados.<br />
2. En otros países fuera de la Unión <strong>Europe</strong>a<br />
Si desea desechar este producto, por favor póngase en contacto con sus<br />
autoridades locales y pregunte por el método de eliminación correcto.<br />
7
1. R-<strong>26ST</strong> introduction 12.01 1/12/06 8:22 PM Page I<br />
<strong>GB</strong><br />
Attention:<br />
Your product is<br />
marked with this<br />
symbol.<br />
It means that used<br />
electrical and<br />
electronic products<br />
should not be mixed<br />
with general<br />
household waste.<br />
There is a separate<br />
collection system for<br />
these products.<br />
A. Information on Disposal for Users<br />
(private households)<br />
1. In the <strong>Europe</strong>an Union<br />
Attention: If you want to dispose of this equipment, please do not use the<br />
ordinary dust bin!<br />
Used electrical and electronic equipment must be treated separately and in<br />
accordance with legislation that requires proper treatment, recovery and<br />
recycling of used electrical and electronic equipment.<br />
Following the implementation by member states, private households within<br />
the EU states may return their used electrical and electronic equipment to<br />
designated collection facilities free of charge*.<br />
In some countries* your local retailer may also take back your old product<br />
free of charge if you purchase a similar new one.<br />
*) Please contact your local authority for further details.<br />
If your used electrical or electronic equipment has batteries or accumulators,<br />
please dispose of these separately beforehand according to local<br />
requirements.<br />
By disposing of this product correctly you will help ensure that the waste<br />
undergoes the necessary treatment, recovery and recycling and thus<br />
prevent potential negative effects on the environment and human health<br />
which could otherwise arise due to inappropriate waste handling.<br />
2. In other Countries outside the EU<br />
If you wish to discard this product, please contact your local authorities and<br />
ask for the correct method of disposal.<br />
For Switzerland: Used electrical or electronic equipment can be returned<br />
free of charge to the dealer, even if you don’t purchase a new product.<br />
Further collection facilities are listed on the homepage of www.swico.ch or<br />
www.sens.ch.<br />
B. Information on Disposal for Business Users<br />
1. In the <strong>Europe</strong>an Union<br />
If the product is used for business purposes and you want to discard it:<br />
Please contact your SHARP dealer who will inform you about the take-back<br />
of the product. You might be charged for the costs arising from take-back<br />
and recycling. Small products (and small amounts) might be taken back by<br />
your local collection facilities.<br />
For Spain: Please contact the established collection system or your local<br />
authority for take-back of your used products.<br />
2. In other Countries outside the EU<br />
If you wish to discard of this product, please contact your local authorities<br />
and ask for the correct method of disposal.<br />
8
1. R-<strong>26ST</strong> introduction 12.01 1/12/06 8:22 PM Page J<br />
D INHALT<br />
Bedienungsanleitung<br />
SEHR GEEHRTER KUNDE . . . . . . . . . . . . . . . .1<br />
ENTSORGUNGSINFORMATIONEN . . . . . . . . .3<br />
GERÄT . . . . . . . . . . . . . . . . . . . . . . . . . . . .11<br />
ZUBEHÖR . . . . . . . . . . . . . . . . . . . . . . . . . .12<br />
BEDIENFELD . . . . . . . . . . . . . . . . . . . . . .13-14<br />
WICHTIGE SICHERHEITSHINWEISE . . . . . .D-1-3<br />
AUFSTELLANWEISUNGEN . . . . . . . . . . . . . .D-3<br />
VOR INBETRIEBNAHME . . . . . . . . . . . . . . . .D-4<br />
EINSTELLEN DER UHR . . . . . . . . . . . . . . . . .D-4<br />
MIKROWELLENLEISTUNG . . . . . . . . . . . . . .D-5<br />
GAREN MIT DER MIKROWELLE . . . . . . . . . . .D-5<br />
ANDERE NÜTZLICHE FUNKTIONEN . . . . . .D-6-7<br />
BEDIENUNG VON EXPRESS-MENÜ,<br />
EXPRESS-GAREN & EXPRESS-AUFTAUEN . . .D-8-9<br />
F TABLE DES MATIERES<br />
Mode d’emploi<br />
CHÈRE CLIENTE, CHER CLIENT . . . . . . . . . . . .1<br />
INFORMATIONS SUR LA MISE AU REBUT<br />
CORRECTE . . . . . . . . . . . . . . . . . . . . . . . . . .4<br />
FOUR . . . . . . . . . . . . . . . . . . . . . . . . . . . . .11<br />
ACCESSOIRES . . . . . . . . . . . . . . . . . . . . . . .12<br />
PANNEAU DE COMMANDE . . . . . . . . . .13-14<br />
INSTRUCTIONS IMPORTANTES DE SECURITE . . .F-1-3<br />
INSTALLATION . . . . . . . . . . . . . . . . . . . . . . .F-3<br />
AVANT MISE EN SERVICE . . . . . . . . . . . . . . .F-4<br />
REGLER L’HORLOGE . . . . . . . . . . . . . . . . . . .F-4<br />
NIVEAU DE PUISSANCE DU MICRO-ONDES . . . .F-5<br />
FONCTIONNEMENT MANUEL . . . . . . . . . . .F-5<br />
AUTRES FONCTIONS PRATIQUES . . . . . . . .F-6-7<br />
MENU RAPIDE, CUISSON RAPIDE &<br />
DÉCONGÉLATION RAPIDE . . . . . . . . . . . . . .F-8-9<br />
TABELLE EXPRESS-MENÜ . . . . . . . . . . . . . .D-10<br />
TABELLE EXPRESS-GAREN . . . . . . . . . . . . . .D-11<br />
TABELLE EXPRESS-AUFTAUEN . . . . . . . . . . .D-12<br />
REZEPTE FÜR EXPRESS-MENÜ . . . . . . . .D-13-14<br />
REINIGUNG UND PFLEGE . . . . . . . . . . . . .D-15<br />
FUNKTIONSPRÜFUNG . . . . . . . . . . . . . . .D-15<br />
Kochbuch<br />
WAS SIND MIKROWELLEN? . . . . . . . . . . .D-16<br />
DAS GEEIGNETE GESCHIRR . . . . . . . . . . . .D-16<br />
TIPPS UND TECHNIKEN . . . . . . . . . . . .D-17-19<br />
TABELLEN UND REZEPTE . . . . . . . . . . . .D-20-26<br />
SERVICE NIEDERLASSUNGEN . . . . . . .171-176<br />
TECHNISCHE DATEN . . . . . . . . . . . . . . . . .177<br />
TABLEAU DE MENUS RAPIDES . . . . . . . . . . . . .F-10<br />
TABLEAU DE CUISSON RAPIDE . . . . . . . . . . . .F-11<br />
TABLEAU DE DECONGELATION RAPIDE . . . . . .F-12<br />
RECETTES POUR MENU RAPIDE . . . . . . . . .F-13-14<br />
ENTRETIEN ET NETTOYAGE . . . . . . . . . . . .F-15<br />
AVANT D’APPELER LE DEPANNEUR . . . . . . .F-15<br />
Livre de recette<br />
QUE SONT LES MICRO-ONDES? . . . . . . . .F-16<br />
BIEN CHOISIR LA VAISSELLE . . . . . . . . . . . .F-16<br />
CONSEILS ET TECHNIQUES . . . . . . . . . .F-17-19<br />
TABLEAUX ET RECETTES . . . . . . . . . . . . .F-20-26<br />
ADDRESSES D’ENTRETIEN . . . . . . . . . .171-176<br />
FICHE TECHNIQUE . . . . . . . . . . . . . . . . . .177<br />
NL INHOUDSOPGAVE<br />
Gebruiksaanwijzing<br />
GEACHTE KLANT . . . . . . . . . . . . . . . . . . . . . .1<br />
INFORMATIE OVER VERANTWOORDE<br />
VERWIJDERING . . . . . . . . . . . . . . . . . . . . . . .5<br />
OVEN . . . . . . . . . . . . . . . . . . . . . . . . . . . . .11<br />
TOEBEHOREN . . . . . . . . . . . . . . . . . . . . . . .12<br />
BEDIENINGSPANEEL . . . . . . . . . . . . . . .13-14<br />
BELANGRIJKE VEILIGHEIDSMAATREGELEN . .NL-1-3<br />
INSTALLATIE . . . . . . . . . . . . . . . . . . . . . . .NL-3<br />
ALVORENS IN GEBRUIK TE NEMEN . . . . . .NL-4<br />
INSTELLEN VAN DE KLOK . . . . . . . . . . . . .NL-4<br />
KOKEN MET DE MAGNETRON . . . . . . . . .NL-5<br />
HANDBEDIENING . . . . . . . . . . . . . . . . . . .NL-5<br />
ANDERE GEHAKKELIJKE FUNCTIES . . . . .NL-6-7<br />
SNELMENU, SNEL BEREIDEN &<br />
SNEL ONTDOOIEN . . . . . . . . . . . . . . . .NL-8-9<br />
9<br />
TABEL SNELMENU . . . . . . . . . . . . . . . . . .NL-10<br />
TABEL SNEL BEREIDEN . . . . . . . . . . . . . . .NL-11<br />
TABEL SNEL ONTDOOIEN . . . . . . . . . . . .NL-12<br />
RECEPTEN VOOR SNELMENU . . . . . . .NL-13-14<br />
ONDERHOUD EN REINIGEN . . . . . . . . . .NL-15<br />
VOORDAT U EEN REPARATEUR BELT . . . . .NL-15<br />
Kookboek<br />
WAT ZIJN MICROGOLVEN? . . . . . . . . . . .NL-16<br />
GESCHIKTE SCHALEN/TIPS EN ADVIES . .NL-16-19<br />
TABEL EN RECEPTEN . . . . . . . . . . . . . .NL-20-26<br />
ONDERHOUDSADRESSEN . . . . . . . . . .171-176<br />
SPECIFICATIES . . . . . . . . . . . . . . . . . . . . . .178
1. R-<strong>26ST</strong> introduction 12.01 1/12/06 8:22 PM Page K<br />
I INDICE<br />
<strong>Manual</strong>e d’istruzioni<br />
GENTILE CLIENTE . . . . . . . . . . . . . . . . . . . . . .2<br />
INFORMAZIONI PER UN CORRETTO<br />
SMALTIMENTO . . . . . . . . . . . . . . . . . . . . . . .6<br />
FORNO . . . . . . . . . . . . . . . . . . . . . . . . . . .11<br />
ACCESSORI . . . . . . . . . . . . . . . . . . . . . . . .12<br />
PANNELLO DEI COMANDI . . . . . . . . . . . .13-14<br />
ISTRUZIONI IMPORTANTI SULLA SICUREZZA . .I-1-3<br />
INSTALLAZIONE . . . . . . . . . . . . . . . . . . . . . .I-3<br />
COTTURA A MICROONDE . . . . . . . . . . . . . .I-4<br />
REGOLAZIONE DELL’OROLGIO . . . . . . . . . .I-4<br />
PRIMA DI USARE IL FORNO . . . . . . . . . . . . . .I-5<br />
OPERAZIONI MANUALI . . . . . . . . . . . . . . . .I-5<br />
ALTRE FUNZIONI UTILI . . . . . . . . . . . . . . . .I-6-7<br />
MENU, COTTURA E<br />
SCONGELAMENTO RAPIDI . . . . . . . . . . . . .I-8-9<br />
E INDICE<br />
<strong>Manual</strong> de instrucciones<br />
ESTIMADO CLIENTE . . . . . . . . . . . . . . . . . . . .2<br />
INFORMACIÓN SOBRE LA ELIMINACIÓN . . . .7<br />
HORNO . . . . . . . . . . . . . . . . . . . . . . . . . . .11<br />
ACCESORIOS . . . . . . . . . . . . . . . . . . . . . . .12<br />
PANEL DE CONTROL . . . . . . . . . . . . . . .13-14<br />
MEDIDAS IMPORTANTES DE SEGURIDAD . . . . .E-1-3<br />
INSTALACION . . . . . . . . . . . . . . . . . . . . . . .E-3<br />
ANTES DE LA PUESTA EN FUNCTIONAMIENTO . .E-4<br />
PUESTA EN HORA DEL RELOJ . . . . . . . . . . . .E-4<br />
COCCIÓN POR MICROONDAS . . . . . . . . . .E-5<br />
OPERACIONES MANUALES . . . . . . . . . . . . .E-5<br />
OTRAS FUNCIONES CÓMODAS . . . . . . . .E-6-7<br />
MENÚ RÁPIDO, COCCIÓN RÁPIDA Y<br />
FUNCIONAMIENTO DE LA DESCONGELACIÓN<br />
RÁPIDA . . . . . . . . . . . . . . . . . . . . . . . . . . .E-8-9<br />
TABELLA MENU RAPIDI . . . . . . . . . . . . . . . . .I-10<br />
TABELLA COTTURA RAPIDA . . . . . . . . . . . . . .I-11<br />
TABELLA SCONGELAMENTO RAPIDO . . . . . . .I-12<br />
RICETTE PER MENU RAPIDI . . . . . . . . . . . .I-13-14<br />
MANUTENZIONE E PULIZIA . . . . . . . . . . . .I-15<br />
COSA VERIFICARE PRIMA DI CHIAMARE IL<br />
SERVIZIO DI ASSISTENZA . . . . . . . . . . . . . .I-15<br />
Libro di ricette<br />
CHE COSA SONO LE MICRO-ONDE ? . . . . .I-16<br />
UTENSILI ADATTI . . . . . . . . . . . . . . . . . . . . .I-16<br />
CONSIGLI E TECNICHE DI COTTURA . . .I-17-20<br />
TABELLAS E RICETTE . . . . . . . . . . . . . . . .I-20-26<br />
DIRECCIONES DE SERVICIO . . . . . . . . .171-176<br />
DATI TECHNICI . . . . . . . . . . . . . . . . . . . . .178<br />
TABLA DEL MENÚ RÁPIDO . . . . . . . . . . . . . .E-10<br />
TABLA DE COCCIÓN RÁPIDA . . . . . . . . . . . .E-11<br />
TABLA DE DESCONGELACIÓN RÁPIDA . . . . .E-12<br />
RECETAS PARA MENÚS RÁPIDOS . . . . . . .E-13-14<br />
LIMPIEZA Y MANTENIMIENTO . . . . . . . . . .E-15<br />
COMPROBACIONES ANTES DE LLAMAR AL<br />
SERVICIO DE REPARACIONES . . . . . . . . . .E-15<br />
Recetario<br />
QUÉ SON LAS MICROONDAS? . . . . . . . . .E-16<br />
LA VAJILLA APPROPIADA . . . . . . . . . . . . . .E-16<br />
SUGERENCIAS Y TECNICAS . . . . . . . . .E-17-20<br />
TABLAS Y RECETAS . . . . . . . . . . . . . . . .E-21-26<br />
INDIRIZZI DE SERVICIO . . . . . . . . . . . .171-176<br />
ESPECIFICACIONES . . . . . . . . . . . . . . . . . .179<br />
<strong>GB</strong> CONTENTS<br />
<strong>Operation</strong> manual<br />
DEAR CUSTOMER . . . . . . . . . . . . . . . . . . . . .2<br />
INFORMATION ON PROPER DISPOSAL . . . . . .8<br />
OVEN . . . . . . . . . . . . . . . . . . . . . . . . . . . .11<br />
ACCESSORIES . . . . . . . . . . . . . . . . . . . . . . .12<br />
CONTROL PANEL . . . . . . . . . . . . . . . . . .13-14<br />
IMPORTANT SAFETY INSTRUCTIONS . . . .<strong>GB</strong>-1-3<br />
INSTALLATION . . . . . . . . . . . . . . . . . . . . .<strong>GB</strong>-3<br />
BEFORE OPERATION . . . . . . . . . . . . . . . . .<strong>GB</strong>-4<br />
SETTING THE CLOCK . . . . . . . . . . . . . . . .<strong>GB</strong>-4<br />
MICROWAVE POWER LEVEL . . . . . . . . . . .<strong>GB</strong>-5<br />
MANUAL OPERATION . . . . . . . . . . . . . . . .<strong>GB</strong>-5<br />
OTHER CONVENIENT FUNCTION . . . . .<strong>GB</strong>-6-7<br />
EXPRESS MENU, EXPRESS COOK &<br />
EXPRESS DEFROST OPERATION . . . . . . . .<strong>GB</strong>-8-9<br />
10<br />
EXPRESS MENU CHART . . . . . . . . . . . . . .<strong>GB</strong>-10<br />
EXPRESS COOK CHART . . . . . . . . . . . . . .<strong>GB</strong>-11<br />
EXPRESS DEFROST CHART . . . . . . . . . . . .<strong>GB</strong>-12<br />
RECIPES FOR EXPRESS MENU . . . . . . .<strong>GB</strong>-13-14<br />
CARE AND CLEANING . . . . . . . . . . . . . .<strong>GB</strong>-15<br />
SERVICE CALL CHECK . . . . . . . . . . . . . . .<strong>GB</strong>-15<br />
Cookbook<br />
WHAT ARE MICROWAVES? . . . . . . . . . . .<strong>GB</strong>-16<br />
SUITABLE OVENWARE . . . . . . . . . . . . . . .<strong>GB</strong>-16<br />
TIPS AND ADVICE . . . . . . . . . . . . . . .<strong>GB</strong>-17-19<br />
TABLES AND RECIPES . . . . . . . . . . . . .<strong>GB</strong>-20-26<br />
SERVICE ADDRESSES . . . . . . . . . . . . . .171-176<br />
SPECIFICATIONS . . . . . . . . . . . . . . . . . . . .179
1. R-<strong>26ST</strong> introduction 12.01 1/12/06 8:22 PM Page L<br />
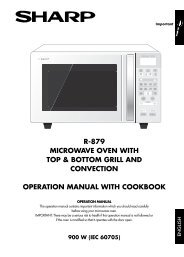
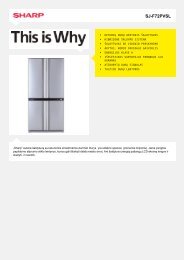
GERÄT/FOUR/OVEN/FORNO/HORNO/OVEN<br />
6 2<br />
1<br />
3<br />
9<br />
4<br />
5<br />
8<br />
7<br />
10<br />
4<br />
11<br />
D<br />
1 Türgriff<br />
2 Garraumlampe<br />
3 Türscharniere<br />
4 Türsicherheitsverriegelung<br />
5 Tür<br />
6 Türdichtungen und<br />
Dichtungsoberflächen<br />
7 Antriebswelle<br />
8 Garraum<br />
9 Bedienfeld<br />
10 Spritzschutz für den Hohlleiter<br />
11 Netzkabel<br />
12 Lüftungsöffnungen<br />
13 Außenseite<br />
I<br />
1 Maniglia di apertura sportello<br />
2 Luce del forno<br />
3 Cerniere sportello<br />
4 Chiusura di sicurezza sportello<br />
5 Sportello<br />
6 Guarnizioni e superfici di<br />
tenuta sportello<br />
7 Accoppiatore<br />
8 Cavità del forno<br />
9 Pannello dei comandi<br />
10 Coperchio guida onde<br />
11 Cavo di alimentazione<br />
12 Apperture di ventilazione<br />
13 Mobile esterno<br />
F<br />
1 Poignée d’ouverture de la porte<br />
2 Eclairage du four<br />
3 Charnières de porte<br />
4 Loquets de sécurité de la porte<br />
5 Porte<br />
6 Joint de porte et surface de<br />
contact du joint<br />
7 Entraînement<br />
8 Cavité du four<br />
9 Panneau de commande<br />
10 Cadre du répartiteur d’ondes<br />
11 Cordon d’alimentation<br />
12 Ouvertures de ventilation<br />
13 Partie extérieure<br />
E<br />
1 Tirador para abrir la puerta<br />
2 Lámpara del horno<br />
3 Bisagras<br />
4 Pestillos de seguridad de la puerta<br />
5 Puerta<br />
6 Sellos de la puerta y superficies<br />
de sellado<br />
7 Acoplamiento<br />
8 Cavidad del horno<br />
9 Panel de control<br />
10 Tapa de la guía de ondas<br />
11 Cable de alimentación<br />
12 Orificios de ventilación<br />
13 Exterior de la caja<br />
NL<br />
12<br />
13<br />
1 Deurhendel<br />
2 Ovenlamp<br />
3 Deurscharnieren<br />
4 Veiligheidsvergrendeling van de deur<br />
5 Deur<br />
6 Deurafdichtingen en pasvlakke<br />
7 Verbindingsstuk<br />
8 Ovenruimte<br />
9 Bedieningspaneel<br />
10 Afdekplaatje (voor golfgeleider)<br />
11 Netsnoer<br />
12 Ventilatie-openingen<br />
13 Behuizing<br />
<strong>GB</strong><br />
1 Door opening handle<br />
2 Oven lamp<br />
3 Door hinges<br />
4 Door safety latches<br />
5 Door<br />
6 Door seals and sealing<br />
surfaces<br />
7 Coupling<br />
8 Oven cavity<br />
9 Control panel<br />
10 Waveguide cover<br />
11 Power supply cord<br />
12 Ventilation openings<br />
13 Outer cabinet<br />
11
1. R-<strong>26ST</strong> introduction 12.01 1/12/06 8:22 PM Page 1<br />
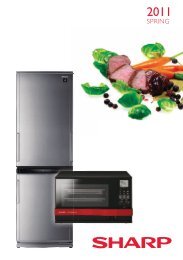
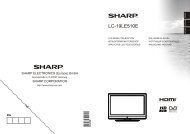
ZUBEHÖR/ACCESSOIRES/TOEBEHOREN<br />
ACCESSORI/ACCESORIOS/ACCESSORIES<br />
14<br />
15<br />
7<br />
D ZUBEHÖR<br />
Überprüfen Sie, dass die Zubehörteile vorhanden sind:<br />
den Drehteller-Träger (15) auf die abgedichte<br />
Antriebswelle (7) auf den Garraumboden legen. Dann<br />
den Drehteller (14) darauf legen.<br />
Um Schäden am Drehteller zu vermeiden, ist darauf zu<br />
achten, dass Gefäße und Behälter bei der Entnahme<br />
nicht den Rand des Drehtellers berühren.<br />
Hinweis: Bei der Bestellung von Zubehörteilen müssen<br />
Sie dem Händler bzw. dem SHARP Kundendienst immer<br />
die Teilebezeichnung und den Modellnamen angeben.<br />
F ACCESSORIES<br />
Assurez-vous que les accessoires sont contenus dans<br />
l’emballage: Posez le pied du plateau (15) sur la<br />
entraînement (7). Puis posez le plateau (14) tournant<br />
dessus en tenant compte de l’accouplement de la sole de<br />
la cavité.<br />
Pour éviter d’endommager le plateau tournant, s’assurez<br />
que les plats ou les récipients ne touchent pas le bord<br />
du plateau lorsqu’ils sont retirés du four.<br />
Remarques: Lorsque vous passez une commande<br />
d’accessories, veuillez mentionner au revendeur ou au<br />
service d’entretien agréé par SHARP le nom des pièces<br />
et nom du modèle.<br />
NL TOEBEHOREN<br />
Kontroleer dat de volgende accessoires zijn geleverd:<br />
Plaats de draaisteun (15) op de vloer van de<br />
ovenruimte. Plaats vervolgens de draaitafel (14) op het<br />
verbindingsstuk (7) van de draaisteun.<br />
Om ervoor te zorgen dat de draaitafel niet wordt<br />
beschadigd, moeten de borden of schalen goed<br />
worden opgetild, zodat ze de rand van de draaitafel<br />
niet raken wanneer u ze uit de oven haalt.<br />
Opmerking: Stel uw handelaar of erkend SHARP<br />
onderhoudspersoneel bij het nabestellen van accessoires<br />
op de hoogte van: de naam en de modelnaam.<br />
I ACCESSORI<br />
Accertatevi che i seguenti accessori siano presenti:<br />
Mettere il sostegno rotante (15) nella accoppiatore (7)<br />
sul pavimento della cavità del forno. Mettere poi il<br />
piatto rotante (14) sul sostegno rotante.<br />
Per evitare di danneggiare il piatto rotante, al momento<br />
di togliere i piatti o i contenitori dal forno, sollevateli<br />
completamente dal piatto facendo attenzione a non<br />
urtare il bordo.<br />
Nota: Ordinando gli accesori, dita al rivenditore o ad<br />
un tecnico di servizio SHARP autorizzato il nome della<br />
parte e il nome del modello.<br />
E ACCESORIOS<br />
Compruebe que dispone de todos los accesorios<br />
siguientes: Coloque el soporte del rodillo (15) en el<br />
suelo de la cavidad del horno. Coloque después el<br />
plato giratorio (14) sobre el soporte colocado en la<br />
acoplamiento (7).<br />
Levante los platos o recipientes cuando vaya a sacarlos<br />
del horno para no golpear el borde del plato giratorio y<br />
evitar dañarlo.<br />
Nota: Cuando haga el pedido de los accesorios,<br />
indíquele a su distribuidor o técnico de servicio SHARP<br />
autorizado los dos datos siguientes: el nombre de la<br />
pieza, y el nombre del modelo.<br />
<strong>GB</strong> ACCESSORIES<br />
Check to make sure the following accessories are<br />
provided:<br />
(14) Turntable (15) Roller stay<br />
• Place the roller stay in the coupling (7) on the floor<br />
of the cavity.<br />
• Then place the turntable on the roller stay.<br />
•To avoid turntable damage, ensure dishes or<br />
containers are lifted clear of the turntable rim when<br />
removing them from the oven.<br />
Note: When you order accessories, please mention<br />
two items: part name and model name to your dealer or<br />
SHARP authorised service agent.<br />
12
1. R-<strong>26ST</strong> introduction 12.01 1/12/06 8:22 PM Page 2<br />
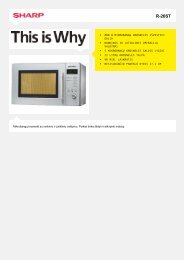
BEDIENFELD/PANNEAU DE COMMANDE<br />
1<br />
2<br />
3<br />
4<br />
5<br />
6<br />
7<br />
8<br />
D<br />
BEDIENFELD<br />
1 Display<br />
2 Symbole<br />
Die entsprechende Anzeige über einem Symbol<br />
blinkt oder leuchtet auf. Wenn eine Anzeige<br />
blinkt, drücken Sie die entsprechende Taste (mit<br />
dem gleichen Symbol) oder führen Sie den den<br />
erforderlichen Bedienungsschritt durch.<br />
Umrühren<br />
Wenden<br />
KG/Gewicht<br />
Symbol für Mikrowellen-Leistungsstufen<br />
Symbol für Garen<br />
3 Taste EXPRESS-AUFTAUEN<br />
Diese Taste zur Auswahl von einem der 5<br />
Automatikprogramme drücken<br />
4 Tasten EXPRESS-GAREN (Express-Menü<br />
& Express-Garen)<br />
Diese Taste zur Auswahl von einem der 7<br />
Automatikprogramme drücken<br />
5 STOP-Taste<br />
6 START/+1min-Taste<br />
7 MIKROWELLEN-LEISTUNGSSTUFEN-Taste<br />
8 ZEITSCHALTUHR/GEWICHTS-Knopf<br />
F<br />
PANNEAU DE COMMANDE<br />
1 Affichage numérique<br />
2 Témoins<br />
L’indicateur clignotera ou s’allumera juste audessus<br />
de son symbole respectif, en fonction<br />
de l’instruction donnée. Lorsqu’un indicateur<br />
clignote, appuyez sur la touche adéquate<br />
(qui comporte le même symbole) ou effectuez<br />
l’opération nécessaire.<br />
Remuer<br />
Retourner<br />
KG/Poids<br />
Témoin de niveau de puissance<br />
Témoin de cuisson<br />
3 Touche de DECONGELATION RAPIDE<br />
Appuyer pour sélectionner l’un des 5<br />
programmes automatiques.<br />
4 Touches de CUISSON RAPIDE (Menu<br />
rapide & Cuisson rapide)<br />
Appuyer pour sélectionner l’un des 7<br />
programmes automatiques.<br />
5 Touche ARRET<br />
6 Touche DEPART/+1min<br />
7 Touche NIVEAUX DE PUISSANCE MICRO-ONDES<br />
8 Bouton MINUTERIE/POIDS<br />
13
1. R-<strong>26ST</strong> introduction 12.01 1/12/06 8:22 PM Page 3<br />
BEDIENINGSPANEEL/PANNELLO DI CONTROLLO<br />
PANEL DE MANDOS/CONTROL PANEL<br />
NL<br />
1 Digitale display<br />
2 Indikators<br />
De overeenkomstige indicator boven elk<br />
symbool zal gaan knipperen of gaan branden<br />
volgens de gebruiksaanwijzing. Als een<br />
indicator knippert, drukt u op de gepaste toets<br />
(met hetzelfde symbool) of voert u de vereiste<br />
bewerking uit.<br />
Roeren<br />
Omdraaien<br />
KG/Gewicht<br />
Vermogenniveau-indikator<br />
Koken-indikator<br />
3 Toets SNEL ONTDOOIEN<br />
Druk op de toets om één van de 5<br />
automatische kookprogramma’s te kiezen.<br />
4 Toetsen SNEL BEREIDEN (Snelmenu &<br />
Snel bereiden)<br />
Druk op de toets om één van de 7<br />
automatische kookprogramma’s te kiezen.<br />
5 STOP-toets<br />
6 START/+1min-toets<br />
7 MAGNETRON VERMOGENNIVEAU-toets<br />
8 TIJDSCHAKELAAR/GEWICHT-knop<br />
I<br />
BEDIENINGSPANEEL<br />
PANNELLO DEI COMANDI<br />
1 Display digitale<br />
2 Indicatori<br />
Il relativo indicatore situato superiormente a<br />
ciascun simbolo lampeggerà oppure si<br />
accenderà a luce fissa a seconda del comando.<br />
Quando un indicatore lampeggia, premere il<br />
relativo pulsante (che presenta lo stesso simbolo)<br />
oppure effettuare l’operazione necessaria.<br />
Mescolare<br />
Voltare<br />
KG/Peso<br />
Indicatore di livello potenza<br />
microonde<br />
Indicatore di cottura<br />
3 Pulsante SCONGELAMENTO RAPIDO<br />
Premere il pulsante per selezionare uno dei 5<br />
programmi automatici.<br />
4 Pulsanti COTTURA RAPIDA (Menu rapido<br />
e Cottura rapida)<br />
Premere il pulsante per selezionare uno dei 7<br />
programmi automatici.<br />
5 Pulsante di ARRESTO<br />
6 Pulsante di INIZIO/+1min<br />
7 Pulsante delle LIVELLO DI POTENZA MICROONDE<br />
8 Manopola RUTTORE/PESO<br />
14<br />
E<br />
1 Visualizador digital<br />
2 Indicadores<br />
Según la acción que se realice, el indicador<br />
correspondiente se iluminará o parpadeará<br />
encima de su símbolo. Cuando el indicador<br />
parpadee, pulse el botón apropiado (con el<br />
mismo símbolo) o lleve a cabo la acción<br />
necesaria.<br />
Remover<br />
Darle vuelta<br />
KG/Peso<br />
Indicador del nivel de potencia de<br />
microondas<br />
Indicador de cocción<br />
3 Botón de DESCONGELACIÓN RÁPIDA<br />
Pulsar para seleccionar uno de los 5<br />
programas automáticos.<br />
4 Botones para COCCIÓN RÁPIDA (Menú<br />
rápido y Cocción rápida)<br />
Pulsar para seleccionar uno de los 7<br />
programas automáticos.<br />
5 Tecla de PARADA<br />
6 Tecla COMENZAR/+1min<br />
7 Tecla de NIVEL DE POTENCIA DEL MICROONDAS<br />
8 Mando TEMPORIZADOR/PESO<br />
<strong>GB</strong><br />
PANEL DE CONTROL<br />
CONTROL PANEL<br />
1 Digital Display<br />
2 Indicators<br />
The appropriate indicator will flash or light<br />
up, just above each symbol according to the<br />
instruction. When an indicator is flashing,<br />
press the suitable button (having the same<br />
symbol) or do the necessary operation.<br />
Stir<br />
Turn over<br />
Weight<br />
Microwave power level<br />
Cooking in progress<br />
3 EXPRESS DEFROST button<br />
Press to select one of the 5 automatic<br />
programmes.<br />
4 EXPRESS COOK (Express Menu &<br />
Express Cook) buttons<br />
Press to select one of the 7 automatic<br />
programmes.<br />
5 STOP button<br />
6 START/+1min button<br />
7 MICROWAVE POWER LEVEL button<br />
8 TIMER/WEIGHT knob
7. R-<strong>26ST</strong> English 27.01 27/1/06 4:59 PM Page 2<br />
IMPORTANT SAFETY INSTRUCTIONS<br />
IMPORTANT SAFETY INSTRUCTIONS: READ CAREFULLY AND KEEP FOR FUTURE REFERENCE<br />
To avoid the danger of fire.<br />
The microwave oven should not be left<br />
unattended during operation. Power<br />
levels that are too high, or cooking times<br />
that are too long, may overheat foods<br />
resulting in a fire.<br />
This oven is designed to be used on a countertop<br />
only. It is not designed to be built into a kitchen unit.<br />
The electrical outlet must be readily accessible so<br />
that the unit can be unplugged easily in an<br />
emergency.<br />
The AC power supply must be 230V, 50Hz, with a<br />
minimum 10A distribution line fuse, or a minimum<br />
10A distribution circuit breaker.<br />
A separate circuit serving only this appliance<br />
should be provided.<br />
Do not place the oven in areas where heat is<br />
generated. For example, close to a conventional oven.<br />
Do not install the oven in an area of high humidity<br />
or where moisture may collect.<br />
Do not store or use the oven outdoors.<br />
If smoke is observed, switch off or<br />
unplug the oven and keep the door<br />
closed in order to stifle any flames.<br />
Use only microwave-safe containers and<br />
utensils. See Page <strong>GB</strong>-16. Utensils should<br />
be checked to ensure that they are<br />
suitable for use in microwave ovens.<br />
When heating food in plastic or paper<br />
containers, keep an eye on the oven due<br />
to the possibility of ignition.<br />
Clean the waveguide cover, the oven<br />
cavity, the turntable and roller stay after<br />
use. These must be dry and free from<br />
grease. Built-up grease may overheat<br />
and begin to smoke or catch fire.<br />
Do not place flammable materials near the oven or<br />
ventilation openings.<br />
Do not block the ventilation openings.<br />
Remove all metallic seals, wire twists, etc., from<br />
food and food packages. Arcing on metallic<br />
surfaces may cause a fire.<br />
Do not use the microwave oven to heat oil for deep<br />
frying. The temperature cannot be controlled and<br />
the oil may catch fire.<br />
To make popcorn, use only special microwave<br />
popcorn makers.<br />
Do not store food or any other items inside the oven.<br />
Check the settings after you start the oven to ensure<br />
the oven is operating as desired.<br />
To avoid overheating and fire, special care must be taken when<br />
cooking or reheating foods with a high sugar or fat content, for<br />
example, Sausage rolls, Pies or Christmas pudding.<br />
See the corresponding hints in operation manual and the<br />
cookery book section.<br />
To avoid the possibility of injury<br />
WARNING:<br />
Do not operate the oven if it is damaged or<br />
malfunctioning. Check the following before use:<br />
a)The door; make sure the door closes properly and<br />
ensure it is not misaligned or warped.<br />
b)The hinges and safety door latches; check to make sure<br />
they are not broken or loose.<br />
c) The door seals and sealing surfaces; ensure that they<br />
have not been damaged.<br />
d)Inside the oven cavity or on the door; make sure there<br />
are no dents.<br />
e) The power supply cord and plug; ensure that they are<br />
not damaged.<br />
If the door or door seals are damaged, the oven must not be<br />
operated until it has been repaired by a competent person.<br />
Never adjust , repair or modify the oven yourself.<br />
It is hazardous for anyone other than a competent<br />
person to carry out any service or repair<br />
operation which involves the removal of a cover<br />
which gives protection against exposure to<br />
microwave energy.<br />
Do not operate the oven with the door open or<br />
alter the door safety latches in any way.<br />
Do not operate the oven if there is an object<br />
between the door seals and sealing surfaces.<br />
Do not allow grease or dirt to build up on the<br />
door seals and adjacent parts. Clean the oven<br />
at regular intervals and remove any food<br />
deposits. Follow the instructions for “Care and<br />
Cleaning” on page <strong>GB</strong>-15. Failure to maintain<br />
the oven in a clean condition could lead to a<br />
deterioration of the surface that could<br />
adversely affect the life of the appliance and<br />
possibly result in a hazardous situation.<br />
Individuals with PACEMAKERS should check with<br />
their doctor or the manufacturer of the pacemaker<br />
for precautions regarding microwave ovens.<br />
To avoid the possibility of electric shock<br />
Under no circumstances should you remove the outer cabinet.<br />
Never spill or insert any objects into the door lock openings or<br />
ventilation openings. In the event of a spill, turn off and unplug the<br />
oven immediately, and call an authorised SHARP service agent.<br />
Do not immerse the power supply cord or plug in<br />
water or any other liquid.<br />
Do not let the power supply cord hang over the<br />
edge of a table or work surface.<br />
145/<strong>GB</strong>-1
7. R-<strong>26ST</strong> English 27.01 27/1/06 4:59 PM Page 3<br />
IMPORTANT SAFETY INSTRUCTIONS<br />
Keep the power supply cord away from heated<br />
surfaces, including the rear of the oven.<br />
Do not attempt to replace the oven lamp yourself<br />
or allow anyone who is not an electrician<br />
authorised by SHARP to do so. If the oven lamp<br />
fails, please consult your dealer or an authorised<br />
SHARP service agent.<br />
If the power supply cord of this appliance is<br />
damaged, it must be replaced with a special cord.<br />
The exchange must be made by an authorised<br />
SHARP service agent.<br />
To avoid the possibility of explosion and<br />
sudden boiling:<br />
WARNING: Liquids and other foods must<br />
not be heated in sealed containers since<br />
they are liable to explode.<br />
Microwave heating of beverages can result in<br />
delayed eruptive boiling, therefore care must<br />
be taken when handling the container.<br />
Never use sealed containers. Remove seals and<br />
lids before use. Sealed containers can explode due<br />
to a build up of pressure even after the oven has<br />
been turned off.<br />
Take care when microwaving liquids. Use a widemouthed<br />
container to allow bubbles to escape.<br />
Never heat liquids in narrow necked<br />
containers such as baby bottles, as this<br />
may result in the contents erupting from the<br />
container when heated and cause burns.<br />
To prevent sudden eruption of boiling liquid and<br />
possible scalding:<br />
1. Do not use excessive amount of time (See page <strong>GB</strong>-<br />
20).<br />
2. Stir liquid prior to heating/reheating.<br />
3. It is advisable to insert a glass rod or similar utensil<br />
(not metal) into the liquid whilst reheating.<br />
4. Let liquid stand for at least 20 seconds in the oven<br />
at the end of cooking time to prevent delayed<br />
eruptive boiling.<br />
Do not cook eggs in their shells, and whole<br />
hard boiled eggs should not be heated in<br />
microwave ovens since they may explode<br />
even after microwave cooking has ended.<br />
To cook or reheat eggs which have not<br />
been scrambled or mixed, pierce the yolks<br />
and the whites, or the eggs may explode.<br />
Shell and slice hard boiled eggs before<br />
reheating them in the microwave oven.<br />
Pierce the skin of such foods as potatoes, sausages<br />
and fruit before cooking, or they may explode.<br />
To avoid the possibility of burns<br />
WARNING: The contents of feeding bottles<br />
and baby food jars must be stirred or shaken<br />
and the temperature checked before<br />
consumption, in order to avoid burns.<br />
Use pot holders or oven gloves when removing food<br />
from the oven to prevent burns.<br />
Always open containers, popcorn makers, oven<br />
cooking bags, etc., away from the face and hands to<br />
avoid steam burns and eruption of boiling.<br />
To avoid burns, always test food temperature<br />
and stir before serving and pay special<br />
attention to the temperature of food and<br />
drink given to babies, children or the elderly.<br />
Temperature of the container is not a true<br />
indication of the temperature of the food or drink;<br />
always check the food temperature.<br />
Always stand back from the oven door when opening<br />
it to avoid burns from escaping steam and heat.<br />
Slice stuffed baked foods after heating to release<br />
steam and avoid burns.<br />
Keep children away from the door to prevent them<br />
burning themselves.<br />
To avoid misuse by children<br />
WARNING: Only allow children to use the<br />
oven without supervision when adequate<br />
instructions have been given so that the child<br />
is able to use the oven in a safe way and<br />
understands the hazards of improper use.<br />
Do not lean or swing on the oven door. Do not play<br />
with the oven or use it as a toy.<br />
Children should be taught all important safety instructions:<br />
use of pot holders, careful removal of food coverings; paying<br />
special attention to packaging (e.g. self-heating materials)<br />
designed to make food crisp, as they may be extra hot.<br />
Other warnings<br />
Never modify the oven in any way.<br />
Do not move the oven while it is in operation.<br />
This oven is for home food preparation only and<br />
may only be used for cooking food. It is not<br />
suitable for commercial or laboratory use.<br />
To promote trouble-free use of your oven<br />
and avoid damage.<br />
Never operate the oven when it is empty.<br />
When using a browning dish or self-heating material,<br />
always place a heat-resistant insulator such as a porcelain<br />
plate under it to prevent damage to the turntable and<br />
roller stay due to heat stress. The preheating time<br />
specified in the dishes instructions must not be exceeded.<br />
Do not use metal utensils, which reflect microwaves<br />
and may cause electrical arcing. Do not put cans<br />
in the oven.<br />
ENGLISH<br />
146/<strong>GB</strong>-2
7. R-<strong>26ST</strong> English 27.01 27/1/06 4:59 PM Page 4<br />
IMPORTANT SAFETY INSTRUCTIONS<br />
Use only the turntable and the roller stay designed<br />
for this oven. Do not operate the oven without the<br />
turntable.<br />
To prevent the turntable from breaking:<br />
(a)Before cleaning the turntable with water, leave<br />
the turntable to cool.<br />
(b)Do not put hot foods or hot utensils on a cold<br />
turntable.<br />
(c) Do not put cold foods or cold utensils on a hot<br />
turntable.<br />
Do not place anything on the outer cabinet during<br />
operation.<br />
NOTE:<br />
If you are unsure how to connect your oven, please<br />
consult an authorised, qualified electrician.<br />
Neither the manufacturer nor the dealer can accept<br />
any liability for damage to the oven or personal<br />
injury resulting from failure to observe the correct<br />
electrical connection procedure.<br />
Water vapour or drops may occasionally form on<br />
the oven walls or around the door seals and<br />
sealing surfaces. This is a normal occurrence and is<br />
not an indication of microwave leakage or a<br />
malfunction.<br />
INSTALLATION<br />
1. Remove all packing materials from the inside of<br />
the oven cavity. Discard the loose polythene sheet<br />
from between the door and cavity. Remove the<br />
feature sticker, if attached, from the outside of<br />
the door.<br />
Do not remove the protective film attached to the<br />
inside of the door.<br />
2. Check the oven carefully for any signs of damage.<br />
3. Place the oven on a flat, level surface strong<br />
enough to support the oven’s weight plus the<br />
heaviest item likely to be cooked.<br />
4. Ensure there is a minimum free space above the<br />
oven of 15cm:<br />
15cm<br />
✓<br />
REMOVE<br />
✗<br />
DO NOT REMOVE<br />
5. Securely connect the plug of the oven to a standard<br />
earthed (grounded) household electrical outlet.<br />
147/<strong>GB</strong>-3
7. R-<strong>26ST</strong> English 27.01 27/1/06 4:59 PM Page 5<br />
BEFORE OPERATION<br />
Plug in the oven.<br />
1. The oven display will flash:<br />
2. Touch the STOP button the display will show:<br />
Using the STOP button<br />
Use the STOP button to:<br />
1. Erase a mistake during programming.<br />
2. Stop the oven temporarily during cooking.<br />
3. Cancel a programme during cooking, touch twice.<br />
x1<br />
To set the clock, see below.<br />
SETTING THE CLOCK<br />
There are two setting modes: 12 hour clock and 24 hour clock.<br />
1. To set the 12 hour clock, hold the MICROWAVE POWER LEVEL button<br />
down for 3 seconds. will appear in the display.<br />
2. To set the 24 hour clock, press the MICROWAVE POWER LEVEL button once<br />
more after Step 1, in the example below will appear in the display.<br />
To set the clock, follow the example below.<br />
Example:<br />
To set the 24 hour clock to 23:35<br />
1. Choose the clock function.<br />
(12 hour clock)<br />
Choose the 24 hour<br />
clock.<br />
2. Set the hours. Rotate the<br />
TIMER/WEIGHT knob until<br />
the correct hour is displayed<br />
(23).<br />
x1 and hold<br />
for 3 secs.<br />
3. Press the MICROWAVE<br />
POWER LEVEL button<br />
to change from hours to<br />
minutes.<br />
x1 and hold<br />
for 3 secs.<br />
4. Set the minutes. Rotate the<br />
TIMER/WEIGHT knob until<br />
the correct minute is displayed<br />
(35).<br />
5. Press the MICROWAVE POWER<br />
LEVEL button to start the clock.<br />
NOTE:<br />
1. You can rotate the TIMER/WEIGHT knob<br />
clockwise or counter-clockwise.<br />
2. Press the STOP button if you make a mistake<br />
during programming.<br />
3. If the electrical power supply to your microwave<br />
oven is interrupted, the display will intermittently<br />
x1<br />
x1<br />
148/<strong>GB</strong>-4<br />
Check the display.<br />
show after the power is reinstated. If this<br />
occurs during cooking, the programme will be<br />
erased. The time of day will also be erased.<br />
4. When you want to reset the time of day, follow the<br />
above example again.<br />
x1<br />
ENGLISH
7. R-<strong>26ST</strong> English 27.01 27/1/06 4:59 PM Page 6<br />
MICROWAVE POWER LEVEL<br />
Your oven has 5 power levels. To choose the power level<br />
for cooking, follow the advice given in the recipe section.<br />
Generally the following recommendations apply:<br />
100 P (800 W) used for fast cooking or reheating<br />
e.g. soup, casseroles, canned food, hot beverages,<br />
vegetables, fish, etc.<br />
70 P (560 W) used for longer cooking of dense foods<br />
such as roast joints, meat loaf and plated meals, also<br />
for sensitive dishes such as cheese sauce and sponge<br />
cakes. At this reduced setting, the sauce will not boil<br />
over and food will cook evenly without over cooking at<br />
the sides.<br />
50 P (400 W) for dense foods which require a long<br />
cooking time when cooked conventionally, eg. beef<br />
dishes, it is advisable to use this power setting to<br />
ensure the meat will be tender.<br />
30 P (240 W) to defrost, select this power setting, to<br />
ensure that the dish defrosts evenly. This setting is also<br />
ideal for simmering rice, pasta, dumplings and<br />
cooking egg custard.<br />
10 P (80 W) For gentle defrosting, eg. cream<br />
gateaux or pastry.<br />
P = Percentage.<br />
To set the power, touch the MICROWAVE POWER LEVEL button until the desired level is displayed. If<br />
MICROWAVE POWER LEVEL button is touched once, will be displayed. If you miss your desired level,<br />
continue touching the MICROWAVE POWER LEVEL button until you reach the level again. If the level is not<br />
selected, the level 100 P is automatically set.<br />
MANUAL OPERATION<br />
Your oven can be programmed for up to 90 minutes.<br />
(90.00) The input unit of cooking (defrosting) time<br />
varies from 10 seconds to five minutes. It depends on<br />
the total length of the cooking (defrosting) time as<br />
shown on the table.<br />
Cooking time Increasing unit<br />
0-5 minutes 10 seconds<br />
5-10 minutes 30 seconds<br />
10-30 minutes 1 minute<br />
30-90 minutes 5 minutes<br />
Example:<br />
Suppose you want to heat soup for 2 minutes and 30 seconds on 70 P microwave power.<br />
1. Enter the desired cooking time by<br />
rotating the TIMER/WEIGHT<br />
knob clockwise.<br />
(2 min. & 30 sec.)<br />
2. Choose desired power<br />
by pressing the<br />
MICROWAVE POWER<br />
LEVEL button twice.<br />
3. Press the START/<br />
+1min button to<br />
begin cooking.<br />
x2<br />
Check the display.<br />
x1<br />
NOTE:<br />
1. When the door is opened during the cooking process, the cooking time on the digital display stops<br />
automatically. The cooking time starts to count down again when the door is closed and the<br />
START/+1min button is pressed.<br />
2. If you wish to know the power level during cooking, press the MICROWAVE POWER LEVEL button.<br />
As long as your finger is touching the MICROWAVE POWER LEVEL button, the power level will be displayed.<br />
3. You can rotate the TIMER/WEIGHT knob clockwise or counterclockwise. If you rotate the knob<br />
counterclockwise, the cooking time will decrease from 90 minutes by degrees.<br />
149/<strong>GB</strong>-5
7. R-<strong>26ST</strong> English 27.01 27/1/06 4:59 PM Page 7<br />
OTHER CONVENIENT FUNCTIONS<br />
1. MULTIPLE SEQUENCE COOKING<br />
A maximum of 3 sequences can be input, consisting of manual cooking time and mode.<br />
Example:<br />
To cook: 5 minutes on 100 P power (Stage 1)<br />
16 minutes on 30 P power (Stage 2)<br />
STAGE 1<br />
1. Enter the desired cooking time<br />
by rotating TIMER/WEIGHT<br />
knob.<br />
2. Choose the desired power level<br />
by pressing the MICROWAVE<br />
POWER LEVEL button once.<br />
x1<br />
STAGE 2<br />
3. Enter desired time by<br />
rotating TIMER/WEIGHT<br />
knob.<br />
4. Choose the desired power<br />
level by pressing the<br />
MICROWAVE POWER<br />
LEVEL button four times.<br />
5. Press the START/<br />
+1min button once to<br />
begin cooking.<br />
x4<br />
x1<br />
Check the display.<br />
(The oven will begin to cook for 5 minutes on 100 P, and then for 16 minutes on 30 P).<br />
ENGLISH<br />
150/<strong>GB</strong>-6
7. R-<strong>26ST</strong> English 27.01 27/1/06 4:59 PM Page 8<br />
OTHER CONVENIENT FUNCTIONS<br />
2. MINUTE PLUS FUNCTION<br />
The START/+1min button allows you to operate the two following functions:<br />
a. Direct start<br />
You can directly start cooking on 100 P microwave power level for 1 minute by pressing the<br />
START/+1min button.<br />
NOTE:<br />
To avoid the misuse by children the START/+1min button can be used only within 3 minutes after<br />
preceding operation, i.e., closing the door, pressing the STOP button or cooking completion.<br />
b. Extend the cooking time<br />
You can extend the cooking time during manual cooking for multiples of 1 minute if the button is<br />
pressed while the oven is in operation.<br />
3. TO CHECK THE POWER LEVEL<br />
To check the microwave power level during cooking press the MICROWAVE POWER LEVEL button.<br />
x1<br />
As long as your finger is touching the MICROWAVE POWER LEVEL button the power level will be<br />
displayed.<br />
The oven continues to count down although the display shows the power level.<br />
151/<strong>GB</strong>-7
7. R-<strong>26ST</strong> English 27.01 27/1/06 4:59 PM Page 9<br />
EXPRESS MENU, EXPRESS COOK &<br />
EXPRESS DEFROST OPERATION<br />
EXPRESS MENU, EXPRESS COOK and EXPRESS DEFROST automatically work out the correct cooking<br />
mode and cooking time. You can choose from 4 EXPRESS MENU, 3 EXPRESS COOK and 5 EXPRESS<br />
DEFROST menus. What you need to know when using this automatic function:<br />
For example:<br />
1a. EXPRESS MENU: Each EXPRESS MENU<br />
button has two menus.<br />
1a.<br />
A. CHICKEN PAN WITH<br />
VEGETABLES/MINCE<br />
AND ONION button<br />
B. FISH FILLET WITH<br />
SAUCE/GRATIN button<br />
If you press the FISH FILLET WITH<br />
SAUCE/GRATIN button once, the display will<br />
appear as shown:<br />
x1<br />
Menu number<br />
1b.<br />
Menu number<br />
1b. EXPRESS COOK: Press the EXPRESS COOK<br />
button once, the display will appear as shown.<br />
x1<br />
1c. EXPRESS DEFROST: Press the EXPRESS<br />
DEFROST button once, the display will appear<br />
as shown.<br />
1c.<br />
x1<br />
Menu number<br />
The menu can be chosen by pressing the EXPRESS MENU, EXPRESS COOK or EXPRESS DEFROST<br />
button until the desired menu number is displayed. See pages <strong>GB</strong>-10 - <strong>GB</strong>-12 “EXPRESS MENU,<br />
EXPRESS COOK and EXPRESS DEFROST charts”.<br />
The menu number will be changed automatically by holding down the EXPRESS MENU, EXPRESS<br />
COOK or EXPRESS DEFROST button.<br />
2. The weight or quantity of the food can be input by<br />
rotating the TIMER/WEIGHT knob until the<br />
desired weight/quantity is displayed.<br />
• Enter the weight of the food only. Do not include<br />
the weight of the container.<br />
• For food weighing more or less than weights/<br />
quantities given in the EXPRESS MENU,<br />
EXPRESS COOK and EXPRESS DEFROST<br />
charts, use manual operation. For best results,<br />
follow the cooking charts in the Cookbook section.<br />
3. To start cooking press START/+1min button.<br />
2.<br />
3.<br />
x1<br />
TIMER/WEIGHT<br />
knob<br />
START/+1min button<br />
ENGLISH<br />
When action is required (e.g. to turn food over)<br />
the oven stops and the audible signals sound,<br />
remaining cooking time and any indicator will<br />
flash on the display. To continue cooking, press<br />
the START/+1min button.<br />
The final temperature will vary according to the<br />
initial temperature. Check food is piping hot after<br />
cooking. If necessary, you can extend the<br />
cooking manually.<br />
152/<strong>GB</strong>-8
7. R-<strong>26ST</strong> English 27.01 27/1/06 4:59 PM Page 10<br />
EXPRESS MENU, EXPRESS COOK &<br />
EXPRESS DEFROST OPERATION<br />
Example 1 for EXPRESS MENU:<br />
To cook Chicken Pan with Vegetables 1,5 kg using Express Menu C1-1.<br />
1. Select the menu required by<br />
pressing the CHICKEN PAN<br />
WITH VEGETABLES/MINCE<br />
AND ONION button once.<br />
2. Enter the weight by rotating<br />
the TIMER/WEIGHT knob.<br />
3. Press the START/+1min<br />
button once.<br />
x1<br />
x1<br />
Check the display.<br />
Example 2 for EXPRESS COOK:<br />
To cook Frozen Gratin 0,6 kg using Express Cook EC-3.<br />
1. Select the menu required by<br />
pressing the EXPRESS<br />
COOK button 3 times.<br />
2. Enter the weight by rotating<br />
the TIMER/WEIGHT knob.<br />
3. Press the START/+1min<br />
button once.<br />
x3<br />
x1<br />
Check the display.<br />
To use EXPRESS DEFROST, follow the above example for EXPRESS COOK.<br />
153/<strong>GB</strong>-9
7. R-<strong>26ST</strong> English 27.01 27/1/06 4:59 PM Page 11<br />
EXPRESS MENU CHART<br />
BUTTON<br />
EXPRESS MENU<br />
NO.<br />
WEIGHT (Increasing<br />
Unit) / UTENSILS<br />
PROCEDURE<br />
x1<br />
C1-1 Express Menu<br />
Chicken Pan with<br />
Vegetables<br />
0,5 - 1,5 kg* (500 g)<br />
(initial temp Chicken 5° C)<br />
Gratin dish with<br />
microwave foil<br />
• See recipe for Chicken Pan with<br />
Vegetables on page <strong>GB</strong>-13.<br />
* Total weight of all ingredients<br />
x2<br />
C1-2 Express Menu<br />
Mince and Onion<br />
0,5 - 1,5 kg* (500 g)<br />
(initial temp Mince 5° C)<br />
Bowl with lid<br />
• See recipe for Mince &<br />
Onion on page <strong>GB</strong>-13.<br />
• When the oven stops, the<br />
audible signals sound and in<br />
the display appears ‘STIR’,<br />
stir the food and re-cover.<br />
* Total weight of all ingredients<br />
x1<br />
C2-1 Express Menu<br />
Fish Fillet with Sauce<br />
0,5 - 1,5 kg* (500 g)<br />
(initial temp fish 5° C,<br />
sauce 20° C)<br />
Gratin dish & microwave<br />
foil<br />
• See recipe for Fish Fillet with<br />
Sauce on page <strong>GB</strong>-13.<br />
* Total weight of all ingredients<br />
x2<br />
C2-2 Express Menu<br />
Gratin<br />
0,5 - 1,5 kg* (500 g)<br />
(initial temp 20° C)<br />
Gratin dish<br />
• See recipe for Gratin on page<br />
<strong>GB</strong>-14.<br />
* Total weight of all ingredients<br />
ENGLISH<br />
154/<strong>GB</strong>-10
7. R-<strong>26ST</strong> English 27.01 27/1/06 4:59 PM Page 12<br />
EXPRESS COOK CHART<br />
BUTTON<br />
x1<br />
x2<br />
x3<br />
EXPRESS<br />
COOK NO.<br />
EC-1 Cook<br />
Frozen Vegetables<br />
e.g. Brussel sprouts,<br />
green beans, peas,<br />
mixed vegetables,<br />
broccoli<br />
EC-2 Cook<br />
Frozen Ready<br />
Meals<br />
Stirrable type e.g.<br />
Noodles, Bolognese,<br />
Chinese Menus.<br />
EC-3 Cook<br />
Frozen Gratin<br />
e.g. macaroni gratin,<br />
lasagne, etc.<br />
WEIGHT (Increasing<br />
Unit) / UTENSILS<br />
0,1 - 0,6 kg (100 g)<br />
(initial temp -18° C)<br />
Bowl and lid<br />
0,3 - 1,0 kg* (100 g)<br />
(initial temp -18° C)<br />
Bowl and lid<br />
* If the manufacturer instructs<br />
to add water, calculate the<br />
total amount for the program<br />
with additional liquid.<br />
0,2 - 0,6 kg (100 g)<br />
(initial temp -18° C)<br />
Shallow, oval gratin dish<br />
and microwave foil or<br />
original container and<br />
microwave foil<br />
PROCEDURE<br />
• Add 1 tbsp water per 100 g and salt as desired.<br />
(For mushrooms no additional water is<br />
necessary).<br />
• Cover with a lid.<br />
• When the oven stops, the audible signals sound<br />
and in the display ‘STIR’ appears, stir the food<br />
and re-cover.<br />
• After cooking, let stand for approx. 2 minutes.<br />
NOTE: If frozen vegetables are compacted<br />
together, cook manually.<br />
• Transfer meal to suitable microwave-proof dish.<br />
• Add some liquid if recommended by the<br />
manufacturer.<br />
• Cover with a lid.<br />
• Cook without cover if the manufacturer instructs.<br />
• When the oven stops, the audible signals sound<br />
and in the display ‘STIR’ appears, stir the food<br />
and re-cover.<br />
• After cooking, stir and let stand for approx. 2<br />
minutes.<br />
• Remove the frozen gratin from the package.<br />
If the container is not suitable for microwave<br />
ovens, transfer gratin to a suitable microwave<br />
proof dish.<br />
• Cover with microwave foil.<br />
• If the container is suitable for microwave ovens,<br />
remove original paper cover and cover with<br />
microwave foil.<br />
• After cooking, let stand for approx. 5 minutes.<br />
155/<strong>GB</strong>-11
7. R-<strong>26ST</strong> English 27.01 27/1/06 4:59 PM Page 13<br />
EXPRESS DEFROST CHART<br />
BUTTON<br />
x1<br />
EXPRESS<br />
DEFROST NO.<br />
Ed-1 Defrost<br />
Steaks and Chops<br />
WEIGHT(Increasing<br />
Unit) / UTENSILS<br />
0,2 - 0,8 kg (100 g)<br />
(initial temp -18° C)<br />
(See note below)<br />
Flan dish<br />
PROCEDURE<br />
• Place the food in a flan dish in the centre of the<br />
turntable.<br />
• When the oven stops, the audible signals sound<br />
and in the display ‘TURN OVER’ appears, turn the<br />
food over, rearrange and separate. Shield thin parts<br />
and warm spots with small pieces of aluminium foil.<br />
• After defrosting, wrap in aluminium foil for 10 - 15<br />
minutes, until thoroughly defrosted.<br />
x2<br />
Ed-2 Defrost<br />
Minced Meat<br />
0,2 - 0,8 kg (100 g)<br />
(initial temp -18° C)<br />
(See note below)<br />
Flan dish<br />
• Place the block of minced meat in a flan dish in<br />
the centre of the turntable.<br />
• When the oven stops, the audible signals sound<br />
and in the display ‘TURN OVER’ appears, turn the<br />
food over. Remove the defrosted parts if possible.<br />
• After defrosting cover with aluminium foil, stand<br />
for 5 - 10 minutes, until thoroughly defrosted.<br />
• Place the poultry in a flan dish in the centre of the<br />
turntable.<br />
• When the oven stops, the audible signals sound and in<br />
the display ‘TURN OVER’ appears, turn over and shield<br />
thin parts and warm spots with small pieces of<br />
aluminium foil.<br />
• After defrosting, rinse with cold water, cover with<br />
aluminium foil and stand for 15 - 30 minutes until<br />
thoroughly defrosted.<br />
• Finally clean the poultry under running water.<br />
• Remove all packaging from the cake.<br />
• Place on a plate in the middle of the turntable.<br />
• After defrosting, cut the cake into similar sized<br />
pieces keeping space between each piece and let<br />
stand for 10 - 60 minutes until evenly defrosted.<br />
• Distribute in a flan dish in the centre of the turntable.<br />
For large amounts distribute directly on the turntable.<br />
• When the oven stops, the audible signals sound<br />
and in the display ‘TURN OVER’ appears, turn<br />
over, re-arrange and remove defrosted slices.<br />
• After defrosting cover in aluminum foil and stand<br />
for 5 - 15 minutes, until thoroughly defrosted.<br />
x3<br />
Ed-3 Defrost<br />
Poultry<br />
0,9 - 1,5 kg (100 g)<br />
(initial temp -18° C)<br />
(See note below)<br />
Flan dish<br />
x4<br />
Ed-4 Defrost<br />
Cake<br />
0,1 - 1,4 kg (100 g)<br />
(initial temp -18° C)<br />
Plate<br />
x5<br />
Ed-5 Defrost<br />
Bread<br />
0,1 - 1,0 kg (100 g)<br />
(initial temp -18° C)<br />
Flan dish<br />
(Only sliced bread is<br />
recommended for this<br />
programme.)<br />
NOTE: Express Defrost<br />
1 Steaks and Chops should be frozen in one layer.<br />
2 Minced meat should be frozen in a thin shape.<br />
3 After turning over, shield the defrosted portions with small, flat pieces of aluminium foil.<br />
4 The poultry should be processed immediately after defrosting.<br />
ENGLISH<br />
156/<strong>GB</strong>-12
7. R-<strong>26ST</strong> English 27.01 27/1/06 4:59 PM Page 14<br />
RICIPES FOR EXPRESS MENU<br />
CHICKEN PAN WITH VEGETABLES (C1-1)<br />
Spicy chicken fricassee<br />
Ingredients<br />
0,5 kg 1,0 kg 1,5 kg<br />
60 g 120 g 180 g long grain rice (parboiled)<br />
1 1 1 sachet saffron<br />
25 g 50 g 75 g onion (sliced)<br />
50 g 100 g 150 g red pepper (in strips)<br />
50 g 100 g 150 g leek (in strips)<br />
150 g 300 g 450 g fillet of chicken breast (cubed)<br />
pepper, paprika powder<br />
10 g 20 g 30 g butter<br />
150 ml 300 ml 450 ml meat stock<br />
MINCE AND ONION (C1-2)<br />
Ingredients<br />
0,5 kg 1,0 kg 1,5 kg<br />
150 g 300 g 450 g minced meat ( 1 /2 beef, 1 /2 pork)<br />
50 g 100 g 150 g onion (finely chopped)<br />
1/2 1 1 1 /2 egg<br />
15 g 30 g 45 g white breadcrumbs<br />
salt and pepper<br />
115 ml 230 ml 345 ml meat stock<br />
20 g 40 g 60 g tomato purée<br />
65 g 125 g 190 g potatoes (finely chopped)<br />
65 g 125 g 190 g carrots (finely chopped)<br />
1/2 tbsp 1 tbsp 1 1 /2 tbsp chopped parsley<br />
FISH FILLET WITH SAUCE (C2-1)<br />
Fish fillet with piquant sauce<br />
Ingredients<br />
0,5 kg 1,0 kg 1,5 kg<br />
175 g 350 g 525 g canned tomatoes (drained)<br />
50 g 100 g 150 g corn<br />
5 g 10 g 15 g chilli sauce<br />
15 g 30 g 45 g onion (finely chopped)<br />
1 tsp 1-2 tsp 2-3 tsp red wine vinegar<br />
mustard, thyme, cayenne pepper<br />
250 g 500 g 750 g fish fillet<br />
salt<br />
Preparation<br />
1. Mix the rice and saffron and place in the<br />
greased dish.<br />
2. Mix the onions, red pepper, leek and chicken.<br />
Season and place on the rice.<br />
3. Put butter on the top.<br />
4. Pour the stock over and cover with microwave<br />
foil and cook on EXPRESS MENU C1-1<br />
“Chicken Pan with Vegetables”.<br />
5. After cooking, let stand for 5 minutes.<br />
Preparation<br />
1. Mix together the minced meat, onion, egg and<br />
the breadcrumbs. Season with salt and pepper.<br />
Place the meat dough into a bowl.<br />
2. Mix the meat stock with the tomato purée.<br />
3. Add the liquid, potatoes, carrots and parsley to<br />
the meat, mix it up well.<br />
4. Cover and cook on EXPRESS MENU C1-2<br />
“Mince and Onion”.<br />
5. When the oven stops and the audible signals<br />
sound, stir and re-cover.<br />
6. After cooking, stir and stand for approx. 5<br />
minutes. Sprinkle with parsley and serve.<br />
Preparation<br />
1. Mix ingredients for the sauce.<br />
2. Place the fish fillet (e.g. Rosefish fillet) in a<br />
gratin dish with the thin ends toward the centre<br />
and sprinkle with salt.<br />
3. Mix a sauce from tomatoes, corn, chilli sauce,<br />
onion, vinegar and spices and spread the<br />
sauce on the fish fillet.<br />
4. Cover with microwave foil and cook on<br />
EXPRESS MENU C2-1, “Fish Fillet with Sauce”.<br />
5. After cooking, let stand for approx. 2 minutes.<br />
FISH FILLET WITH SAUCE (C2-1)<br />
Fish fillet with curry sauce<br />
Ingredients<br />
0,5 kg 1,0 kg 1,5 kg<br />
250 g 500 g 750 g fish fillet<br />
salt<br />
50 g 100 g 150 g banana (sliced)<br />
200 g 400 g 600 g ready-made curry sauce<br />
Preparation<br />
1. Place the fish fillet in a gratin dish with the thin<br />
ends toward the centre and sprinkle with salt.<br />
2. Spread the banana and the ready-made curry<br />
sauce on the fish fillet.<br />
3. Cover with microwave foil and cook on<br />
EXPRESS MENU C2-1, “Fish Fillet with<br />
Sauce”.<br />
4. After cooking, let stand for approx. 2 minutes.<br />
157/<strong>GB</strong>-13
7. R-<strong>26ST</strong> English 27.01 27/1/06 4:59 PM Page 15<br />
RECIPES FOR EXPRESS MENU<br />
GRATIN (C2-2)<br />
Spinach gratin<br />
Ingredients<br />
0,5 kg 1,0 kg 1,5 kg<br />
150 g 300 g 450 g leaf spinach (defrosted, drained)<br />
15 g 30 g 45 g onion (finely chopped)<br />
salt, pepper, nutmeg<br />
150 g 300 g 450 g boiled potatoes (sliced)<br />
35 g 75 g 110 g cooked ham (diced)<br />
50 g 100 g 150 g crème fraîche<br />
1 2 3 eggs<br />
40 g 75 g 115 g grated cheese<br />
paprika powder<br />
Preparation<br />
1. Mix together the leaf spinach with the onion<br />
and season with salt, pepper and nutmeg.<br />
2. Grease the gratin dish. Place alternate layers of<br />
potato slices, diced ham and spinach in the<br />
dish. The top layer should be spinach.<br />
3. Mix the eggs with crème fraîche, add salt and<br />
pepper and pour over the vegetables.<br />
4. Cover the gratin with the grated cheese,<br />
sprinkle with paprika powder and cook on<br />
EXPRESS MENU C2-2, “Gratin”.<br />
5. After cooking, let stand for 5 minutes.<br />
GRATIN (C2-2)<br />
Potato-courgette-gratin<br />
Ingredients<br />
0,5 kg 1,0 kg 1,5 kg<br />
200 g 400 g 600 g potatoes (sliced)<br />
115 g 230 g 345 g courgette (finely sliced)<br />
75 g 150 g 225 g crème fraîche<br />
1 2 3 eggs<br />
1/2 1 2 clove of garlic (crushed)<br />
salt, pepper<br />
40 g 80 g 120 g feta cheese (diced)<br />
10 g 20 g 30 g sunflower kernel<br />
paprika powder<br />
Preparation<br />
1. Grease the gratin dish and place alternate<br />
layers of potato slices and courgette in the dish.<br />
2. Mix the eggs with crème fraîche, season with<br />
salt, pepper and garlic and pour over the<br />
vegetables.<br />
3. Crumble the feta cheese and sprinkle over the<br />
gratin.<br />
4. Finally sprinkle the gratin with sunflower kernel<br />
and paprika powder and cook on EXPRESS<br />
MENU C2-2, “Gratin”.<br />
5. After cooking, let stand for 5 minutes.<br />
ENGLISH<br />
158/<strong>GB</strong>-14
7. R-<strong>26ST</strong> English 27.01 27/1/06 4:59 PM Page 16<br />
CARE AND CLEANING<br />
CAUTION: DO NOT USE COMMERCIAL<br />
OVEN CLEANERS, STEAM CLEANERS,<br />
ABRASIVE, HARSH CLEANERS, ANY THAT<br />
CONTAIN SODIUM HYDROXIDE OR<br />
SCOURING PADS ON ANY PART OF YOUR<br />
MICROWAVE OVEN.<br />
CLEAN THE OVEN AT REGULAR INTERVALS<br />
AND REMOVE ANY FOOD DEPOSITS - Keep<br />
the oven clean, or the oven could lead to a<br />
deterioration of the surface. This could<br />
adversely affect the life of the appliance and<br />
possibly result in a hazardous situation.<br />
Oven exterior<br />
The outside of your oven can be cleaned easily with<br />
mild soap and water. Make sure the soap is wiped off<br />
with a moist cloth, and dry the exterior with a soft towel.<br />
Oven controls<br />
Open the door before cleaning to de-activate the oven<br />
controls. Care should be taken when cleaning the<br />
oven control. Using a cloth dampened with water<br />
only, gently wipe the panel until it becomes clean.<br />
Avoid using excessive amounts of water. Do not use<br />
any sort of chemical or abrasive cleaner.<br />
Oven Interior<br />
1. For cleaning, wipe any splatters or spills with a soft<br />
damp cloth or sponge after each use while the<br />
oven is still warm. For heavier spills, use a mild<br />
soap and wipe several times with a damp cloth<br />
until all residues are removed. Do not remove the<br />
waveguide cover.<br />
2. Make sure that mild soap or water does not<br />
penetrate the small vents in the walls which may<br />
cause damage to the oven.<br />
3. Do not use spray type cleaners on the oven interior.<br />
Turntable and Roller stay<br />
Remove the turntable and roller stay from the oven.<br />
Wash the turntable and roller stay in mild soapy<br />
water. Dry with a soft cloth. Both the turntable and the<br />
roller stay are dishwasher safe.<br />
Door<br />
To remove all trace of dirt, regularly clean both sides<br />
of the door, the door seals and adjacent parts with a<br />
soft, damp cloth. Do not use abrasive cleaner.<br />
NOTE: A steam cleaner should not be used.<br />
SERVICE CALL CHECK<br />
Please check the following before calling for service.<br />
1. Power Supply<br />
Check the power plug is properly connected to a suitable wall outlet.<br />
Check the line fuse/circuit breaker is functioning properly.<br />
2. Place a cup of water (approx. 150 ml) in the oven and close the door securely.<br />
Programme the oven for one minute on 100 P power and start the oven.<br />
Does the oven lamp come on? YES NO<br />
Does the turntable rotate? YES NO<br />
NOTE: The turntable turns in either direction.<br />
Does the ventilation work?<br />
(Place your hand over the ventilation openings and check for air flow.) YES NO<br />
After 1 minute does the signal sound? YES NO<br />
Does cooking in progress indicator go off? YES NO<br />
Is the cup with water warm after the above operation? YES NO<br />
If you answer “No” to any of the above questions, call a Service Technician appointed by SHARP and report the<br />
results of your check. See inside back cover for details of address.<br />
NOTE: If you cook the food over the standard time with only 100 P (800 W), the power of the oven will lower<br />
automatically to avoid overheating. (The microwave power level will be reduced).<br />
Cooking Mode<br />
Microwave 100 P<br />
Standard time<br />
20 minutes<br />
159/<strong>GB</strong>-15
7. R-<strong>26ST</strong> English 27.01 27/1/06 4:59 PM Page 17<br />
WHAT ARE MICROWAVES?<br />
Microwaves are generated in the microwave oven<br />
by a magnetron and cause the water molecules in<br />
the food to oscillate.<br />
Heat is generated by the friction which is caused,<br />
with the result that the food is thawed, heated or<br />
cooked.<br />
SUITABLE OVENWARE<br />
GLASS AND CERAMIC GLASS<br />
Heat-resistant glass utensils are very<br />
suitable. The cooking process can be<br />
observed from all sides. They must not,<br />
however, contain any metal (e.g. lead<br />
crystal), nor have a metallic overlay (e.g. gold edge,<br />
cobalt blue finish).<br />
CERAMICS<br />
Generally very suitable. Ceramics must be glazed,<br />
since with unglazed ceramics moisture can get into<br />
the ceramic. Moisture causes the material to heat up<br />
and may make it shatter. If you are not certain<br />
whether your utensil is suitable for the microwave,<br />
carry out the utensil suitability test.<br />
PORCELAIN<br />
Very suitable. Ensure that the porcelain does not<br />
have a gold or silver overlay and that it does not<br />
contain any metal.<br />
PLASTIC AND PAPER UTENSILS<br />
Heat resistant plastic utensils which are suitable for<br />
use in the microwave can be used to thaw, heat and<br />
cook food. Follow the manufacturer’s<br />
recommendations.<br />
Heat-resistant paper made for use in a microwave<br />
oven is also suitable. Follow the manufacturer’s<br />
recommendations.<br />
MICROWAVE FOIL<br />
This, or heat-resistant foil, is very suitable for covering<br />
or wrapping. Please follow the manufacturer’s<br />
recommendations.<br />
ROASTING BAGS<br />
Can be used in a microwave oven. Metal clips are<br />
not suitable for fastening them since the roasting bag<br />
foil might melt. Fasten the roasting bag with string<br />
and pierce it several times with a fork. Non heatresistant<br />
food wraps are not recommended for use in<br />
a microwave oven.<br />
BROWNING DISH<br />
A special microwave dish made from ceramic glass with<br />
a metal alloy base, which allows food to be browned.<br />
When using the browning dish a suitable insulator,<br />
e.g. a porcelain plate, must be placed between the<br />
turntable and the browning dish. Be careful to adhere<br />
exactly to the pre-heating time given in the<br />
manufacturer’s instructions. Excessive pre-heating can<br />
damage the turntable and the turntable stand or can<br />
trigger the safety-device which will switch off the oven.<br />
METAL<br />
Generally speaking, metal should not be used, since<br />
microwaves do not pass through metal and therefore<br />
cannot reach the food. There are, however,<br />
exceptions: small strips of aluminium foil may be used<br />
to cover certain parts of the food, so that these do not<br />
thaw too quickly or begin to cook (e.g. chicken<br />
wings).Small metal skewers and aluminium containers<br />
(e.g. of ready- cooked meals) can be used. They<br />
must, however, be small in relation to the food, e.g.<br />
aluminium containers must be at least 2 /3 to 3 /4 filled<br />
with food. It is recommended that you transfer the<br />
food into a dish suitable for use in the microwave.<br />
When using aluminium containers or other metal<br />
utensils there must be a gap of approx. 2 cms<br />
between them and the walls of the cooking area,<br />
otherwise the walls could be damaged by possible<br />
arcing.<br />
NO UTENSIL SHOULD HAVE A METAL<br />
OVERLAY - parts such as screws, bands or handles.<br />
UTENSIL SUITABILITY TEST<br />
If you are not sure whether your utensil<br />
is suitable for use in your microwave<br />
oven, carry out the following test: Place<br />
the utensil into the oven. Place a glass<br />
container filled with 150 ml of water<br />
on or next to the utensil. Switch on the oven at 800<br />
W power for 1 to 2 minutes. If the utensil stays cool<br />
or just warm to the touch, it is suitable. Do not use<br />
this test on a plastic utensil. It could melt.<br />
ENGLISH<br />
160/<strong>GB</strong>-16
7. R-<strong>26ST</strong> English 27.01 27/1/06 4:59 PM Page 18<br />
TIPS AND ADVICE<br />
TIME SETTINGS<br />
In general the thawing, heating and cooking times<br />
are significantly shorter than when using a<br />
conventional cooker or oven. For this reason you<br />
should adhere to the recommended times given in<br />
this cookery book. It is better to set the times too<br />
short, rather than too long. Test the food after it<br />
has been cooked. It is better to have to cook<br />
something for a little longer than to overcook it.<br />
INITIAL TEMPERATURES<br />
Thawing, heating and cooking times are<br />
dependent upon the initial temperature of the food.<br />
Deep-frozen food and food stored in a<br />
refrigerator, for example, requires longer than<br />
food which has been stored at room temperature.<br />
For heating and cooking, normal storage<br />
temperatures are assumed (refrigerator<br />
temperature approx. 5° C, room temperature<br />
approx. 20° C). For thawing the temperature of<br />
the deep freeze is assumed to be - 18° C.<br />
COOKING TIMES<br />
All the times given in this cookery book are<br />
guidelines, which can be varied according to the<br />
initial temperature, weight and condition of the<br />
food (water or fat content etc.).<br />
SALT, SPICES AND HERBS<br />
Food cooked in your microwave retains its<br />
individual flavour better than it does when<br />
conventional preparation methods are used. For<br />
this reason you should use salt very sparingly and<br />
normally add it only after cooking. Salt absorbs<br />
liquid and dries out the outer layer of the food.<br />
Herbs and spices can be used as normal.<br />
ADDITION OF WATER<br />
Vegetables and other foods with a high water<br />
content can be cooked in their own juice or with<br />
the addition of a little water. This ensures that<br />
many vitamins and minerals are preserved.<br />
FOOD IN SKINS OR SHELLS<br />
Food such as sausages, chickens, chicken legs,<br />
baked potatoes, tomatoes, apples, egg yolks or<br />
such like should be pricked or pierced with a fork<br />
or small wooden skewer. This will enable the<br />
steam which forms to dissipate without splitting the<br />
skin or shell.<br />
LARGE AND SMALL QUANTITIES<br />
Microwave times are directly dependent upon the<br />
amount of food which you would like to thaw, heat<br />
or cook. This means that small portions cook more<br />
quickly than larger ones.<br />
As a rule of thumb:<br />
TWICE THE AMOUNT = ALMOST TWICE THE TIME<br />
HALF THE AMOUNT = HALF THE TIME<br />
DEEP AND SHALLOW CONTAINERS<br />
Both containers have the same capacity, but the<br />
cooking time is longer for the deeper one. You<br />
should therefore choose as flat a container as<br />
possible with a large surface area. Only use deep<br />
containers for dishes where there is a danger of<br />
overcooking, e.g. for noodles, rice, milk etc..<br />
ROUND AND OVAL CONTAINERS<br />
Food cooks more evenly in round or oval<br />
containers than in containers with corners, since<br />
the microwave energy concentrates in the corners<br />
and the food in these areas could become<br />
overcooked.<br />
COVERING<br />
Covering the food retains the moisture within it and<br />
shortens the cooking time. Use a lid, microwave<br />
foil or a cover. Foods which are to be crispy, e.g.<br />
roasts or chickens, should not be covered.<br />
As a general rule, whatever would be covered in a<br />
conventional oven should also be covered in a<br />
microwave oven. Whatever would be uncovered<br />
in an ordinary oven can also be left uncovered in<br />
a microwave oven.<br />
TURNING<br />
Medium-sized items, such as hamburgers and<br />
steaks, should be turned over once during<br />
cooking, in order to shorten the cooking process.<br />
Large items, such as roasts and chickens, must be<br />
turned, since the upper side receives more<br />
microwave energy and could dry out if not turned.<br />
STANDING TIME<br />
Keeping to the standing time is one of the most<br />
important rules with microwaves. Almost all foods,<br />
which are thawed, heated or cooked in the<br />
microwave, require a certain amount of time to<br />
stand, during which temperature equalisation takes<br />
place and the moisture in the food is evenly<br />
distributed.<br />
161/<strong>GB</strong>-17
7. R-<strong>26ST</strong> English 27.01 27/1/06 4:59 PM Page 19<br />
TIPS AND ADVICE<br />
BROWNING AGENTS<br />
After more than 15 minutes cooking time food<br />
acquires a brownness, although this is not<br />
comparable to the deep brownness and crispness<br />
obtained through conventional cooking. In order<br />
to obtain an appetising brown colour you can use<br />
browning agents. For the most part they<br />
simultaneously act as seasoning agents.<br />
In the following table you will find some<br />
suggestions for substances you might use for<br />
browning and some of the uses to which you might<br />
put them.<br />
BROWNING AGENT DISH METHOD<br />
Melted butter and dried paprika<br />
Poultry<br />
Coat the poultry with the<br />
butter/paprika mixture<br />
Dried paprika<br />
Dust with paprika<br />
Soya sauce<br />
Barbecue and Worcester sauce, Gravy<br />
Rendered down bacon fat or dried onions<br />
Cocoa, chocolate flakes, brown icing,<br />
honey and marmalade<br />
Oven baked dishes”Cheese<br />
toasties”<br />
Meat and poultry<br />
Roasts, Rissoles, Small roasted<br />
items<br />
Oven baked dishes, toasted<br />
items, soups, stews<br />
Cakes and desserts<br />
Coat with the sauce<br />
Coat with the sauce<br />
Sprinkle pieces of bacon or<br />
dried onions on top<br />
Sprinkle pieces on top of cakes<br />
and desserts or use to glaze<br />
HEATING<br />
● Ready-prepared meals in aluminium containers<br />
should be removed from the aluminium container<br />
and heated on a plate or in a dish.<br />
● Remove the lids from firmly closed containers.<br />
● Food should be covered with microwave foil, a plate<br />
or cover (obtainable from stores), so that the surface<br />
does not dry out. Drinks need not be covered.<br />
● When boiling liquids such as water, coffee, tea or<br />
milk, place a glass stirrer in the container.<br />
● If possible, stir large quantities from time to time, to<br />
ensure that the temperature is evenly distributed.<br />
● The times are for food at a room temperature of<br />
20° C. The heating time for food stored in a<br />
refrigerator should be increased slightly.<br />
● After heating allow the food to stand for 1-2<br />
minutes, so that the temperature inside the food can<br />
be evenly distributed (standing time).<br />
● The times given are guidelines, which can be<br />
varied according to the initial temperature, weight,<br />
water content, fat content or the result which you<br />
wish to achieve.<br />
THAWING<br />
Your microwave is ideal for thawing. Thawing times<br />
are usually considerably shorter than in traditional<br />
methods of thawing.<br />
Here are a few tips. Take the frozen item out of its<br />
packaging and place on a plate for thawing.<br />
BOXES AND CONTAINERS<br />
Boxes and containers suitable for microwaves are<br />
particularly good for thawing and heating food, since<br />
they can withstand temperatures in a deep freeze<br />
(down to approx. –40° C) as well as being heatresistant<br />
(up to approx. 220° C). You can therefore<br />
use the same container to thaw, heat and even cook<br />
the food, without having to transfer it.<br />
COVERING<br />
Cover thin parts with small strips of aluminium foil<br />
before thawing. Thawed or warm parts should<br />
likewise be covered with aluminium strips during<br />
thawing. This stops the thin parts becoming too hot<br />
while thicker parts are still frozen.<br />
CORRECT SETTING<br />
It is better to choose a setting which is too low rather<br />
than one which is too high. By so doing you will<br />
ensure that the food thaws evenly.<br />
If the microwave setting is too high, the surface of the<br />
food will already have begun to cook while the inside<br />
is still frozen.<br />
ENGLISH<br />
162/<strong>GB</strong>-18
7. R-<strong>26ST</strong> English 27.01 27/1/06 4:59 PM Page 20<br />
TIPS AND ADVICE<br />
TURNING/STIRRING<br />
Almost all foods have to be turned or stirred from time<br />
to time. As early as possible, separate parts which are<br />
stuck together and rearrange them.<br />
SMALL AMOUNTS<br />
Thaw more quickly and evenly than larger ones. We<br />
recommend that you freeze portions which are as<br />
small as possible. By so doing you will be able to<br />
prepare whole menus quickly and easily.<br />
FOODS REQUIRING CAREFUL HANDLING<br />
Foods such as gateaux, cream, cheese and bread<br />
should only be partially thawed and then left to thaw<br />
completely at room temperature. By so doing you will<br />
avoid the outer areas becoming too hot while the<br />
inside is still frozen.<br />
STANDING TIME<br />
This is particularly important after thawing food, as the<br />
thawing process continues during this period. In the<br />
thawing table you will find the standing times for<br />
various foods. Thick, dense foods require a longer<br />
standing time than thinner foods or food of a porous<br />
nature. If the food has not thawed sufficiently, you may<br />
continue thawing it in the microwave oven or lengthen<br />
the standing time accordingly. At the end of the<br />
standing time you should process the food as soon as<br />
possible and not re-freeze it.<br />
COOKING FRESH VEGETABLES<br />
● When buying vegetables try to ensure that, as far<br />
as possible, they are of similar size. This is<br />
particularly important when you want to cook the<br />
vegetables whole (e.g. boiled potatoes).<br />
● Wash the vegetables before preparing them, clean<br />
them and only then weigh the required quantity for<br />
the recipe and chop them up.<br />
● Season them as you would normally, but as a rule<br />
only add salt after cooking.<br />
● Add about 5 tbsps of water for 500 g of<br />
vegetables. Vegetables which are high in fibre<br />
require a little more water. You will find information<br />
about this in the table.<br />
● Vegetables are usually cooked in a dish with a lid.<br />
Those with a high moisture content, e.g. onions or<br />
boiled potatoes, can be cooked in microwave foil<br />
without adding water.<br />
● After half the cooking time has elapsed vegetables<br />
should be stirred or turned over.<br />
● After cooking allow the vegetables to stand for<br />
approx. 2 minutes, so that the temperature<br />
disperses evenly (standing time).<br />
● The cooking times given are guidelines and<br />
depend upon the weight, initial temperature and<br />
condition of the type of vegetable in question. The<br />
fresher the vegetables, the shorter the cooking<br />
times.<br />
COOKING MEAT, FISH AND POULTRY<br />
● When buying food items, try to ensure that, as far<br />
as possible, they are of similar size. This will<br />
ensure that they are cooked properly.<br />
● Before preparation wash meat, fish and poultry<br />
thoroughly under cold running water and pat them<br />
dry with kitchen paper. Then continue as normal.<br />
● Beef should be well hung and have little gristle.<br />
● Even though the pieces may be of a similar size,<br />
cooking results may vary. This is due, amongst<br />
other things, to the kind of food, variations in the fat<br />
and moisture content as well as the temperature<br />
before cooking.<br />
● After the food has been cooking for 15 minutes it<br />
acquires a natural brownness, which may be<br />
enhanced by the use of a browning agent. If, in<br />
addition, you would like the surface to be crisp you<br />
should either use the browning dish or sear the<br />
food on your cooker and finish cooking it in your<br />
microwave. By doing this you will simultaneously<br />
obtain a brown base for making a sauce.<br />
● Turn large pieces of meat, fish or poultry half way<br />
through the cooking time, so that they are cooked<br />
evenly from all sides.<br />
● After cooking cover roasts with aluminium foil and<br />
allow them to stand for approx. 10 minutes (standing<br />
time). During this period the roast carries on cooking<br />
and the liquid is evenly distributed, so that when it is<br />
carved a minimum amount of juice is lost.<br />
THAWING AND COOKING<br />
Deep-frozen dishes can be thawed and cooked at the<br />
same time in one process in your microwave. You will<br />
find some examples in the table. Do take note,<br />
however, of the general advice given on “heating” and<br />
“thawing” food. Please refer to the manufacturer’s<br />
instructions on the packaging when preparing deepfrozen<br />
dishes. These usually contain precise cooking<br />
times and offer advice on preparation.<br />
163/<strong>GB</strong>-19
7. R-<strong>26ST</strong> English 27.01 27/1/06 4:59 PM Page 21<br />
TABLES<br />
ABBREVIATIONS USED<br />
tbsp = tablespoon KG = kilogram DF = deep frozen<br />
tsp = teaspoon g = gram MW = microwave<br />
l.p. = large pinch l = litre MWO = microwave oven<br />
s.p. = small pinch ml = millilitre min = minutes<br />
Cup = cupful cm = centimetre sec = seconds<br />
Sach. = sachet DFC = dry fat content dm = diameter<br />
* Refrigerator temperature<br />
TABLE: HEATING FOOD AND DRINK<br />
Food / Drink Quantity Power Time Hints<br />
-g/ml- -Setting- -Min-<br />
Coffee, 1 cup 150 800W approx.1 do not cover<br />
Milk, 1 cup 150 800W approx.1 do not cover<br />
Water, 1 cup 150 800W 1 1 /2 -2 do not cover, bring to the boil<br />
6 cups 900 800W 10-12 do not cover, bring to the boil<br />
1 bowl 1000 800W 10-12 do not cover, bring to the boil<br />
Platters 400 800W approx.4 sprinkle some water onto the sauce, cover<br />
(Vegetables, meat and trimmings)<br />
stir half way through the heating time<br />
Stew 200 800W 2-3 cover, stir after heating<br />
Clear soup 200 800W approx.2 cover, stir after heating<br />
Cream soup 200 800W approx.2 cover, stir after heating<br />
Vegetables 200 800W 2-3 if necessary add some water, cover<br />
500 800W 4-5 stir half way through the heating time<br />
Garnishes 200 800W 1-2 sprinkle with water, cover and stir from time to<br />
500 800W 4-5 time.<br />
Meat, 1 slice* 200 800W 3-4 thinly spread sauce over the top, cover<br />
Fish fillet* 200 800W 2-3 cover<br />
Sausages 2 180 560W approx.2 pierce the skin several times<br />
Cake, 1 piece 100 400W 1 /2 place on a cake stand<br />
Baby food, 1 glass 190 400W approx.1 remove the lid, after heating stir well and test the<br />
temperature<br />
Melting butter or margarine* 50 800W approx. 1 /2 cover<br />
Melting chocolate 100 400W 2-3 stir from time to time<br />
Dissolving six sheets of gelatine 10 400W 1 /2 dip into water, squeeze thoroughly and place in<br />
a soup bowl, stir from time to time<br />
Glazing for a tart for 1 /4 1 of liquid 10 400W 5-6 mix the sugar in 250 ml of liquid, cover, stir well<br />
during and after heating<br />
TABLE: COOKING MEAT, FISH AND POULTRY<br />
Food Quantity Power Time Hints Standing time<br />
-g- -Setting- -Min- -Min-<br />
Roasts 500 800W 8-10* season to taste, place in a shallow flan dish 10<br />
(pork, 400W 10-12 turn over after *<br />
veal, lamb) 1000 800W 20-23* 10<br />
400W 11-13<br />
Roast beef (medium) 1000 800W 9-11* season to taste, place in a quiche dish, 10<br />
400W 5-7 turn over after *<br />
Minced meat 1000 800W 16-18 prepare the minced meat mixture (half pork/half beef) 10<br />
place in a shallow casserole dish<br />
Fish fillet 200 800W 3-4 season to taste, place on a plate, cover 3<br />
Chicken 1200 800W 22-25* season to taste, place in a casserole dish, 3<br />
turn half way through cooking time *<br />
Chicken legs 200 800W 3-4 season to taste, place on a plate, cover 3<br />
* When turning over remove the juices from the dish.<br />
ENGLISH<br />
164/<strong>GB</strong>-20
7. R-<strong>26ST</strong> English 27.01 27/1/06 4:59 PM Page 22<br />
TABLES<br />
TABLE: THAWING<br />
Food Quantity Power Thawing time Hints Standing time<br />
-g- -Setting- -Min- -Min-<br />
Roast meat (e.g. pork, beef, 1500 80W 58-64 place on an upturned plate, turn 30-90<br />
lamb, veal) 1000 80W 42-48 half way through thawing time 30-90<br />
500 80W 18-20 30-90<br />
Steaks, escalopes, cutlets, liver 200 80W 7-8 turn half way through thawing time 30<br />
Goulash 500 240W 8-12 separate and stir half way through thawing time 10-15<br />
Sausages, 8 600 240W 6-9 place next to each other, 5-10<br />
4 300 240W 4-5 turn half way through thawing time 5-10<br />
Duck, turkey 1500 80W 48-52 place upon an upturned plate, 30-90<br />
turn half way through thawing time<br />
Chicken 1200 80W 39-43 place upon an upturned plate, 30-90<br />
turn half way through thawing time<br />
1000 80W 33-37 place upon an upturned plate, 30-90<br />
turn half way through thawing time<br />
Chicken legs 200 240W 4-5 turn half way through thawing time 10-15<br />
Whole fish 800 240W 9-12 turn half way through thawing time 10-15<br />
Fish fillet 400 240W 7-10 turn half way through thawing time 5-10<br />
Crabs 300 240W 6-8 turn half way through thawing time 30<br />
Rolls, 2 80 240W app.1 only partially thaw -<br />
Sliced bread for toasting 250 240W 2-4 remove outer slices after each minute has passed 5<br />
White loaf, whole 750 240W 7-10 turn half way through thawing time (centre still frozen) 30<br />
Cakes, per piece 100-150 80W 2-5 place on a cake stand 5<br />
Cream cake, per piece 150 80W 3-4 place on a cake stand 10<br />
Whole gateau, Ø 25cm 80W 20-24 place on a cake stand 30-60<br />
Butter 250 240W 2-4 only partially thaw 15<br />
Fruit such as strawberries 250 240W 4-5 spread them out evenly 5<br />
raspberries, cherries, plums<br />
turn half way through thawing time<br />
TABLE: THAWING AND COOKING<br />
Food Quantity Power Cooking time Added water Hints Standing time<br />
-g- -Setting- -Min- -tbsps/ml- -Min-<br />
Fish fillet 300 800W 10-11 - cover 1-2<br />
Trout, 1 fish 250 800W 7-9 - cover<br />
Platter 400 800W 8-9 - cover, stir half way through cooking time -<br />
Leaf spinach 300 800W 7-9 - cover, stir once or twice during cooking 2<br />
Broccoli 300 800W 7-9 3-5tbsps cover, stir half way through cooking time 2<br />
Peas 300 800W 7-9 3-5tbsps cover, stir half way through cooking time 2<br />
Kohlrabi 300 800W 7-9 3-5tbsps cover, stir half way through cooking time 2<br />
Mixed vegetables 500 800W 12-14 3-5tbsps cover, stir half way through cooking time 2<br />
Brussels sprouts 300 800W 7-9 3-5tbsps cover, stir half way through cooking time 2<br />
Red cabbage 450 800W 11-13 3-5tbsps cover, stir half way through cooking time 2<br />
165/<strong>GB</strong>-21
7. R-<strong>26ST</strong> English 27.01 27/1/06 4:59 PM Page 23<br />
TABLES<br />
TABLE: COOKING FRESH<br />
Vegetable Quantity Power Time Hints Added Water<br />
-g- -Setting- -Min- -tbsps/ml-<br />
Leaf Spinach 300 800W 5-7 wash dry well, cover, stir once or twice during cooking -<br />
Cauliflower 800 800W 15-17 1 whole head, cover, divide into florets, stir 5-6tbsps<br />
500 800W 10-12 during cooking 4-5tbsps<br />
Broccoli 500 800W 10-12 divide into florets, cover, stir occasionally during cooking 4-5tbsps<br />
Mushrooms 500 800W 8-10 whole heads, cover, stir occasionally during cooking -<br />
Chinese leaves 300 800W 9-11 cut into strips, cover, stir occasionally during cooking 4-5tbsps<br />
Peas 500 800W 9-11 cover, stir occasionally during cooking 4-5tbsps<br />
Fennel 500 800W 9-11 cut into quarters, cover, stir occasionally during cooking 4-5tbsps<br />
Onions 250 800W 5-7 whole, cook in microwave foil -<br />
Kohlrabi 500 800W 10-12 dice, cover, stir occasionally during cooking 50ml<br />
Carrots 500 800W 10-12 cut into rings, cover, stir occasionally during cooking 4-5tbsps<br />
300 800W 9-12<br />
Green peppers 500 800W 7-9 cut into strips, stir once or twice during cooking 4-5tbsps<br />
Boiled potatoes (skins on) 500 800W 9-11 cover, stir occasionally during cooking 4-5tbsps<br />
Leeks 500 800W 9-11 cut into rings, cover, stir occasionally during cooking 4-5tbsps<br />
Red cabbage 500 800W 10-12 cut into strips, stir once or twice 50ml<br />
during cooking<br />
Brussels sprouts 500 800W 9-11 whole sprouts, cover, stir occasionally during cooking 50ml<br />
Boiled Potatoes (salted) 500 800W 9-11 cut into large pieces of a similar size, add a little salt, 150ml<br />
cover, stir occasionally during cooking<br />
Celery 500 800W 9-11 dice finely, cover, stir occasionally during cooking 50ml<br />
White cabbage 500 800W 10-12 cut into strips, cover, stir occasionally during cooking 50ml<br />
Courgettes 500 800W 9-11 slice, cover, stir occasionally during cooking 4-5tbsps<br />
RECIPES<br />
ADAPTING RECIPES FOR THE<br />
MICROWAVE OVEN<br />
If you would like to adapt your favourite recipes for<br />
the microwave, you should take note of the<br />
following:<br />
Shorten cooking times by a third to a half. Follow<br />
the example of the recipes in this cookery book.<br />
Foods which have a high moisture content such as<br />
meat, fish, poultry, vegetables, fruit, stews and<br />
soups can be prepared in your microwave without<br />
any difficulty. Foods which have little moisture,<br />
such as platters of food, should have the surface<br />
moistened prior to heating or cooking.<br />
The amount of liquid to be added to raw foods,<br />
which are to be braised, should be reduced to<br />
about two thirds of the quantity in the original<br />
recipe. If necessary, add more liquid during<br />
cooking.<br />
The amount of fat to be added can be reduced<br />
considerably. A small amount of butter, margarine<br />
or oil is sufficient to flavour food. For this reason<br />
your microwave is excellent for preparing low-fat<br />
foods as part of a diet.<br />
HOW TO USE RECIPES<br />
● All the recipes in this cookery book are<br />
calculated on the basis of 4 servings - unless<br />
otherwise stated.<br />
● Recommendations relating to suitable utensils<br />
and the total cooking times are given at the<br />
beginning of every recipe.<br />
● As a rule the quantities shown are assumed to<br />
be wholly consumable, unless specifically<br />
indicated otherwise.<br />
● When eggs are given in the recipes they are<br />
assumed to have weight of approx. 55 g<br />
(grade M).<br />
ENGLISH<br />
166/<strong>GB</strong>-22
7. R-<strong>26ST</strong> English 27.01 27/1/06 4:59 PM Page 24<br />
RECIPES<br />
Germany<br />
CAMEMBERT TOAST<br />
Total cooking time: approx. 1-2 minutes<br />
Utensil:<br />
Ingredients<br />
4 slices of bread for toasting<br />
2 tbsp butter or margarine (20 g)<br />
150 g Camembert<br />
4 tsp Cranberry jelly<br />
Cayenne pepper<br />
1. Toast the bread and spread with butter.<br />
2. Cut the Camembert into slices and arrange on<br />
top of the toast. Put the cranberry jelly in the<br />
middle of the cheese and sprinkle with cayenne<br />
pepper.<br />
3. Place the toast on a plate and heat for<br />
1-2 Mins. 800 W<br />
Tip:You can vary this recipe according to your<br />
taste. For example, you can use fresh<br />
mushrooms and grated cheese or cooked ham,<br />
asparagus and Emmental cheese.<br />
Netherlands<br />
MUSHROOM SOUP<br />
Champignonsoep<br />
Total cooking time: approx. 13-17 Minutes<br />
Utensil: Bowl with Lid (2 l Capacity)<br />
Ingredients<br />
200 g mushrooms, sliced<br />
1 onion (50 g), finely chopped<br />
300 ml meat stock<br />
300 ml Cream<br />
2 1/ 2 tbsps Flour (25 g)<br />
2 1/ 2 tbsps Butter or Margarine (25 g)<br />
Salt & Pepper<br />
1 Egg<br />
150 g Crème fraîche<br />
1. Place the vegetables and the stock in the bowl,<br />
cover and cook.<br />
8-9 Mins. 800 W<br />
2. Blend all the ingredients in the mixer.<br />
3. Mix the flour and butter to a dough and smooth<br />
into the soup. Season with salt and pepper, cover<br />
and cook. Stir after cooking.<br />
5-6 Mins. 800 W<br />
4. Mix the egg yolk with the cream, gradually stir<br />
into the soup. Heat for a short time, but do not let<br />
it boil!<br />
1-2 Mins. 800 W<br />
Allow the soup to stand for about 5 minutes after<br />
cooking.<br />
167/<strong>GB</strong>-23
7. R-<strong>26ST</strong> English 27.01 27/1/06 4:59 PM Page 25<br />
RECIPES<br />
Switzerland<br />
ZÜRICH VEAL IN CREAM<br />
Total cooking time: approx. 12-16 minutes<br />
Utensil: dish with lid (2 l capacity)<br />
Ingredients<br />
600 g veal fillet<br />
1 tbsp butter or margarine<br />
1 onion (50 g), finely chopped<br />
100 ml white wine<br />
Seasoned gravy browning, for approx. 1 /2<br />
300 ml cream<br />
1 tbsp parsley, chopped<br />
l gravy<br />
France<br />
SOLE FILLETS<br />
Total cooking time: approx. 11-14 minutes<br />
Utensil: shallow,oval oven dish with microwave foil<br />
(approx. 26 cm long)<br />
Ingredients<br />
400 g sole fillets<br />
1 lemon, whole<br />
2 tomatoes (150 g)<br />
1 tsp butter or margarine for greasing<br />
1 tbsp vegetable oil<br />
1 tbsp parsley, chopped<br />
salt & pepper<br />
4 tbsps white wine (30 ml)<br />
2 tbsps butter or margarine (20 g)<br />
Greece<br />
BRAISED LAMB WITH GREEN BEANS<br />
Total cooking time: approx. 20-24 minutes<br />
Utensil: shallow oval soufflé mould with lid<br />
(about 26 cm long)<br />
Ingredients<br />
1-2 tomatoes (100 g)<br />
400 g lamb, boned<br />
1 tsp butter or margarine for greasing the bowl<br />
1 onion (50 g), finely chopped<br />
1 clove garlic, crushed<br />
salt, pepper<br />
sugar<br />
250 g tinned green beans<br />
1. Cut the fillet into finger-width strips.<br />
2. Grease the dish all over with the butter. Put the<br />
onion and the meat into the dish, cover and<br />
cook. Stir once during cooking.<br />
7-9 Mins. 800 W<br />
3. Add the white wine, gravy browning and cream,<br />
stir, cover and continue cooking. Stir occasionally.<br />
5-6 Mins. 800 W<br />
4. Test the veal, stir the mixture once more and allow<br />
to stand for approx. 5 minutes. Serve garnished<br />
with parsley.<br />
1. Wash the sole fillets and pat them dry. Remove<br />
any bones.<br />
2. Cut the lemon and the tomatoes into thin slices.<br />
3. Grease the oven dish with butter. Place the fish<br />
fillets inside and drizzle the vegetable oil over them.<br />
4. Sprinkle parsley over the fish, place the tomato<br />
slices on top and season. Place the lemon slices<br />
on top of the tomatoes and pour the white wine<br />
over them.<br />
5. Place small pats of butter on top of the lemon,<br />
cover and cook.<br />
10-12 Mins. 800 W<br />
After cooking allow the fish fillets to stand for<br />
approx. 2 minutes.<br />
Tip:This recipe can also be used for Haddock,<br />
Halibut, Mullet, Plaice or Cod.<br />
1. Skin and remove the stalks of the tomatoes, then<br />
purée in a blender or food processor.<br />
2. Cut the lamb into large chunks. Grease the bowl<br />
with butter. Add meat, onions and garlic, season,<br />
cover and cook.<br />
9-11 Mins. 800 W<br />
3. Add beans and puréed tomatoes to the meat,<br />
cover and continue cooking.<br />
11-13 Mins. 560 W<br />
After cooking, leave the lamb to stand for<br />
approximately 5 minutes.<br />
Tip:If you prefer to use fresh beans, these should be<br />
pre-cooked.<br />
ENGLISH<br />
168/<strong>GB</strong>-24
7. R-<strong>26ST</strong> English 27.01 27/1/06 4:59 PM Page 26<br />
RECIPES<br />
Italy<br />
LASAGNE<br />
Total cooking time 22-27 minutes<br />
Utensils: Bowl with lid (2 l capacity)<br />
shallow square soufflé mould with lid<br />
(approx 20 x 20 x 6 cm)<br />
Ingredients<br />
300 g tinned tomatoes<br />
50 g ham, finely cubed<br />
1 onion (50 g), finely chopped<br />
1 clove of garlic, crushed<br />
250 g minced meat (beef)<br />
2 tbsp mashed tomato (30 g)<br />
salt, pepper<br />
oregano, thyme, basil, nutmeg<br />
150 ml cream (crème fraîche)<br />
100 ml milk<br />
50 g grated Parmesan cheese<br />
1 tsp mixed chopped herbs<br />
1 tsp olive oil<br />
1 tsp vegetable oil to grease the mould<br />
125 g lasagne verde<br />
1 tbsp grated Parmesan cheese<br />
1 tbsp butter or margarine<br />
1. Cut the tomatoes into slices, mix with the ham<br />
and onion, garlic, minced meat and mashed<br />
tomato. Season and cook with the lid on. Stir<br />
during cooking.<br />
7-9 Mins. 800 W<br />
2. Mix the cream with the milk, Parmesan cheese,<br />
herbs, oil, and spices.<br />
3. Grease the soufflé mould and cover the bottom of<br />
the mould with about 1 / 3 of the pasta. Put half of<br />
the minced meat mixture on the pasta and pour<br />
on some sauce. Put an additional 1 / 3 of the<br />
pasta on top followed by another layer of the<br />
minced meat mixture and some sauce, finishing<br />
with the remaining pasta on top. Finally, cover the<br />
pasta with lots of sauce and sprinkle with<br />
Parmesan cheese. Place butter flakes on top and<br />
cook with the lid on.<br />
15-16 Mins. 560 W<br />
After cooking, let the lasagne stand for<br />
approximately 5-10 minutes.<br />
France<br />
RATATOUILLE<br />
Total cooking time 19-21 minutes<br />
Utensils: Bowl with lid (2 l capacity)<br />
Ingredients<br />
5 tbsp olive oil (50 ml)<br />
1 clove garlic, crushed<br />
1 onion (50 g), sliced<br />
1 small aubergine (250 g), cut into cubes<br />
1 courgette (200 g), into cubes<br />
1 pepper (200 g), cut into large cubes<br />
1 Small fennel (75 g) cut into large cubes<br />
1 bouquet garni<br />
200 g tinned artichoke hearts, cut into quarters<br />
salt, pepper<br />
1. Place the olive oil and garlic clove in the bowl. Add<br />
the prepared vegetables, except the artichoke hearts,<br />
and season with pepper. Add the bouquet garni,<br />
cover and cook, stirring once.<br />
18-20 Mins. 800 W<br />
For the last 5 minutes, add the artichoke hearts and heat.<br />
2. Season the ratatouille to taste with salt and pepper.<br />
Remove the bouquet garni before serving. After<br />
cooking, leave the ratatouille to stand for around 2<br />
minutes.<br />
Tip:Ratatouille can be served hot with meat dishes.<br />
Served cold, it also makes an excellent starter.<br />
A bouquet garni consists of: one stalk of parsley,<br />
a bunch of herbs suitable for seasoning soup, one<br />
stalk of lovage, one stalk of thyme, several bay<br />
leaves.<br />
169/<strong>GB</strong>-25
7. R-<strong>26ST</strong> English 27.01 27/1/06 4:59 PM Page 27<br />
RECIPES<br />
Spain<br />
BAKED POTATOES<br />
Total cooking time 12-16 minutes<br />
Utensils: Bowl with lid (2 l capacity)<br />
China plate<br />
Ingredients<br />
4 medium sized potatoes (400 g)<br />
100 ml water<br />
60 g ham, cut into fine cubes<br />
1 /2 onion (25 g) finely cubed<br />
75-100 ml milk<br />
2 tbsp grated Parmesan cheese (20 g)<br />
salt, pepper<br />
2 tbsp grated Emmental cheese<br />
1. Place the potatoes in a dish, add the water, cover<br />
and cook. Rearrange halfway through cooking.<br />
8-9 Mins. 800 W<br />
Leave to cool.<br />
2. Cut the potatoes lengthwise and carefully remove the<br />
potato from the skin. Mix the potato with the ham,<br />
onion, milk and Parmesan cheese to an even<br />
consistency. Season with salt and pepper.<br />
3. Fill the potato skins with potato mixture and sprinkle<br />
with Emmental cheese. Place potatoes on a plate and<br />
cook.<br />
4-6 Mins. 800 W<br />
After cooking, leave to stand for approximately<br />
2 minutes.<br />
Denmark<br />
FRUIT JELLY WITH VANILLA SAUCE<br />
Total cooking time 10-13 minutes<br />
Utensils: Dish with lid (2 l capacity)<br />
(1 l capacity)<br />
Ingredients<br />
150 g redcurrants, washed and stalks removed<br />
150 g strawberries, washed and haulms removed<br />
150 g raspberries, washed and haulms removed<br />
250ml white wine<br />
100 g sugar<br />
50 ml lemon juice<br />
8 gelatin leaves<br />
300 ml milk<br />
inside of 1 /2 vanilla pod<br />
30 g sugar<br />
15 g food thickener<br />
1. Put some of the fruit to one side for decoration.<br />
Purée the rest of the fruit with the white wine, put<br />
it into a dish, cover and heat.<br />
7-9 Min. 800 W<br />
Fold in the sugar and the lemon juice.<br />
2. Soak the gelatin in cold water for approx. 10<br />
minutes, then take it out and squeeze dry. Stir the<br />
gelatin in with the hot purée until it has dissolved.<br />
Place the jelly in the refrigerator and leave to set.<br />
3. To make the vanilla sauce; put the milk into the<br />
other dish. Slit the vanilla pod and remove the<br />
inside. Stir this in with the milk, together with the<br />
sugar and the food thickener, cover and cook,<br />
stirring during cooking and again at the end.<br />
3-4 Min. 800 W<br />
4. Turn out the jelly onto a plate and decorate with<br />
the whole fruit. Add the vanilla sauce.<br />
Tip:You can also use defrosted frozen fruits.<br />
ENGLISH<br />
170/<strong>GB</strong>-26
8. R-26 Service Addresses 1/12/06 9:24 PM Page 138<br />
• SEULEMENT VALIDE POUR L'ALLEMAGNE ET L’AUTRICHE • SLECHTS GELDIG VOOR DUITSLAND EN OOSTENRUK •<br />
• SOLTANTO VALIDO PER LA GERMANIA E L’AUSTRIA • SOLAMENTE VÁLIDO PARA ALEMANIA Y AUSTRIA •<br />
Vorgehensweise bei Vorliegen eines Produktmangels:<br />
• Wurde Ihr Gerät durch einen Fachbetrieb mit einem von <strong>Sharp</strong> genehmigten Einbaurahmen oder rahmenlos ein-/untergebaut,<br />
können Sie die unter Ziffer 1. aufgeführten Garantieansprüche im Rahmen des Quick 48 Stunden Vor-Ort-Service geltend<br />
machen und sich direkt an den KUNDEN-SERVICE wenden oder Sachmängel gegenüber Ihrem Verkäufer geltend machen.<br />
• Für alle übrigen Geräte können Sie die unter Ziffer 2. aufgeführten Garantieansprüche ohne Quick 48 Stunden Vor-Ort-<br />
Service oder Sachmängel gegenüber Ihrem Verkäufer geltend machen.<br />
1. Garantie mit Quick 48 Stunden Vor-Ort-Service<br />
Gilt für Deutschland und Österreich<br />
Haushalts- Mikrowellengeräte im Quick 48 Stunden Vor-Ort-Service<br />
Sehr geehrter <strong>Sharp</strong> Kunde,<br />
alle ein-/ untergebauten Haushalts-Mikrowellengeräte, die durch einen Fachbetrieb fachgerecht mit einem von SHARP<br />
genehmigten Einbaurahmen oder rahmenlos ein-/ bzw. untergebaut worden sind, werden im Quick 48 Vor-Ort-Service<br />
abgewickelt. Die in dieser Garantie beschriebenen Ansprüche stehen Ihnen zusätzlich neben den gesetzlichen<br />
Sachmängelansprüchen gegen Ihren Verkäufer zu.<br />
Umfang der Garantie: Sollte Ihr Mikrowellengerät trotz sorgfältiger Herstellung und Endkontrolle einen Mangel<br />
aufweisen, können Sie innerhalb der Garantiezeit, Garantieleistungen gegen <strong>Sharp</strong> Electronics (<strong>Europe</strong>) GmbH in Anspruch<br />
nehmen. Diese stehen Ihnen zu, wenn ein herstellungsbedingter Material- und/oder Verarbeitungsmangel (nachfolgend<br />
„Mangel“) bei dem Mikrowellengerät oder Teilen davon - mit Ausnahme der Garraum-Glühlampe - innerhalb von 24<br />
Monaten auftritt. Die Garantie umfasst nicht Mängel, die durch unsachgemäße Behandlung, Bedienungsfehler oder durch<br />
Fremdeinwirkung entstanden sind. Transportschäden bei Neugeräten müssen Sie bei Ihrem Verkäufer geltend machen. Die<br />
Garantiefrist von 24 Monaten beginnt mit dem Tag, an dem Sie das fabrikneue Gerät von einem Händler gekauft haben. Die<br />
Erbringung von Garantieleistungen verlängert nicht die Garantiezeit.<br />
Die Garantie gilt für alle Geräte, die in Deutschland ab dem 01.12.2001<br />
und in Österreich ab dem 01.04.2004 gekauft worden sind.<br />
Garantieleistungen: <strong>Sharp</strong> Electronics (<strong>Europe</strong>) GmbH erfüllt seine Garantieverpflichtungen für Mängel durch kostenlose<br />
Reparatur und einen Quick 48 Stunden Vor-Ort-Service. Etwa anfallende Transportkosten innerhalb Deutschlands und<br />
Österreich übernehmen wir.<br />
Im Quick 48 Stunden Vor-Ort-Service werden alle Reklamationen, die an Werktagen außer samstags bis 17:00 Uhr beim<br />
Quick 48 Deutschland, Tel.: 0180 / 5 23 46 74 *(€ 0,12/Min) und in Österreich Tel.: 0820 / 240 496 **(€ 0,145/Min)<br />
eingehen, ab dem darauffolgenden Werktag gerechnet, im Regelfall innerhalb 48 Stunden bei Ihnen im Vor-Ort-Service<br />
repariert.<br />
Geltendmachung der Garantie: Der Mangel des Gerätes muss innerhalb der Garantiefrist unter Angabe des<br />
Kaufdatums, der Modellbezeichnung und der Seriennummer des Gerätes unter den oben aufgeführten Telefonnummern<br />
Deutschland Tel.: 0180 / 5 23 46 74 (€ 0,12/Min) und Österreich Tel.: 0820 / 240 496 (€ 0,145/Min) geltend<br />
gemacht werden. Bei der Vor-Ort-Reparatur ist dann der Kaufbeleg, aus dem sich das Kaufdatum, die Modellbezeichnung<br />
und die Seriennummer des Gerätes ergibt, vorzulegen.<br />
Achtung:<br />
Wird dieser Service für von Ihnen selbst ein-/untergebaute Geräte in Anspruch genommen, sind für Aus-/und Einbau,<br />
Fahrzeit und Km die entstehenden Kosten von Ihnen zu tragen!<br />
Bitte erkundigen Sie sich vor Anforderung des Kundendienstes bei diesem über die anfallenden Kosten. Den für Sie<br />
nächstgelegenen Kundendienst nennt Ihnen gern unsere o.g. Hotline.<br />
Als Nachweis für Sachmängel-/ Garantiearbeiten dient Ihr Kaufbeleg / Rechnung.<br />
Selbstverständlich können Sie unseren QUICK 48 Vor-Ort-Service Mikrowellengeräte auch nach Ablauf der Verjährungsfristen<br />
für Sachmängel-/Garantiefristen in Anspruch nehmen, dann jedoch gegen Aufwandsberechnung des jeweiligen<br />
Kundendienstes.<br />
Garantiegeber: SHARP Electronics (<strong>Europe</strong>) GmbH, Sonninstraße 3, 20097 Hamburg<br />
www.sharp.de<br />
171
8. R-26 Service Addresses 1/12/06 9:24 PM Page 139<br />
• SEULEMENT VALIDE POUR L'ALLEMAGNE ET L’AUTRICHE • SLECHTS GELDIG VOOR DUITSLAND EN OOSTENRUK •<br />
• SOLTANTO VALIDO PER LA GERMANIA E L’AUSTRIA • SOLAMENTE VÁLIDO PARA ALEMANIA Y AUSTRIA •<br />
Vorgehensweise bei Vorliegen eines Produktmangels:<br />
• Wurde Ihr Gerät durch einen Fachbetrieb mit einem von <strong>Sharp</strong> genehmigten Einbaurahmen oder rahmenlos ein-/untergebaut,<br />
können Sie die unter Ziffer 1. aufgeführten Garantieansprüche im Rahmen des Quick 48 Stunden Vor-Ort-Service geltend<br />
machen und sich direkt an den KUNDEN-SERVICE wenden oder Sachmängel gegenüber Ihrem Verkäufer geltend machen.<br />
• Für alle übrigen Geräte können Sie die unter Ziffer 2. aufgeführten Garantieansprüche ohne Quick 48 Stunden Vor-Ort-<br />
Service oder Sachmängel gegenüber Ihrem Verkäufer geltend machen.<br />
2. Garantie ohne Quick 48 Stunden Vor-Ort-Service<br />
Gilt für Deutschland und Österreich<br />
Haushalts - Mikrowellengeräte<br />
Wichtiger Endkunden – Hinweis: Serviceabwicklung nur über den Verkäufer. Die in dieser Garantie beschriebenen<br />
Ansprüche stehen Ihnen zusätzlich neben den gesetzlichen Sachmängelansprüchen gegen Ihren Verkäufer zu.<br />
Sehr geehrter <strong>Sharp</strong> Kunde,<br />
SHARP- Geräte sind Markenartikel, die mit Präzision und Sorgfalt nach modernen Fertigungsmethoden hergestellt werden. Bei<br />
sachgemäßer Handhabung und unter Beachtung der Bedienungsanleitung wird Ihnen Ihr Gerät lange Zeit gute Dienste<br />
leisten.<br />
Das Auftreten von Fehlern ist aber nie auszuschließen. Sollte Ihr Gerät innerhalb der gesetzlichen oder mit Ihrem Verkäufer<br />
vereinbarten Verjährungsfristen für Sachmängel-/ Garantiefristen einen Mangel aufweisen und das Gerät wurde nicht von<br />
Ihrem Handelspartner ein-/unter-gebaut, so wenden Sie sich bitte an den Verkäufer, bei dem Sie das Gerät<br />
erworben haben und geben Sie das defekte Gerät dort ab, denn dieser ist Ihr Ansprechpartner für Sachmängel.<br />
Umfang der Garantie: Wenn ein herstellungsbedingter Material- und/oder Verarbeitungsmangel (nachfolgend „Mangel“)<br />
bei dem Gerät oder Teilen davon - mit Ausnahme der in der Bedienungsanleitung angegebenen Teilen mit begrenzter<br />
Lebensdauer – innerhalb von 24 Monaten auftritt, können Sie unsere Garantieleistung in Anspruch nehmen.<br />
Die Garantie umfasst nicht Mängel, die durch unsachgemäße Behandlung, Bedienungsfehler oder durch Fremdeinwirkung<br />
entstanden sind.<br />
Die Garantiefrist von 24 Monaten beginnt mit dem Tag, an dem Sie das fabrikneue Gerät von einem Händler gekauft haben.<br />
Die Erbringung von Garantieleistungen verlängert nicht die Garantiezeit.<br />
Die Garantie gilt für alle Geräte, die ab dem 01.12.2001 in Deutschland<br />
und in Österreich ab dem 01.04.2004 gekauft worden sind.<br />
Garantieleistung: <strong>Sharp</strong> Electronics (<strong>Europe</strong>) GmbH erfüllt seine Garantieverpflichtung für Mängel nach seiner Wahl durch<br />
kostenlose Reparatur oder durch Austausch des mangelhaften Gerätes gegen ein mangelfreies. Etwa anfallende<br />
Transportkosten innerhalb Deutschlands und Österreich werden von uns übernommen.<br />
Geltendmachung der Garantie: Um die Garantie in Anspruch nehmen zu können, benötigen Sie den Kaufbeleg<br />
(Rechnung, Quittung) aus dem sich das Kaufdatum, die Modellbezeichnung und Seriennummer des Gerätes ergibt. Der<br />
Mangel des Gerätes muss innerhalb der Garantiefrist von Ihnen gegenüber einem <strong>Sharp</strong> Service-Partner oder einem<br />
autorisierten Händler von <strong>Sharp</strong> Electronics (<strong>Europe</strong>) GmbH geltend gemacht werden. Bei weiteren Fragen wenden Sie sich<br />
bitte an unsere Service-Hotline 01805-29 95 29 * (€ 0,12 /Min)<br />
Selbstverständlich können Sie die Hilfe unserer Service-Hotline 01805-29 95 29 * (€ 0,12 /Min) für<br />
<strong>Sharp</strong>-Mikrowellengeräte auch nach Ablauf der Verjährungsfristen für Sachmängel-/Garantiefristen in Anspruch nehmen,<br />
dann jedoch gegen Aufwandsberechnung des jeweiligen Kundendienstes.<br />
Garantiegeber: SHARP Electronics (<strong>Europe</strong>) GmbH, Sonninstraße 3, 20097 Hamburg<br />
www.sharp.de<br />
172
8. R-26 Service Addresses 1/12/06 9:24 PM Page 140<br />
• ADDRESSES D’ENTRETIEN • ONDERHOUDSADRESSEN • DIRECCIONES DE SERVICIO • INDIRIZZI DI SERVIZIO •<br />
BELGIUM - http://www.sharp.be<br />
En cas d´une réclamation concernant une four a micro-onde SHARP, nous vous prions de vous adresser à votre<br />
spècialiste ou à une adresse des SHARP Services suivantes.<br />
Indien uw magnetron problemen geeft kunt u zich wenden tot uw dealer of een van de onderstaande <strong>Sharp</strong> service<br />
centra.<br />
SHARP ELECTRONICS, Phone: 0900-10158<br />
AVTC, Kleine Winkellaan 54,1853 Strombeek-Bever, 02/2674019 / ETS HENROTTE, Rue Du Campinaire 154, 6240 Farciennes,<br />
071/396290 / Nouvelle <strong>Central</strong> Radio (N.C.R), Rue des Joncs 15 L-1818 HOWALD, 00352404078 / Service Center Deinze,<br />
Kapellestraat, 95, 9800 DEINZE, 09-386.76.67<br />
NEDERLAND - http://www.sharp.nl<br />
Indien uw magnetron problemen geeft kunt u zich wenden tot uw dealer of naar onderstaand <strong>Sharp</strong> Service Centrum.<br />
SHARP ELECTRONICS BENELUX BV,- Helpdesk -,Postbus 900, 3990 DW Houten, 0900-7427723<br />
FRANCE - http://www.sharp.fr<br />
En cas de réclamation pour les fours micro-ondes SHARP, nous vous prions de vous adresser à votre spécialiste ou à<br />
l’une des stations techniques agréées SHARP suivantes:<br />
A.A.V.I., 1 rue du Mont de Terre, 59818 Lesquin Cedex, 03.20.62.18.98 / A.A.V.I. (Point d'Accueil), 9-11 rue Léon Trulin, 59000 Lille,<br />
03.20.14.96.20 / ATELIER ROUSSEL, 12 Bld Flandre Dunkerque, 56100 Lorient, 02.97.83.07.41 / BASTIA TELE VIDEO, Immeuble<br />
Le Béarn - Av. de la libération, 20600 Bastia, 04.95.30.81.29 / C.M.T.S., 38 rue des Ormeaux, 75020 Paris, 01.43.70.20.00 /<br />
ELECTRONIC SERVICE PLUS, 5 bd LOUIS XI - ZI le Menneton, 37000 Tours, 02.47.77.90.90 / ELECTRO SERVICE, 21 rue de Mulhouse<br />
- B.P 122, 68313 Illzach, 03.89.62.50.00 / M.R.T., 74 Rue Albert Einstein - 72021 Le Mans Cedex, 02.43.28.52.20 / S.T.E., 3 chemin<br />
de l'Industrie, 06110 Le Cannet Rocheville, 04.93.46.05.00 / S.T.R. AQUITAINE, 111 rue Bouthier - B.P 27, 33015 Bordeaux,<br />
05.57.80.78.07 / S.T.V.S., 1 rue de la Presse, 42000 Saint Etienne, 0825.898.903 / S.T.V.S., 10 chemin Saint Gobin, 69 190 Saint<br />
fons, 04.72.89.06.89 / S.T.V.S. (point d'accueil), 143 av Maréchal de Saxe, Entrée: 54 rue Villeroy, 69003 Lyon 04.78.62.07.05 /<br />
TECH SERVICE, 15 rue du château de ribaute, ZA ribaute 2, 31130 Quint Fonsegrives, 05.62.57.63.90 / TIMO VIDEO, 131 chemin des<br />
bassins, Zone Europarc - Hameau D, 94000 Creteil, 01.43.39.08.18 / U.N.T.D., 1 rue des Lourdines, 76000 Rouen, 02.35.72.28.04<br />
ITALIA - http://www.sharp.it<br />
Nel caso si verificassero problemi alla vostra apparecchiatura potrete rivolgervi presso un nostro centro di assistenza<br />
autorizzato sharp<br />
ABRUZZO: CTR di de Berardinis vincenzo, Via Giuseppe Cacchi L'Aquila, 0862-315407 / CTR di de Berardinis vincenzo, Via P.<br />
Gobetti Avezzano L'Aquila, 0863-412131 / Marinangeli Fabrizio, Via Rocco Carabba L'Aquila, 0862-310279 / Marinangeli<br />
Fabrizio, Via F.lli Rosselli Avezzano L'Aquila, 0863-25207 / Elettrovideo snc, Via Tiburtina Pescara, 085-52020 / Cat di Bellone, Via<br />
Dell' Aereoporto Teramo, 0861-415745<br />
BASILICATA: SUONO E IMMAGINE di Conti Massimo, Via E. Maiorana Matera, 0835-389310<br />
CALABRIA: Battaglia Saverio, Via C. Colombo Catanzaro Lido, 0961-33824 / S.A.T.E. di Dodaro, Via degli Stadi Cosenza, 0984-<br />
482337 / SE.RI.EL.CO., Via delle Medaglie d'Oro Cosenza, 0984-33152 / Eurotrading dei F.lli Aiello G. & D. snc, Via Torino<br />
Crotone, 0962-20889 / Assistenza Tecnica Cozzupoli & Crupi snc, Via R. Campi primo tronco 103 Reggio Calabria, 0965-24022 /<br />
Ater snc, Via Naz. Pentimele 159/a-b Reggio Calabria, 096547051 / Ciano Giuseppe, Via Seconda Traversa Toscanini Taurianova,<br />
0966-643483 / Audio Video snc, Via A. De Gasperi 4/e Vibo Valentia, 0963-45571 o 45572<br />
CAMPANIA: Elettronica D' Argenio, Via Nazionale Torrette Nercogliano Avellino, 0825-681590 / D.R.F. di Rubbo, Via L. Piccinato<br />
Benevento, 0824-62416 / Audio Service, Via Cattaneo 4/6 Caserta, 0823-329099 / Congestri’ Ignazio, Via Giordano Bruno<br />
Maddaloni Caserta, 0823-437704 / Elettronica Service snc di Starace Aniello e C., Viale Europa Castellamare di Stabia Napoli, 081-<br />
8728280 / Errediesse Service, Via P. Mascagni Napoli, 081-5794825 / SATEP, Via Nazionale delle Puglie 176 Casoria Napoli, 081-<br />
7590706 / Video Elettronica 2 di Nasti, Via Antonino Pio Napoli, 081-7676300 / M.C. Elettronica snc di Milito M. e Della Sala,<br />
Via dei Mille Salerno, 089-330591 / Netti Gianfrano, Via Magna Grecia Capaccio Scalo Salerno, 0828-730071<br />
EMILIA ROMAGNA: MA.PI. snc, Via T. Azzolini Bologna, 051-6414115 / VIdEO 2000 SRL, Via dell'Industria Bologna, 051-<br />
531581/624060 / Assistenza Electron di Fogli, Via F.lli Aventi Ferrara, 0532-903250 / Stema snc, Viale Bologna Forlì, 0543-<br />
704475 / Audio Video Center, Via Vandelli 23 Modena, 059-235219 / REAT srl, via Giardini Nord 8 Formigine Modena, 059-<br />
557168 / Ecoservice Srl, Via Buffolara 68A Parma, 0521-987402 / Parmaservice sas, Via Benedetta Parma, 0521-271666 /<br />
Riparazioni Elettriche Ravenna, Via Reale Camerlona Ravenna, 0544-521500 / Technolab snc, Via Romea Ravenna, 0544-64008 /<br />
RTE RADIO TV ELETTRONICA di I. Catellani & C., Via Premuda Reggio Emilia, 0522-381277 / Masini Service, Via Mediterraneo<br />
Bellaria Rimini, 0541-347714 / Novatecnica snc, Via Giovenale Rimini, 0541-736361 / Nuova Tecnocoop, Via Armellini Bellariva di<br />
Rimini, 0541-370812<br />
FRIULI VENEZIA GIULIA: D.R.M. di de Monte Ignio, P.ZA Montesanto S. Lorenzo Isontino Gorizia, 0481-808858 / AVR di Dri sas,<br />
Via Colonna 20/8 Pordenone, 0434-27669 / Officina Elletrom. di Starace Elio, Via Caprin Trieste, 040-773718<br />
LAZIO: A.P. Rip. Arduini Piero, Via Licinio Refice 192 Frosinone, 0775-291267 / Palmieri Francesco, Via S. Polledrara Frosinone,<br />
0775-291485 / Elettronica 81, Via Ezio Latina, 0773-694608 / Italreg di Albano, Parco Belvedere Conca 74 Gaeta, 0771-470851 /<br />
CTS centro tecnico specializzato, Via Rialto Roma, 06-39729748 / Panaservice SRL, Via Barbana 35 Roma, 06-5409766 / Video<br />
Service sas di G. Calabrese & C. (VT), Str. Teverina Viterbo, 0761-251557<br />
LIGURIA: G.A.T.E. snc, Passo P. Carrega Genova, 010-8361543 / STAE SNC, Corso A. Gastaldi Genova, 010-5299269 / Cat snc di<br />
Ginulla O. & Rebuffo M., Via L. Giordano Imperia, 0183-710920 / Michelis Sandro, Via Giannetti Imperia, 0183-275891 / RIEN<br />
snc, Via Valle La Spezia, 0187-21925 / Tognetti service, Via Lunigiana La Spezia, 0187-507656 / Teleservice snc, Via Ponchelli 27R<br />
Savona, 019-810058<br />
LOMBARDIA: Video Service snc, Via Locatelli Seriate Bergamo, 035-296883 / Baccinelli Marzio & C. snc, Via Branze Brescia, 030-<br />
2006411 / Eurotecnica di Ronchi, Via Milano Brescia, 030-317673 / S.T.A.R.T. Video Hi-Fi, Via Orti Romani Cremona, 0372-38731 /<br />
Sae di Oneda M. snc, Via Chinaglia Cremona, 0372-460314 / Tecnovideo snc, P.zza De Gasperi Mantova, 0376-321554 / A.E. snc,<br />
via Acerbi 28 Milano, 02-66220906 / AT Electronics, Piazza Cartagine 4 Milano, 02-58019146 / Test TV snc, Via Altamura Milano, 02-<br />
4035408 - 406441 / Morini Daniele, Via Maiocchi Voghera Pavia, 0383-368740 / Crel snc, Via Carducci Sondrio, 0342-216538 /<br />
Elettronica Cappi, Via Gorizia Sondrio, 0342-210459 / Salvadori Claudio, Via del Bosco Busto Arsizio Varese, 0331-329973 /<br />
Salvadori Claudio Succursale, Via Merano Varese, 0332-333501 / Teletecnica 2000, Via Torino Gallarate Varese, 0331-775519<br />
173
8. R-26 Service Addresses 1/12/06 9:24 PM Page 141<br />
• ADDRESSES D’ENTRETIEN • ONDERHOUDSADRESSEN • DIRECCIONES DE SERVICIO • INDIRIZZI DI SERVIZIO •<br />
MARCHE: Digitecnica di Moroni R: & c snc, Via Zuccarini Candia, 071-2866067 / Marconi Lanfranco, Via Monte Bianco Porto<br />
d'Ascoli, 0735-659230 / Pluritecnica di Campitelli A. Nespeca M. snc, Via Gradara Ascoli Piceno, 0736-342635 / SAT Radio Tv<br />
snc, Via D. Rossi Macerata, 0733-231304 / C.A.T. snc, Via A. Cecchi Pesaro, 0721-25608 / SAT 2000 snc di Sparamonti P. e C.,<br />
Via dello Stadio. 16 Terni, 0744-424133<br />
PIEMONTE: Siragusa & Roagna, C.so Matteotti Asti, 0141-531131 / Arte e Tecnica snc, Via Falletti 22 Biella, 015-8496250 /<br />
Alpilab di Giordano, Corso Giovanni XXIII 11 Cuneo, 0171-690384 / VIdeotext di Oberto Stefano, P.za Trento e Trieste Canale<br />
Cuneo, 0173-95878 / Guida di Guida Alessio, Via Roggiolo Trecate Novara, 0321-71608 / El.te di Antonello Adriano, Via Ugo<br />
Foscolo Torino, 011-6503786 / REAT di Frisina Rita, Corso Unione Sovietica 584 Torino, 011-3979817 / Elektro di Fiore Francesco,<br />
Via Tripoli Vercelli, 0161-250071<br />
PUGLIA: Marinelli Benedetto, Via dei Salici Barletta, 0883-514054 / SAT sas di Partipilo, Via Borsellino e Falcone 17 bis Bari, 080-<br />
5022999 / Astrotec p.s.c.a.r.l., Viale Ofanto Foggia, 0881-685013 / Stear snc, Via E. Perrone Foggia, 0881-778483 / Arnesano<br />
Faustino, Via M. Moscardino 10 Lecce, 0832-318277 / Microkey srl, Via Giammatteo Lecce, 0832-399398 / Microkey srl, Via de<br />
Giuseppe Maglie Lecce, 0836-424813 / Santoro Attilio, Via Marche 24 Taranto, 099-335884<br />
SARDEGNA: AS.TEC. Elettronica, Via Riva Villasanta 227 Cagliari, 070-524153 / Floris Sergio, Via Mazzini Gonnesa, 0781-45436 /<br />
G.S. Elettronica di Porcu Giuseppe M., Via della Resistenza Nuoro, 0784-203084 / Co.ri.fr.el. 2, Via del Castagno Settore "D"<br />
Olbia, 0789-562104 / Videoelettronica snc, Via Torino Sassari, 079-276616<br />
SICILIA: Service Russo di Russo Alfonso, Via Dei Giovani Agrigento, 0922-610788 / Video Service di De Francisci Paolo, Via<br />
P.Nenni Agrigento, 0922-595881 / Vullo Michele, Via Gorizia Caltanissetta, 0934-551367 / A.V.S. Elettronica, Via Sassari 2/c<br />
Catania, 095-446696 / Cuppari Electronics, via S. Agostino 15 Messina, 090-672064 / Cuppari Electronics Succursale, Via Libertà<br />
Capo d' Orlando Messina, 0941-911785 / Tecnica Sud snc, Viale Regina Elena Messina, 090-40037 / Alamia Service Piccola<br />
Cooperativa, C.so Pisani 310/312 Palermo, 091-6570502 / Di Fonzo F. & Figli snc, Via Ruggero Loria Palermo, 091-363578 /<br />
Elettronica di Di Tullio Maria, Via Carlentini Siracusa, 0931-758602 / Latino Impianti, Via Eloro Rosolini Siracusa, 0931-857099 /<br />
Tecnico Siracusana, Via Novelli Siracusa, 0931-39440 / Arte TV sas, Via G. Centorbi 17 Mazara del Vallo Trapani, 0923-908160 /<br />
Euroservice 2000, via degli Atleti 61/c Marsala Trapani, 0923-956475<br />
TOSCANA: Bardazzi Paolo, Via Forlanini 8DR Firenze, 055-4376776 / Cate di Lepri Guido e C. snc, Via Segantini Empoli, 0571-<br />
80652 / Centi Franco, Via Dosio 83 Firenze, 055-710388 / Laboratorio Tv Arrighi, Via F.lli Cervi P.A. Elsa Empoli, 0571-931327 /<br />
M2 Elettronica, Via Danimarca Grosseto, 0564-454571 / NA.TO.MA. snc, Via del sabotino 13 Grosseto, 0564-456229 / Cate di<br />
Lepri Guido e C. snc, C.so Matteotti Cecina, 0586-635071 / A.T.E.S., Via Torino 3/a Livorno, 0586-859566 / Laboratorio<br />
Riparazioni Falchi, Via A. Garibaldi Piombino, 0565-49400 / Teleservice di D'Amicis E. & V. snc, Via P. Pisana Livorno, 0586-<br />
400564 / E.T.S. di Napolitano Biagio, Via Bientina Altopascio, 0583-269196 / Elettronica RNP, Via Romana Lucca, 0583-956225 o<br />
957565 / MGM Service snc di Martinelli, Via Paolinelli Capannori, 0583-30382 / DBS ELETTRONICA di Aldovardi S. & C. snc,<br />
Via Simon musico Massa, 0585-489893 / SAEC, Via degli Artigiani Massa, 0585-251724 / Belcari Enrico, Via J. Gagarin Pisa, 0587-<br />
420273 / E.T.S. di Napolitano Biagio, Via Lucchese Montecatini Terme, 0572-767430 / Cate di Lepri Guido e C. snc, Via Fiorentina<br />
Prato, 0574-632652 / Teleservice di Benvenuti Stefano, Via E.Fermi 9/13 Prato, 0574-580840 / PA.RI.EL.S.di Barletti Mirella,<br />
Via B.Tolomei 9 Siena, 0577.51159<br />
TRENTINO ALTO ADIGE: Dal Pozzo Enzo, Via Barletta Bolzano, 0471-913290 / Tecnoservice snc, Via San Vigilio Bolzano, 0471-<br />
289062 / Melone Michele, Via Zara Trento, 0461-235166 / Sighel Mauro, Via A. Volta Trento, 0461-935919<br />
UMBRIA: Baldassarri G. & G. snc, Via A. Manna S. Andrea delle Fratte, 075-5270921 / Tecnoconsult Elettronica, Via Madonna<br />
Alta Perugia, 075-5003089 / Quondam, Via del Rivo Terni, 0744-301512<br />
VALLE D’AOSTA: Cat di D'Isanto, C.so Ivrea Aosta, 0165-364056<br />
VENETO: D.D. Assistenza Tecnica snc, Via Mondin Belluno, 0437-30240 / Pierezza Carlo, Via Barroccio dal Borgo Padova, 049-<br />
681592 / L'Elettronica più snc, Via Gaspare Campo Rovigo, 0425-33221 / Assistenza Elettronica Campi, Via E. Reginato Treviso,<br />
0422-436245 / Franchino gianfranco, Via Zermanese 6B Treviso, 0422-321054 / Video Tv1732, Via San Marco Sottomarina, 041-<br />
5541675 / Vignando Luigino, Via dell' Industria Gruaro, 0421-74472 / Zaffalon Urbano, via Santa Croce 2040 Venezia, 041-<br />
2750670 / Global Service Impianti di Cerpelloni & C., p.zza Plebiscito 9A Avesa, 045-8342935 / Video Service, Via Vitruvio<br />
Verona, 045-566299 / DL service di dal Lago Lorenzo, Via Giaretta 33 Vicenza, 0444-566662 / Speedy service, V.le Europa 42/b<br />
Thiene, 0445.368235<br />
ESPANA - http://www.sharp.es<br />
En caso de una reclamación con vuestra SHARP Microwave, preguntan por favor la casa dónde han comprado su<br />
máquina o infórmanse en una de las SHARP Service casas siguientes.<br />
ALAVA: Merino Nicolas Jose A., Av Judizmendi 24, Vitoria-Gasteiz, 945/ 25.18.92<br />
ALBACETE: Juman, Cl Ejercito 1, Albacete, 967/ 22.40.78 / Parreño, Cl Santiago Rusiñol 50, Albacete, 967/ 22.62.49<br />
ALICANTE: A.E. De Consumo, Cl Peru 42, Alcoy, 96/ 552.32.35 / David Torregrosa Jorda, Cl Terrassa 6, Alcoy, 965/ 33.43.06 /<br />
Eurosat, S.L., Cl Montero Rios 33, Alicante, 96/ 525.80.40 / Angel Avellan Puig, Cl Poeta Quintana 13, Alicante, 965/ 21.32.55 /<br />
Joaquin Saez Servicios, Cl Escorpion 6-8, Alicante, 96/ 528.73.33 / Video Electronica Noguera, Cl Castellon 17, Altea, 965/<br />
84.41.58 / Tele-Color, Cl Del Vent 9, Benidorm, 96/ 585.24.60 / Joaquin A. Lon Jaen, Cl Patricio Ferrandiz 66, Denia, 96/<br />
578.67.50 / Trinitario Gea, Cl Jaime Pomares Javaloyes 47, Elche, 96/ 545.56.25 / Unisat, Cl Duque De Tamames 9, Orihuela, 96/<br />
674.11.94 / Jose A. Patiño Villena, Cr De Bigastro 1, Orihuela, 96/ 571.74.29 / Electroservicios Plaza, Pz Santiago 5, Orihuela,<br />
96/ 828.45.67 / E.Electrosax, Cl Rio Turia 1, Sax, 96/ 547.42.32 / Electronica Santa Pola, Cl Orihuela 43, Torrevieja, 96/<br />
571.25.58 / A.T. Tv. Video, Av De La Constitucion 185 D, Villena, 965/ 80.02.31<br />
ALMERIA: Televideo, Cl Velazquez 7 Local-A, Adra, 950/ 40.18.63 / Servirap, Cl Angel Ochotonera 11, Almeria, 950/ 27.40.67 /<br />
Sonivitel S.L., Cl Poeta Paco Aquino 51, Almeria, 950/ 22.97.55 / Servicio Tecnico Ponce, Plg Ps Maritimo E- Europa 1, Garrucha,<br />
950/ 13.28.37<br />
ASTURIAS: Asturservice, Cl Sanchez Calvo 6 Bjos., Aviles, 98/ 556.83.87 / S.A.T. Juan-Manuel, Cl Uria 60, Cangas De Narcea,<br />
98/ 581.22.48 / Manuel Alea Villa, Cl Llano Morgolles S/N, Cangas De Onis, 98/ 592.26.40 / Electronica Edimar, S.A, Cl<br />
Cangas De Onis 4, Gijon, 98/ 535.34.51 / Astusetel S.L., Cl Cea Bermudez 9, Gijon, 98/ 539.10.11 / Juan Morillon Del Corro,<br />
Av De Gijon 19, La Felguera/Langreo, 98/ 567.40.24 / Santiago Valderrey, Cl Dr. Venancio Mtez. 7, Navia, 98/ 563.18.61 /<br />
Alvarez Olivar Casilda, Cl San Jose 12, Oviedo, 98/ 522.37.39 / G.A.M.I.F.E.L, Cl Ricardo Montes 6, Oviedo, 98/ 528.43.60<br />
AVILA: Daniel Serran0 Labrado, Cl Jose Gochicoa 16, Arenas De S.Pedro, 920/ 37.15.16 / Electronica Gredos, Cl Eduardo<br />
Marquina 24, Avila, 920/ 22.48.39 / Reparaciones San Segundo, Cl Soria 6, Avila, 920/ 22.33.21<br />
174
8. R-26 Service Addresses 1/12/06 9:24 PM Page 142<br />
• ADDRESSES D’ENTRETIEN • ONDERHOUDSADRESSEN • DIRECCIONES DE SERVICIO • INDIRIZZI DI SERVIZIO •<br />
BADAJOZ: Indalecio Amaya Sanchez, Cl Carreras 11, Almendralejo, 924/ 66.47.01 / Electronica Bote, Pz Portugal 2, Badajoz,<br />
924/ 22.17.40 / Patricio Electronica, Cl Reyes Huertas 7, Merida, 924/ 33.04.13 / Electronica Centeno S.L., Av Del Zafra 1, Puebla<br />
Sancho Perez, 924/ 57.53.08 / C.E. Vilanovense C.B., Cl Camino Magacela 4 Local-5, Villanueva Serena, 924/ 84.59.92<br />
BALEARES (MENORCA): Insat, Cb, Cl Pintor Calbo 30, Mahon, 971/ 36.53.18<br />
BALEARES (IBIZA): Reparaciones Ortega, Cl Via Punica 33, Ibiza, 971/ 39.01.55<br />
BALEARES (MALLORCA): Instalaciones Maes, S.L., Cl Son Nadal 63, Palma De Mallorca, 971/ 27.49.47<br />
BARCELONA: Servinters, S.C.C.L., Pz Casagemes 20, Badalona, 93/ 389.44.60 / Fermo, Av Morera 5, Badalona, 93/ 465.22.00 /<br />
Videocolor, Cl Villarroel 44, Barcelona, 93/ 454.99.08 / 4 En 1 Reparaciones, Cl Taquigrafo Marti 19, Barcelona, 93/ 430.97.26 /<br />
La Clinica Del Electrod., Cl Balmes 160, Barcelona, 93/ 236.44.11 / Pulgar I Edo S.L., Cl Castillejos 333, Barcelona, 93/ 436.44.11<br />
/ Domotica, Av Diagonal 296, Barcelona, 93/ 408.66.22 / Estarlich, Cl Industria 131, Calella, 93/ 766.22.33 / Joaquin Casajoana<br />
Pages, Cl Major 19 (Tienda), Castelldefels, 93/ 664.43.60 / Electronica Mateos, Cr De Caldas (Bajos) 76, Granollers, 93/ 849.28.77<br />
/ Teelco, Av Balmes 90, Igualada, 93/ 805.11.90 / Elde, Cl Bruch 55, Manresa, 93/ 872.85.42 / Totvisio Electronica S.L., Pj Ferrer<br />
14, Manresa, 93/ 873.88.81 / Ramon Villaret De Gea, Cl Moli De Vent 21, Mataro, 93/ 798.02.48 / Estarlich, Cl Auquebisbe Creus<br />
12, Mataro, 93/ 790.22.89 / Salja & Mat, Cl La Raseta 15 L-3, Molins De Rey, 93/ 668.13.61 / Ce.Va.Sat, Ps Rubio I Ors 105,<br />
Sabadell, 93/ 710.76.13 / Servei Tecnic Ferrer, Cl Sarda 37, Sabadell, 93/ 710.51.38 / Fix Servicio Tecnico, Cl Valles 88, Sant<br />
Cugat Valles, 93/ 675.59.02 / Ce. Va. Sat, S.C., Cr Matadepera 87, Terrassa, 93/ 785.51.11 / Laurea S.A.T, Cl Guilleries Bis 20, Vic,<br />
93/ 889.02.48 / Fred Vilafranca, Cl Progres 42, Vilafranca Del Penedes, 93/ 890.48.52 / Top Electronica, Cl Misser Rufet 4 Bjos,<br />
Vilafranca Penedes, 93/ 890.35.91<br />
BILBAO:, Telnor, Pz Juanene 5 Tras., Erandio, 94/ 417.04.97<br />
BURGOS: Servitec Burgos S.L., Cl Lavaderos 7-9, Burgos, 947/ 22.41.68 / Electronica Mas, Cl Alfonso Vi 6, Miranda De Ebro, 947/<br />
31.49.94<br />
CACERES: Ruiz Garcia Jose, Cl Ecuador 5-B, Caceres, 927/ 22.48.86 / Arsenio Sanchez, C.B., Cl Tornavacas 9, Plasencia, 927/<br />
41.11.21 / Radio Sanchez C.B., Av De Miajadas S/N, Trujillo, 927/ 32.06.88<br />
CADIZ: Jose Borja Y Jose Arana, Cl San Antonio 31, Algeciras, 956/ 66.60.53 / Galan Sat S.L., Cl Cruz Roja Española 11, Cadiz,<br />
956/ 20.14.17 / Fermafrio, Pz España 1, Cadiz, 956/ 28.10.82 / Novomam-Sat, Pol. Urbisur, Jorge Juan 4, Chiclana De La Frontera,<br />
956/ 40.12.09 / Electronica Y Climatizacion Jeda, Cl Divina Pastora E-1 L-4,5,6, Jerez La Frontera, 956/ 33.64.99 / Servitel, Cl<br />
Porvenir 11 Local, Jerez La Frontera, 956/ 33.76.55 / Electrogan, Cl Pagador 31, Pto. Sta. Maria, 956/ 87.07.05 / Galan Sat S.L., Cl<br />
Factoria Matagorda 52, Puerto Real, 956/ 83.35.35 / Rota Electrosur, Cl Malaga 11, Rota, 956/ 81.59.60<br />
CANTABRIA: Electronica Seyma, Cl Camilo Alonso Vega 48, Santander, 942/ 32.50.60<br />
CASTELLON: Electronica Maestrat, Ps Febrer Soriano 65, Benicarlo, 964/ 46.03.08 / Asiste, S.L., Av De Valencia Nave 19, Castellon,<br />
964/ 21.57.69 / Vensat Reparaciones, Cl Vinaros 24, Castellon, 964/ 20.57.12<br />
CEUTA: Pedro A. Carcaño Lopez, Cl Urano (Local 7), Ceuta, 956/ 50.43.99<br />
CIUDAD REAL: Tele-Nueva, Cl Campo 56, Tomelloso, 926/ 50.59.96 / Electronica Arellano, Cl Lorenzo Rivas 14, Alcazar De San<br />
Juan, 926/ 54.78.95 / Lara Technitel, Cl De La Jara 1, Ciudad Real, 926/ 21.17.87 / Satelec, Cl Libertad 13, Ciudad Real, 926/<br />
22.01.55 / Climatec, Cl Pozo 3 4º A, Puertollano, 652/ 79.03.60 / Angel Rodero Bellow, Cl Asturias 26, Tomelloso, 926/ 51.52.76<br />
/ Electrodiaz S.L., Cl Buensuceso 10, Valdepeñas, 926/ 32.23.24<br />
CORDOBA: Electronica Sales, Cl Andalucia 11, Aguilar Frontera, 957/ 66.09.04 / Dueñas Ca|As Teodoro, Cl Hermano Juan Fdez<br />
15, Cordoba, 957/ 26.35.06 / Cayro, Cl Hermano Juan Fdez. 15, Cordoba, 957/ 26.35.06 / Microm Electronica, Av Aeropuerto 2,<br />
Cordoba, 957/ 23.02.22 / Antonio Gonzalez Esquinas, Cl Gral Primo Rivera 61, Peñarroya, 957/ 57.10.50 / Serpriego S.L., Cl<br />
San Luis 4 Bjo. Izda., Priego De Cordoba, 957/ 54.15.11<br />
GIRONA: Reparaciones Pilsa S.C., Cl J. Pascual I Prats 8, Gerona, 972/ 20.66.96 / Feliu Canalias, Cl Major 26, Campdevanol,<br />
972/ 73.01.72 / Riera Daviu, Cl Torras Y Bages 19, Figueres, 972/ 50.32.64 / Satel, Ps De Barcelona 12, Olot, 972/ 26.55.19 /<br />
New Meresa, Cl Surera Bertran 23, Palafrugell, 972/ 30.44.54 / Arbe Servei, Av Pompeu Fabra 134, Palafrugell, 696/ 20.14.08<br />
GRANADA: Servicosta, Pz Dr. Alvarez Riosol 1, Almuñecar, 958/ 63.11.43 / Digimat Electronica, Av Jose De Mora 16, Baza, 958/ 70-04-<br />
52 / Electronica Wenceslao, Cl Fontiveros 42, Granada, 958/ 81.16.16 / Fermasa, Cl Azorin 7, Granada, 958/ 25.64.77 / Servigon, Cl<br />
Hospital De La Virgen 22, Granada, 958/ 20.52.81 / Electronica Vargun, C/.Mozart L-2 Ed.Granate, Granada, 958/ 26.06.01<br />
GUADALAJARA: Tecnicas Marvi S.L., Pz Capitan Boixareu 51, Guadalajara, 949/ 23.27.63 Ferreteria Toledano, Cl Ejercito 17 A,<br />
Guadalajara, 949/ 23.02.61<br />
GUIPUZCOA: Teknibat Electronica, Cl Zezenbide 4, Eibar, 943/ 70.24.37 / Estudios 3, C.B., Pz De Los Estudios 3, San Sebastian,<br />
943/ 45.37.97 / Reparaciones Urruti S.L., Ps Aintzieta 32, San Sebastian, 943/ 45.84.10<br />
HUELVA: Abril Sanchez Valentin, Cl Cadiz 2, Cala, 959/ 10.60.41 / Telejara, Pol. Polirrosa Cl-A Nave-27, Huelva, 959/ 22.60.74 /<br />
Telesonid Huelva, S.C.A., Cl Fco.Vazquez Limon 4, Huelva, 959/ 24.38.60 / Airsext Huelva, Ps De La Glorieta 6, Huelva, 959/<br />
22.88.13 / Electro Sur, Cl Alonso De Ercilla 23, Huelva, 959/ 29.06.15<br />
JAEN: Electronica Gonzalez, Corredera San Bartolome 11, Andujar, 953/ 50.33.82 / Electro Himega, S.A., Cl Adarves Bajos 4-C,<br />
Jaen, 953/ 24.22.56 / Uniservic Electronica, Cl Goya 1 Bjos, Ubeda, 953/ 75.14.19<br />
LA CORUÑA: Ramsat, Av Finisterre 117-B, Cee, 981/ 74.74.61 / Zener Electronica, Cl Ronda De Monte Alto 15, La Coruña, 981/<br />
22.07.00 / S.T. Mendez, Cl Gil Vicente 13, La Coruña, 981/ 27.52.52 / Bandin Audio, Cl Rua Arcos Moldes 2 B-3, Rianxo, 981/<br />
86.60.23 / Victor Perez Quintela, Cl Entrerios 35, Santiago De Compostela, 981/ 58.43.92<br />
LA RIOJA: Top Service, Cl Achutegui De Blas 17, Calahorra, 941/ 13.50.35 / Electronica Musand, Cl Rey Pastor 60-62, Logroño,<br />
941/ 22.84.52 / Aguado Sat, Cl Velez De Guevara 26 Bajo, Logroño, 941/ 25.25.53<br />
LEON: Prosat, Pz Doce Martires 5, Leon, 987/ 20.34.10 / Tecnyser Electro, Cl Relojero Losada 25, Leon, 987/ 22.77.87 / Asist.<br />
Tecnica Marcos, Cl Conde De Toreno 5, Leon, 987/ 20.01.01 / Domespa Bierzo, Cl Batalla De Lepanto 8, Ponferrada, 987/ 41.14.29<br />
LERIDA: Satef, Cl Sant Pelegri 54, Tarrega, 973/ 50.08.48 / Electronica Guirao, Cl Sant Pere Claver 16 B-2, Tarrega, 973/ 50.02.34 /<br />
Jordi Duro Fort, Cl Industria 6 3º 3ª, Tremp, 973/ 65.25.15<br />
LLEIDA: Ielsa Electronica, Cl Tarragona 15, Lleida, 973/ 24.71.27 / Cristel, Cl Vallcalent 32, Lleida, 973/ 27.08.26<br />
LUGO: Televexo S.L., Cl Nosa Sra. Do Carmen 82, Burela, 982/58.18.57 / Servicio Tecnico Pasfer, Av Arcadio Pardiñas 77, Burela,<br />
696/17.86.458 / Electronica Penelo, Cl Serra Gañidoira 63, Lugo, 982/ 21.47.43 / Electronica Fouces, Cl Benito Vicetto 34,<br />
Monforte De Lemos, 982/ 40.24.38<br />
175
8. R-26 Service Addresses 1/12/06 9:24 PM Page 143<br />
• ADDRESSES D’ENTRETIEN • ONDERHOUDSADRESSEN • DIRECCIONES DE SERVICIO • INDIRIZZI DI SERVIZIO •<br />
MADRID: Video Service Electronic, Cl Era Honda 9, Alcala De Henares, 91/ 880.27.87 / Variosat, S.L., Cl Isla De Corcega 24,<br />
Alcobendas, 91/ 662.04.68 / Ugenasa, Cl La Canaleja 4, Alcorcon, 91/ 611.52.51 / Electronica Barajas, Pz Del Jubilado 8, Barajas, 91/<br />
305.48.90 / Tec-Norte, Cl Santiago Apostol 5, Collado Villalba, 91/851.63.47 / Garman C.B., Cl Carlos Sole 38 Local, Madrid,<br />
91/380.33.49 / Electronica Garman, C.B., Cl Mandarina 15, Madrid, 91/ 368.01.79 / Electronica Ansar, Cl Tomasa Ruiz 4, Madrid, 91/<br />
460.47.45 / Elbeservi, S.A., Cl Dr.R. Castroviejo 19, Madrid, 91/ 386.27.11 / Cromadelta, Cl Alfonso Xii 31, Mostoles, 91/ 664.16.41<br />
MALAGA: Servisuel, Edif. La Union, Cm De Las Cañadas Lc 2, Fuengirola, 952/ 46.90.28 / Climaire Plus, Cl Guaro 4, Malaga, 95/<br />
234.50.36 / Electronica Garcia Campoy, Av Velazquez 5, Malaga, 952/ 32.00.77 / Electronica Bg, Cl Andalucia 2, San Pedro De<br />
Alcantara, 952/ 78.50.09 / Video Taller, S.C., Edif. La Noria B Bjos-5, Torre Del Mar, 952/ 54.23.95<br />
MELILLA: Sonitev, Cl Ejercito Español 3, Melilla, 952/ 68.30.80 / MURCIA: Reg., C.B., Cl Ramon Y Cajal 27, Cartagena, 968/<br />
51.00.06 / Caro Porlan Raimundo, Cl Jose Mouliaa 45, Lorca, 968/ 46.18.11 / J. Luis Haro Calvo, Cl La Seda 8 Edif. Las Terrazas,<br />
Lorca, 968/ 47.18.79 / Electroservicios Seba,C.B, Cl Isaac Albeniz 4 Bjos, Murcia, 968/ 29.85.93 / Visatel, Cl Torre Alvarez S/N,<br />
Murcia, 968/24.16.47 / Electro Servicios Plaza, Cl Gomez Cortina 10, Murcia, 968/ 28.45.67 / Angel Lopez Alcaraz, Cl Sierra Del<br />
Espartal 6 (Edif. Ana), Murcia, 968/ 29.39.10 / Rafael Gomez Yelo, Ps Corbera 17, Murcia, 968/ 26.14.67<br />
NAVARRA: A. T. Pamplona, Cl Julian Gayarre 1, Pamplona, 948/ 24.19.50 / Unitec, Cl Fuente Canonigos 5, Tudela, 948/ 82.74.34<br />
ORENSE: Fernandez Gonzalez Jose, Av Buenos Aires 75 Bjos, Orense, 988/ 23.48.53 / Antonio Rodriguez Alvarez, Cl Cabeza<br />
De Manzaneda 7, Orense, 988/ 22.40.98<br />
PALENCIA: Electronica Javier, Av Castilla 77, Palencia, 979/ 75.03.74 / Multiservicio Palencia, Cl Cardenal Cisneros 20, Palencia,<br />
979/ 74.53.80<br />
PAMPLONA: Electro Reparaciones 2000, Cl Monasterio Fitero 26, Pamplona, 948/ 26.79.12<br />
PONTEVEDRA: Imason, Cl Loureiro Crespo 43, Pontevedra, 986/ 84.16.36 / <strong>Central</strong> De Servicios, Cl Asturias (Bajo) 10, Vigo, 986/<br />
37.47.45 / Sial-Alvimo S.L., C/ C.Torrecedeira 92 Bjos, Vigo, 986/ 29.93.01 / Electronica Cambados, Cl Camilo Jose Cela 13,<br />
Vilagarcia Arousa, 986/ 50.83.27<br />
SALAMANCA: Almat Electronica, Cl Galileo 21, Salamanca, 923/ 22.45.08 / J. Daniel Martinez, Cl Abraham Lacut 11-15,<br />
Salamanca, 923/ 19.16.10<br />
SEGOVIA: Guijo S.T., Cl Teofilo Ayuso 2 Local, Segovia, 921/ 42.94.18<br />
SEVILLA: Electro 93 S.L., Cl Melliza 1, Dos Hermanas, 95/ 472.37.16 / Electronica Bersabe, Pasaje Merinos 62 A, Ecija, 95/<br />
483.33.93 / Electronica Guillen, Cl La Cilla 70, Osuna, 954/ 81.12.96 / Electronica Triana, Cl Evangelista 69-71 L-25, Sevilla, 95/<br />
433.83.03 / Telepal, Cl Julio Verne 49, Sevilla, 95/ 464.95.80 / Auvitel, S.L., Cl Virgen De Africa 20, Sevilla, 95/ 427.57.07 / Luis<br />
Rivas Caldas, Cl Febo 16, Sevilla, 95/ 451.73.55 / Intersat Sevilla, Cl Beethoven 5, Sevilla, 95/ 443.02.26 / Frilar, Pol. Indust.<br />
Navisa C/A 47, Sevilla, 95/ 492.14.44 / Televideo Nervion, Cl Juan Curiel 22, Sevilla, 95/ 458.10.66<br />
SORIA: Teco, Cl Antolin De Soria 10, Soria, 975/ 22.61.25<br />
TARRAGONA: Selecco S.L., Cl Calderon De La Barca 11, Amposta, 977/ 70.00.12 / Mañe Grifolls, Cl Jesus 21, Calafell, 977/<br />
69.04.39 / Tecno Serveis Mora, Cl Pau Picasso 1, Mora D'ebre, 977/ 40.08.83 / Euro Tecnics Electronica, Cl Lepanto 16-18, Reus,<br />
977/ 32.24.89 / Martorell Altes Francisco, Cl Roseta Mauri 10, Reus, 977/ 75.32.41 / Electronica Loguard, Cl Vapor Vell 17, Reus,<br />
977/ 32.38.04 / Electronica S. Torres, Cl Ernest Vilches 4-B L-2, Tarragona, 977/ 21.21.48 / Sertecs, S.C., Cl Caputxins (Bajos) 22,<br />
Tarragona, 977/ 22.18.51 / Electro Servei C.B., Ps Moreira 10, Tortosa, 977/ 51.04.42<br />
TERUEL: Electronica Alcañiz S.L., Cl Carmen 21, Alcañiz, 979/ 87.07.94 / Teleservicio Bajo Aragon, Cl Romualdo Soler 4, Alcañiz,<br />
978/ 87.08.10 / Alejandro Hernandez, Rb San Julian 59, Teruel, 978/ 60.85.51<br />
TOLEDO: Electro Anaya, Cl Vertedera Alta 14, Consuegra, 925/ 48.09.81 / Electronica Rivas, Cl Barrio San Juan 1, Talavera La Reina,<br />
925/ 80.55.46 / Electronica Fe-Car, S.L., Av Santa Barbara 30, Toledo, 925/ 21.21.45 / Electronica Jopal S.L., Av Santa Barbara<br />
S/N, Toledo, 925/ 25.04.42<br />
VALENCIA: Envisa Electronic, S.L., Cl General Espartero 9, Alzira, 96/ 241.24.87 / Tecno Hogar, Cl Dos De Mayo 41, Gandia, 96/<br />
286.53.35 / Electro Servis, Cl Grupo San Valero 4-6, Sueca, 96/ 170.38.50 / Frifonta, Cl Actor Llorens 3, Valencia, 96/ 369.92.66 /<br />
Servicios Electronicos, Cl Doctor Oloriz 3, Valencia, 96/ 340.20.34 / Antonio Monleon, S.L., Av De La Plata 91, Valencia, 96/ 334.55.87<br />
VALLADOLID: Electronica Vitelson, Pz Del Mercado 9, Medina Del Campo, 983/ 80.43.56 / Teleservicios, Cl Esgueva 6, Valladolid,<br />
983/ 30.92.61 / Asist. Tecnica Marcos, Cl Pio Del Rio Hortega 2-4, Valladolid, 983/ 29.78.66 / Jesus Alburquerque, Cl Vinos<br />
Ribera Del Duero 10, Valladolid, 983/ 24.62.26 / Teodoro Negro Hernandez, Glorieta Descubrimiento 4, Valladolid, 983/ 39.17.81<br />
VIZCAYA: Servitele, Cl Autonomia 24 Galerias, Bilbao, 94/ 444.89.02 / Negredo Martin Daniel, Cl Padre Pernet 8, Bilbao, 94/<br />
411.22.82 / Collantes Martin Onofre, Cl Ortuño De Alango 7, Portugalete, 94/ 483.21.22<br />
ZAMORA: R.T.V. Blanco, Cl Eduardo Julian Perez 9, Zamora, 980/ 51.14.41<br />
ZARAGOZA: Cinca Monterde Antonio, Cl Via Universitas 52, Zaragoza, 976/ 31.69.65 / Aragon Televideo, S.C., Cl Batalla<br />
Clavijo 18, Zaragoza, 976/ 32.97.12<br />
SWITZERLAND - http://www.sharp.ch<br />
<strong>Sharp</strong> Electronics AG, Langwiesenstrasse 7, CH-8108 Dällikon, +41 1 846 61 11<br />
SWEDEN - http://www.sharp.se<br />
Bild&Ljudservice, Roxviksgatan 8, 582 73 Linköping, 013-356250 / Jönköping Antenn & TV Service, Fridhemsvägen 20, 553 02<br />
Jönköping, 036-161690 / Tomi Elektronik, Svandammsplan 2, 126 47 Hägersten, 08-186170 / Tv Trim, St Pauligatan 37, 416 90<br />
Göteborg, 031-847200 / Tv-berg, Krusegatan 26, 212 25 Malmö, 040-188380<br />
NORWAY<br />
Service Eksperten, Trondheimsvn 436B, N-0962 Oslo, 22 90 19 30<br />
ICELAND<br />
Braedurnir Ormsson Ltd, PO box 8790, IS-128 Reykjavik, +354-5332800 / Hjolmtaekni Ehf, Skeifar, IS-108 Reykjavik, +354-5332150<br />
DENMARK<br />
Elektronik Centret, Literbuen 10A, DK2740 Skovlunde, 44 50 30 00<br />
SUOMI<br />
Oy Perkko, PL 40 Rälssintie 6, SF-00721 Helsinki, +35-8947805000 / Theho Video Oy, Niittyläntie 3, SF-0620 Helsinki, +35-891461500<br />
176
9. R-<strong>26ST</strong> Specifications 1/12/06 8:37 PM Page 2<br />
D<br />
TECHNISCHE DATEN<br />
D<br />
Stromversorgung<br />
Sicherung/Sicherungsautomat<br />
Leistungsaufnahme: Mikrowelle<br />
Leistungsabgabe: Mikrowelle<br />
Mikrowellenfrequenz<br />
Außenabmessungen<br />
Garraumabmessungen<br />
Garrauminhalt<br />
Drehteller<br />
Gewicht<br />
Garraumlampe<br />
: 230 V, 50 Hz, Einphasenstrom<br />
: Mindestens 10 A<br />
: 1,25 kW<br />
: 800 W (IEC 60705)<br />
: 2450 MHz*(Gruppe 2/Klasse B)<br />
: 460 mm (B) x 275 mm (H) x 380 mm (T)<br />
: 319 mm (B) x 211 mm (H) x 336 mm (T)**<br />
: 22 Liter**<br />
: ø 272mm<br />
: 12 kg<br />
: 25 W/240-250 V<br />
* Dieses Produkt erfüllt die Anforderungen des europäischen Standards EN55011.<br />
Das Produkt wird standardkonform als Gerät der Gruppe 2, Klasse B eingestuft.<br />
Gruppe 2 bedeutet, dass das Gerät zweckbestimmt hochfrequente Energie in Form elektromagnetischer Strahlen<br />
zur Wärmebehandlung von Lebensmitteln erzeugt.<br />
Gerät der Klasse B bedeutet, dass das Gerät für den Einsatz im häuslichen Bereich geeignet ist.<br />
** Der Garrauminhalt wird aus der max. gemessenen Breite, Tiefe und Höhe errechnet. Die tatsächliche<br />
Aufnahmekapazität von Lebensmitteln ist jedoch geringer.<br />
DIE TECHNISCHEN DATEN KÖNNEN JEDERZEIT OHNE ANGABE VON GRÜNDEN GEÄNDERT WERDEN, UM<br />
DEM TECHNISCHEN FORTSCHRITT RECHNUNG ZU TRAGEN.<br />
F<br />
FICHE TECHNIQUE<br />
F<br />
Tension d’alimentation<br />
Fusible/disjoncteur de protection<br />
Consommation électrique: Micro-ondes<br />
Puissance:<br />
Micro-ondes<br />
Fréquence des micro-ondes<br />
Dimensions extérieures<br />
Dimensions intérieures<br />
Capacité<br />
Plateau tournant<br />
Poids<br />
Eclairage de four<br />
: 230 V, 50 Hz, monophasé<br />
: 10 A minimum<br />
: 1,25 kW<br />
: 800 W (IEC 60705)<br />
: 2450 MHz*(Groupe 2/Classe B)<br />
: 460 mm (W) x 275 mm (H) x 380 mm (D)<br />
: 319 mm (W) x 211 mm (H) x 336 mm (D)**<br />
: 22 litres**<br />
: ø 272mm<br />
: 12 kg<br />
: 25 W/240-250 V<br />
* Ce produit répond aux exigences de la norme européenne EN55011.<br />
Conformément à cette norme, ce produit est un équipement de groupe 2, classe B.<br />
Groupe 2 signifie que cet équipement génère volontairement de l'énergie RF sous forme de rayonnement<br />
électromagnétique pour le traitement thermique d'aliments.<br />
Classe B signifie que l'équipement est adapté à une utilisation domestique.<br />
** La capacité intérieure est calculée en multipliant la largeur, la profondeur et la hauteur maximales. La contenance<br />
réelle pour les aliments est inférieure à celle-ci.<br />
LES SPECIFICATIONS PEUVENT ETRE CHANGEES SANS PREAVIS LORS D’AMELIORATIONS APPORTEES A L’APPAREIL.<br />
177
9. R-<strong>26ST</strong> Specifications 1/12/06 8:37 PM Page 3<br />
NL<br />
TECHNISCHE GEGEVENS<br />
NL<br />
Wisselstroom<br />
Zekering/circuitonderbreker<br />
Stroombenodigdheid: Magnetron<br />
Uitvoermogen<br />
Magnetron<br />
Magnetronfrequentie<br />
Afmetingen buitenkant<br />
Afmetingen binnenkant<br />
Ovencapaciteit<br />
Draaitafel<br />
Gewicht<br />
Ovenlampje<br />
: 230 V, 50 Hz, enkele fase<br />
: Minimum 10 A<br />
: 1,25 kW<br />
: 800 W (IEC 60705)<br />
: 2450 MHz*(Groep 2/Klasse B)<br />
: 460 mm (B) x 275 mm (H) x 380 mm (D)<br />
: 319 mm (B) x 211 mm (H) x 336 mm (D)**<br />
: 22 liter**<br />
: ø 272mm<br />
: 12 kg<br />
: 25 W/240-250 V<br />
* Dit product voldoet aan de eisen van de <strong>Europe</strong>se norm EN55011.<br />
Volgens deze norm is dit product geclassificeerd als groep 2 klasse B apparatuur.<br />
Groep 2 betekent dat het de bedoeling is dat dit apparaat radiofrequentie-energie genereert in de vorm van<br />
elektromagnetische straling voor het verhitten van voedsel.<br />
Klasse B betekent dat het apparaat geschikt is voor huishoudelijk gebruik.<br />
** De inhoud wordt berekend door het meten van de maximum breedte, hoogte en diepte van het apparaat. Het<br />
actuele inhoudsvermogen voor spijzen is geringer.<br />
DOOR CONTINUE VERBETERINGEN KUNNEN SPECIFICATIES ZONDER AANKONDIGING VERANDEREN.<br />
I<br />
DATI TECNICI<br />
I<br />
Tensione di linea CA<br />
Fusibile linea distribuzione/interruttore automatico<br />
Tensione di alimentazione: Microonde<br />
Potenza erogata: Microonde<br />
Frequenza microonde<br />
Dimensioni esterne<br />
Dimensioni cavità<br />
Capacità forno<br />
Piatto rotante<br />
Peso<br />
Lampada forno<br />
: 230 V, 50 Hz, monofase<br />
: 10 A minimo<br />
: 1,25 kW<br />
: 800 W (IEC 60705)<br />
: 2450 MHz*(Gruppo 2/Classe B)<br />
: 460 mm (L) x 275 mm (A) x 380 mm (P)<br />
: 319 mm (L) x 211 mm (A) x 336 mm (P)**<br />
: 22 litri**<br />
: ø 272 mm<br />
: 12 kg<br />
: 25 W/240-250 V<br />
* Il Prodotto soddisfa i requisiti della norma europea EN55011.<br />
In conformità a tale norma, questo prodotto è classificato come apparecchiatura appartenente al gruppo 2 classe B.<br />
Gruppo 2 significa che l'apparecchiatura genera energia in frequenza radio sotto forma di radiazioni<br />
elettromagnetiche per il riscaldamento dei cibi.<br />
Apparecchiatura di Classe B significa che l'apparecchiatura può essere utilizzata in ambienti domestici.<br />
** La capacità interna è calcolata misurando la larghezza, profondità e altezza massima. Lo spazio a disposizione per<br />
gli alimenti è inferiore e dipende dagli accessori inseriti.<br />
NEL QUADRO DELLA NOSTRA POLITICA DI MIGLIORAMENTO CONTINUO, LE SPECIFICHE TECNICHE POSSONO<br />
ESSERE MODIFICATE SENZA COMUNICAZIONE PREVENTIVA.<br />
178
9. R-<strong>26ST</strong> Specifications 1/12/06 8:37 PM Page 4<br />
E<br />
DATOS TÉCNICOS<br />
E<br />
Tensión de CA<br />
Fusible/disyuntor de fase<br />
Requisitos potencia de CA: Microondas<br />
Potencia de salida: Microondas<br />
Frecuencia microondas<br />
Dimensiones exteriores<br />
Dimensiones interiores<br />
Capacidad del horno<br />
Plato giratorio<br />
Peso<br />
Lámpara del horno<br />
: 230 V, 50 Hz, monofásica<br />
: Mínimo 10 A<br />
: 1,25 kW<br />
: 800 W (IEC 60705)<br />
: 2450 MHz*(Grupo 2/Clase B)<br />
: 460 mm (An) x 275 mm (Al) x 380 mm (P)<br />
: 319 mm (An) x 211 mm (Al) x 336 mm (P)**<br />
: 22 litros**<br />
: ø 272 mm<br />
: 12 kg<br />
: 25 W/240-250 V<br />
* Este Producto cumple el requisito de la norma europea EN55011.<br />
De acuerdo con dicha norma, este producto está clasificado como equipamiento del grupo 2, clase B.<br />
El grupo 2 significa que el equipamiento genera intencionadamente energía por radiofrecuencia en forma de<br />
radiación electromagnética para el tratamiento por calentamiento de alimentos.<br />
La clase B significa que el equipamiento resulta adecuado para su uso en establecimientos domésticos.<br />
** La capacidad interna se calcula midiendoa el máximo de ancho, alto y profundo. La capacidad de cabida de<br />
alimentos es menor.<br />
LAS CARACTERÍSTICAS TÉCNICAS PUEDEN CAMBIAR SIN PREVIO AVISO AL IR INTRODUCIÉNDOSE MEJORAS EN<br />
EL APARATO.<br />
<strong>GB</strong><br />
SPECIFICATIONS<br />
<strong>GB</strong><br />
AC Line Voltage<br />
Distribution line fuse/circuit breaker<br />
AC Power required: Microwave<br />
Output power:<br />
Microwave<br />
Microwave Frequency<br />
Outside Dimensions<br />
Cavity Dimensions<br />
Oven Capacity<br />
Turntable<br />
Weight<br />
Oven lamp<br />
: 230 V, 50 Hz, single phase<br />
: Minimum 10 A<br />
: 1.25 kW<br />
: 800 W (IEC 60705)<br />
: 2450 MHz*(Group 2/Class B)<br />
: 460 mm(W) x 275 mm(H) x 380 mm(D)<br />
: 319 mm(W) x 211 mm(H) x 336 mm(D)**<br />
: 22 litres**<br />
: ø 272 mm<br />
: approx. 12 kg<br />
: 25 W/240-250 V<br />
* This Product fulfils the requirement of the <strong>Europe</strong>an standard EN55011.<br />
In conformity with this standard, this product is classified as group 2 class B equipment.<br />
Group 2 means that the equipment intentionally generates radio-frequency energy in the form of electromagnetic radiation for<br />
the heat treatment of food.<br />
Class B equipment means that the equipment is suitable to be used in domestic establishments.<br />
** Internal capacity is calculated by measuring maximum width, depth and height. Actual capacity for holding food is less.<br />
AS PART OF A POLICY OF CONTINUOUS IMPROVEMENT, WE RESERVE THE RIGHT TO ALTER DESIGN AND<br />
SPECIFICATIONS WITHOUT NOTICE.<br />
179
9. R-<strong>26ST</strong> Specifications 1/12/06 8:37 PM Page 5<br />
SHARP ELECTRONICS (<strong>Europe</strong>) GmbH<br />
Sonninstraße 3, D-20097 Hamburg<br />
TINSZA149WRRZ-H61<br />
Gedruckt in Thailand<br />
Imprimé au Thaïlande<br />
Gedrukt in Thailand<br />
Stampato in Tailandia<br />
Impreso en Tailandia<br />
Printed in Thailand<br />
5