

EBV-200-A Installation Instructions - Sloan Valve Company
EBV-200-A Installation Instructions - Sloan Valve Company
EBV-200-A Installation Instructions - Sloan Valve Company

Create successful ePaper yourself
Turn your PDF publications into a flip-book with our unique Google optimized e-Paper software.
Code No. 0816556<br />
Rev. 0b (07/07)<br />
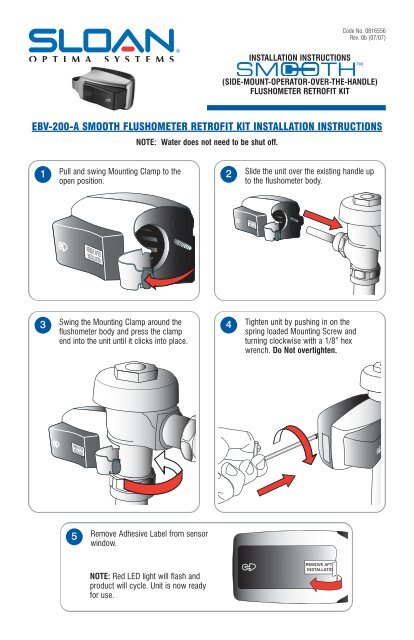
INSTALLATION INSTRUCTIONS<br />
(SIDE-MOUNT-OPERATOR-OVER-THE-HANDLE)<br />
FLUSHOMETER RETROFIT KIT<br />
<strong>EBV</strong>-<strong>200</strong>-A SMOOTH FLUSHOMETER RETROFIT KIT INSTALLATION INSTRUCTIONS<br />
NOTE: Water does not need to be shut off.<br />
1 Pull and swing Mounting Clamp to the<br />
open position.<br />
2 Slide the unit over the existing handle up<br />
to the flushometer body.<br />
3 Swing the Mounting Clamp around the<br />
flushometer body and press the clamp<br />
end into the unit until it clicks into place.<br />
4 Tighten unit by pushing in on the<br />
spring loaded Mounting Screw and<br />
turning clockwise with a 1/8” hex<br />
wrench. Do Not overtighten.<br />
5 Remove Adhesive Label from sensor<br />
window.<br />
NOTE: Red LED light will flash and<br />
product will cycle. Unit is now ready<br />
for use.
OPERATION<br />
NORMAL OPERATION<br />
LOW BATTERY INDICATOR<br />
When a user enters the sensor's effective range,<br />
the Red LED light in the sensor window flashes for<br />
eight seconds. After eight seconds of sensing a<br />
user, the light will stop flashing and the unit waits<br />
for the user to step away before initiating a flush<br />
cycle.<br />
When a user enters the sensor’s effective range<br />
and the Red LED light in the sensor window<br />
flashes twice as fast as normal, the batteries need<br />
replacement. Refer to the Battery Replacement<br />
<strong>Instructions</strong> on Page 4.<br />
INITIATING A MANUAL FLUSH CYCLE<br />
A manual flush cycle may be initiated by fully<br />
pressing and releasing the Override Handle.<br />
2
ADJUSTMENT PROCEDURES<br />
The SMOOTH unit is factory set with a Sentinel Flush Feature. This Feature will activate the flushometer once<br />
every 72 hours with no activity, to maintain the water seal in the fixture and conserve water. There should be no<br />
need for further adjustments; however, if an adjustment is required, refer to the following instructions.<br />
Note: To make the adjustments indicated below, power to unit(s) must be turned off for ten (10) seconds.<br />
Mode selection is available within one (1) hour after every power up condition (reinstalling batteries).<br />
RESETTING UNIT TO NORMAL RANGE<br />
(Water Closets)<br />
Mode A<br />
The SMOOTH unit may be reset to normal range<br />
by fully pressing and holding in the Override<br />
Handle until the Red LED light in the Sensor<br />
Window illuminates. Then immediately release the<br />
Override Handle.<br />
SETTING UNIT FOR REDUCED RANGE<br />
(Water Closets)<br />
Mode B<br />
The SMOOTH unit may be set to reduced range<br />
for closet applications by pressing and holding in<br />
the Override Handle until the Red LED light in the<br />
Sensor Window flashes a slow long blinking light.<br />
Then immediately release the Override Handle.<br />
SETTING UNIT TO REDUCED RANGE<br />
(Typically for Urinals)<br />
Mode C<br />
The SMOOTH unit may be set to reduced range by<br />
pressing and holding in the Override Handle until<br />
the Red LED light in the Sensor Window displays<br />
a rapid on and off blinking light. Then immediately<br />
release the Override Handle.<br />
3
MAINTENANCE PROCEDURES<br />
BATTERY REPLACEMENT INSTRUCTIONS<br />
NOTE: Water does not need to be shut off.<br />
1 Release Mounting Clamp by turning<br />
the Mounting Screw counterclockwise<br />
with a 1/8” hex wrench.<br />
2 Swing the Mounting Clamp into the open<br />
position.<br />
3 Slide the unit from the flushometer body.<br />
4 Open Battery Compartment Door and<br />
remove old batteries from unit. Replace<br />
batteries with 4 (four) new C-size<br />
batteries. Close Battery Compartment<br />
Door. Reinstall unit as instructed on front<br />
page.<br />
NOTICE: The information contained in this document is subject to change without notice.<br />
If further assistance is required, please contact the <strong>Sloan</strong> <strong>Valve</strong> <strong>Company</strong> <strong>Installation</strong> Engineering Department at:<br />
1-888-SLOAN-14 (1-888-756-2614)<br />
LIMITED WARRANTY<br />
<strong>Sloan</strong> <strong>Valve</strong> <strong>Company</strong> warrants its OPTIMA SMOOTH <strong>EBV</strong>-<strong>200</strong>-A unit to be made of first class materials, free from defects of material or workmanship<br />
under normal use and to perform the service for which it is intended in a thoroughly reliable and efficient manner when properly installed and serviced, for<br />
a period of three years from date of purchase. During this period, <strong>Sloan</strong> <strong>Valve</strong> <strong>Company</strong> will, at its option, repair or replace any part or parts which prove<br />
to be thus defective if returned to <strong>Sloan</strong> <strong>Valve</strong> <strong>Company</strong>, at customer’s cost, and this shall be the sole remedy available under this warranty. No claims will<br />
be allowed for labor, transportation or other incidental costs. This warranty extends only to persons or organizations who purchase <strong>Sloan</strong> <strong>Valve</strong> <strong>Company</strong>’s<br />
products directly from <strong>Sloan</strong> <strong>Valve</strong> <strong>Company</strong> for purpose of resale. This warranty does not cover the life of the batteries.<br />
THERE ARE NO WARRANTIES WHICH EXTEND BEYOND THE DESCRIPTION ON THE FACE HEREOF. IN NO EVENT IS SLOAN VALVE COMPANY<br />
RESPONSIBLE FOR ANY CONSEQUENTIAL DAMAGES OF ANY MEASURE WHATSOEVER.<br />
SLOAN VALVE COMPANY • 10500 Seymour Avenue • Franklin Park, IL 60131<br />
Phone: 1-800-9-VALVE-9 or 1-847-671-4300 • Fax: 1-800-447-8329 or 1-847-671-4380<br />
www.sloanvalve.com<br />
Copyright © <strong>200</strong>7 SLOAN VALVE COMPANY<br />
07-07


