Optima Plus Flushometer Maintenance Guide - Sloan Valve Company
Optima Plus Flushometer Maintenance Guide - Sloan Valve Company
Optima Plus Flushometer Maintenance Guide - Sloan Valve Company
You also want an ePaper? Increase the reach of your titles
YUMPU automatically turns print PDFs into web optimized ePapers that Google loves.
Repair Parts and <strong>Maintenance</strong> <strong>Guide</strong><br />
<strong>Optima</strong> <strong>Plus</strong> ® <strong>Sloan</strong> <strong>Flushometer</strong> <br />
Sensor<br />
<strong>Flushometer</strong>s<br />
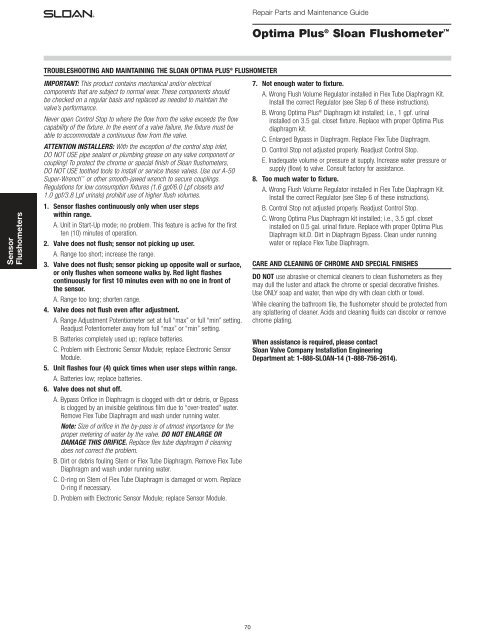
TROUBLESHOOTING AND MAINTAINING THE SLOAN OPTIMA PLUS ® FLUSHOMETER<br />
IMPORTANT: This product contains mechanical and/or electrical<br />
components that are subject to normal wear. These components should<br />
be checked on a regular basis and replaced as needed to maintain the<br />
valve’s performance.<br />
Never open Control Stop to where the flow from the valve exceeds the flow<br />
capability of the fixture. In the event of a valve failure, the fixture must be<br />
able to accommodate a continuous flow from the valve.<br />
ATTENTION INSTALLERS: With the exception of the control stop inlet,<br />
DO NOT USE pipe sealant or plumbing grease on any valve component or<br />
coupling! To protect the chrome or special finish of <strong>Sloan</strong> flushometers,<br />
DO NOT USE toothed tools to install or service these valves. Use our A-50<br />
Super-Wrench or other smooth-jawed wrench to secure couplings.<br />
Regulations for low consumption fixtures (1.6 gpf/6.0 Lpf closets and<br />
1.0 gpf/3.8 Lpf urinals) prohibit use of higher flush volumes.<br />
1. Sensor flashes continuously only when user steps<br />
within range.<br />
A. Unit in Start-Up mode; no problem. This feature is active for the first<br />
ten (10) minutes of operation.<br />
2. <strong>Valve</strong> does not flush; sensor not picking up user.<br />
A. Range too short; increase the range.<br />
3. <strong>Valve</strong> does not flush; sensor picking up opposite wall or surface,<br />
or only flushes when someone walks by. Red light flashes<br />
continuously for first 10 minutes even with no one in front of<br />
the sensor.<br />
A. Range too long; shorten range.<br />
4. <strong>Valve</strong> does not flush even after adjustment.<br />
A. Range Adjustment Potentiometer set at full “max” or full “min” setting.<br />
Readjust Potentiometer away from full “max” or “min” setting.<br />
B. Batteries completely used up; replace batteries.<br />
C. Problem with Electronic Sensor Module; replace Electronic Sensor<br />
Module.<br />
5. Unit flashes four (4) quick times when user steps within range.<br />
A. Batteries low; replace batteries.<br />
6. <strong>Valve</strong> does not shut off.<br />
A. Bypass Orifice in Diaphragm is clogged with dirt or debris, or Bypass<br />
is clogged by an invisible gelatinous film due to “over-treated” water.<br />
Remove Flex Tube Diaphragm and wash under running water.<br />
Note: Size of orifice in the by-pass is of utmost importance for the<br />
proper metering of water by the valve. DO NOT ENLARGE OR<br />
DAMAGE THIS ORIFICE. Replace flex tube diaphragm if cleaning<br />
does not correct the problem.<br />
B. Dirt or debris fouling Stem or Flex Tube Diaphragm. Remove Flex Tube<br />
Diaphragm and wash under running water.<br />
C. O-ring on Stem of Flex Tube Diaphragm is damaged or worn. Replace<br />
O-ring if necessary.<br />
D. Problem with Electronic Sensor Module; replace Sensor Module.<br />
7. Not enough water to fixture.<br />
A. Wrong Flush Volume Regulator installed in Flex Tube Diaphragm Kit.<br />
Install the correct Regulator (see Step 6 of these instructions).<br />
B. Wrong <strong>Optima</strong> <strong>Plus</strong> ® Diaphragm kit installed; i.e., 1 gpf. urinal<br />
installed on 3.5 gal. closet fixture. Replace with proper <strong>Optima</strong> <strong>Plus</strong><br />
diaphragm kit.<br />
C. Enlarged Bypass in Diaphragm. Replace Flex Tube Diaphragm.<br />
D. Control Stop not adjusted properly. Readjust Control Stop.<br />
E. Inadequate volume or pressure at supply. Increase water pressure or<br />
supply (flow) to valve. Consult factory for assistance.<br />
8. Too much water to fixture.<br />
A. Wrong Flush Volume Regulator installed in Flex Tube Diaphragm Kit.<br />
Install the correct Regulator (see Step 6 of these instructions).<br />
B. Control Stop not adjusted properly. Readjust Control Stop.<br />
C. Wrong <strong>Optima</strong> <strong>Plus</strong> Diaphragm kit installed; i.e., 3.5 gpf. closet<br />
installed on 0.5 gal. urinal fixture. Replace with proper <strong>Optima</strong> <strong>Plus</strong><br />
Diaphragm kit.D. Dirt in Diaphragm Bypass. Clean under running<br />
water or replace Flex Tube Diaphragm.<br />
CARE AND CLEANING OF CHROME AND SPECIAL FINISHES<br />
DO NOT use abrasive or chemical cleaners to clean flushometers as they<br />
may dull the luster and attack the chrome or special decorative finishes.<br />
Use ONLY soap and water, then wipe dry with clean cloth or towel.<br />
While cleaning the bathroom tile, the flushometer should be protected from<br />
any splattering of cleaner. Acids and cleaning fluids can discolor or remove<br />
chrome plating.<br />
When assistance is required, please contact<br />
<strong>Sloan</strong> <strong>Valve</strong> <strong>Company</strong> Installation Engineering<br />
Department at: 1-888-SLOAN-14 (1-888-756-2614).<br />
70


