Showerheads, Parts and Accessories Section - Sloan Valve Company
Showerheads, Parts and Accessories Section - Sloan Valve Company
Showerheads, Parts and Accessories Section - Sloan Valve Company

You also want an ePaper? Increase the reach of your titles
YUMPU automatically turns print PDFs into web optimized ePapers that Google loves.
Repair <strong>Parts</strong> <strong>and</strong> Maintenance Guide<br />
Vacuum Breaker Trap Primer<br />
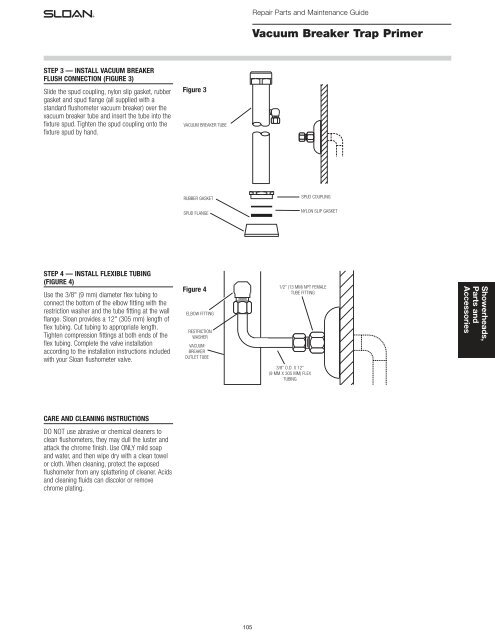
STEP 3 — INSTALL VACUUM BREAKER<br />
FLUSH CONNECTION (FIGURE 3)<br />
Slide the spud coupling, nylon slip gasket, rubber<br />
gasket <strong>and</strong> spud flange (all supplied with a<br />
st<strong>and</strong>ard flushometer vacuum breaker) over the<br />
vacuum breaker tube <strong>and</strong> insert the tube into the<br />
fixture spud. Tighten the spud coupling onto the<br />
fixture spud by h<strong>and</strong>.<br />
Figure 3<br />
VACUUM BREAKER TUBE<br />
RUBBER GASKET<br />
SPUD COUPLING<br />
SPUD FLANGE<br />
NYLON SLIP GASKET<br />
STEP 4 — INSTALL FLEXIBLE TUBING<br />
(FIGURE 4)<br />
Use the 3/8" (9 mm) diameter flex tubing to<br />
connect the bottom of the elbow fitting with the<br />
restriction washer <strong>and</strong> the tube fitting at the wall<br />
flange. <strong>Sloan</strong> provides a 12" (305 mm) length of<br />
flex tubing. Cut tubing to appropriate length.<br />
Tighten compression fittings at both ends of the<br />
flex tubing. Complete the valve installation<br />
according to the installation instructions included<br />
with your <strong>Sloan</strong> flushometer valve.<br />
Figure 4<br />
ELBOW FITTING<br />
RESTRICTION<br />
WASHER<br />
VACUUM<br />
BREAKER<br />
OUTLET TUBE<br />
1/2” (13 MM) NPT FEMALE<br />
TUBE FITTING<br />
3/8” O.D. X 12”<br />
(9 MM X 305 MM) FLEX<br />
TUBING<br />
<strong>Showerheads</strong>,<br />
<strong>Parts</strong> <strong>and</strong><br />
<strong>Accessories</strong><br />
CARE AND CLEANING INSTRUCTIONS<br />
DO NOT use abrasive or chemical cleaners to<br />
clean flushometers, they may dull the luster <strong>and</strong><br />
attack the chrome finish. Use ONLY mild soap<br />
<strong>and</strong> water, <strong>and</strong> then wipe dry with a clean towel<br />
or cloth. When cleaning, protect the exposed<br />
flushometer from any splattering of cleaner. Acids<br />
<strong>and</strong> cleaning fluids can discolor or remove<br />
chrome plating.<br />
105