MS magnetic scale installation guide for LM10 ... - Resource Centre
MS magnetic scale installation guide for LM10 ... - Resource Centre
MS magnetic scale installation guide for LM10 ... - Resource Centre

Create successful ePaper yourself
Turn your PDF publications into a flip-book with our unique Google optimized e-Paper software.
Installation <strong>guide</strong><br />
<strong>LM10</strong>D02_05<br />
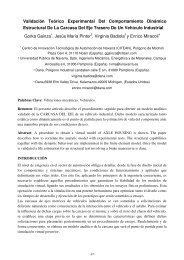
Scale and end clamp <strong>installation</strong> drawing<br />
Hole to hole distance 1<br />
Scale length<br />
Measuring length 2<br />
3.5 ±0.5<br />
Positive counting<br />
10 ±0.2<br />
End clamp<br />
10<br />
Min. distance<br />
of Ri from<br />
left edge<br />
Position of reference mark<br />
<strong>MS</strong>10B/WWYYBB-2000<br />
Cut or magnetised<br />
reference mark (Ri)<br />
3 ±0.5 End clamp<br />
10<br />
Min. distance<br />
of Ri from<br />
right edge<br />
Hole <strong>for</strong> M2.5 × 6<br />
screws<br />
End clamp<br />
1.5 ±0.2<br />
6<br />
Mounting<br />
surface<br />
3.5 ±0.5<br />
Scale length<br />
1<br />
Hole to hole distance = <strong>scale</strong> length + 6 ±1 mm<br />
2<br />
Measuring length = <strong>scale</strong> length - 17 mm<br />
4. Load the <strong>scale</strong> into the applicator tool<br />
Separate the backing paper from the first 40 mm of <strong>scale</strong> and feed it into<br />
the applicator tool.<br />
Push the <strong>scale</strong> carefully through to the end of <strong>scale</strong> mark, ensuring that<br />
it does not stick to the mounting surface until it is in position.<br />
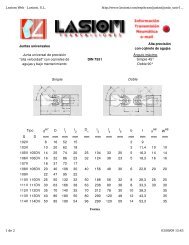
10. Apply the stick-on reference mark (if used)<br />
Place the <strong>LM10</strong>ARM00 reference mark applicator tool on <strong>scale</strong> in the correct<br />
orientation/required position along the length (Figure 5).<br />
Figure 5<br />
NOTE: To prevent the <strong>scale</strong> sticking to the mounting surface during this<br />
operation it may be necessary to re-apply approximately 20 mm<br />
of backing paper to the end of the <strong>scale</strong> be<strong>for</strong>e inserting through<br />
<strong>scale</strong> <strong>guide</strong>.<br />
Self-aligning<br />
reference mark<br />
applicator tool<br />
Magnetic <strong>scale</strong><br />
Attach the end of the <strong>scale</strong> to the mounting surface with light finger<br />
pressure.<br />
5. Apply the <strong>scale</strong><br />
Traverse the axis through its full travel at a slow, steady speed.While<br />
moving the axis:<br />
●● Apply a light finger pressure to the <strong>scale</strong> behind the applicator tool<br />
to attach it to the mounting surface.<br />
●● Gently pull the backing paper away from in front of the applicator<br />
tool as it is separated.<br />
6. Remove the applicator tool<br />
When the applicator tool has reached the limit of its travel, lock it in place<br />
and unbolt it from the readhead mounting bracket.<br />
7. Ensure complete adhesion<br />
Apply firm finger pressure along the full length of the <strong>scale</strong> from the<br />
centre outwards to each end.<br />
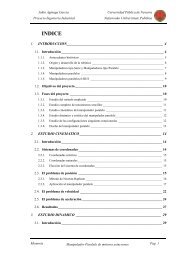
8. Install the end clamps (if used)<br />
Use the enclosed screws and screw the end clamps ensuring the end of<br />
<strong>magnetic</strong> <strong>scale</strong> is held under the clamp (Figure 4).<br />
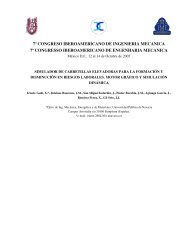
11. Stick the reference mark on the <strong>scale</strong><br />
Remove the backing tape from the reference mark sticker and carefully attach it to<br />
the surface of the <strong>scale</strong> by placing it next to the applicator tool (Figure 6).<br />
NOTE: The correct orientation of reference mark is crucial. The mark on the<br />
sticker should be on the same side as the reference mark designators.<br />
Figure 6<br />
Reference mark<br />
designator<br />
Reference<br />
mark sticker<br />
Figure 4<br />
Ø2.6<br />
12. Remove the stick-on reference mark applicator tool<br />
Remove the applicator tool leaving the reference mark sticker in the desired<br />
position (Figure 7).<br />
3.5 ±0.5<br />
Figure 7<br />
10<br />
9. Apply cover foil (if used)<br />
Degrease the <strong>scale</strong> surface with alcohol and install as per <strong>scale</strong><br />
<strong>installation</strong> instructions in step 3 onwards.<br />
DO NOT remove the <strong>scale</strong> <strong>for</strong> refitting or use elsewhere once it has been<br />
applied to the mounting surface. The <strong>scale</strong> can be applied once only.