Country Cuisine Kitchen Ensemble - RJR Fabrics
Country Cuisine Kitchen Ensemble - RJR Fabrics
Country Cuisine Kitchen Ensemble - RJR Fabrics

Create successful ePaper yourself
Turn your PDF publications into a flip-book with our unique Google optimized e-Paper software.
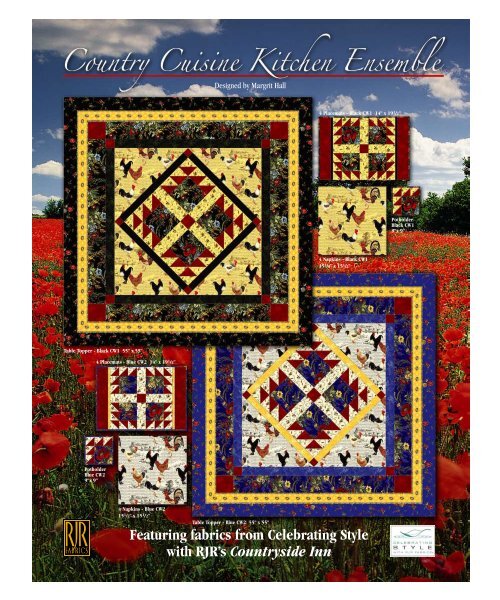
Designed by Margrit Hall<br />
4 Placemats - Black CW1 14" x 19 1 /2"<br />
Potholder<br />
Black CW1<br />
9"x 9"<br />
4 Napkins - Black CW1<br />
15 1 /2" x 15 1 /2"<br />
Table Topper - Black CW1 55" x 55"<br />
4 Placemats - Blue CW2 14" x 19 1 /2"<br />
Potholder<br />
Blue CW2<br />
9"x 9"<br />
4 Napkins - Blue CW2<br />
15 1 /2" x 15 1 /2"<br />
Table Topper - Blue CW2 55" x 55"<br />
Featuring fabrics from Celebrating Style<br />
with <strong>RJR</strong>’s <strong>Country</strong>side Inn
Finished Quilt Size 55" x 55"<br />
PLEASE READ THE PATTERN CAREFULLY BEFORE YOU BEGIN.<br />
All Seams are 1 /4" – All strips are cut the width of fabric (WOF) except the border print. Carefully trim all selvages.<br />
Fabric Requirements and Cutting Instructions<br />
Style # Style #<br />
Fabric # Black Description Blue Description Yardage Cutting Directions<br />
Colorway<br />
Colorway<br />
1 5766-3 Small Yellow Floral 5766-2 Small White Floral 3/8 yd<br />
2 5768-2 Red 5768-2 Red 3/8 yd<br />
3 5760-1 Large Black Floral 5760-3 Large Blue Floral 7/8 yd<br />
Cut 1 strip 3" wide.<br />
Cut into 4 rectangles 3" x 9 1 /2".<br />
Cut 1 strip 4 1 /8" wide. Cut into 10<br />
squares 4 1 /8" x 4 1 /8".<br />
Cut 1 strip 4 1 /8" wide. Cut into 10<br />
squares 4 1 /8" x 4 1 /8".<br />
Cut 1 strip 4 1 /2" wide. Cut into 4<br />
squares 4 1 /2" x 4 1 /2". Cut the<br />
remainder of the strip down to<br />
measure 3" wide. Cut 1 square 3" x<br />
3". Cut the remainder of the strip<br />
down to measure 2 1 /2" wide. Cut<br />
into 4 squares<br />
2 1 /2" x 2 1 /2". Cut the remainder of<br />
the strip down to measure 1 1 /2"<br />
wide. Cut 4 squares 1 1 /2" x 1 1 /2".<br />
Cut 1 strip 6 1 /2" wide. Cut into 4<br />
squares 6 1 /2" x 6 1 /2".<br />
Cut 4 strips 4 1 /2" wide for the 2nd<br />
border.<br />
Cut 2 strips 1 1 /2" wide. Cut each<br />
4 5748-5 Black 5768-3 Yellow 1/4 yd strip into 2 rectangles 1 1 /2" x 21" for<br />
a total of 4 rectangles 1 1 /2" x 21".<br />
5 5759-2 Yellow Chicken Print 5759-1 White Chicken Print 5/8 yd<br />
Cut 1 strip 16 7 /8" wide. Cut into 2<br />
squares 16 7 /8" x 16 7 /8".<br />
Cut once on the diagonal<br />
to make 4 triangles.<br />
6 5768-1 Dark Green Print 5768-4 Blue Print 1/2 yd Cut 4 strips 2 1 /2" wide.<br />
Center the design motif and cutting<br />
7 5763-2 Yellow Border Print 5763-2 Yellow Border Print 1 5 /8 yds lengthwise cut 4 strips 3" wide by<br />
56" long. (3rd Border)<br />
8 5764-1 Small Black Floral 5764-2 Small Blue Floral 1 1 /4 yds<br />
Cut 6 strips 3 1 /2" wide.<br />
Cut 7 strips 2 1 /4" wide (Binding)<br />
Center Block Construction<br />
1. Draw a diagonal line across the wrong side of<br />
all the 4 1 /8" x 4 1 /8" squares of Fabric #1.<br />
Do Not Cut.<br />
2. Place 10 Fabric #1 squares, right sides together,<br />
Center Block Construction Illustration with 10 4 1 /8"<br />
Fabric #2 squares. Sew a scant 1 /4" away form both sides<br />
of the diagonal line. Cut on the diagonal line. Open the<br />
square and press seams open. There will be a total of 20<br />
half square triangle units. Place the 3 1 /2" Template A<br />
square on top of each half square triangle unit. Make sure<br />
the diagonal line of the template is centered on the<br />
diagonal seam and trim the unit to measure 31/2" square.
Sew print print<br />
red red<br />
Trim<br />
Tablecloth Center Construction<br />
1. Sew a 1 1 /2" x 21" Fabric #4 black strip to the top and<br />
bottom of the center block.<br />
Cut Make 20<br />
3. Layout block and sew together as illustrated. (see table<br />
topper pictured for color reference) Press all seams open.<br />
2. Sew a 1 1 /2" x 1 1 /2" Fabric #2 red square to each end<br />
of the 2 remaining 1 1 /2" x 21" Fabric # 4 strips,<br />
Make 4<br />
Unit A<br />
Make 4 Make 4<br />
Make 4<br />
3. Sew a 16 7 /8" Fabric #5 triangle to opposite sides of unit<br />
A. Sew a 16 7 /8" Fabric #5 triangle to the two remaining<br />
sides of unit A to make the tablecloth center.<br />
3" x 9 1 /2"<br />
Make 2<br />
3" x 9 1 /2" 3" x 9 1 /2"<br />
Make 1<br />
Borders<br />
1st Border<br />
Cut 4 Fabric #6 2 1 /2" wide strips down to measure<br />
2 1 /2" x 32 1 /2". Sew 2 of the strips to the top and bottom of<br />
the tablecloth center. Sew a 2 1 /2" x 2 1 /2" square to each end<br />
of the 2 remaining 2 1 /2" x 32 1 /2" strips. Sew to the sides of<br />
the tablecloth center.<br />
2nd Border<br />
Cut 4 Fabric #4 4 1 /2" wide strips down to measure<br />
4 1 /2" x 36 1 /2". Sew 2 of the strips to the top and bottom of the<br />
tablecloth. Sew a 4 1 /2" x 4 1 /2" square to each end of the 2<br />
remaining 2 1 /2" x 36 1 /2" strips. Sew to the sides of the<br />
tablecloth.<br />
3rd Border<br />
Fold 4 Fabric #7 3" wide strips border print in half and<br />
press, making sure to place the fold in the center of one of<br />
the design motifs. Set aside.<br />
4th Border<br />
1. Cut 2 Fabric #8 3 1 /2" wide strips in half vertically to<br />
make 4 strips 3 1 /2" x 21".<br />
21" 21"<br />
42"<br />
2. Sew a 3 1/2" x 21" strip to each of the 4 remaining 3 1 /2"<br />
wide strips.<br />
42" 21"<br />
Make 4<br />
63"<br />
Center Block – Make 4<br />
3. Fold the 3 1 /2" x 63" strip in half and press on the fold.
Mitering Border Construction<br />
1. Matching the pressed fold of borders 3 and 4, sew the<br />
two borders together lengthwise.<br />
4th Border<br />
3rd Border<br />
Center Fold<br />
2. Sew one of the border<br />
units to the top and<br />
bottom of the<br />
tablecloth, matching<br />
the center of the quilt<br />
to the center fold of<br />
the border unit. Sew<br />
from dot to dot, do<br />
not sew through the<br />
seam allowance. Repeat for each side.<br />
Border Unit<br />
Make 4<br />
3. Extra border strip lengths extend beyond the sides of the<br />
tablecloth. With the border strip on the right laying over<br />
the border strip at the top, fold the right border strip<br />
under itself at a 45°. Press and pin border ends together<br />
to hold them in place.<br />
4. Fold the tablecloth on the diagonal as illustrated. Draw a<br />
line on the crease and sew on the line. Do not sew<br />
through the seam allowance. Backstitch at the dot.<br />
Repeat for the remaining three corners.<br />
Sew to Dot<br />
Trim Line<br />
Wrong Side of Fabric<br />
5. Remove pins, turn the tablecloth to the right side and<br />
check to make sure that the corners lay flat. Trim ¼" away<br />
from the seam line.<br />
Completed<br />
Mitered Corner<br />
6. Repeat for the remaining corners.<br />
Quilt and bind.<br />
Wrong Side<br />
of Fabric<br />
Template A<br />
3 1 /2" Square
<strong>Country</strong> Side Inn Placemats<br />
Finished Size 14" x 19 1 /2"<br />
PLEASE READ THE PATTERN CAREFULLY BEFORE YOU BEGIN.<br />
All Seams are 1 /4" – All strips are cut the width of fabric (WOF). Carefully trim all selvages.<br />
Fabric Requirements and Cutting Instructions<br />
Style # Style #<br />
Fabric # Black Description Blue Description Yardage Cutting Directions<br />
Colorway<br />
Colorway<br />
1 5766-3 Small Yellow Floral 5766-2 Small White Floral 5/8 yd<br />
2 5768-2 Red 5768-2 Red 3/4 yd<br />
3 5760-1 Large Black Floral 5760-3 Large Blue Floral 3/8 yd<br />
Cut 4 strips 3 1 /8" wide. Cut into 40<br />
squares 3 1 /8" x 3 1 /8".<br />
Cut 1 strip 4 1 /2" wide. Cut into 16<br />
rectangles 4 1 /2" x 2 1 /2".<br />
Cut 4 strips 3 1 /8" wide. Cut into 40<br />
squares 3 1 /8" x 3 1 /8".<br />
Cut the remainder of the strip down<br />
to measure 2 1 /2" wide. Cut into 4<br />
squares 2 1 /2" x 2 1 /2" .<br />
Cut 4 strips 3" wide.<br />
Cut 2 strips 4 1 /2" wide. Cut into 16<br />
squares 4 1 /2" x 4 1 /2" .<br />
4 5748-5 Black Print 5768-3 Yellow Print 1/4 yd Cut 4 strips 1" wide.<br />
5 5764-1 Small Black Floral 5765-2 Small Blue Floral 5/8 yd<br />
Cut 8 strips 2 1 /4" wide for binding.<br />
Each mat uses 2 strips.<br />
Placemat Construction<br />
1. Draw a diagonal line across the wrong side of all<br />
40 of the 3 1 /8" x 3 1 /8" squares of Fabric #1. Do Not Cut.<br />
2. Place 40 squares of Fabric #1, right sides together, with<br />
40 of the 3 1 /8" squares of Fabric #2. Sew a scant 1 /4" away<br />
from both sides of the diagonal line. Cut on the diagonal line.<br />
Open the square and press seams open. There will be a<br />
total of 80 half square triangle units. Place the 2 1 /2" Template<br />
B square on top of each half square triangle unit with the<br />
diagonal line of the template centered on the diagonal seam<br />
and trim the unit to measure 2 1 /2" square.<br />
3. Layout block and sew together as illustrated for the<br />
tablecloth. (see photo for color reference) Press all seams<br />
open.<br />
Adding Sides (If your measurements are different, cut to<br />
your measurements)<br />
1. Cut 4 strips of 1" wide Fabric #4<br />
into 8 rectangles 1" x 14 1 /2". Sew<br />
a strip to 2 opposite sides of all<br />
4 blocks.<br />
2. Cut 4 strips of 3" wide Fabric #2<br />
into 8 rectangles 3" x 14 1 /2". Sew<br />
to the black strips on all 4<br />
placements.<br />
3. Quilt and bind.<br />
Template B<br />
2 1 /2" Square<br />
Make 4<br />
Make 4<br />
Sew print print<br />
red red<br />
Trim<br />
Cut Make 80
<strong>Country</strong> Side Inn Napkins<br />
Finished Size 15 1 /2" x 15 1 /2"<br />
PLEASE READ THE PATTERN CAREFULLY BEFORE YOU BEGIN.<br />
All Seams are 1 /4" – All strips are cut the width of fabric (WOF). Carefully trim all selvages.<br />
Fabric Requirements and Cutting Instructions<br />
Style # Style #<br />
Fabric # Black Description Blue Description Yardage Cutting Directions<br />
Colorway<br />
Colorway<br />
1 5759-2 Yellow Chicken 5759-1 White Chicken 1 yd<br />
Cut 2 strips 16 1 /2" wide. Cut into 4<br />
squares 16 1 /2" x 16 1 /2".<br />
Napkin Construction<br />
1. Turn the edges under (to the wrong side of the fabric)<br />
1/4", and press toward the center of the square.<br />
2. Turn the edges under another 1 /4", and press.<br />
3. Stitch around the edges of the napkin.<br />
Wrong<br />
Side of<br />
Fabric<br />
Make 4<br />
1/4"<br />
Wrong<br />
Side of<br />
Fabric<br />
The edges can also be finished by serging around the<br />
napkins.
<strong>Country</strong> Side Inn Potholder<br />
Finished Size 9" x 9"<br />
PLEASE READ THE PATTERN CAREFULLY BEFORE YOU BEGIN.<br />
All Seams are 1 /4" – All strips are cut the width of fabric (WOF). Carefully trim all selvages.<br />
Fabric Requirements and Cutting Instructions<br />
Style # Style #<br />
Fabric # Black Description Blue Description Yardage Cutting Directions<br />
Colorway<br />
Colorway<br />
1 5766-3 Small Yellow Floral 5766-2 Small White Floral Scraps Cut 3 squares 4 1 /8" x 4 1 /8"<br />
2 5768-2 Red 5768-2 Red Scraps Cut 3 squares 4 1 /8" x 4 1 /8"<br />
3 5760-1 Large Black Floral 5760-3 Large Blue Floral Scraps Cut 1 square 6 1 /2" x 6 1 /2".<br />
4 5764-1 Small Black Floral 5764-2 Small BlueFloral Scraps Cut 1 strip 2 1 /4" wide for binding.<br />
Potholder Construction<br />
1. Make half square triangles as described and illustrated<br />
under the Tablecloth Block Construction. There will be a<br />
total of 6 half square triangles. Use Template A to trim the<br />
half square triangles.<br />
2. Using 5 of the half square triangles and the 6 1 /2" square<br />
of Fabric #3, and sew together as illustrated.<br />
6 1 /2"<br />
3. Quilt and bind.
<strong>Country</strong> Side Inn Tea Cozy<br />
Finished Size 12" x 9 1 /2"<br />
PLEASE READ THE PATTERN CAREFULLY BEFORE YOU BEGIN.<br />
All Seams are 1 /4" – All strips are cut the width of fabric (WOF). Carefully trim all selvages.<br />
Fabric Requirements and Cutting Instructions<br />
Fabric # Yardage Cutting Directions<br />
1 Cut the 18" x 42" strip of<br />
Chicken<br />
chicken fabric in half<br />
1/2 Yd<br />
Fabric of<br />
vertically to make two<br />
your choice<br />
18" x 21" rectangles.<br />
5. Place a piece of lining fabric right sides together on each<br />
of the two tea cozy pieces. Stitch across the bottom edge.<br />
Press seam open.<br />
Any Lining<br />
Fabric<br />
1/2 Yd<br />
Batting of 2 pieces<br />
your Choice 18" x 21"<br />
Ribbon of 1 piece<br />
your Choice 1/2" x 3 1 /2"<br />
Wrong<br />
Side<br />
Make 2<br />
Stitch<br />
Construction<br />
1. Lay the 2 pieces of<br />
18" x 21" chicken fabric<br />
on top of the 2 pieces<br />
of 18" x 21" batting, with<br />
the chicken fabric right<br />
side up. Quilt the<br />
chicken fabric and<br />
batting layers together<br />
as illustrated.<br />
2" Diamonds<br />
2. Using the tea cozy<br />
pattern cut out a front<br />
and a back for the<br />
tea cozy from the<br />
quilted fabric.<br />
3. Using the tea cozy<br />
pattern cut out 2 pieces<br />
of lining.<br />
4. Fold the ribbon and<br />
stitch to the front side of<br />
one of the quilted tea<br />
cozy pieces.<br />
Make 2<br />
Cut 2<br />
6. Lay the two tea cozy sections right sides together and<br />
stitch around the edge. Leave a 3" opening for turning.<br />
Batting Side<br />
of Tea Cozy<br />
Seam from Step 5<br />
Wrong Side<br />
of Lining<br />
7. Turn to right side and stitch opening closed. Tuck lining<br />
inside the tea cozy.<br />
8. To finish top stitch 1 /4" away from sides and top of the tea<br />
cozy.<br />
Top Stitch<br />
Leave<br />
Open
Tea Cozy Template at 50%