EDID Manager User's Manual - Eavs
EDID Manager User's Manual - Eavs
EDID Manager User's Manual - Eavs

You also want an ePaper? Increase the reach of your titles
YUMPU automatically turns print PDFs into web optimized ePapers that Google loves.
<strong>EDID</strong> <strong>Manager</strong><br />
<strong>User's</strong> <strong>Manual</strong>
Page 2 / 19
<strong>EDID</strong> <strong>Manager</strong><br />
User’s <strong>Manual</strong> Rev. 1.0<br />
SAFETY INSTRUCTIONS<br />
Class II apparatus construction.<br />
This equipment should be operated only from the power source indicated on the product.<br />
To disconnect the equipment safely from power, remove the power cord from the rear of the<br />
equipment, or from the power source. The MAINS plug is used as the disconnect device, the<br />
disconnect device shall remain readily operable.<br />
There are no user-serviceable parts inside of the unit. Removal of the top cover will expose<br />
dangerous voltages. To avoid personal injury, do not remove the top cover. Do not operate<br />
the unit without the cover installed.<br />
The apparatus shall not be exposed to dripping or splashing and that no objects filled with<br />
liquids, such as vases, shall be placed on the apparatus.<br />
The apparatus must be safely connected to multimedia systems. Follow instructions<br />
described in this manual.<br />
WEEE ( W aste Electrical & Electronic Equipment)<br />
Correct Disposal of This Product<br />
This marking shown on the product or its literature, indicates that it should not be<br />
disposed with other household wastes at the end of its working life. To prevent<br />
possible harm to the enviroment or human health from uncontrolled waste disposal,<br />
please separate this from other types of wastes and recycle it responsibily to promote<br />
the sustainable reuse of material resources.<br />
Household users should contact either the retailer where they purchased this product,<br />
or their local government office, for details of where and how they can take this item<br />
for environmentally safe recycling.<br />
Business users should contact their supplier and check the terms and conditions of the purchase<br />
contract. This product should not be mixed with other commercial wastes for disposal.<br />
Page 3 / 19
DECLARATION OF CONFORMITY<br />
We,<br />
Lightware Kft. 1071 Budapest Peterdy str. 15 HUNGARY<br />
as manufacturer declare, that the products<br />
<strong>EDID</strong> <strong>Manager</strong><br />
( Computer Monitor Extender )<br />
in accordance with the EMC Directive 2004/108/EC and the Low Voltage Directive<br />
2006/95/EEC is in conformity with the following standards:<br />
EMI/EMC ..................................... EN 55022 Class B<br />
Safety ........... UL, CUL, GS, CR, RCM, PSE, Class II<br />
Date: 01 October 2009<br />
Name: Gergely Vida ( Managing Director )<br />
Signed:<br />
Page 4 / 19
<strong>EDID</strong> <strong>Manager</strong><br />
User’s <strong>Manual</strong> Rev. 1.0<br />
Table of contents<br />
1. GENERAL DESCRIPTION..............................................................................................................6<br />
1.1. BOX CONTENTS .........................................................................................................................6<br />
1.2. FEATURES ................................................................................................................................6<br />
1.3. UNDERSTANDING <strong>EDID</strong> .............................................................................................................7<br />
1.3.1. Basics .............................................................................................................................7<br />
1.3.2. Common problems related to <strong>EDID</strong> ...............................................................................7<br />
1.4. ADVANCED <strong>EDID</strong> MANAGEMENT ................................................................................................8<br />
1.5. FIBER CABLE POWERING ............................................................................................................8<br />
1.6. TOP VIEW ..................................................................................................................................9<br />
1.7. ELECTRICAL CONNECTIONS ..................................................................................................... 11<br />
1.7.1. DVI inputs and outputs ................................................................................................ 11<br />
2. OPERATION ................................................................................................................................ 12<br />
2.1. POWER .................................................................................................................................. 12<br />
2.2. LEARNING THE <strong>EDID</strong> .............................................................................................................. 12<br />
2.3. SWITCHING THE <strong>EDID</strong> ............................................................................................................ 13<br />
2.4. FACTORY PRESET <strong>EDID</strong> LIST .................................................................................................. 13<br />
2.5. BURNING THE <strong>EDID</strong> ............................................................................................................... 14<br />
3. TROUBLESHOOTING ................................................................................................................. 15<br />
3.1. THERE IS NO PICTURE ............................................................................................................. 15<br />
4. MECHANICAL DRAWINGS ........................................................................................................ 16<br />
4.1. TOP VIEW ............................................................................................................................... 16<br />
4.2. SIDE VIEW .............................................................................................................................. 16<br />
5. WARRANTY ................................................................................................................................. 17<br />
6. SPECIFICATIONS ........................................................................................................................ 18<br />
Page 5 / 19
1. General description<br />
1.1. Box contents<br />
−<br />
−<br />
−<br />
−<br />
<strong>EDID</strong> <strong>Manager</strong><br />
<strong>User's</strong> manual<br />
Quick Start Guide<br />
1.2. Features<br />
<br />
<br />
<br />
<br />
<br />
<br />
<br />
+5V wall plug power adaptor<br />
60 meter input cable compensation – Using 22AWG high quality DVI cable, the<br />
input is automatically compensated for up to 60 meter cable<br />
length, which extends installation possibilities even on highest<br />
HDTV or computer resolutions. In case of lower pixel<br />
resolutions, this length can be even higher.<br />
Advanced <strong>EDID</strong> Management – The user can emulate any <strong>EDID</strong> on the <strong>EDID</strong><br />
<strong>Manager</strong>’s input, read out and store any attached monitor's<br />
<strong>EDID</strong> in 49 internal memory locations.<br />
Supports all HDTV resolutions – 720p, 1080i and 1080p etc. without HDCP<br />
encoding - Unencrypted HDTV signals up to 165 MHz pixel<br />
clock frequency regardless of the resolution passed through.<br />
Signal Present LED – Valid DVI clock signal is detected, when signal is applied to<br />
DVI IN.<br />
Source and Monitor Connected LEDs – Two LEDs indicate when a DVI source<br />
and display device is connected to the <strong>EDID</strong> <strong>Manager</strong>.<br />
Top panel control – <strong>EDID</strong> Address selection with two decimal rotary switches,<br />
Learn <strong>EDID</strong> and Burn <strong>EDID</strong> buttons are available for Advanced<br />
<strong>EDID</strong> Management.<br />
Fiber cable support – Self powered DVI fiber cables using +5V from DVI sources<br />
(VGA cards, etc.) usually consume more than 50 mA, which<br />
load is maximum allowed by DVI 1.0 standard. <strong>EDID</strong> <strong>Manager</strong><br />
supports +5V 500 mA constant current output on DVI OUT to<br />
power long distance fiber optical cables.<br />
Universal power adaptor – <strong>EDID</strong> <strong>Manager</strong> is equipped with a universal +5V<br />
power adaptor, which accepts AC voltages from 100 to 240<br />
Volts with 50 or 60 Hz line frequency.<br />
Page 6 / 19
<strong>EDID</strong> <strong>Manager</strong><br />
User’s <strong>Manual</strong> Rev. 1.0<br />
1.3. Understanding <strong>EDID</strong><br />
1.3.1. Basics<br />
<strong>EDID</strong> stands for Extended Display Identification Data. Simply put, <strong>EDID</strong> is the<br />
passport of display devices (monitors, TV sets, projectors). It contains information<br />
about the display’s capabilities, such as supported resolutions, refresh rates (these<br />
are called Detailed Timings), the type and manufacturer of the display device, etc.<br />
After connecting a DVI source to a DVI display, the source reads out the <strong>EDID</strong> to<br />
determine the resolution and refresh rate of the image to be transmitted.<br />
Most DVI computer displays have 128-byte long <strong>EDID</strong> structure. However, Digital<br />
Televisions and HDMI capable displays may have another 128 bytes, which is<br />
called E-<strong>EDID</strong> and defined by CEA (Consumer Electronics Association). This<br />
extension contains information about additional Detailed Timings, audio<br />
capabilities, speaker allocation and HDMI capabilities. It is important to know, that<br />
all HDMI capable devices must have CEA extension, but not all devices are HDMI<br />
capable which have the extension.<br />
1.3.2. Common problems related to <strong>EDID</strong><br />
Problem: „My system consists of the following: a PC, then a Lightware <strong>EDID</strong><br />
<strong>Manager</strong>, then a third party Distribution Amplifier, then an SXGA<br />
(1280x1024) LCD monitor and an XGA (1024x768) projector. I would<br />
like to see the same image on the monitor and the projector. What<br />
<strong>EDID</strong> should I chose on the <strong>EDID</strong> <strong>Manager</strong>?”<br />
Solution: If you want to see the image on both displays, you need to select the<br />
resolution of the smaller display (in this case XGA), otherwise the<br />
smaller display may not show the higher resolution image.<br />
Page 7 / 19
Problem: „I turned the rotary switches on the <strong>EDID</strong> <strong>Manager</strong> to have a different<br />
resolution but nothing happens.”<br />
Solution: Some graphics cards and video sources read out the <strong>EDID</strong> only after<br />
power-up and later they don’t sense that <strong>EDID</strong> has been changed. You<br />
need to restart your source to make it read out the <strong>EDID</strong> again.<br />
Problem: „I have an <strong>EDID</strong> <strong>Manager</strong> and I’m using a Lightware factory preset<br />
<strong>EDID</strong>. I would like to be able to choose from different resolutions, but<br />
my source allows only one resolution.”<br />
Solution: Most Lightware factory preset <strong>EDID</strong> allow only one resolution, forcing<br />
the sources to output only that particular signal. You need to select the<br />
Universal <strong>EDID</strong> (address 49). It supports all common VESA resolutions.<br />
Additionally it also features audio support.<br />
1.4. Advanced <strong>EDID</strong> Management<br />
Each DVI sink (e.g. monitors, projectors, plasma displays, and switcher inputs)<br />
must support the <strong>EDID</strong> data structure. Source BIOS and operating systems are<br />
likely to query the sink using DDC2B protocol to determine what pixel formats and<br />
interface are supported. DVI standard makes use of <strong>EDID</strong> data structure for the<br />
identification of the monitor type and capabilities. Most DVI sources (VGA cards,<br />
set top boxes, etc) will output DVI signal after accepting the connected sink’s <strong>EDID</strong><br />
information. In case of <strong>EDID</strong> readout failure or missing <strong>EDID</strong> the source will not<br />
output DVI video signal.<br />
<strong>EDID</strong> <strong>Manager</strong> has advanced functions that help system integration. It stores and<br />
emulates 99 <strong>EDID</strong> plus the <strong>EDID</strong> of the display device which is connected to DVI<br />
OUT. Memory addresses from 01 to 50 are factory presets, while memories from<br />
51 to 99 are user programmable. The <strong>EDID</strong> <strong>Manager</strong> stores the <strong>EDID</strong> of the last<br />
attached monitor or projector connected to DVI OUT in a non-volatile memory.<br />
The <strong>EDID</strong> emulated on the input can be copied from the <strong>EDID</strong> <strong>Manager</strong>'s memory<br />
(static <strong>EDID</strong> emulation) or from the attached monitor (dynamic <strong>EDID</strong> emulation).<br />
For example, the <strong>EDID</strong> <strong>Manager</strong> can be set up to emulate the device, which is<br />
connected to DVI OUT, and the <strong>EDID</strong> automatically changes, if the monitor is<br />
replaced with another display device (as long as it has a valid <strong>EDID</strong>).<br />
Info<br />
The user is not required to disconnect the DVI cable to change an <strong>EDID</strong> as<br />
opposed to other manufacturer’s products. <strong>EDID</strong> can be changed even if source is<br />
connected to the input and powered ON.<br />
1.5. Fiber Cable powering<br />
As special feature, <strong>EDID</strong> <strong>Manager</strong> is able to supply 500 mA current to power fiber<br />
optical transmitters like Lightware DVI-OPT-TX100 (Pin 14 on DVI OUT connector).<br />
Standard DVI outputs or VGA cards supply only 55 mA current on +5V output, thus<br />
unable to directly power a fiber optical cable.<br />
Info<br />
<strong>EDID</strong> <strong>Manager</strong> does not check if the connected sink (monitor, projector or other<br />
equipment) supports Hotplug or <strong>EDID</strong> signals but outputs the signal immediately<br />
after it has been applied to the input.<br />
Page 8 / 19
<strong>EDID</strong> <strong>Manager</strong><br />
User’s <strong>Manual</strong> Rev. 1.0<br />
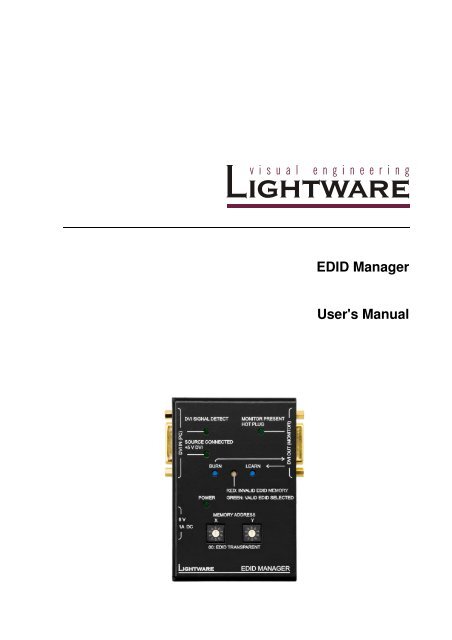
1.6. Top view<br />
Signal detect<br />
LED<br />
Monitor present<br />
LED<br />
DVI Input<br />
DVI Output<br />
Source connected LED<br />
Burn <strong>EDID</strong><br />
Learn <strong>EDID</strong><br />
+5V DC input<br />
<strong>EDID</strong> status<br />
Power LED<br />
Address selection<br />
Signal detect LED<br />
Monitor present LED<br />
DVI Input<br />
Indicates if a valid DVI clock signal is present on the DVI IN<br />
connector.<br />
Indicates if a powered display device (or matrix switcher,<br />
repeater, etc.) is connected to the DVI OUT connector and<br />
sends a valid Hot Plug Signal on Pin 16 through the DVI cable.<br />
Connect one single link DVI-D or DVI-I cable (only digital pins<br />
are connected internally) between the DVI source and <strong>EDID</strong><br />
<strong>Manager</strong>. The built-in automatic cable equalization circuit<br />
compensates for up to 60 meters at 1920x1080p 60 Hz<br />
resolution. For lower resolutions, even longer cables can be<br />
used.<br />
Source connected LED Indicates if +5V power signal is sent to Pin 14 of the input DVI<br />
connector by the DVI source (PC, Laptop, etc).<br />
Burn <strong>EDID</strong><br />
Reprograms the attached DVI Matrix switcher’s input <strong>EDID</strong><br />
data. For more information, see chapter 2.5.<br />
+5V DC connector Connect the output of the supplied +5V power adaptor.<br />
CAUTION! Warranty void if damage occurs due to use of a<br />
different power source.<br />
Page 9 / 19
DVI Output<br />
Learn <strong>EDID</strong><br />
<strong>EDID</strong> status LED<br />
Address selection<br />
Connect one single link DVI-D or DVI-I cable (only digital pins<br />
are connected internally) between <strong>EDID</strong> <strong>Manager</strong> and display<br />
device.<br />
The output connector is able to supply 500 mA current on pin<br />
14 to power fiber optical DVI extenders like DVI-OPT-TX100.<br />
If a long DVI cable is connected then equalization and<br />
reclocking may be necessary at the receiver end of the cable.<br />
Stores the <strong>EDID</strong> of the display device attached to DVI OUT in<br />
the selected memory address between 51…99. To learn the<br />
<strong>EDID</strong>, select an appropriate address with the rotary switches<br />
and press and hold the Learn button for two seconds.<br />
Function 1: displays the firmware version of the device. For<br />
more information, see chapter 2.1.<br />
Function 2: after applying a Hot Plug signal to DVI OUT, this<br />
LED indicates that the unit is reading the <strong>EDID</strong> from the<br />
connected display device. If the LED is blinking green then the<br />
<strong>EDID</strong> is valid, if blinking red, then the <strong>EDID</strong> is invalid or missing.<br />
Function 3: this LED indicates whether the selected <strong>EDID</strong> is<br />
valid (continuous green = valid, continuous red = invalid or<br />
empty memory selected).<br />
Function 4: after pressing the LEARN button, this LED indicates<br />
whether the learn process was successful (blinking green =<br />
successful, blinking red = unsuccessful). For more information,<br />
see chapter 2.2.<br />
Function 5: after pressing the BURN button, this LED indicates<br />
whether the burn process was successful (blinking green =<br />
successful, blinking red = unsuccessful). For more information,<br />
see chapter 2.5.<br />
The rotary switches select one of 100 <strong>EDID</strong> memory addresses.<br />
Addresses 1…50 are factory preset and 51…99 are user<br />
programmable. Address 00 enables transparent mode. For<br />
more information, see chapter 2.2. Use a flat head screwdriver<br />
that fits into the actuator. Avoid the use of keys, coins, knives<br />
and other sharp objects because they might cause permanent<br />
damage to the rotary switches.<br />
Page 10 / 19
<strong>EDID</strong> <strong>Manager</strong><br />
User’s <strong>Manual</strong> Rev. 1.0<br />
1.7. Electrical connections<br />
1.7.1. DVI inputs and outputs<br />
<strong>EDID</strong> <strong>Manager</strong> provides 29 pole „digital only” DVI-I connectors for input and output<br />
connections. Always use high quality DVI cable for connecting sources and<br />
displays.<br />
The input has a built-in signal detection circuit with a LED indicator. The DVI Signal<br />
Detect LED lights green, if the input connector senses an active DVI signal.<br />
Pin Signal Pin Signal Pin Signal<br />
1 TMDS Data2- 11 TMDS D1/3 Shield 21 TMDS Data5+ (nc)<br />
2 TMDS Data2+ 12 TMDS Data3- (nc) 22 TMDS Clk Shield<br />
3 TMDS D2/4 Shield 13 TMDS Data3+ (nc) 23 TMDS Clock+<br />
4 TMDS Data4- (nc) 14 +5V Power 24 TMDS Clock-<br />
5 TMDS Data4+ (nc) 15 GND (for +5V) 25 R (not connected)<br />
6 DDC Clock 16 Hot Plug Detect 26 G (not connected)<br />
7 DDC Data 17 TMDS Data0- 27 B (not connected)<br />
8 VSYNC (nc) 18 TMDS Data0+ 28 HSYNC (nc)<br />
9 TMDS Data1- 19 TMDS D0/5 Shield 29 Analog GND<br />
10 TMDS Data1+ 20 TMDS Data5- (nc)<br />
Table 1. DVI-I “digital only” connector pin assignments<br />
Cable length at inputs<br />
<strong>EDID</strong> <strong>Manager</strong> has an advanced built-in cable equalization circuit, which<br />
automatically provides cable length compensation. This circuit extends the<br />
maximum usable cable length to 60 meters using high quality 22AWG copper cable<br />
at WUXGA 1920x1200 graphics resolution.<br />
Cable type<br />
Signal<br />
22 AWG<br />
Reference type<br />
DVI GEAR: SHR DVI<br />
24 AWG<br />
Reference type<br />
TASKER: TSK 1060<br />
Resolution Max length (meter) Max length (meter)<br />
1920x1200; 1600x1200;<br />
2048x1080p; 1080p<br />
1680x1050; 1400x1050;<br />
1280x1024<br />
1024x768; 1365x768;<br />
720p; 1080i;<br />
60 m 50 m<br />
75 m 62 m<br />
92 m 77 m<br />
800x600 100 m (calculated) 84 m (calculated)<br />
640x480; 480p; 576p 120 m (calculated) 100 m (calculated)<br />
Table 2. Maximum DVI cable lengths at inputs<br />
Page 11 / 19
2. Operation<br />
2.1. Power<br />
When building an electronic system, make sure that all of the devices are powered<br />
down before connecting them. Powered on devices may have dangerous voltage<br />
levels that can damage sensitive electronic circuits.<br />
1. After the system is complete, connect the output of the +5V Power Adaptor<br />
to the <strong>EDID</strong> <strong>Manager</strong>. The unit is immediately powered ON.<br />
After the <strong>EDID</strong> <strong>Manager</strong> is initialized, the attached DVI source and monitor<br />
can be powered on.<br />
2. After being powered on, the <strong>EDID</strong> <strong>Manager</strong> displays its firmware version<br />
using the <strong>EDID</strong> Status LED.<br />
The following example shows this process for a firmware version of 1.3.7<br />
RED blinks once → Short pause → GREEN blinks three times → Short<br />
pause → GREEN blinks seven times → Short pause → The normal function<br />
of the LED is in effect.<br />
3. After indicating the firmware version, the <strong>EDID</strong> STATUS LED lights red for 2-<br />
3 seconds, then turns green if the selected <strong>EDID</strong> is valid, or remains red, if<br />
the selected <strong>EDID</strong> is invalid.<br />
4. If a display device is connected to DVI OUT, the <strong>EDID</strong> <strong>Manager</strong> reads the<br />
<strong>EDID</strong> from the attached monitor’s <strong>EDID</strong> memory.<br />
If the read process is successful, the GREEN LED blinks a few times then<br />
the <strong>EDID</strong> Status LED shows whether the selected <strong>EDID</strong> is valid (green) or<br />
not (red).<br />
If the read process is unsuccessful, the RED LED blinks a few times then the<br />
<strong>EDID</strong> Status LED shows whether the selected <strong>EDID</strong> is valid (green) or not<br />
(red).<br />
Info<br />
If none of the LEDs light up upon power-up, the unit is most likely damaged and<br />
further use is not advised. Please contact support@lightware.hu<br />
2.2. Learning the <strong>EDID</strong><br />
The factory preset <strong>EDID</strong>s cannot be changed by the user. Only addresses from 51<br />
to 99 are user programmable.<br />
1. After connecting the sink device to DVI OUT, use a screwdriver to select an<br />
empty memory address. <strong>EDID</strong> are stored in multiple programmable nonvolatile<br />
memories.<br />
If the <strong>EDID</strong> status LED is illuminated RED, then the memory slot is empty<br />
and ready to be programmed. If GREEN, the memory was already used<br />
before, but still available for reprogramming.<br />
2. Push the LEARN button on the top side of the <strong>EDID</strong> <strong>Manager</strong> and hold it<br />
down for approximately 3 seconds.<br />
Once the button is pushed the <strong>EDID</strong> status LED goes dark. If the teaching is<br />
successful, the GREEN <strong>EDID</strong> status LED blinks five times and stays<br />
illuminated. If the teaching is unsuccessful, the RED <strong>EDID</strong> status LED blinks<br />
five times and stays illuminated either red or green, depending on the status<br />
of the selected address.<br />
Page 12 / 19
<strong>EDID</strong> <strong>Manager</strong><br />
User’s <strong>Manual</strong> Rev. 1.0<br />
2.3. Switching the <strong>EDID</strong><br />
1. Use a screwdriver to change the memory address on the top side of the<br />
<strong>EDID</strong> <strong>Manager</strong>.<br />
After either one of the rotary switches has been rotated the unit waits<br />
approximately 2 seconds before the selected <strong>EDID</strong> becomes active. If the<br />
<strong>EDID</strong> status is unchanged the <strong>EDID</strong> STATUS LED does not blink.<br />
2. The address 00 (zero zero) has a special function. If a monitor is connected<br />
to DVI OUT, then its <strong>EDID</strong> is copied to the DVI IN connector. If no monitor is<br />
connected to the output then the <strong>EDID</strong> transmitted to the DVI IN connector is<br />
the <strong>EDID</strong> of the last connected monitor.<br />
Info<br />
Info<br />
If an invalid <strong>EDID</strong> is selected, the <strong>EDID</strong> <strong>Manager</strong> does NOT give a HOT PLUG<br />
signal to the source connected to DVI input.<br />
After every <strong>EDID</strong> change, <strong>EDID</strong> <strong>Manager</strong> toggles the HOT PLUG signal for<br />
approximately 1 second. Some graphics cards or DVD players do not sense the<br />
HOT PLUG signal, and even if <strong>EDID</strong> has been changed, the set resolution is not<br />
affected. In this case the source device must be restarted, or powered OFF and<br />
ON again.<br />
2.4. Factory preset <strong>EDID</strong> list<br />
Lightware factory preloaded <strong>EDID</strong> are specially provided to force graphic cards to<br />
output only the exact pixel resolution and refresh rate.<br />
Universal <strong>EDID</strong> (address 49) allows multiple resolutions including all common<br />
VESA defined resolutions. In addition, it also features audio support. The use of<br />
universal <strong>EDID</strong> is advised for fast and easy system setup.<br />
MEMORY Resolution MEMORY Resolution<br />
01 640x480@60 Hz 26 1600x1200@50 Hz<br />
02 640x480@75 Hz 27 1600x1200@60 Hz<br />
03 848x480@60 Hz 16:9 28 1920x1200@60 Hz<br />
04 800x600@50 Hz 29 1920x1200@50 Hz<br />
05 800x600@60 Hz 30 480i@59.94 Hz<br />
06 800x600@75 Hz 31 640x480@59.94 Hz<br />
07 1024x768@50 Hz 32 720x480p@60 Hz<br />
08 1024x768@60 Hz 33 576i@50 Hz<br />
09 1024x768@75 Hz 34 720x576p@50 Hz<br />
10 1152x864@75 Hz 35 1280x720p@50 Hz<br />
11 1280x768@50 Hz 36 1280x720p@60 Hz<br />
12 1280x768@60 Hz 37 1920x1080i1 @50 Hz<br />
13 1280x768@75 Hz 38 1920x1080i2 @50 Hz<br />
14 1360x768@60 Hz 39 1920x1080i@60 Hz<br />
15 1364x768@50 Hz 40 1920x1080p@24 Hz<br />
16 1364x768@60 Hz 41 1920x1080p@25 Hz<br />
17 1364x768@75 Hz 42 1920x1080p@30 Hz<br />
18 1280x1024@50 Hz 43 1920x1080p1 @50 Hz<br />
19 1280x1024@60 Hz 44 1920x1080p2 @50 Hz<br />
20 1280x1024@75 Hz 45 1920x1080p@60 Hz<br />
21 1366x1024@60 Hz 46 2048x1080p1 @50 Hz<br />
22 1400x1050@50 Hz 47 2048x1080p2 @50 Hz<br />
23 1400x1050@60 Hz 48 2048x1080p@60 Hz<br />
24 1400x1050@75 Hz 49 UNIVERSAL <strong>EDID</strong><br />
25 1680x1050@50 Hz 50 2560x1600@60 Hz<br />
Table 3. Factory Preset <strong>EDID</strong> list<br />
Page 13 / 19
2.5. Burning the <strong>EDID</strong><br />
Sink devices store their <strong>EDID</strong> information in a non-volatile memory (EEPROM,<br />
Electrically Erasable Programmable Read-Only Memory). Normally this memory is<br />
write protected in monitors and projectors, thus impossible to be modified by the<br />
Burn <strong>EDID</strong> function of the <strong>EDID</strong> <strong>Manager</strong>. Some of them however are not write<br />
protected, so users must be very careful when using this function.<br />
Burning a wrong <strong>EDID</strong> can damage the display!<br />
Users can burn <strong>EDID</strong> in the inputs of any DVI Matrix Switcher that doesn’t have<br />
built-in <strong>EDID</strong> management function as long as its EEPROMs are not write<br />
protected.<br />
1. After connecting the sink device to DVI OUT of <strong>EDID</strong> <strong>Manager</strong>, use a<br />
screwdriver to select the memory address of the <strong>EDID</strong> to be burnt.<br />
If the <strong>EDID</strong> status LED is illuminated GREEN, then the memory slot contains<br />
a valid <strong>EDID</strong> and it is ready to be burnt.<br />
2. Push the BURN button and hold it down for approximately 10 seconds.<br />
Once the button is pushed the <strong>EDID</strong> status LED goes dark. After the 10<br />
seconds, the <strong>EDID</strong> status LED becomes orange. Once the LED becomes<br />
orange, push and release the BURN button 3 times within 5 seconds. Now<br />
the burn process starts.<br />
If the <strong>EDID</strong> status LED blinks GREEN, then the burn process was<br />
successful. If it blinks RED, then the burn process failed.<br />
Page 14 / 19
<strong>EDID</strong> <strong>Manager</strong><br />
User’s <strong>Manual</strong> Rev. 1.0<br />
3. Troubleshooting<br />
3.1. There is no picture<br />
Check the cables<br />
Due to the high data rates, the cables must fit very well. DVI connectors have to be<br />
locked with screws, no tensions or breaches are allowed. If your source or display<br />
has more connectors then make sure that the proper interface is selected.<br />
Check the source equipment<br />
Check the Source Connected LED on the top side of the <strong>EDID</strong> <strong>Manager</strong>. This LED<br />
indicates the presence of the +5V signal coming from the DVI source. If it is not<br />
illuminated, then your DVI source is powered off, or its DVI output is inactive.<br />
Please refer to the user’s manual of your DVI source.<br />
Check the incoming signal<br />
Check the DVI Signal Present LED on the top side of the <strong>EDID</strong> <strong>Manager</strong>. This LED<br />
indicates the presence of an active incoming DVI clock signal. If it is not<br />
illuminated, then no DVI clock signal is present at the input connector of the <strong>EDID</strong><br />
<strong>Manager</strong>. Please check whether your source is configured to output a video signal.<br />
Check whether your source is powered on and configured properly. If the source is<br />
a computer, then verify that the DVI output is selected and active. Try restarting<br />
your computer; if you get a picture during the booting process, you have to review<br />
the driver settings.<br />
Check the display status<br />
Check the Monitor Present Hotplug LED on the top side of the <strong>EDID</strong> <strong>Manager</strong>. This<br />
LED indicates the presence of the Hotplug signal coming from the attached display<br />
device. If it is not illuminated, then your display is not powered or not configured<br />
properly.<br />
Check <strong>EDID</strong> related problems<br />
Check the <strong>EDID</strong> Status LED on the top side of the <strong>EDID</strong> <strong>Manager</strong>. This LED<br />
indicates whether a valid <strong>EDID</strong> is selected. If it is illuminated RED, then an invalid<br />
<strong>EDID</strong> or an empty memory address is selected. Please select a valid <strong>EDID</strong>.<br />
If the <strong>EDID</strong> Status LED is illuminated GREEN, then maybe your display device is<br />
not capable of receiving the sent video format. Try emulating your display device’s<br />
<strong>EDID</strong> to the source. You will find help to this process in section 2.3. If you get a<br />
picture now, you have an <strong>EDID</strong> related issue, please read chapter 1.3 for more<br />
details.<br />
Check the <strong>EDID</strong><br />
Maybe the data rate is too high for that type of cable. Try switching another <strong>EDID</strong><br />
to the inputs with lower resolution. If the source is a computer and you are an<br />
expert user, you can try modifying the refresh rate, so you would be able to get it to<br />
work at higher resolutions over a noisy connection.<br />
Page 15 / 19
4. Mechanical Drawings<br />
4.1. Top view<br />
102,4 mm<br />
69,6 mm<br />
4.2. Side view<br />
27 mm<br />
102,4 mm<br />
Page 16 / 19
<strong>EDID</strong> <strong>Manager</strong><br />
User’s <strong>Manual</strong> Rev. 1.0<br />
5. Warranty<br />
Lightware Visual Engineering warrants this product against defects in materials and<br />
workmanship for a period of three years from the date of purchase.<br />
The customer shall pay shipping charges when unit is returned for repair. Lightware will<br />
cover shipping charges for return shipments to customers.<br />
In case of defect please call your local representative, or Lightware at<br />
Lightware Visual Engineering<br />
1071. Budapest Peterdy str. 15, HUNGARY<br />
Tel.: +36 1 889 6177<br />
Fax.: +36 1 342 9903<br />
E-mail: support@lightware.hu<br />
Page 17 / 19
6. Specifications<br />
Video<br />
Standard .................................................................................................... DVI 1.0<br />
Color depth ................................................................................ 24 bits, 8 bit/color<br />
Format ..................................................................................................... RGB only<br />
Data rate ........................................... all between 25 Mbps and 1.65 Gbps /color<br />
Resolutions (single link) .................. all between 640x480 and 1920x1200@60Hz<br />
HDTV resolutions .................................................................... 720p, 1080i, 1080p<br />
HDCP compliant ................................................................................................ No<br />
Input equalization ...................................................................... +40 dB, automatic<br />
Reclocking ......................................................................................................... No<br />
<strong>EDID</strong> Emulation ............................ Yes, 50 factory preset, 50 user programmable<br />
<strong>EDID</strong> Support ................................................................. 256 Byte Extended <strong>EDID</strong><br />
General<br />
Connectors ...................................................................... 29-pole DVI-I digital only<br />
Number of DVI inputs........................................................................................... 1<br />
Number of DVI outputs ........................................................................................ 1<br />
+5V output current (DVI)..............500 mA continuous with overcurrent protection<br />
Power adaptor ............................... 100-240 V AC 50/60 Hz 0.6A to +5V DC 2.6A<br />
Power consumption ............................................................................1,5W typical<br />
....................................... 4W max when powering a fiber extender on DVI output<br />
Compliance ....................................................................................................... CE<br />
EMI/EMC ................................................................................... EN 55022 Class B<br />
Safety ....................................................... UL, CUL, GS, CR, RCM, PSE, Class II<br />
Warranty ................................................................................................... 3 years<br />
Enclosure<br />
Rack mountable ................................................................................................. No<br />
Material ............................................................................................... 2 mm Metal<br />
Dimensions ................................................ 102,4 mm W x 69,6 mm D x 27 mm H<br />
Net Weight .................................................................................................... 175 g<br />
Page 18 / 19
<strong>EDID</strong> <strong>Manager</strong><br />
User’s <strong>Manual</strong> Rev. 1.0<br />
NOTES:<br />
Page 19 / 19