Download samples and instructions - Stampin' Up!
Download samples and instructions - Stampin' Up!
Download samples and instructions - Stampin' Up!

You also want an ePaper? Increase the reach of your titles
YUMPU automatically turns print PDFs into web optimized ePapers that Google loves.
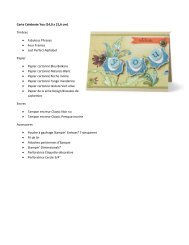
SUN FUN INVITATION<br />
MATERIALS LIST:<br />
• Life’s a Breeze stamp set<br />
• Mark the Date stamp set<br />
• Pumpkin Pie card stock<br />
• Whisper White card stock<br />
• Bashful Blue textured card stock<br />
• Real Red textured card stock<br />
• Whisper White textured card stock<br />
• Wild Wasabi pre-cut/pre-scored textured card stock*<br />
• Bashful Blue Die-cut Blooms<br />
• Pumpkin Pie Classic Stampin’ Pad®<br />
• Real Red Classic Stampin’ Pad<br />
• Wild Wasabi Classic Stampin’ Pad<br />
• Pumpkin Pie striped grosgrain ribbon<br />
• Anchored Rub-Ons®<br />
• Stampin’ Dimensionals®<br />
• 1-3/8” Circle punch<br />
• Scallop Circle punch<br />
STEP-BY-STEP:<br />
Envelope<br />
1. Trim 1-1/4" off non-scored bottom of Wild Wasabi precut/pre-scored<br />
textured card stock using Paper Cutter.<br />
2. Fold card stock to the left on the middle score; fold<br />
bottom scored flap in <strong>and</strong> adhere to inside of card<br />
creating a pocket; glue bottom closed to form a topopening<br />
envelope.<br />
3. Stamp bubble image in Wild Wasabi ink on right side<br />
of envelope.<br />
4. Adhere Pumpkin Pie card stock to envelope.<br />
5. Wrap Pumpkin Pie striped ribbon around envelope,<br />
<strong>and</strong> adhere in front <strong>and</strong> back to secure; tie in front <strong>and</strong><br />
trim to desired length.<br />
6. Stamp “You’re invited” on Whisper White card stock<br />
<strong>and</strong> cut out; adhere to envelope using Stampin’<br />
Dimensionals.<br />
7. Punch out scallop circle from Whisper White card<br />
stock using Scallop Circle punch.<br />
8. Punch out circle from Real Red textured card stock<br />
using 1-3/8" Circle punch.<br />
9. Apply “Summer” Rub-On to Real Red circle using<br />
wooden stick included with Rub-Ons assortment.<br />
10. Adhere Real Red circle to scallop circle; adhere scallop<br />
circle to Bashful Blue Die-cut Bloom using Stampin’<br />
Dimensionals.<br />
11. Adhere layered Die-cut Bloom to envelope using<br />
Stampin’ Dimensionals.<br />
12. Punch half-circle in top of envelope using 1-3/8" Circle punch.<br />
Insert<br />
1. Fold Whisper White textured card stock in half creating a<br />
4-1/4" x 5" card.<br />
2. Adhere Bashful Blue card stock to top of card.<br />
3. Stamp “Sun fun” in Real Red ink on card.<br />
4. Stamp calendar image in Pumpkin Pie ink on Whisper White<br />
card stock; adhere to card using Stampin’ Dimensionals.<br />
FROM THE WILD WASABI CARD<br />
*<br />
STOCK SPECIAL PRODUCT OFFER<br />
© 2008 Stampin’ <strong>Up</strong>! All Rights Reserved
SPRING CARD<br />
MATERIALS LIST:<br />
STEP-BY-STEP:<br />
• ABC Alphabet Lower stamp set<br />
• Everyday Flexible Phrases stamp set<br />
• Posy background stamp<br />
• Bashful Blue card stock<br />
• So Saffron card stock<br />
• Very Vanilla card stock<br />
• Wild Wasabi pre-cut/pre-scored textured card stock*<br />
• On Board® Blossoms & Basics<br />
• Bashful Blue Classic Stampin’ Pad®<br />
• Wild Wasabi Classic Stampin’ Pad<br />
• Bashful Blue grosgrain ribbon<br />
• Wild Wasabi double-stitched grosgrain ribbon<br />
• Linen thread<br />
• Anchored Rub-Ons®<br />
• Stampin’ Dimensionals®<br />
• 1/16” Circle punch<br />
• 1” Circle punch<br />
• S<strong>and</strong>ing blocks<br />
• Paperclip<br />
1. Trim 3/4" off non-scored bottom of Wild Wasabi pre-cut/<br />
pre-scored textured card stock using Paper Cutter.<br />
2. Fold card down on the middle score, then fold bottom up<br />
along bottom score.<br />
3. Stamp Posy background stamp in Wild Wasabi ink on<br />
bottom inside of card.<br />
4. Apply double-striped Rub-On to card using wooden stick<br />
included with Rub-Ons assortment.<br />
5. Adhere strip of Bashful Blue card stock to card.<br />
6. Stamp “Spring” in Wild Wasabi ink on card.<br />
7. Cover On Board flower with So Saffron card stock; s<strong>and</strong><br />
edges using s<strong>and</strong>ing block.<br />
8. Punch circle from Very Vanilla card stock using 1" Circle<br />
punch; adhere to flower.<br />
9. Adhere flower to card using Stampin’ Dimensionals.<br />
10. Tie Bashful Blue grosgrain ribbon around paperclip <strong>and</strong><br />
trim to desired length; repeat with Wild Wasabi doublestitched<br />
grosgrain ribbon.<br />
11. Attach paperclip to card.<br />
12. Stamp “Happy” in Bashful Blue ink on Very Vanilla card<br />
stock <strong>and</strong> cut out; punch a hole left of sentiment using<br />
1/16” Circle punch.<br />
13. Thread linen thread through hole <strong>and</strong> tie knot; attach to<br />
ribbon.<br />
FROM THE WILD WASABI CARD<br />
*<br />
STOCK SPECIAL PRODUCT OFFER<br />
© 2008 Stampin’ <strong>Up</strong>! All Rights Reserved
EASTER WISHES CARD<br />
MATERIALS LIST:<br />
• All Holidays stamp set<br />
• Please Come stamp set<br />
• Rose Red card stock<br />
• Bashful Blue textured card stock<br />
• Whisper White textured card stock<br />
• Wild Wasabi pre-cut/pre-scored textured card stock*<br />
• Wild Wasabi textured card stock<br />
• Jersey Shore Designer Series paper<br />
• Bashful Blue Classic Stampin’ Pad®<br />
• Bashful Blue striped grosgrain ribbon<br />
• Take Note Rub-Ons®<br />
• Stampin’ Dimensionals®<br />
• Scallop Circle punch<br />
• 1-3/8” Circle punch<br />
• Staple<br />
STEP-BY-STEP:<br />
1. Fold Wild Wasabi pre-cut/pre-scored textured card<br />
stock up on middle score, then fold top score down<br />
creating a front flap.<br />
2. Adhere Jersey Shore Designer Series paper to inside<br />
of envelope.<br />
3. Adhere Bashful Blue textured card stock to front of<br />
envelope below flap.<br />
4. Apply dotted line Rub-On to top of flap using wooden<br />
stick included with Rub-Ons assortment.<br />
5. Wrap strip of Bashful Blue textured card stock around<br />
flap <strong>and</strong> adhere to back of envelope <strong>and</strong> front flap.<br />
6. Wrap Bashful Blue striped grosgrain ribbon around<br />
flap <strong>and</strong> adhere to back of envelope <strong>and</strong> front flap;<br />
staple on right side.<br />
7. Adhere Wild Wasabi textured card stock stem <strong>and</strong><br />
leaves to envelope.<br />
8. Punch scallop circle from Rose Red card stock using<br />
Scallop Circle punch.<br />
9. Stamp “Easter wishes” in Bashful Blue ink on Whisper<br />
White textured card stock.<br />
10. Punch sentiment from card stock using 1-3/8” Circle punch;<br />
adhere to scallop circle using Stampin’ Dimensionals.<br />
11. Adhere flower to envelope using Stampin’ Dimensionals.<br />
12. Stamp “You’re invited” in Bashful Blue ink on Whisper White<br />
textured card stock; insert in envelope.<br />
FROM THE WILD WASABI CARD<br />
*<br />
STOCK SPECIAL PRODUCT OFFER<br />
© 2008 Stampin’ <strong>Up</strong>! All Rights Reserved
ENJOY EVERY MOMENT MINI-ALBUM<br />
MATERIALS LIST:<br />
• Enjoy Every Moment stamp set<br />
• Daisy Dash jumbo wheel<br />
• Real Red card stock<br />
• Whisper White card stock<br />
• Wild Wasabi pre-cut/pre-scored textured card stock*<br />
• Bashful Blue Classic Stampin’ Pad®<br />
• Real Red Classic Stampin’ Pad<br />
• Wild Wasabi Classic Stampin’ Pad<br />
• VersaMark® pad<br />
• Bashful Blue 1/4” grosgrain ribbon<br />
• Wild Wasabi double-stitched grosgrain ribbon<br />
• Linen thread<br />
• Stampin’ Dimensionals®<br />
• Hobby Blade<br />
• Crop-A-Dile<br />
• 1/2” Circle punch<br />
• Stamp-a-ma-jig<br />
• Staples<br />
STEP-BY-STEP:<br />
1. Holding the Wild Wasabi pre-cut/pre-scored textured<br />
card stock horizontally, fold the card in on both prescored<br />
lines.<br />
2. Score the non-scored end at 1-3/8” <strong>and</strong> fold in so the<br />
card becomes a book cover.<br />
3. Wheel Daisy Dash image in VersaMark ink on top of<br />
book cover.<br />
4. Stamp large flower image in VersaMark ink on front of<br />
book cover.<br />
5. Trim several sheets of Whisper White card stock to<br />
8-1/2” x 4-1/4”, then fold in half; punch two holes<br />
along fold using the Crop-A-Dile.<br />
6. Thread linen thread through holes <strong>and</strong> tie in back,<br />
creating book pages.<br />
7. Cut two slits into the sides of the book cover flaps<br />
using the Hobby Blade.<br />
8. Thread Wild Wasabi double-stitched ribbon through<br />
each slit <strong>and</strong> secure to inside of book cover.<br />
9. Insert white pages into book cover <strong>and</strong> secure under<br />
book cover flaps.<br />
10. Stamp “Enjoy” in Real Red ink on Whisper White card stock.<br />
11. Stamp “Every moment” in Wild Wasabi ink above “Enjoy”<br />
sentiment using Stamp-a-ma-jig.<br />
12. Stamp small flower image in Bashful Blue ink on Whisper<br />
White card stock; repeat using Wild Wasabi ink on Whisper<br />
White card stock.<br />
13. Punch small flower images out with 1/2” Circle punch.<br />
14. Stamp large flower image in Bashful Blue ink on Whisper<br />
White card stock; cut out.<br />
15. Adhere small Wild Wasabi flower to center of large Bashful<br />
Blue flower using Stampin’ Dimensionals.<br />
16. Adhere small Bashful Blue flower to centre of ‘o’ in “Enjoy”<br />
using Stampin’ Dimensionals.<br />
17. Adhere Whisper White card stock to Real Red card stock;<br />
staple twice.<br />
18. Thread Bashful Blue 1/4” grosgrain ribbon through staple<br />
<strong>and</strong> tie knot; trim ribbon to desired length.<br />
19. Adhere Real Red card stock to book cover.<br />
20. Adhere large Bashful Blue flower to book cover using<br />
Stampin’ Dimensionals, layering it over the VersaMark<br />
large flower.<br />
FROM THE WILD WASABI CARD<br />
*<br />
STOCK SPECIAL PRODUCT OFFER<br />
© 2008 Stampin’ <strong>Up</strong>! All Rights Reserved
FATHER’S DAY TIE HOLDER<br />
MATERIALS LIST:<br />
STEP-BY-STEP:<br />
• Always stamp set<br />
• Bashful Blue card stock<br />
• Bordering Blue card stock<br />
• Kraft card stock<br />
• Real Red card stock<br />
• Wild Wasabi pre-cut/pre-scored textured card stock*<br />
• Wild Wasabi textured card stock<br />
• On Board Lots of Letters<br />
• Bordering Blue Classic Stampin’ Pad®<br />
• Stampin’ Dimensionals®<br />
• 1-1/4” Square punch<br />
• 1-3/8” Square punch<br />
1. Holding the Wild Wasabi pre-cut/pre-scored textured<br />
card stock vertically, fold the card in half on<br />
pre-scored line.<br />
1. Score the non-scored end at 1-3/8”.<br />
2. Stamp “You mean everything to me” in Bordering Blue ink<br />
on Kraft card stock; cut out.<br />
3. Punch square from Bashful Blue card stock using 1-3/8”<br />
Square punch; repeat with Real Red card stock <strong>and</strong><br />
Bordering Blue card stock.<br />
4. Punch three squares from Wild Wasabi textured card<br />
stock using 1-1/4” Square punch.<br />
5. Adhere Wild Wasabi squares to Bashful Blue, Real Red,<br />
<strong>and</strong> Bordering Blue squares.<br />
6. Adhere On Board letters ‘d,’ ‘a,’ <strong>and</strong> ‘d’ to each square.<br />
7. Cut strips of Bordering Blue, Real Red, Kraft, <strong>and</strong> Bashful<br />
Blue card stock; adhere to front of card.<br />
8. Adhere squares to card using Stampin’ Dimensionals.<br />
9. Adhere sentiment to card using Stampin’ Dimensionals.<br />
10. Fold each bottom end of card in along the scored lines,<br />
laying one flap over the other; adhere shut using<br />
Sticky Strip.<br />
11. Insert tie into tie holder.<br />
FROM THE WILD WASABI CARD<br />
*<br />
STOCK SPECIAL PRODUCT OFFER<br />
© 2008 Stampin’ <strong>Up</strong>! All Rights Reserved
PINCH PROOF BUTTON<br />
MATERIALS LIST:<br />
• Pinch Proof stamp set<br />
• Green Galore card stock<br />
• Whisper White card stock<br />
• Wild Wasabi pre-cut/pre-scored textured card stock*<br />
• Wild Wasabi Classic Stampin’ Pad<br />
• Wild Wasabi double-stitched grosgrain ribbon<br />
• Scallop Circle punch<br />
• 1/2” Circle punch<br />
• 1” Circle punch<br />
• 1-3/8” Circle punch<br />
• Metal edge tag<br />
• Staple<br />
STEP-BY-STEP:<br />
1. Punch scallop circle from Wild Wasabi pre-cut/<br />
pre-scored textured card stock using Scallop Circle<br />
punch.**<br />
2. Stamp pinch proof image in Wild Wasabi ink on<br />
Whisper White card stock; punch out using 1-3/8”<br />
Circle punch.<br />
3. Stamp second pinch proof image in Wild Wasabi ink<br />
on Green Galore card stock; punch out using 1” Circle<br />
punch; punch out clover using 1/2” Circle punch.<br />
4. Stamp third pinch proof image in Wild Wasabi ink on<br />
Whisper White card stock; punch out clover using 1/2”<br />
Circle punch.<br />
5. Adhere metal edge tag to scallop circle; adhere 1-3/8”<br />
circle to metal edge tag; adhere “pinch proof” to<br />
centre of 1-3/8” circle; adhere clover image to centre of<br />
sentiment.<br />
6. Loop ribbon <strong>and</strong> secure with a staple; adhere to back<br />
of button.<br />
FROM THE WILD WASABI CARD<br />
*<br />
STOCK SPECIAL PRODUCT OFFER<br />
ONE SHEET OF WILD WASABI PRE-CUT/PRE-SCORED<br />
*<br />
TEXTURED CARD STOCK WILL YIELD NINE<br />
SCALLOP CIRCLES.<br />
© 2008 Stampin’ <strong>Up</strong>! All Rights Reserved