08 71 00 Door Hardware.pdf - Milestone Construction Services, Inc
08 71 00 Door Hardware.pdf - Milestone Construction Services, Inc
08 71 00 Door Hardware.pdf - Milestone Construction Services, Inc

Create successful ePaper yourself
Turn your PDF publications into a flip-book with our unique Google optimized e-Paper software.
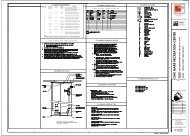
Project Specifications: Transit Maintenance and Operations Facility<br />
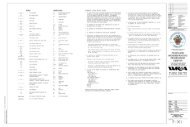
REESE NATL GUARD PEMKO<br />
195C 140MA 51CM<br />
R201A 16A 346C<br />
964C 6<strong>00</strong>A 18061CP<br />
970C A626A 45061CP<br />
Note: Changes in materials (e.g., stainless steel) may change the equivalent<br />
manufacturer’s model number. Contractor is to use material shown in<br />
schedule and change model number as required to obtain same style in<br />
specified material.<br />
PART 3<br />
EXECUTION<br />
3.01 INSTALLATION<br />
A. Factory representatives of the lock, exit device and closer manufacturers will<br />
each provide one hour of installation training on the job Site to the installation<br />
crew for this project.<br />
B. Representatives will return to the jobsite after 40 percent of the hardware has<br />
been installed to check for problems and answer questions from the<br />
installation crew. Representative will inform the Architect, General<br />
Contractor and Owner, in writing, of any serious problems encountered during<br />
this inspection.<br />
C. Mount hardware units at the height indicated in the Recommended Locations<br />
for Builder's <strong>Hardware</strong> for Standard Steel <strong>Door</strong>s and Frames by the <strong>Door</strong> and<br />
<strong>Hardware</strong> Institute; except as specifically indicated or required to comply with<br />
the governing regulations or as otherwise directed by the architect.<br />
D. Install each hardware item in compliance with the manufacturer's<br />
recommendations and instructions. Whenever cutting or fitting is required to<br />
install hardware on or into surfaces which are later to be painted, or finished<br />
another way; co-ordinate removal, storage and the re-installation of hardware<br />
with the finishing work specified in Division 9 sections. Do not install surface<br />
mounted hardware until finishes have been completed on the substrate.<br />
E. Drill and counter sink units that are not factory prepared for anchorage<br />
fasteners. Space anchors and fasteners in accordance with industry standards.<br />
F. Set thresholds for exterior openings in full bed of butyl rubber or<br />
polyisobutylene mastic sealant.<br />
G. Adjust and clean each operating item of hardware and each door to ensure the<br />
proper operation or function of each unit. Replace units that cannot be<br />
adjusted to operate freely and smoothly as intended for the application made.<br />
DOOR HARDWARE<br />
PW/WBG/413749<br />
<strong>08</strong> <strong>71</strong> <strong>00</strong> - 10 JULY 30, 2012<br />
©COPYRIGHT 2012 CH2M HILL