FP-1601 FieldPoint Quick Start Guide - Spectroscopic
FP-1601 FieldPoint Quick Start Guide - Spectroscopic
FP-1601 FieldPoint Quick Start Guide - Spectroscopic

You also want an ePaper? Increase the reach of your titles
YUMPU automatically turns print PDFs into web optimized ePapers that Google loves.
TM<br />
<strong>FieldPoint</strong><br />
<strong>FP</strong>-<strong>1601</strong> <strong>FieldPoint</strong> <strong>Quick</strong> <strong>Start</strong> <strong>Guide</strong><br />
What You Need<br />
to Get Set Up<br />
• <strong>FP</strong>-<strong>1601</strong> network module<br />
• 35 mm DIN rail<br />
• Two DIN rail locks (included)<br />
• Terminal base(s)<br />
• I/O module(s)<br />
• 11–30 VDC power supply<br />
• Accessories: Ethernet cable,<br />
flathead screwdriver<br />
• PC running Windows<br />
• National Instruments <strong>FieldPoint</strong><br />
Software CD<br />
1<br />
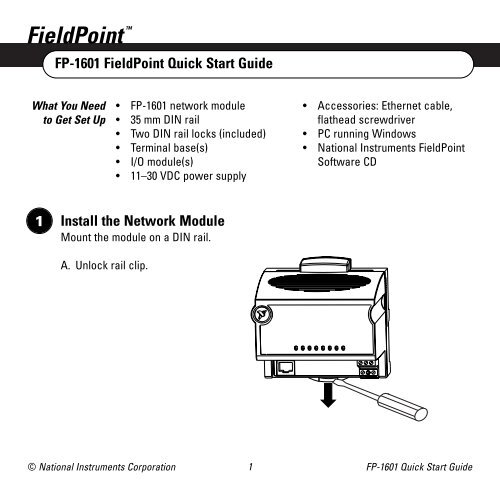
Install the Network Module<br />
Mount the module on a DIN rail.<br />
A. Unlock rail clip.<br />
© National Instruments Corporation<br />
1 <strong>FP</strong>-<strong>1601</strong> <strong>Quick</strong> <strong>Start</strong> <strong>Guide</strong>
NOTE Do not use spliced DIN rails. Use only a single DIN rail.<br />
B. Hook lip on back of module<br />
onto top of DIN rail, press<br />
down, and snap into place.<br />
C. Slide module into position<br />
and lock rail clip.<br />
<strong>FP</strong>-<strong>1601</strong> <strong>Quick</strong> <strong>Start</strong> <strong>Guide</strong><br />
2<br />
ni.com
2<br />
Install the Terminal Base(s)<br />
CAUTION Connect the terminal bases to the network module before applying<br />
power to the module. Do not connect or disconnect terminal bases while<br />
power is applied to the network module.<br />
A. Unlock rail clip.<br />
B. Press base onto rail.<br />
© National Instruments Corporation<br />
3 <strong>FP</strong>-<strong>1601</strong> <strong>Quick</strong> <strong>Start</strong> <strong>Guide</strong>
C. Slide base into position and<br />
lock rail clip. Be careful not<br />
to bend any pins.<br />
D. Repeat for each terminal base, up to nine for each network module in most cases.<br />
You can use one or two extender cables (which you can order separately) if the<br />
<strong>FieldPoint</strong> bank is too long for the available space. Make sure there are no gaps<br />
between terminal bases.<br />
E. You must install DIN rail locks at each end of the bank to ensure reliable<br />
connections between terminal bases and network module. Two rail locks are<br />
included with each network module. Place protective cover on last base.<br />
<strong>FP</strong>-<strong>1601</strong> <strong>Quick</strong> <strong>Start</strong> <strong>Guide</strong><br />
4<br />
ni.com
3<br />
Install the I/O Module(s)<br />
It does not matter where you install each I/O module, except in the following cases:<br />
• If you plan to cascade power between any I/O modules using the V and C terminals,<br />
those modules should be grouped together.<br />
CAUTION Cascading power defeats isolation.<br />
• For more accurate measurements, place thermocouple modules away from heat<br />
sources, including network modules and relay modules.<br />
A. Align slots on module with guide rails<br />
on base, and press module onto base<br />
until terminal base latch locks module<br />
in place.<br />
B. Repeat for each I/O module.<br />
4<br />
Connect the <strong>FP</strong>-<strong>1601</strong> to the Network<br />
Connect the <strong>FP</strong>-<strong>1601</strong> to an<br />
Ethernet network by<br />
connecting the RJ-45<br />
Ethernet port of the<br />
<strong>FP</strong>-<strong>1601</strong> to an Ethernet<br />
hub using a standard<br />
Category 5 Ethernet cable.<br />
Straight-Through<br />
UTP Cable<br />
Straight-Through<br />
UTP Cable<br />
© National Instruments Corporation<br />
5 <strong>FP</strong>-<strong>1601</strong> <strong>Quick</strong> <strong>Start</strong> <strong>Guide</strong>
Optionally, you can connect an<br />
<strong>FP</strong>-<strong>1601</strong> directly to a computer using<br />
an Ethernet crossover cable.<br />
Crossover Cable<br />
Do not use a cable longer than 100 m.<br />
If you are using a 100 Mbps Ethernet,<br />
National Instruments recommends using a Category 5 shielded twisted-pair cable.<br />
If you need to build your own cable, refer to the <strong>FP</strong>-<strong>1601</strong> User Manual specifications<br />
section for cabling details.<br />
5<br />
Wire Power to the <strong>FieldPoint</strong> System<br />
A. Connect power supply leads to the V and C terminals of the network module. Use an<br />
11–30 VDC, 15 W minimum power supply such as the NI <strong>FP</strong>-PS-4. Refer to the I/O<br />
module operating instructions for the power requirements of each module. Refer to<br />
the Specifications section of this document for instructions on calculating the<br />
power requirement of the <strong>FieldPoint</strong> bank.<br />
B Connect power to the I/O modules that require external power for outputs (examples<br />
include output, counter, relay, PWM, PG, and QUAD modules). It is generally best to<br />
power each such module by connecting an external power supply to the V SUP and<br />
COM terminals. Refer to the I/O module operating instructions for power<br />
requirements, detailed wiring diagrams, and safe wiring practices.<br />
<strong>FP</strong>-<strong>1601</strong> <strong>Quick</strong> <strong>Start</strong> <strong>Guide</strong><br />
6<br />
ni.com
CAUTION Cascading power from neighboring bases or network modules<br />
defeats isolation between cascaded modules.<br />
Separate Power Supply<br />
(Recommended)<br />
Cascaded Power<br />
(Reduces Isolation)<br />
No External<br />
Power Required<br />
<strong>FP</strong>-<strong>1601</strong><br />
<strong>FP</strong>-AI-100 <strong>FP</strong>-AO-200 <strong>FP</strong>-RLY-420 <strong>FP</strong>-TC-120<br />
Shades of gray indicate<br />
different voltage potentials.<br />
15 16 V<br />
31 32 C<br />
V 1 2 3<br />
C 17 18<br />
Power supply connected to<br />
V SUP and COM terminals<br />
CAUTION Cascading<br />
power defeats isolation.<br />
© National Instruments Corporation<br />
7 <strong>FP</strong>-<strong>1601</strong> <strong>Quick</strong> <strong>Start</strong> <strong>Guide</strong>
6<br />
Connect to Field Devices<br />
Use the operating instructions for each I/O module to help you connect field devices.<br />
7<br />
Power Up the <strong>FieldPoint</strong> System<br />
CAUTION Connect terminal bases to the <strong>FP</strong>-<strong>1601</strong> before applying power.<br />
Make sure the RESET DIP switch is<br />
not on. Plug in each power supply to<br />
the <strong>FieldPoint</strong> bank. You should see<br />
the POWER and STATUS LEDs come<br />
on. After about 5 seconds, the<br />
STATUS LED begins flashing, one<br />
flash at a time. This indicates that the<br />
<strong>FP</strong>-<strong>1601</strong> is ready to be configured. If<br />
the LEDs do not follow this sequence,<br />
refer to the <strong>FP</strong>-<strong>1601</strong> User Manual<br />
troubleshooting appendix.<br />
O<br />
F<br />
F<br />
/<br />
O<br />
N<br />
1<br />
2<br />
3<br />
4<br />
5<br />
6<br />
7<br />
RESET<br />
<strong>FP</strong>-<strong>1601</strong> <strong>Quick</strong> <strong>Start</strong> <strong>Guide</strong><br />
8<br />
ni.com
8<br />
Install Software on the Host PC<br />
A. Install the software packages you plan to use, such as LabVIEW, LabVIEW RT,<br />
Measurement Studio, VI Logger, or LabWindows /CVI , before you install the<br />
<strong>FieldPoint</strong> software. The <strong>FieldPoint</strong> software installation installs the LabVIEW VIs<br />
and examples and the LabWindows/CVI instrument driver only if it finds the<br />
corresponding development software installed.<br />
B. Close all other applications.<br />
C. Insert the National Instruments <strong>FieldPoint</strong><br />
Software CD into the CD-ROM drive of<br />
your computer.<br />
D. Follow the onscreen instructions to<br />
complete the installation.<br />
NOTE If the setup does not launch automatically, select <strong>Start</strong>»Run from<br />
Windows, enter d:\setup, where d is the letter of the CD-ROM drive, and<br />
select OK.<br />
© National Instruments Corporation<br />
9 <strong>FP</strong>-<strong>1601</strong> <strong>Quick</strong> <strong>Start</strong> <strong>Guide</strong>
9<br />
Configure the <strong>FP</strong>-<strong>1601</strong><br />
Launch NI Measurement & Automation Explorer (MAX) to configure the <strong>FP</strong>-<strong>1601</strong>. For<br />
information about configuring the <strong>FP</strong>-<strong>1601</strong> in software, refer to the Measurement &<br />
Automation Explorer Help for <strong>FieldPoint</strong> (<strong>Start</strong>»Programs»National Instruments»<br />
<strong>FieldPoint</strong>»<strong>FieldPoint</strong> Help).<br />
<strong>FP</strong>-<strong>1601</strong> <strong>Quick</strong> <strong>Start</strong> <strong>Guide</strong><br />
10<br />
ni.com
Specifications<br />
Network<br />
Network interface . . . . . . . . . . . . . . . 10BaseT and 100BaseTX Ethernet<br />
Compatibility. . . . . . . . . . . . . . . . . . . . IEEE 802.3<br />
Communications rate . . . . . . . . . . . . 10 Mbps, 100 Mbps, autonegotiated<br />
Maximum cabling distance . . . . . . . 100 m/segment<br />
Maximum power supplied<br />
to terminal bases . . . . . . . . . . . . . . . . 9 W<br />
Maximum number of banks . . . . . . . Determined by network topology<br />
Power Requirements<br />
Power supply range . . . . . . . . . . . . . 11–30 VDC<br />
Recommended power supply<br />
<strong>FP</strong>-<strong>1601</strong> with<br />
up to 5 modules . . . . . . . . . . . . 15 W (<strong>FP</strong>-PS-4 or equivalent)<br />
<strong>FP</strong>-<strong>1601</strong> with<br />
6 to 9 modules . . . . . . . . . . . . . 20 W<br />
Power consumption . . . . . . . . . . . . . 4.5 W + 1.1(I/O module power requirements)<br />
Physical Characteristics<br />
Screw-terminal wiring . . . . . . . . . . . 16–26 AWG copper conductor wire with 7 mm<br />
(0.28 in.) of insulation stripped from the end<br />
Torque for screw terminals . . . . . . . 0.5–0.6 N · m (4.4–5.3 lb · in.)<br />
Weight. . . . . . . . . . . . . . . . . . . . . . . . . 235 g (8.3 oz)<br />
© National Instruments Corporation<br />
11 <strong>FP</strong>-<strong>1601</strong> <strong>Quick</strong> <strong>Start</strong> <strong>Guide</strong>
Environmental<br />
<strong>FieldPoint</strong> modules are intended for indoor use only. For outdoor use, they must be<br />
installed in a suitable sealed enclosure.<br />
Operating temperature . . . . . . . . . . . –25 to 55 °C<br />
Storage temperature . . . . . . . . . . . . . –55 to 85 °C<br />
Humidity . . . . . . . . . . . . . . . . . . . . . . . 10 to 90% RH, noncondensing<br />
Maximum altitude . . . . . . . . . . . . . . . 2,000 m<br />
Pollution Degree . . . . . . . . . . . . . . . . 2<br />
Safety<br />
The <strong>FP</strong>-<strong>1601</strong> is designed to meet the requirements of the following standards for safety<br />
and electrical equipment for measurement, control, and laboratory use:<br />
• EN 61010-1, IEC 61010-1<br />
• UL 3121-1, UL 61010C-1<br />
• CAN/CSA C22.2 No. 1010.1<br />
For UL and other safety certifications, refer to the product label or to ni.com.<br />
Electromagnetic Compatibility<br />
CE, C-Tick and FCC Part 15 (Class A) Compliant<br />
Emissions . . . . . . . . . . . . . . . . . . . . . . EN 55011 Class A at 10 m FCC Part 15A<br />
above 1 GHz<br />
Immunity . . . . . . . . . . . . . . . . . . . . . . . EN 61326: 1997+A2:2001, Table 1<br />
NOTE For EMC compliance, operate this device with shielded cabling.<br />
<strong>FP</strong>-<strong>1601</strong> <strong>Quick</strong> <strong>Start</strong> <strong>Guide</strong><br />
12<br />
ni.com
CE Compliance<br />
This product meets the essential requirements of applicable European Directives,<br />
as amended for CE Marking, as follows:<br />
Low-Voltage Directive (safety). . . . . 73/23/EEC<br />
Electromagnetic Compatibility<br />
Directive (EMC) . . . . . . . . . . . . . . . . . 89/336/EEC<br />
NOTE Refer to the Declaration of Conformity (DoC) for this product for any<br />
additional regulatory compliance information. To obtain the DoC for this<br />
product, click Declarations of Conformity Information at<br />
ni.com/hardref.nsf/.<br />
Mechanical Dimensions<br />
107.19 mm<br />
(4.22 in.)<br />
109.5 mm<br />
(4.31 in.)<br />
91.44 mm<br />
(3.60 in.)<br />
© National Instruments Corporation<br />
13 <strong>FP</strong>-<strong>1601</strong> <strong>Quick</strong> <strong>Start</strong> <strong>Guide</strong>
Go to ni.com/support for the most current manuals, examples, and troubleshooting information.<br />
For telephone support in the United States, create your service request at ni.com/ask and follow the<br />
calling instructions or dial 512 795 8248. For telephone support outside the United States, contact your<br />
local branch office:<br />
Australia 02 612 9672 8846, Austria 43 0 662 45 79 90 0, Belgium 32 0 2 757 00 20, Brazil 55 11 3262 3599,<br />
Canada (Calgary) 403 274 9391, Canada (Montreal) 514 288 5722, Canada (Ottawa) 613 233 5949,<br />
Canada (Québec) 514 694 8521, Canada (Toronto) 905 785 0085, Canada (Vancouver) 514 685 7530,<br />
China 86 21 6555 7838, Czech Republic 420 2 2423 5774, Denmark 45 45 76 26 00, Finland 385 0 9 725 725 11,<br />
France 33 0 1 48 14 24 24, Germany 49 0 89 741 31 30, Greece 30 2 10 42 96 427, India 91 80 51190000,<br />
Israel 972 0 3 6393737, Italy 39 02 413091, Japan 81 3 5472 2970, Korea 82 02 3451 3400,<br />
Malaysia 603 9131 0918, Mexico 001 800 010 0793, Netherlands 31 0 348 433 466,<br />
New Zealand 64 09 914 0488, Norway 47 0 32 27 73 00, Poland 48 0 22 3390 150, Portugal 351 210 311 210,<br />
Russia 7 095 238 7139, Singapore 65 6226 5886, Slovenia 386 3 425 4200, South Africa 27 0 11 805 8197,<br />
Spain 34 91 640 0085, Sweden 46 0 8 587 895 00, Switzerland 41 56 200 51 51, Taiwan 886 2 2528 7227,<br />
Thailand 662 992 7519, United Kingdom 44 0 1635 523545<br />
CVI, <strong>FieldPoint</strong>, LabVIEW, Measurement Studio, National Instruments, NI, and ni.com are<br />
trademarks of National Instruments Corporation. Product and company names mentioned herein are<br />
trademarks or trade names of their respective companies.<br />
For patents covering National Instruments products, refer to the appropriate location:<br />
Help»Patents in your software, the patents.txt file on your CD, or ni.com/patents.<br />
© 2001–2003 National Instruments Corporation. All rights reserved.<br />
*322978C-01*<br />
322978C-01 Apr03