Aureol Beamshaper - Strand Lighting
Aureol Beamshaper - Strand Lighting
Aureol Beamshaper - Strand Lighting
Create successful ePaper yourself
Turn your PDF publications into a flip-book with our unique Google optimized e-Paper software.
OPERATION MANUAL<br />
AUREOL BEAMSHAPER accessory<br />
Thank you for purchasing a Philips Selecon <strong>Aureol</strong> BeamShaper accessory. We have designed this product to<br />
provide you with a superior fitting in performance design and engineering. We are confident that it will perform<br />
to your expectations for many years to come.<br />
Caution! Installation is entirely at your risk. Read this manual from cover to cover before attempting<br />
installation. Do not attempt installation unless you are suitably qualified. If you do not understand a point in<br />
this manual, don’t guess. Don’t take short cuts. If in doubt, stop! Contact Philips Selecon or one of its<br />
authorised distributors for advice. Don’t be afraid to ask for help.<br />
Key operating points and features<br />
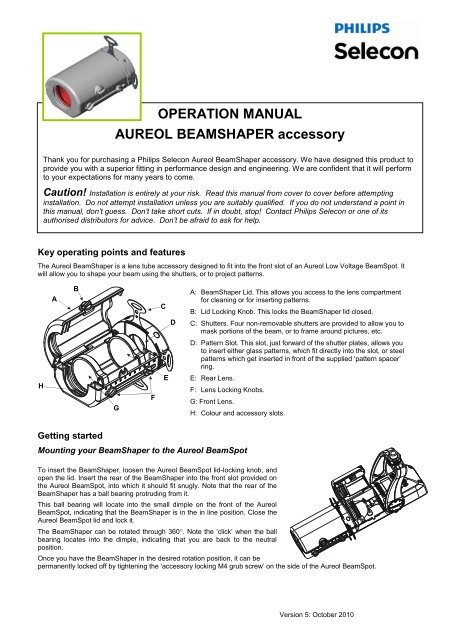
The <strong>Aureol</strong> BeamShaper is a lens tube accessory designed to fit into the front slot of an <strong>Aureol</strong> Low Voltage BeamSpot. It<br />
will allow you to shape your beam using the shutters, or to project patterns.<br />
A<br />
B<br />
C<br />
D<br />
A: BeamShaper Lid. This allows you access to the lens compartment<br />
for cleaning or for inserting patterns.<br />
B: Lid Locking Knob. This locks the BeamShaper lid closed.<br />
C: Shutters. Four non-removable shutters are provided to allow you to<br />
mask portions of the beam, or to frame around pictures, etc.<br />
D: Pattern Slot. This slot, just forward of the shutter plates, allows you<br />
to insert either glass patterns, which fit directly into the slot, or steel<br />
patterns which get inserted in front of the supplied ‘pattern spacer’<br />
ring.<br />
H<br />
G<br />
F<br />
E<br />
E: Rear Lens.<br />
F: Lens Locking Knobs.<br />
G: Front Lens.<br />
H: Colour and accessory slots.<br />
Getting started<br />
Mounting your BeamShaper to the <strong>Aureol</strong> BeamSpot<br />
To insert the BeamShaper, loosen the <strong>Aureol</strong> BeamSpot lid-locking knob, and<br />
open the lid. Insert the rear of the BeamShaper into the front slot provided on<br />
the <strong>Aureol</strong> BeamSpot, into which it should fit snugly. Note that the rear of the<br />
BeamShaper has a ball bearing protruding from it.<br />
This ball bearing will locate into the small dimple on the front of the <strong>Aureol</strong><br />
BeamSpot, indicating that the BeamShaper is in the in line position. Close the<br />
<strong>Aureol</strong> BeamSpot lid and lock it.<br />
The BeamShaper can be rotated through 360. Note the ‘click’ when the ball<br />
bearing locates into the dimple, indicating that you are back to the neutral<br />
position.<br />
Once you have the BeamShaper in the desired rotation position, it can be<br />
permanently locked off by tightening the ‘accessory locking M4 grub screw’ on the side of the <strong>Aureol</strong> BeamSpot.<br />
Version 5: October 2010
Lamps<br />
The <strong>Aureol</strong> BeamShaper is a precision optical instrument and is shipped with the GE Precise 50W 25° 12V MR16 lamp. This<br />
is the Philips Selecon preferred lamp for the BeamShaper however you can also use the following lamps in order of<br />
preference (lamps other than these may not give you the best beam quality):<br />
Osram 50W 38 Philips Halotone ES 45W 8 or 24 Radium Mega 50W or 65W 10<br />
Philips Masterline Plus 50W 24 Philips Standard line 50W 10 Ushio 50W 11<br />
Focusing the BeamShaper<br />
Zoom Focus<br />
The <strong>Aureol</strong> BeamShaper has two lenses that can be moved until the desired<br />
beam quality is reached. To move the lenses, simply loosen the Lens locking<br />
knobs and move them into the desired position, and then tighten the locking<br />
knobs.<br />
The front lens controls the size of the beam of light (forward = small beam,<br />
backwards = large beam), and the rear lens controls the focus quality of the<br />
beam (soft edged or hard edged).<br />
A reference scale is provided on the side of the BeamShaper to allow you to<br />
record your pre-set lens positions, so that they can easily be reproduced.<br />
Note that if the spotlight has been on for more than a few minutes, it may be<br />
hot.<br />
The four shutters can be used to mask off portions of the beam, or to frame<br />
areas, etc. Both the depth and the angle of the shutters can be controlled,<br />
allowing virtually any angle. The BeamShaper can also be rotated through<br />
360 allowing for easy framing of non-horizontal shapes.<br />
Operating the BeamShaper<br />
Inserting Patterns and colours or accessories<br />
The <strong>Aureol</strong> BeamShaper is provided with a slot to accept patterns for projection. This slot<br />
is directly in front of the shutter plates. If you are using glass patterns, they can be<br />
inserted directly into the slot (up to a maximum thickness of 2mm).<br />
If you are using steel patterns, which are much thinner than glass patterns, you must first<br />
insert the pattern spacer into the slot (figure 1), and then slide the steel pattern in front of<br />
the pattern spacer (figure 2).<br />
Patterns to be used are ‘E’ size patterns, with an outside diameter of 37.5mm, and a<br />
standard image diameter of 28mm. Note that as the <strong>Aureol</strong> has a gate of 32mm, the<br />
image could in actual fact be any size up to 32mm in diameter.<br />
Once the lens compartment lid has been closed, it will lock the pattern in position.<br />
Two slots are provided at the front of the BeamShaper for colour media or accessories.<br />
The rear slot will accept media such as dichroic colour filters that are up to 2.5mm thick.<br />
The front slot will accept media that is up to 4mm thick, or will take accessories such as<br />
animation discs, etc.<br />
Colour media can be 50mm round or square. If using square colour media, care should<br />
be taken not to chip the corners of the media when closing the lid.<br />
1<br />
2<br />
Pattern<br />
Spacer<br />
Pattern<br />
Safety and maintenance<br />
Maintain the <strong>Aureol</strong> BeamShaper in good condition and performing at its best by cleaning<br />
it regularly with a soft cloth. The BeamShaper’s lenses should only be cleaned with optical tissue paper.<br />
The above are the only maintenance tasks that can be safely carried out by non approved personnel.<br />
Philips Selecon has manufactured this luminaire in accordance with recognised best practices to recommended international<br />
safety standards. It is your responsibility to maintain this luminaire in good and safe working condition.<br />
Repairs should only be carried out by suitably qualified persons. Do not operate the luminaire with damaged lamps or cable,<br />
etc. Consult your Philips Selecon distributor for assistance. Only replace damaged parts with authorised <strong>Aureol</strong> spares.<br />
Version 5: October 2010
Limited Warranty<br />
Philips Selecon warrants all its display luminaires against defects in materials or workmanship. The term of this warranty is<br />
three years; from the date of delivery.<br />
Display relates to typical usage such as display lighting in a Museum viz: 10 – 12 hrs per day, 7 days per week.<br />
This warranty is void in any of the following circumstances:<br />
(a) The luminaire has been misused, neglected, damaged or abused.<br />
(b) The luminaire has been improperly installed, operated, repaired or maintained.<br />
(c) The luminaire has been modified.<br />
(d) The luminaire has been connected to other equipment with which it is not compatible.<br />
(e) The luminaire has been used or stored in conditions outside its electrical or environmental specifications.<br />
(f) The luminaire has been used for purposes other than for which it was designed.<br />
(g) The luminaire has been used outside its stated specifications and operating parameters.<br />
Correct installation of the luminaire is the owner’s responsibility.<br />
To assert a warranty claim, complete the Philips Selecon Return Authorisation Form (available from www.seleconlight.com ).<br />
Return the luminaire to Philips Selecon or its authorised agent.<br />
If Philips Selecon accepts the warranty claim, Philips Selecon will provide, or arrange for, service, repair or replacement as<br />
Selecon shall determine in its sole discretion. Philips Selecon shall bear the cost of such service, repair or replacement.<br />
However, the owner shall bear the cost of freight and insurance on the luminaire, both ways. If Philips Selecon does not<br />
wish to service, repair or replace the defective luminaire, it shall refund the purchase price.<br />
Philips Selecon’s sole responsibility is to repair, replace or service a luminaire subject to a valid warranty claim. Under no<br />
circumstance will Philips Selecon be liable for direct, indirect, incidental, special or consequential costs or damages,<br />
including dismantling and re-installation costs, loss of operations or profits, to the maximum extent permitted by law.<br />
Philips Selecon accepts no liability for personal injury or property damage resulting from failure to heed relevant operating<br />
and safety procedures specified by Philips Selecon or imposed by law.<br />
This is an express warranty. Philips Selecon disclaims any other express or implied warranties, including warranties of<br />
merchantability or fitness for purpose, to the maximum extent permitted by law.<br />
Some jurisdictions do not allow limitations or disclaimers of implied or statutory warranties. Some jurisdictions do not allow<br />
disclaimers or exclusions of consequential or incidental damages. Therefore, the above disclaimers, limitations and<br />
exclusions may not apply in all jurisdictions in which Philips Selecon sells its luminaires.<br />
This warranty gives the owner specific legal rights. The owner may have other rights or remedies pursuant to the laws in its<br />
territory. Nothing in this limited warranty should be construed as limiting or restricting any other statutory right or remedy of<br />
the owner, except for such limitations or restrictions herein as may be allowed by the law of the territory.<br />
Philips Selecon has a policy of continual product improvement and specifications are subject to change without notice.<br />
Manufacturer<br />
Philips Selecon, 19-21 Kawana Street, Northcote, Auckland, New Zealand<br />
Ph: + 64 9 481 0100, Fax: + 64 9 481 0101<br />
www.seleconlight.com<br />
Version 5: October 2010


