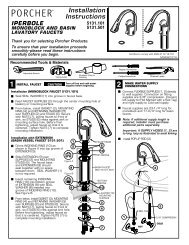
Installation Instructions - Porcher
Installation Instructions - Porcher
Installation Instructions - Porcher

You also want an ePaper? Increase the reach of your titles
YUMPU automatically turns print PDFs into web optimized ePapers that Google loves.
<strong>Installation</strong><br />
<strong>Instructions</strong><br />
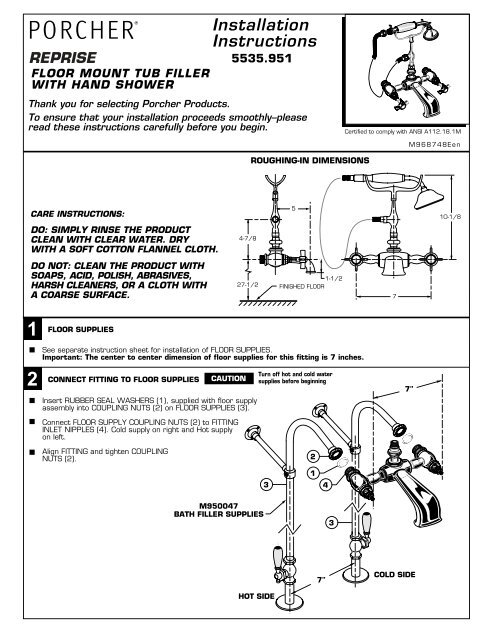
REPRISE 5535.951<br />
FLOOR MOUNT TUB FILLER<br />
WITH HAND SHOWER<br />
Thank you for selecting <strong>Porcher</strong> Products.<br />
To ensure that your installation proceeds smoothly--please<br />
read these instructions carefully before you begin.<br />
Certified to comply with ANSI A112.18.1M<br />
M968748Een<br />
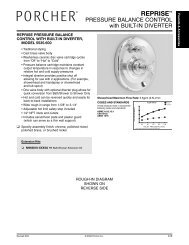
ROUGHING-IN DIMENSIONS<br />
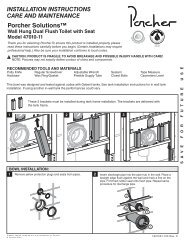
CARE INSTRUCTIONS:<br />
5<br />
10-1/8<br />
DO: SIMPLY RINSE THE PRODUCT<br />
CLEAN WITH CLEAR WATER. DRY<br />
WITH A SOFT COTTON FLANNEL CLOTH.<br />
4-7/8<br />
DO NOT: CLEAN THE PRODUCT WITH<br />
SOAPS, ACID, POLISH, ABRASIVES,<br />
HARSH CLEANERS, OR A CLOTH WITH<br />
A COARSE SURFACE.<br />
27-1/2<br />
1-1/2<br />
FINISHED FLOOR<br />
7<br />
1<br />
FLOOR<br />
SUPPLIES<br />
2<br />
CONNECT<br />
See separate instruction sheet for installation of FLOOR SUPPLIES.<br />
Important: The center to center dimension of floor supplies for this fitting is 7 inches.<br />
CAUTION<br />
Insert RUBBER SEAL WASHERS (1), supplied with floor supply<br />
assembly into COUPLING NUTS (2) on FLOOR SUPPLIES (3).<br />
Turn off hot and cold water<br />
supplies before beginning<br />
7"<br />
FITTING TO FLOOR SUPPLIES<br />
COLD SIDE<br />
Connect FLOOR SUPPLY COUPLING NUTS (2) to FITTING<br />
INLET NIPPLES (4). Cold supply on right and Hot supply<br />
on left.<br />
Align FITTING and tighten COUPLING<br />
NUTS (2).<br />
2<br />
3<br />
1<br />
4<br />
M950047<br />
BATH FILLER SUPPLIES<br />
3<br />
7"<br />
HOT SIDE
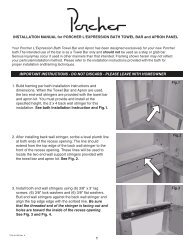
3<br />
INSTALL<br />
HANDLES<br />
Turn VALVE to OFF position.<br />
1<br />
Push CROSS HANDLE (1) onto VALVE STEM<br />
(2). Check alignment, if not satisfactory align.<br />
Insert HANDLE SCREW (3) and tighten.<br />
2<br />
3<br />
4<br />
Press in INDEX BUTTON (4).<br />
Repeat steps for opposite handle assembly.<br />
3<br />
FITTING<br />
BRACKET<br />
1<br />
Insert SEAL WASHER (1) and connect the BRACKET (2) to BRACKET<br />
NIPPLE (3) on top of FAUCET. Align and tighten firmly.<br />
Add SEAL WASHER (4) and connect VACUUM BREAKER (5 not supplied and<br />
must be ordered separately if required) to outlet Nipple on side of BRACKET (2).<br />
Add SEAL WASHER (6) and connect smaller end of HOSE (5) to outlet<br />
Nipple on VACUUM BREAKER (5) .<br />
Add SEAL WASHER (8) to conical end of HOSE (7) and attach<br />
HAND SPRAY (9).<br />
5<br />
4<br />
2<br />
6<br />
3<br />
9<br />
8<br />
7<br />
5<br />
6<br />
TEST INSTALLED FAUCET<br />
Turn VALVES to "off" position.<br />
With handles in "off" position, turn on water supplies<br />
and check all connections for leaks.<br />
Operate both handles and flush water lines thoroughly.<br />
SERVICE<br />
To change direction of handle<br />
6<br />
rotation, proceed as follows:<br />
Turn valve to OFF position.<br />
Pull out INDEX CAP (1) and remove<br />
HANDLE SCREW (2).<br />
Pull off HANDLE (3) and unscrew<br />
5<br />
BONNET NUT (4).<br />
Pry off bonnet ADAPTER (7) with small 90<br />
flat screwdriver.<br />
Remove SPRING CLIP (5).<br />
Lift STOP WASHER (6), turn 90 and replace.<br />
Replace SPRING CLIP (6).<br />
4<br />
Reinstall ADAPTER (7), BONNET NUT (4) and<br />
HANDLE ASSEMBLY (3, 2, 1).<br />
If spout drips, operate handles several times<br />
from OFF to ON position. Do not force - handles turn only 90 .<br />
CAUTION<br />
The flow rate of this Tub Filler exceeds 20 gallons/minute<br />
at higher water pressure. Do not fill bathtub unattended.<br />
Lift HAND SHOWER from HOLDER, direct spray into tub, turn<br />
DIVERTER KNOB to check HAND SHOWER and HOSE for leaks.<br />
Turn handles "off."<br />
7<br />
2<br />
3<br />
CARTRIDGE may accumulate dirt causing<br />
reduced water flow. To clean, first turn off<br />
hot and cold water supplies, then:<br />
Remove HANDLE.<br />
Unscrew CARTRIDGE with wrench.<br />
Thoroughly rinse CARTRIDGE.<br />
Replace CARTRIDGE until flange is<br />
tight against valve body.<br />
Turn valves OFF.<br />
Reinstall BONNET NUT (4) and<br />
HANDLE ASSEMBLY.<br />
1<br />
CARTRIDGE<br />
M968748Een
M950049-YYY0A<br />
HAND SPRAY<br />
REPRISE<br />
FLOOR MOUNT<br />
TUB FILLER<br />
084351-0070A<br />
CHECK VALVE<br />
AND FLOW RESTRICTER 5535.951<br />
M923020-YYY0A<br />
HOSE AND SEALS<br />
M961672-YYY0A<br />
FITTING BRACKET<br />
M953290-YYYOA<br />
VACUUM BREAKER<br />
(NOT SUPPLIED, MUST BE<br />
ORDERED SEPARATELY<br />
IF REQUIRED)<br />
A952849-0070A<br />
CHECK VALVE<br />
A911737-0070A<br />
SEAL WASHER<br />
M962110-YYY0A<br />
DIVERTER KIT<br />
M961712-YYY0A<br />
HANDLE BASE with<br />
SPRING CLIP<br />
(Before 6/03)<br />
M961211-0070A<br />
DIVERTER SEAL KIT<br />
994053-0070A<br />
VALVE<br />
M962264-YYY0A<br />
ADAPTER KIT<br />
(After 6/03)<br />
M908578-YYY0A<br />
CROSS HANDLE<br />
A918555-0070A<br />
HANDLE SCREW<br />
M961649-0070A<br />
INDEX BUTTON COLD<br />
M961650-0070A<br />
INDEX BUTTON HOT<br />
HOTLINE FOR HELP<br />
For toll-free information and answers to your questions, call:<br />
1 (800) 359-3261<br />
Weekdays 8:00 to 7:00 p.m. EST<br />
IN CANADA 480-961-5353<br />
Product names listed herein are trademarks of <strong>Porcher</strong>, Ltd.<br />
©<strong>Porcher</strong>, Ltd.2003<br />
Replace the "YYY" with<br />
appropriate finish code<br />
CHROME<br />
POLISHED NICKEL<br />
POLISHED BRASS<br />
BRUSHED NICKEL<br />
002<br />
008<br />
099<br />
295<br />
M968748Een