Installation Instructions - Porcher
Installation Instructions - Porcher
Installation Instructions - Porcher

You also want an ePaper? Increase the reach of your titles
YUMPU automatically turns print PDFs into web optimized ePapers that Google loves.
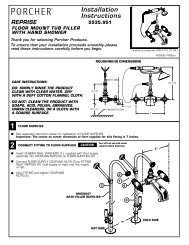
REPRISE<br />
PILLAR TAP FAUCETS<br />
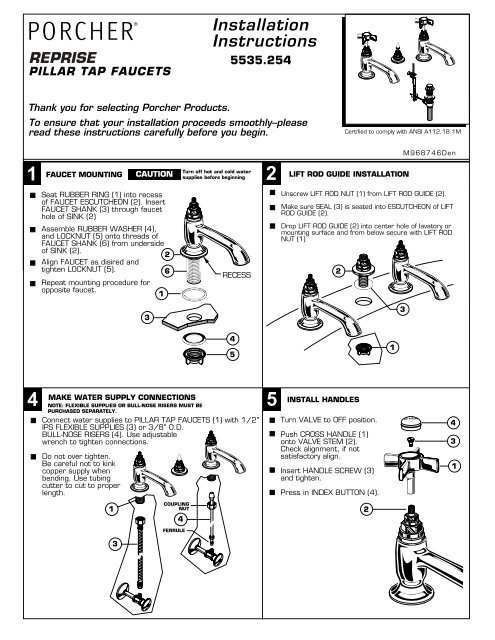
<strong>Installation</strong><br />
<strong>Instructions</strong><br />
5535.254<br />
Thank you for selecting <strong>Porcher</strong> Products.<br />
To ensure that your installation proceeds smoothly--please<br />
read these instructions carefully before you begin.<br />
Certified to comply with ANSI A112.18.1M<br />
1<br />
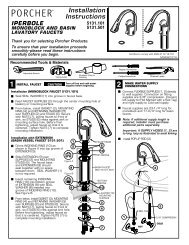
FAUCET MOUNTING<br />
CAUTION<br />
Seat RUBBER RING (1) into recess<br />
of FAUCET ESCUTCHEON (2). Insert<br />
FAUCET SHANK (3) through faucet<br />
hole of SINK (2)<br />
Assemble RUBBER WASHER (4),<br />
and LOCKNUT (5) onto threads of<br />
FAUCET SHANK (6) from underside<br />
of SINK (2).<br />
2<br />
Align FAUCET as disired and<br />
tighten LOCKNUT (5).<br />
6<br />
Repeat mounting procedure for<br />
opposite faucet.<br />
1<br />
3<br />
Turn off hot and cold water<br />
supplies before beginning<br />
RECESS<br />
2<br />
LIFT ROD GUIDE INSTALLATION<br />
2<br />
M968746Den<br />
Unscrew LIFT ROD NUT (1) from LIFT ROD GUIDE (2).<br />
Make sure SEAL (3) is seated into ESCUTCHEON of LIFT<br />
ROD GUIDE (2).<br />
Drop LIFT ROD GUIDE (2) into center hole of lavatory or<br />
mounting surface and from below secure with LIFT ROD<br />
NUT (1)<br />
3<br />
4<br />
5<br />
1<br />
4<br />
MAKE WATER SUPPLY CONNECTIONS<br />
NOTE: FLEXIBLE SUPPLIES OR BULL-NOSE RISERS MUST BE<br />
PURCHASED SEPARATELY.<br />
Connect water supplies to PILLAR TAP FAUCETS (1) with 1/2"<br />
IPS FLEXIBLE SUPPLIES (3) or 3/8" O.D.<br />
BULL-NOSE RISERS (4). Use adjustable<br />
wrench to tighten connections.<br />
Do not over tighten.<br />
Be careful not to kink<br />
copper supply when<br />
bending. Use tubing<br />
cutter to cut to proper<br />
length.<br />
1<br />
COUPLING<br />
NUT<br />
4<br />
FERRULE<br />
5<br />
INSTALL HANDLES<br />
Turn VALVE to OFF position.<br />
4<br />
Push CROSS HANDLE (1)<br />
onto VALVE STEM (2).<br />
3<br />
Check alignment, if not<br />
satisfactory align.<br />
1<br />
Insert HANDLE SCREW (3)<br />
and tighten.<br />
Press in INDEX BUTTON (4).<br />
2<br />
3
6<br />
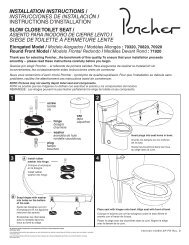
INSTALL POP-UP DRAIN<br />
1<br />
Push Tail piece (11) down into Trap (C) (threaded end up).<br />
Thread Locknut (5), Washer (4) and Gasket (3) (Bevel side<br />
up) onto Drain Body (10).<br />
Apply a bead of Putty (D) to underside of Flange (2) or (2A).<br />
Feed Drain Body (10) up through Sink (A) and thread the<br />
Flange (2) or (2A) fully onto Drain Body (10).<br />
Tighten Locknut (5) firmly, keeping the pivot rod hole pointed<br />
towards the back of the sink.<br />
Assemble Pivot Rod (9) or (9A) as shown in Figure-4B. Notice<br />
the position of the Concave Washer (G).<br />
Insert Pivot Rod (9) or (9A) into Drain Body (10) and tighten<br />
Pivot Nut (F).<br />
Push TAILPIECE INSERT (12) into TAILPIECE (11) and push<br />
TAILPIECE up and thread tightly into DRAIN BODY (10).<br />
Position Extension Rod (7) onto Pop-Up Rod (E) and tighten<br />
Thumbscrew (6).<br />
Remove one end of Clip (8) from Pivot Rod (9) or (9A) by<br />
squeezing ends together while sliding.<br />
Insert Pivot Rod (9) or (9A) into second or third hole in Extension<br />
Rod (7) and reassemble Clip (8).<br />
Drop Stopper (1) into Drain Body (10).<br />
Adjust stopper height by repositioning Extension Rod (7) and<br />
tightening Thumbscrew (6).<br />
2" DIA.<br />
2<br />
A<br />
3<br />
4<br />
5<br />
10<br />
12<br />
11<br />
2A<br />
D<br />
E<br />
6<br />
7<br />
F<br />
C<br />
1-1/4"<br />
2-1/2" DIA.<br />
7<br />
8<br />
9 9A<br />
FIGURE-4B:<br />
13" Lg. 5-7/16" Lg.<br />
9A 9<br />
5-7/16" Lg. 13" Lg.<br />
G<br />
F<br />
7<br />
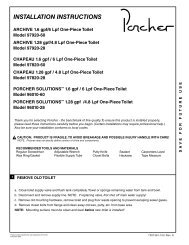
TEST INSTALLED FAUCET<br />
2<br />
With handles in OFF position, turn on water supplies and<br />
check all connections for leaks.<br />
Operate . both HANDLES (1 & 2) to flush water lines thoroughly.<br />
Operate LIFT ROD (3) and check DRAIN for leaks.<br />
1<br />
3<br />
8<br />
SERVICE<br />
To change direction of handle<br />
rotation, proceed as follows: 2<br />
Turn valve to OFF position.<br />
Pull out INDEX CAP (1) and remove<br />
HANDLE SCREW (2).<br />
Pull off HANDLE (3) and unscrew<br />
BONNET NUT (4).<br />
Pry off bonnet ADAPTER (7) with small<br />
flat screwdriver.<br />
Remove SPRING CLIP (6).<br />
Lift STOP WASHER (5), turn 90 and replace.<br />
Replace SPRING CLIP (6).<br />
Reinstall ADAPTER (7), BONNET NUT (4) and<br />
HANDLE ASSEMBLY (3, 2, 1).<br />
If spout drips, operate handles several times<br />
from OFF to ON position. Do not force - handles<br />
turn only 90 .<br />
1<br />
3<br />
4<br />
7<br />
5<br />
90<br />
6<br />
CARE INSTRUCTIONS:<br />
DO: SIMPLY RINSE THE PRODUCT<br />
CLEAN WITH CLEAR WATER. DRY<br />
WITH A SOFT COTTON FLANNEL<br />
CLOTH.<br />
DO NOT: CLEAN THE PRODUCT<br />
WITH SOAPS, ACID, POLISH,<br />
ABRASIVES, HARSH CLEANERS,<br />
OR A CLOTH WITH A COARSE<br />
SURFACE.<br />
M968746Den
M961650-0070A<br />
INDEX BUTTON HOT<br />
M961649-0070A<br />
INDEX BUTTON COLD<br />
M961712-YYY0A<br />
HANDLE BASE with<br />
SPRING CLIP<br />
(Before 6/03)<br />
REPRISE<br />
PILLAR TAP<br />
FAUCETS<br />
5535.254<br />
M908578-YYY0A<br />
CROSS HANDLE<br />
A918555-0070A<br />
HANDLE SCREW<br />
M961654-YYY0A<br />
LIFT ROD<br />
M962264-YYY0A<br />
ADAPTER KIT<br />
(After 6/03)<br />
994053-0070A<br />
VALVE CARTRIDGE<br />
M961667-YYY0A<br />
LIFT ROD GUIDE<br />
M961665-0070A<br />
VALVE MOUNTING KIT<br />
M953460-YYY0A<br />
COMPLETE<br />
DRAIN ASSEMBLY<br />
066116-YYY0A<br />
DRAIN STOPPER<br />
066117-YYY0A<br />
2" FLANGE KIT<br />
M962100-YYY0A<br />
2-1/2" FLANGE KIT<br />
024220-0070A<br />
SUPPLY NUT<br />
066118-0070A<br />
PIVOT ROD KIT (5-7/16" lg.)<br />
070847-0070A<br />
CLIP<br />
Replace the "YYY" with<br />
appropriate finish code<br />
CHROME<br />
POLISHED NICKEL<br />
POLISHED BRASS<br />
BRUSHED NICKEL<br />
002<br />
008<br />
099<br />
295<br />
M962101-0070A<br />
PIVOT ROD KIT (13" lg.)<br />
900864-0070A<br />
DRAIN BODY<br />
M961711-0070A<br />
TAILPIECE INSERT<br />
070532-0040A<br />
TAILPIECE<br />
HOTLINE FOR HELP<br />
For toll-free information and answers to your questions, call:<br />
1 (800) 359-3261<br />
Weekdays 8:00 to 7:00 p.m. EST<br />
IN CANADA 480-961-5353<br />
Product names listed herein are trademarks of <strong>Porcher</strong>, Ltd.<br />
©<strong>Porcher</strong>, Ltd.2003<br />
072574-0070A<br />
EXTENSION ROD<br />
M968746Den