D1LC compact Air Heater - Espar
D1LC compact Air Heater - Espar
D1LC compact Air Heater - Espar

You also want an ePaper? Increase the reach of your titles
YUMPU automatically turns print PDFs into web optimized ePapers that Google loves.
23<br />
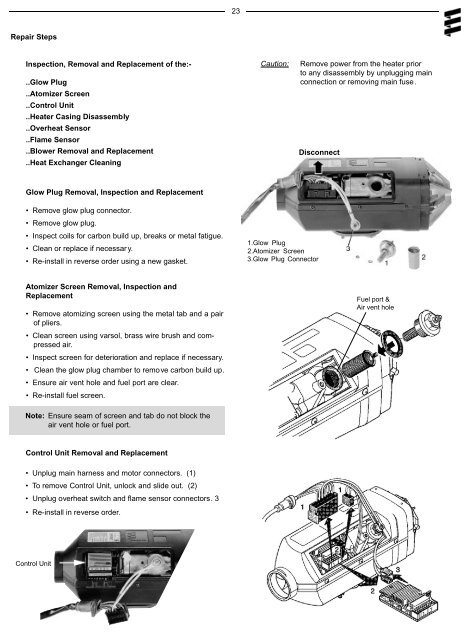
Repair Steps<br />
Inspection, Removal and Replacement of the:-<br />
..Glow Plug<br />
..Atomizer Screen<br />
..Control Unit<br />
..<strong>Heater</strong> Casing Disassembly<br />
..Overheat Sensor<br />
..Flame Sensor<br />
..Blower Removal and Replacement<br />
..Heat Exchanger Cleaning<br />
Caution:<br />
Remove power from the heater prior<br />
to any disassembly by unplugging main<br />
connection or removing main fuse.<br />
Disconnect<br />
Glow Plug Removal, Inspection and Replacement<br />
• Remove glow plug connector.<br />
• Remove glow plug.<br />
• Inspect coils for carbon build up, breaks or metal fatigue.<br />
• Clean or replace if necessar y.<br />
• Re-install in reverse order using a new gasket.<br />
1.Glow Plug<br />
2.Atomizer Screen<br />
3.Glow Plug Connector<br />
Atomizer Screen Removal, Inspection and<br />
Replacement<br />
• Remove atomizing screen using the metal tab and a pair<br />
of pliers.<br />
• Clean screen using varsol, brass wire brush and compressed<br />
air.<br />
• Inspect screen for deterioration and replace if necessary.<br />
• Clean the glow plug chamber to remove carbon build up.<br />
• Ensure air vent hole and fuel port are clear.<br />
• Re-install fuel screen.<br />
Fuel port &<br />
<strong>Air</strong> vent hole<br />
Note: Ensure seam of screen and tab do not block the<br />
air vent hole or fuel port.<br />
Control Unit Removal and Replacement<br />
• Unplug main harness and motor connectors. (1)<br />
• To remove Control Unit, unlock and slide out. (2)<br />
• Unplug overheat switch and flame sensor connectors. 3<br />
• Re-install in reverse order.<br />
Control Unit